SparkFun Indoor Air Quality Sensor - ENS160 (Qwiic) Hookup Guide
Introduction
The SparkFun Indoor Air Quality Sensor - ENS160 (Qwiic) makes use of the ENS160 from ScioSense - a digital multi-gas sensor solution with four sensor elements that can be used in a wide range of applications including building automation, smart home, and HVAC. The independent hotplate control allows the detection of volatile organic compounds (VOCs) including ethanol, toluene, hydrogen and oxidizing gases with superior sensitivity. The ENS160 supports intelligent algorithms to process raw sensor measurements on-chip. These algorithms calculate CO2-equivalents, TVOC, air quality indices (AQIs) and perform humidity and temperature compensation, as well as baseline management, all on chip. Raw sensor measurements can be read for further customization. Let's dig in!
Required Materials
To follow along with this tutorial, you will need the following materials. You may not need everything though depending on what you have. Add it to your cart, read through the guide, and adjust the cart as necessary.
Suggested Reading
If you aren't familiar with the Qwiic system, we recommend reading here for an overview.
| Qwiic Connect System |
We would also recommend taking a look at the following tutorials if you aren't familiar with them.
Serial Terminal Basics
How to Work with Jumper Pads and PCB Traces
RedBoard Qwiic Hookup Guide
Hardware Overview
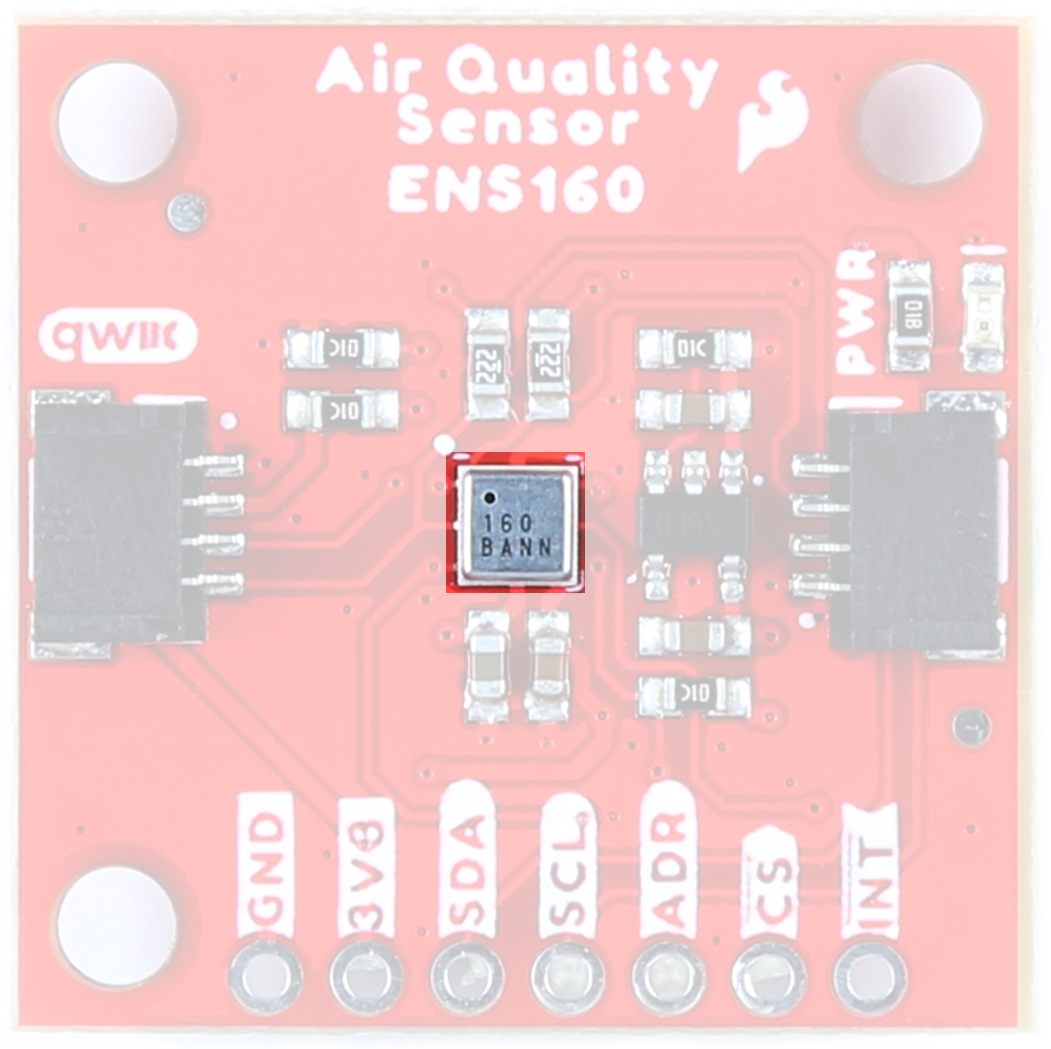
ENS160 Digital Metal-Oxide Multi-Gas Sensor
The ENS160 from ScioSense is a digital multi-gas sensor consisting of four independent heaters and gas sensor elements based on metal oxide (MOX) technology, and a controller. TrueVOC® air quality detection provides outputs such as eCO2, TVOC and AQI in compliance with worldwide IAQ standards.
The ENS160 includes a standard 2-wire digital I2C interface (SCL, SDA) or 4-wire digital SPI interface (SCLK, MOSI, MISO, CSn) for communication to the main host processor. For more information, refer to the datasheet.
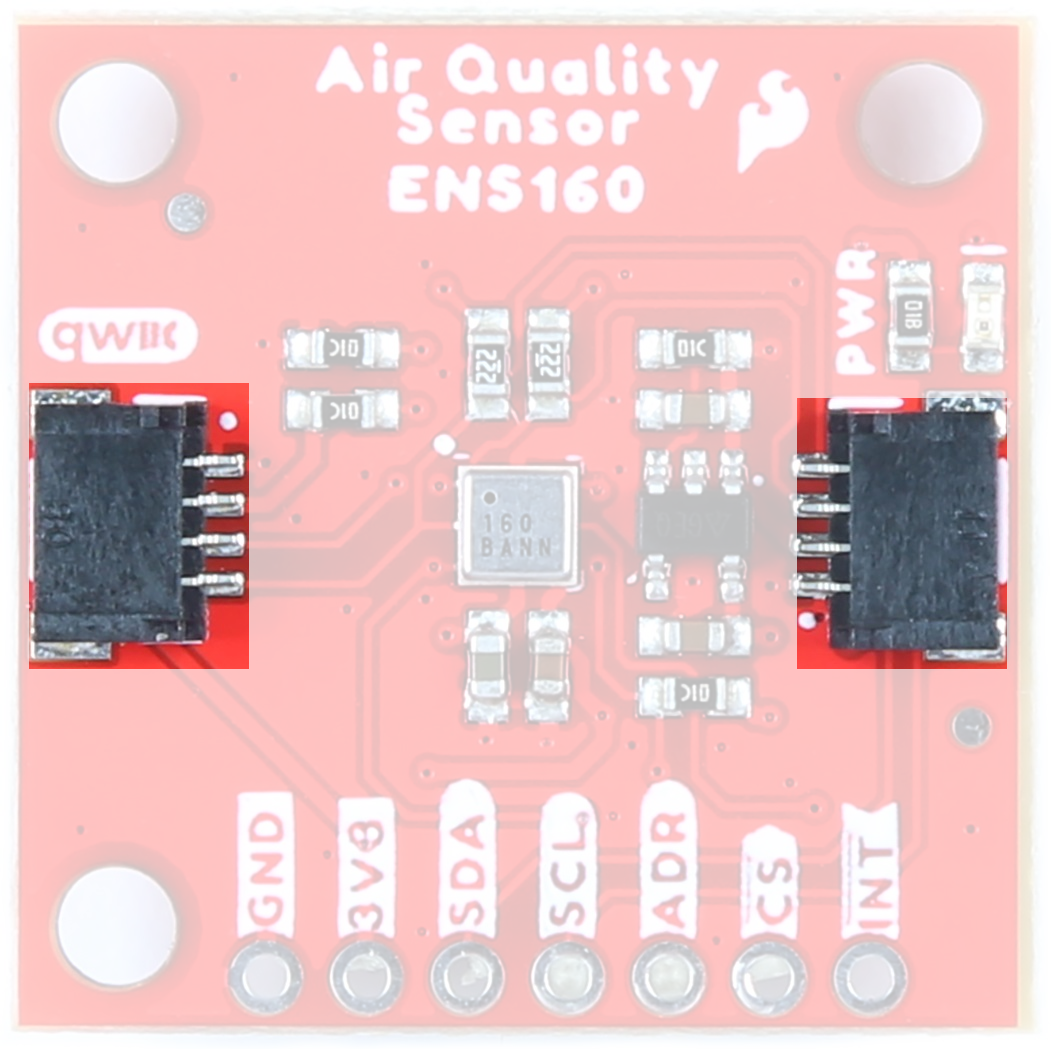
Qwiic Connectors
Our Qwiic Ecosystem makes sensors pretty much plug and play. There are two Qwiic connectors on either side of the Indoor Air Quality Sensor - ENS160 Sensor board to provide power and I2C connectivity simultaneously.
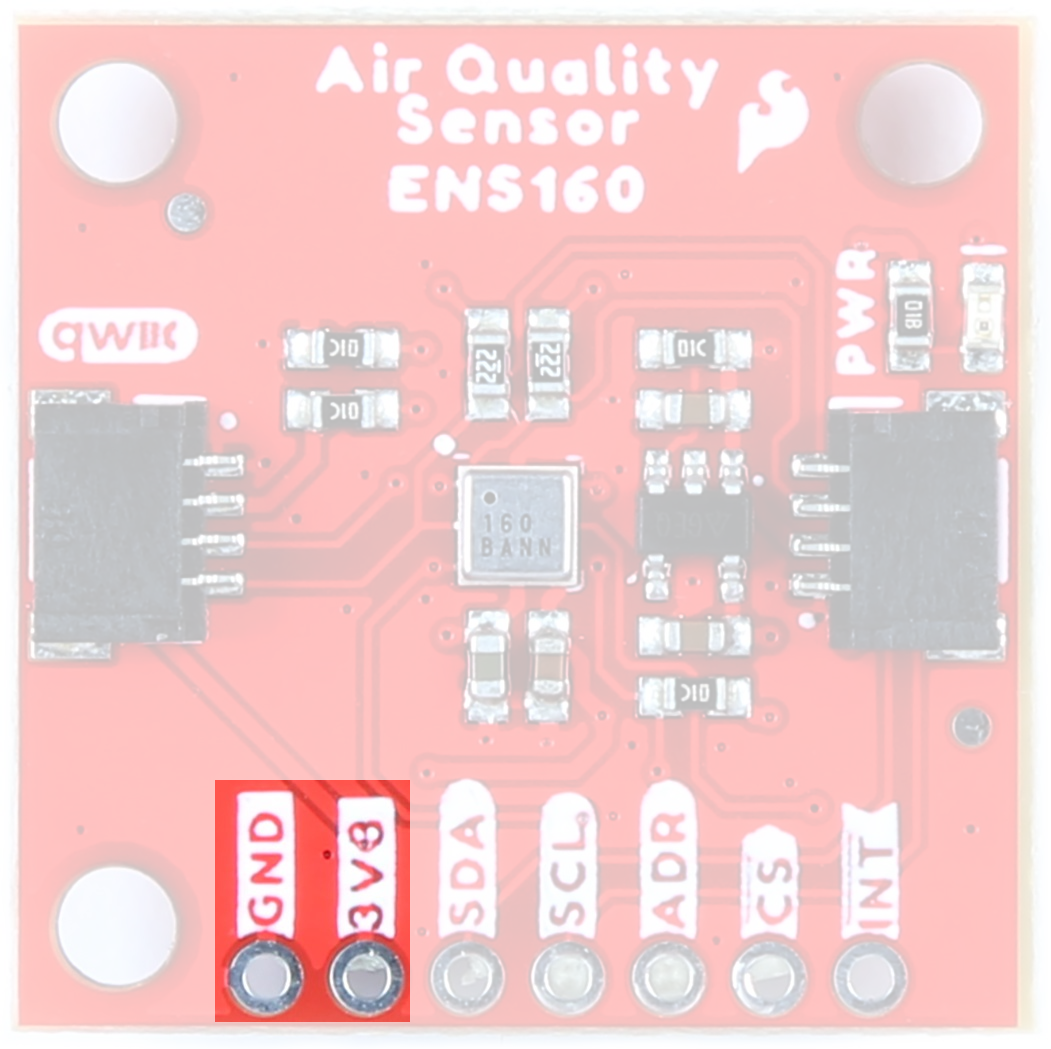
Power
Ideally, power will be supplied via the Qwiic connectors on either side of the board. Alternatively, power can be supplied through the header along the bottom side of the board labeled 3V3 and GND. The ENS160 functions at 1.8V so an on-board regulator
VDD input range is 1.71-1.98V, VDDIO input range is 1.71-3.6V.
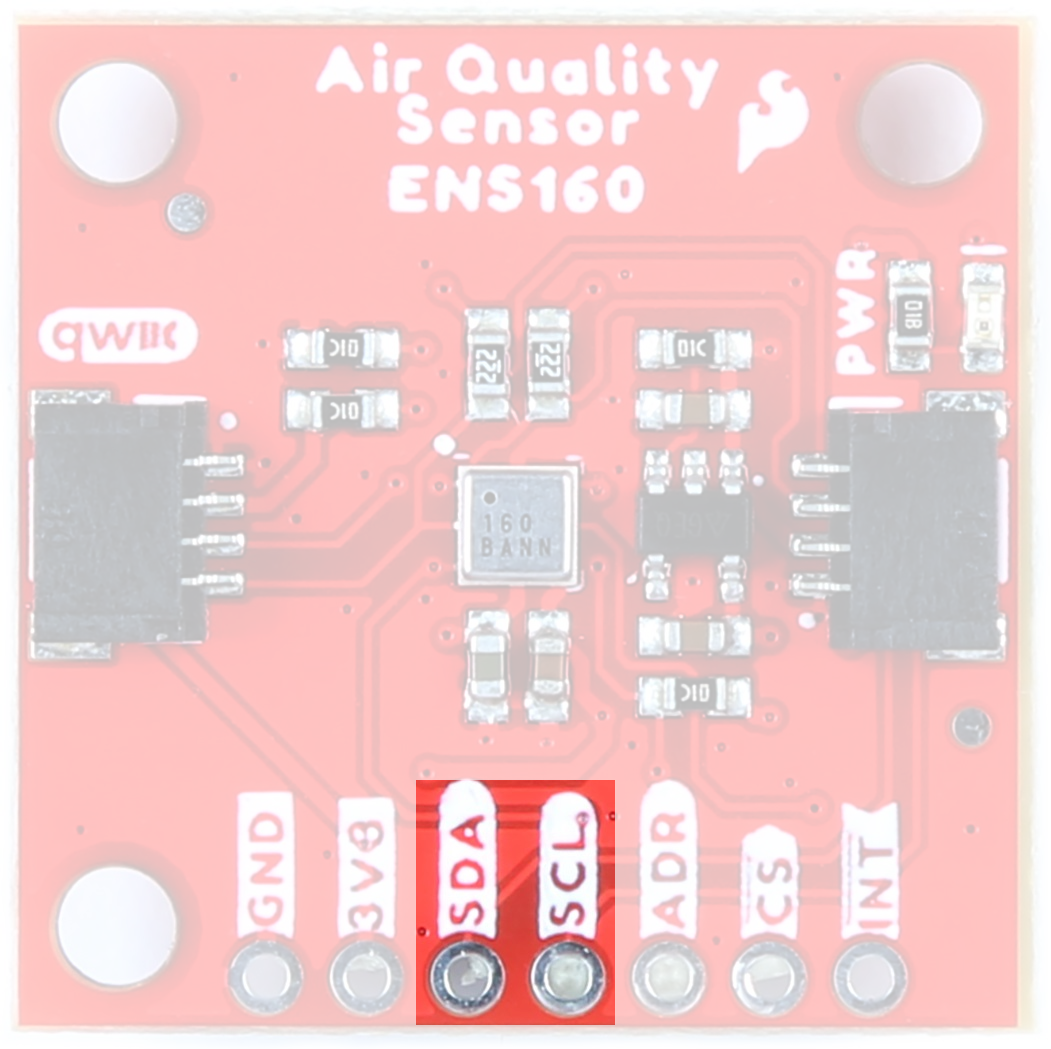
I2C Pins
The I2C pins break out the functionality of the Qwiic connectors. Depending on your application, you can connect to these pins via the plated through holes for SDA and SCL.
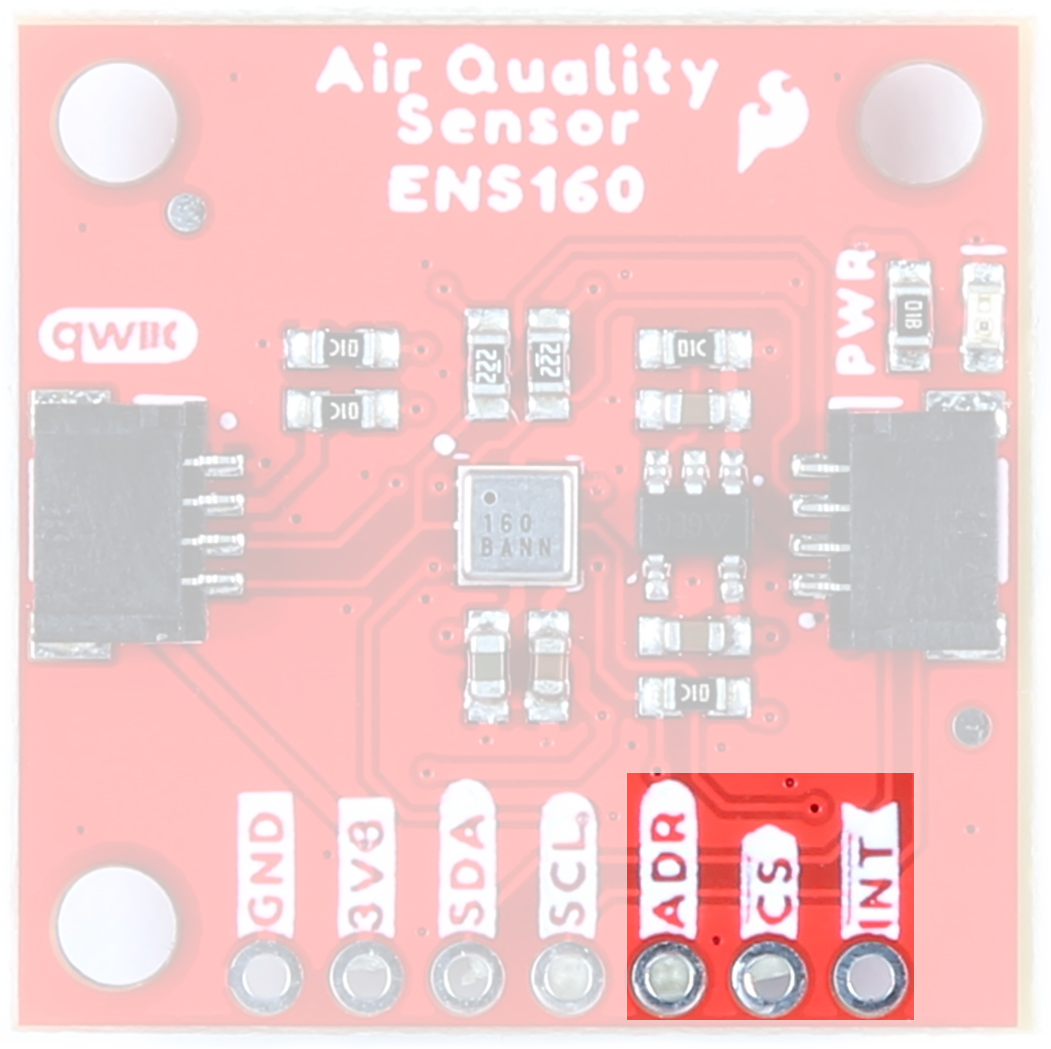
ADDR/POCI, Chip Select, and Interrupt Pins
The ADDR/POCI and Chip Select Pins are for use with SPI functionality. The interrupt pin is broken out to use for triggered events.
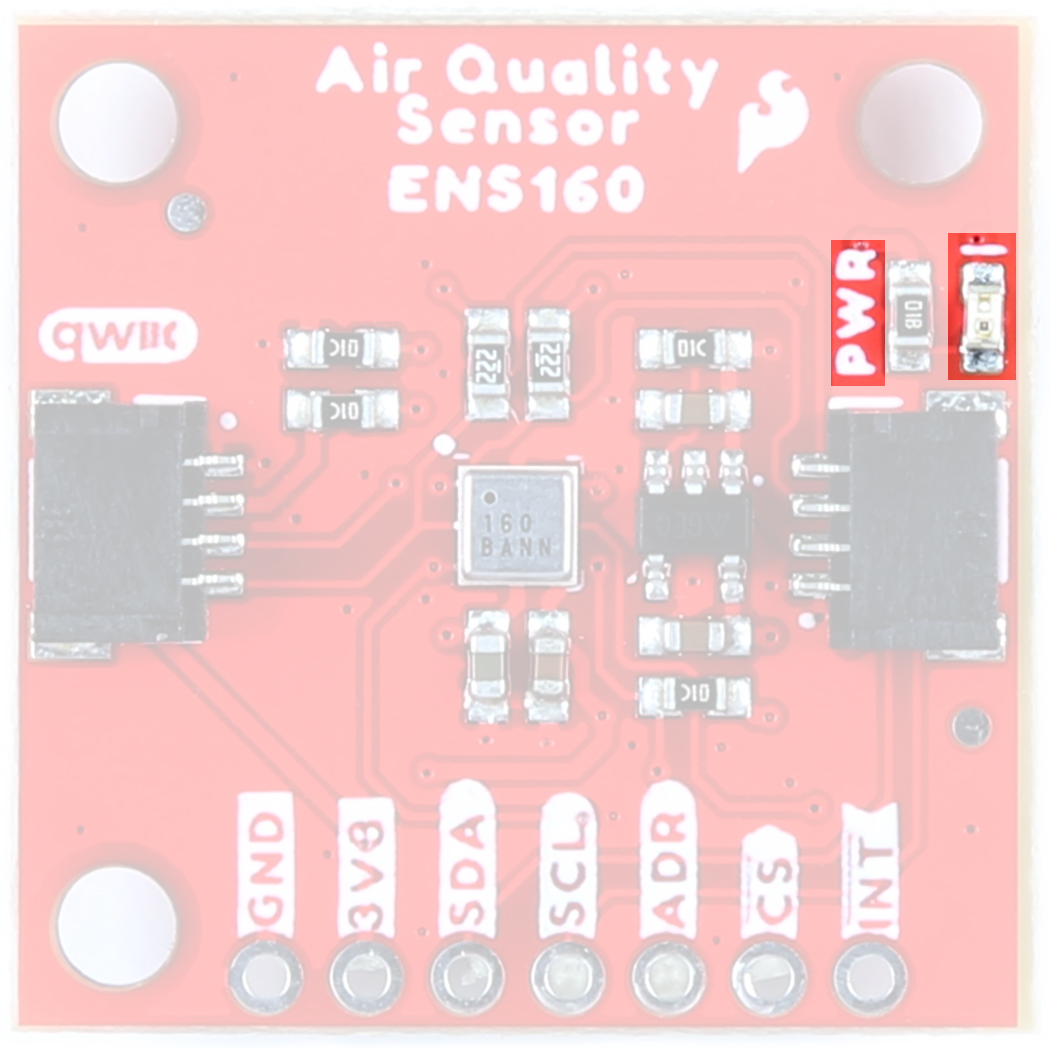
Power LED
When power is supplied to the board, this LED will light up.
Jumpers
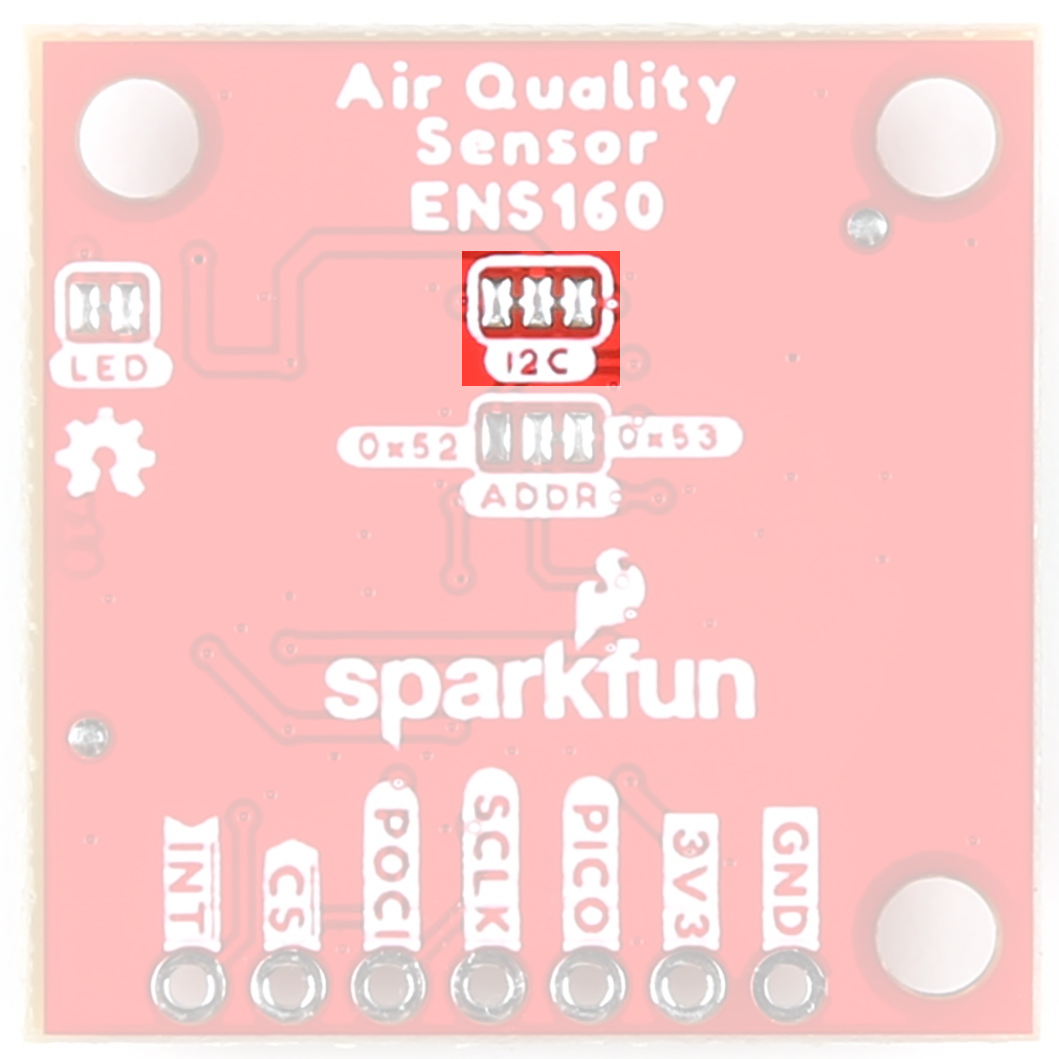
I2C Jumper
Like our other Qwiic boards, the Indoor Air Quality Sensor comes equipped with pull-up resistors on the clock and data pins. If you are daisy-chaining multiple Qwiic devices, you will want to cut this jumper; if multiple sensors are connected to the bus with the pull-up resistors enabled, the parallel equivalent resistance will create too strong of a pull-up for the bus to operate correctly. As a general rule of thumb, disable all but one pair of pull-up resistors if multiple devices are connected to the bus. To disable the pull up resistors, use an X-acto knife to cut the joint between the two jumper pads highlighted below.
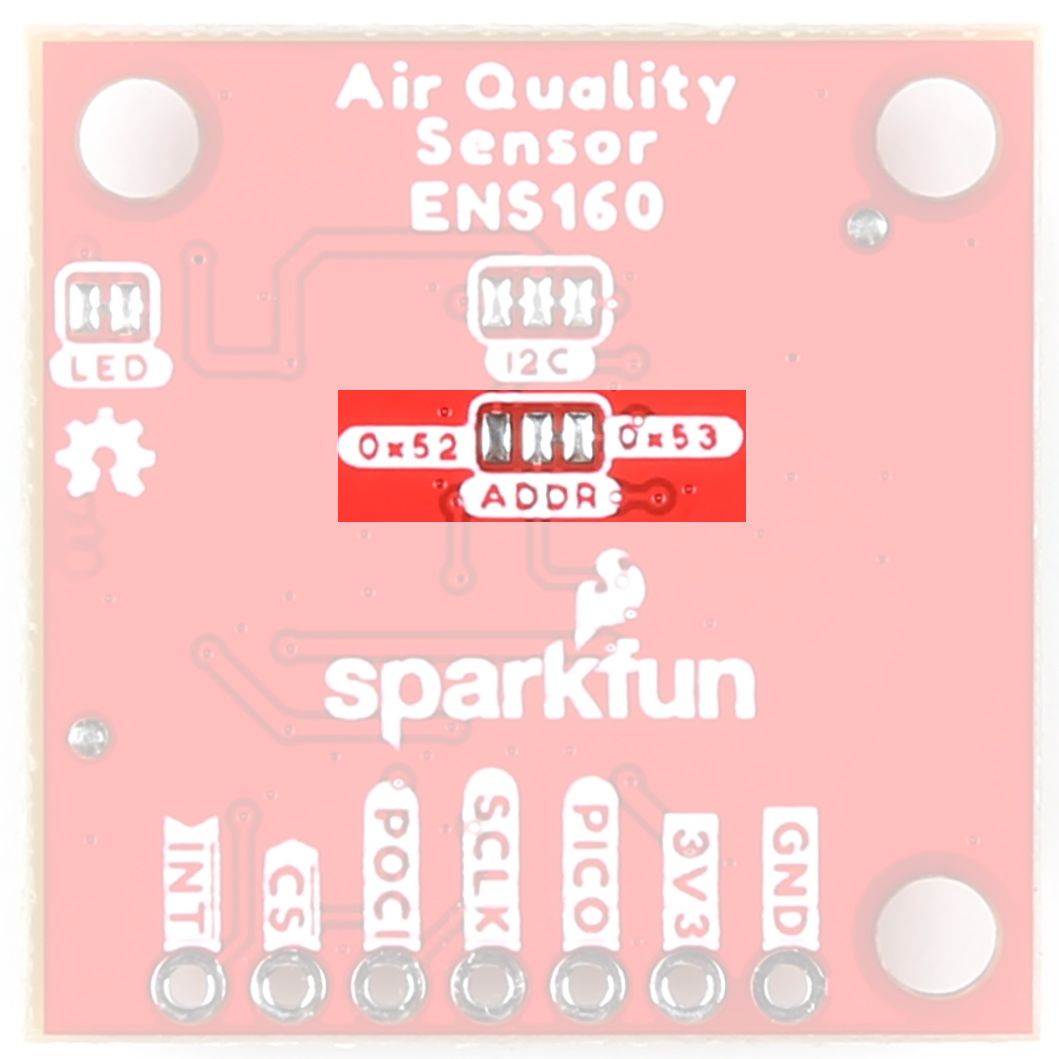
Address Jumper
By default, the 7-bit un-shifted I2C address of the board is 0x53. However, by manipulating the jumper on the back of the board, this address can be changed:
| ADDR | |
|---|---|
| VDD | 0x53 (Default) |
| GND | 0x52 |
| OPEN | Undefined |
LED Jumper
If power consumption is an issue, cutting this jumper will disable the Power LED on the front of the board.

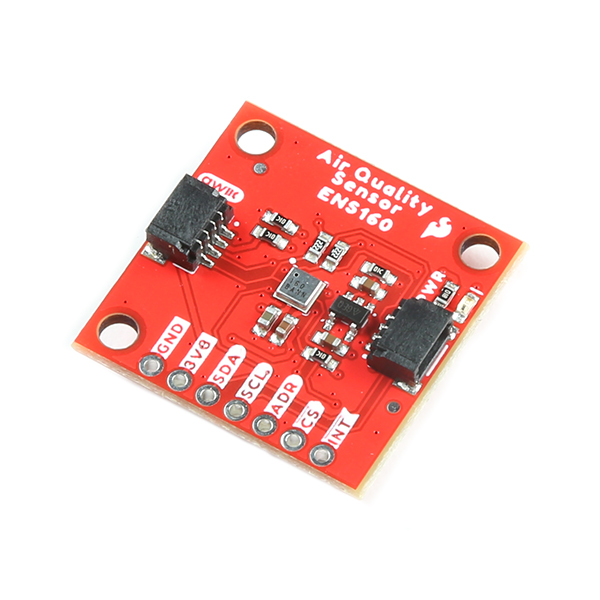
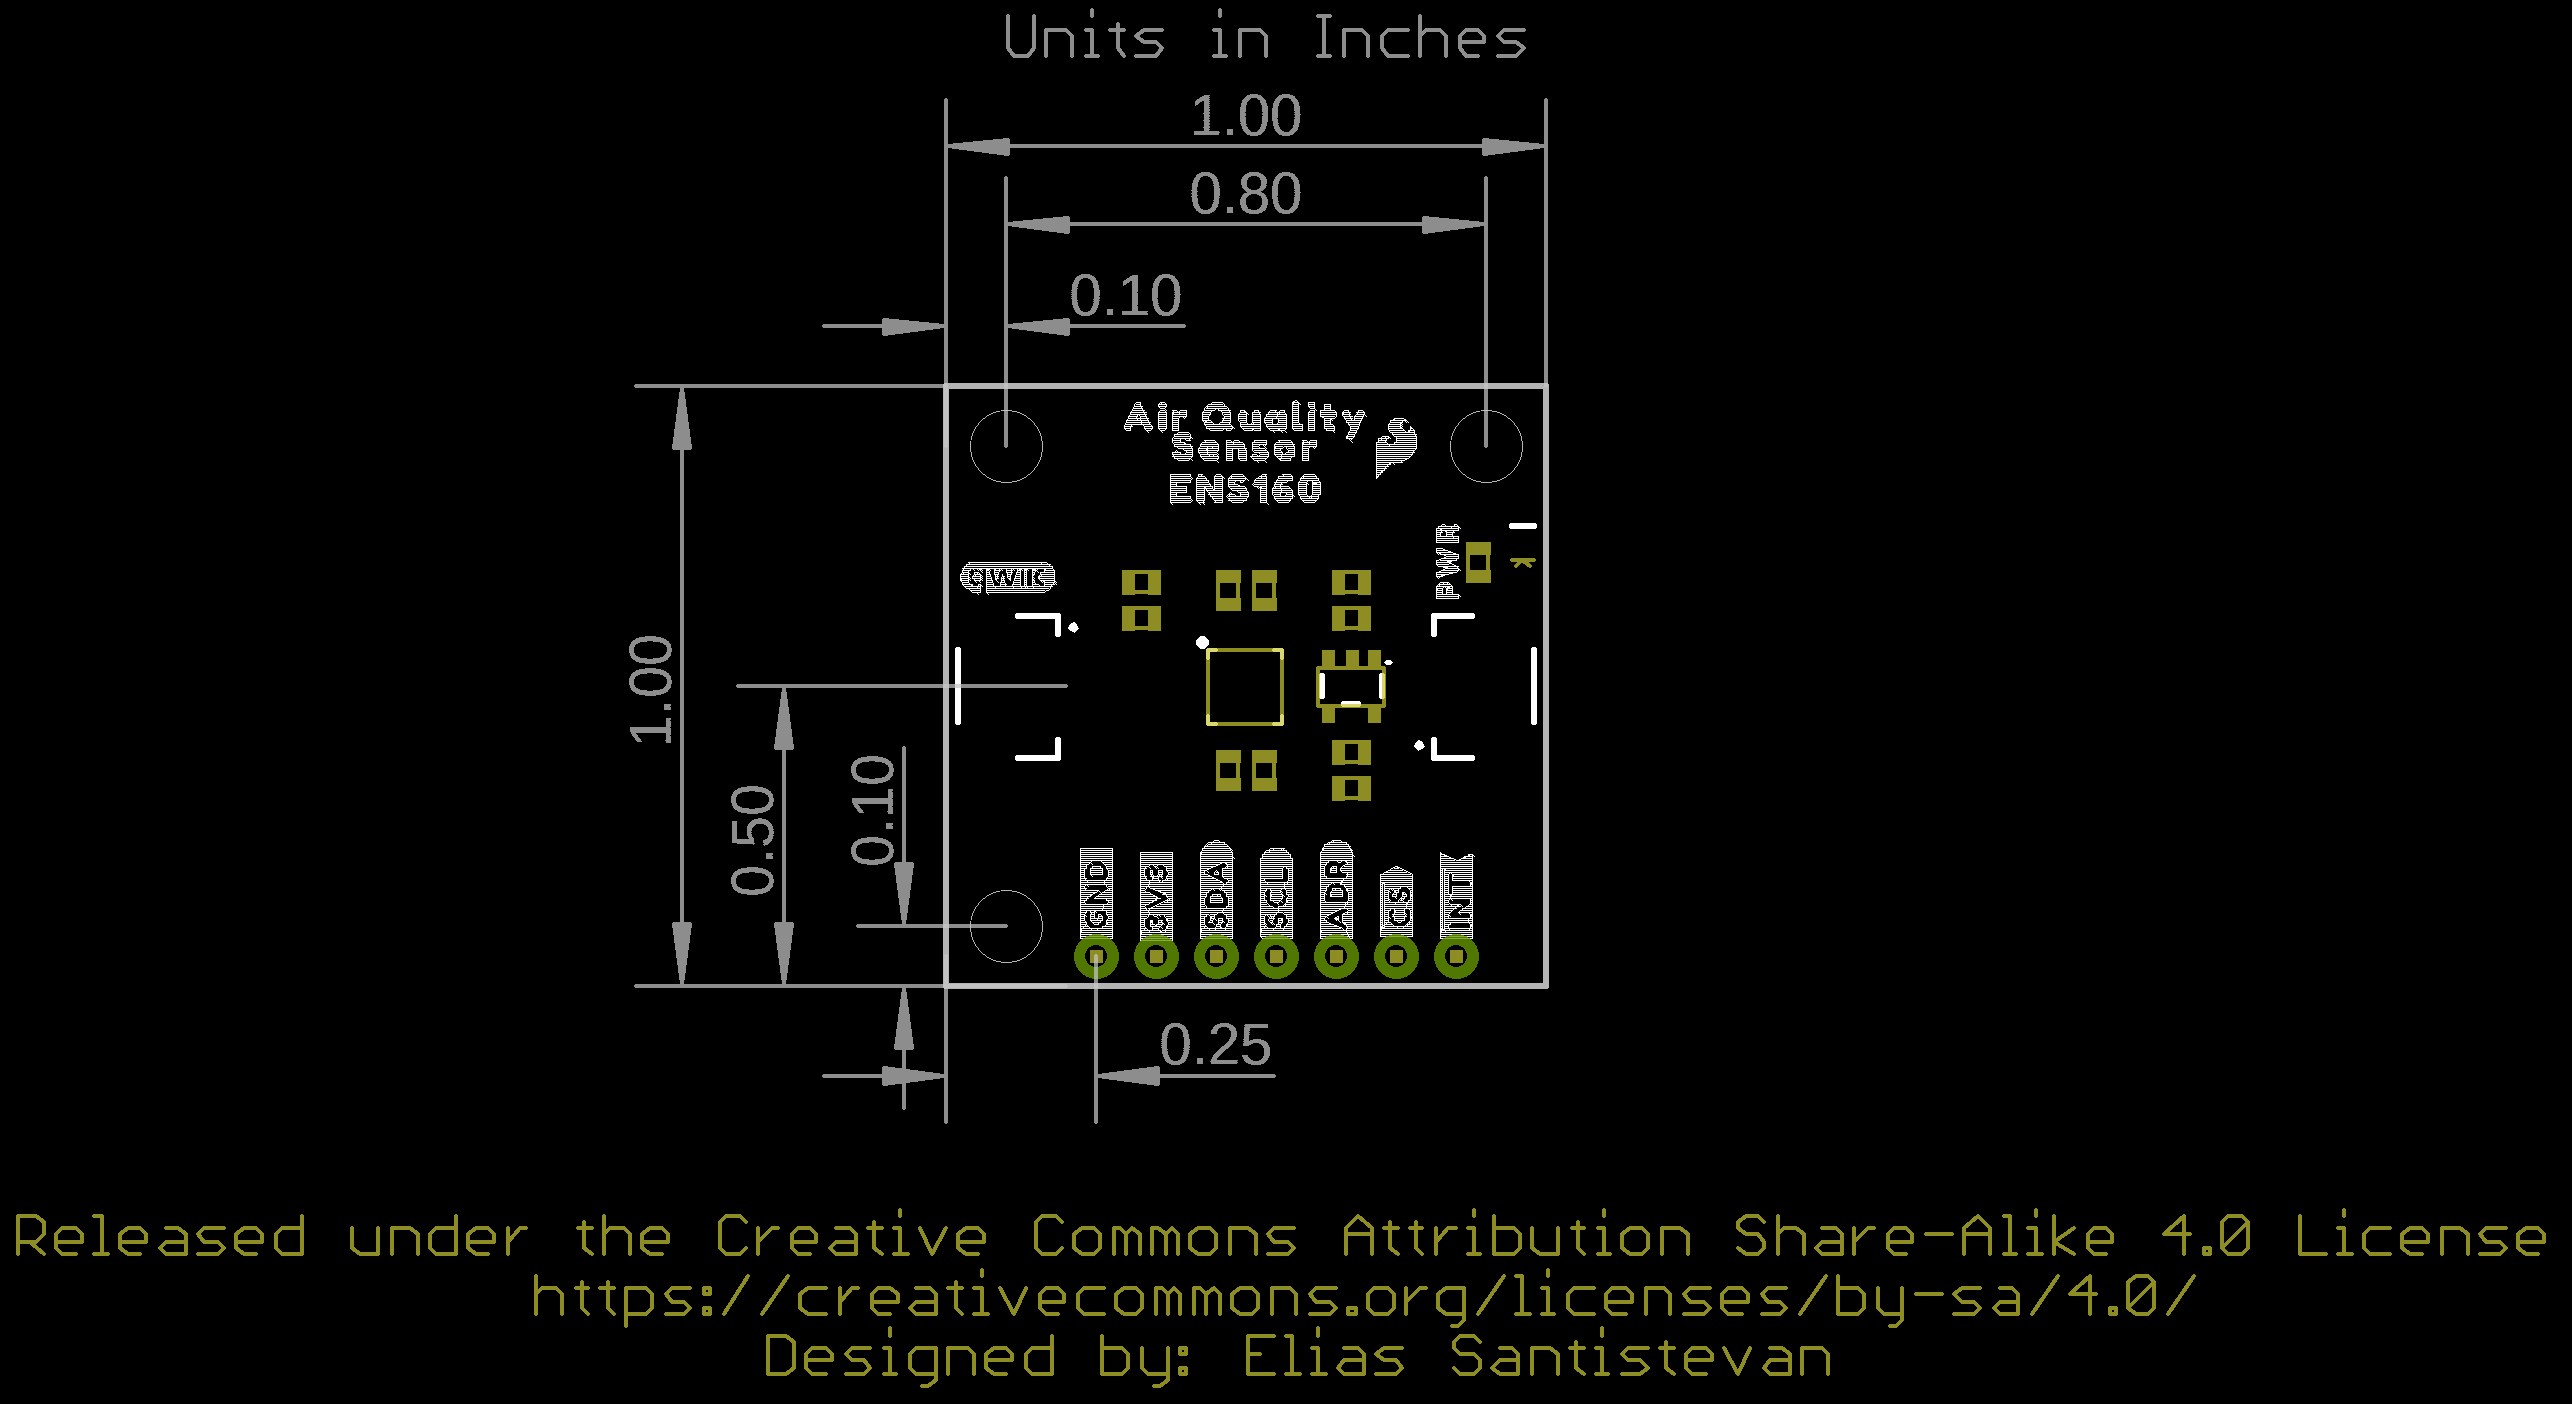
Board Outline
Like most of our standard Qwiic boards, the SparkFun Indoor Air Quality Sensor - ENS160 measures 1 inch by 1 inch.
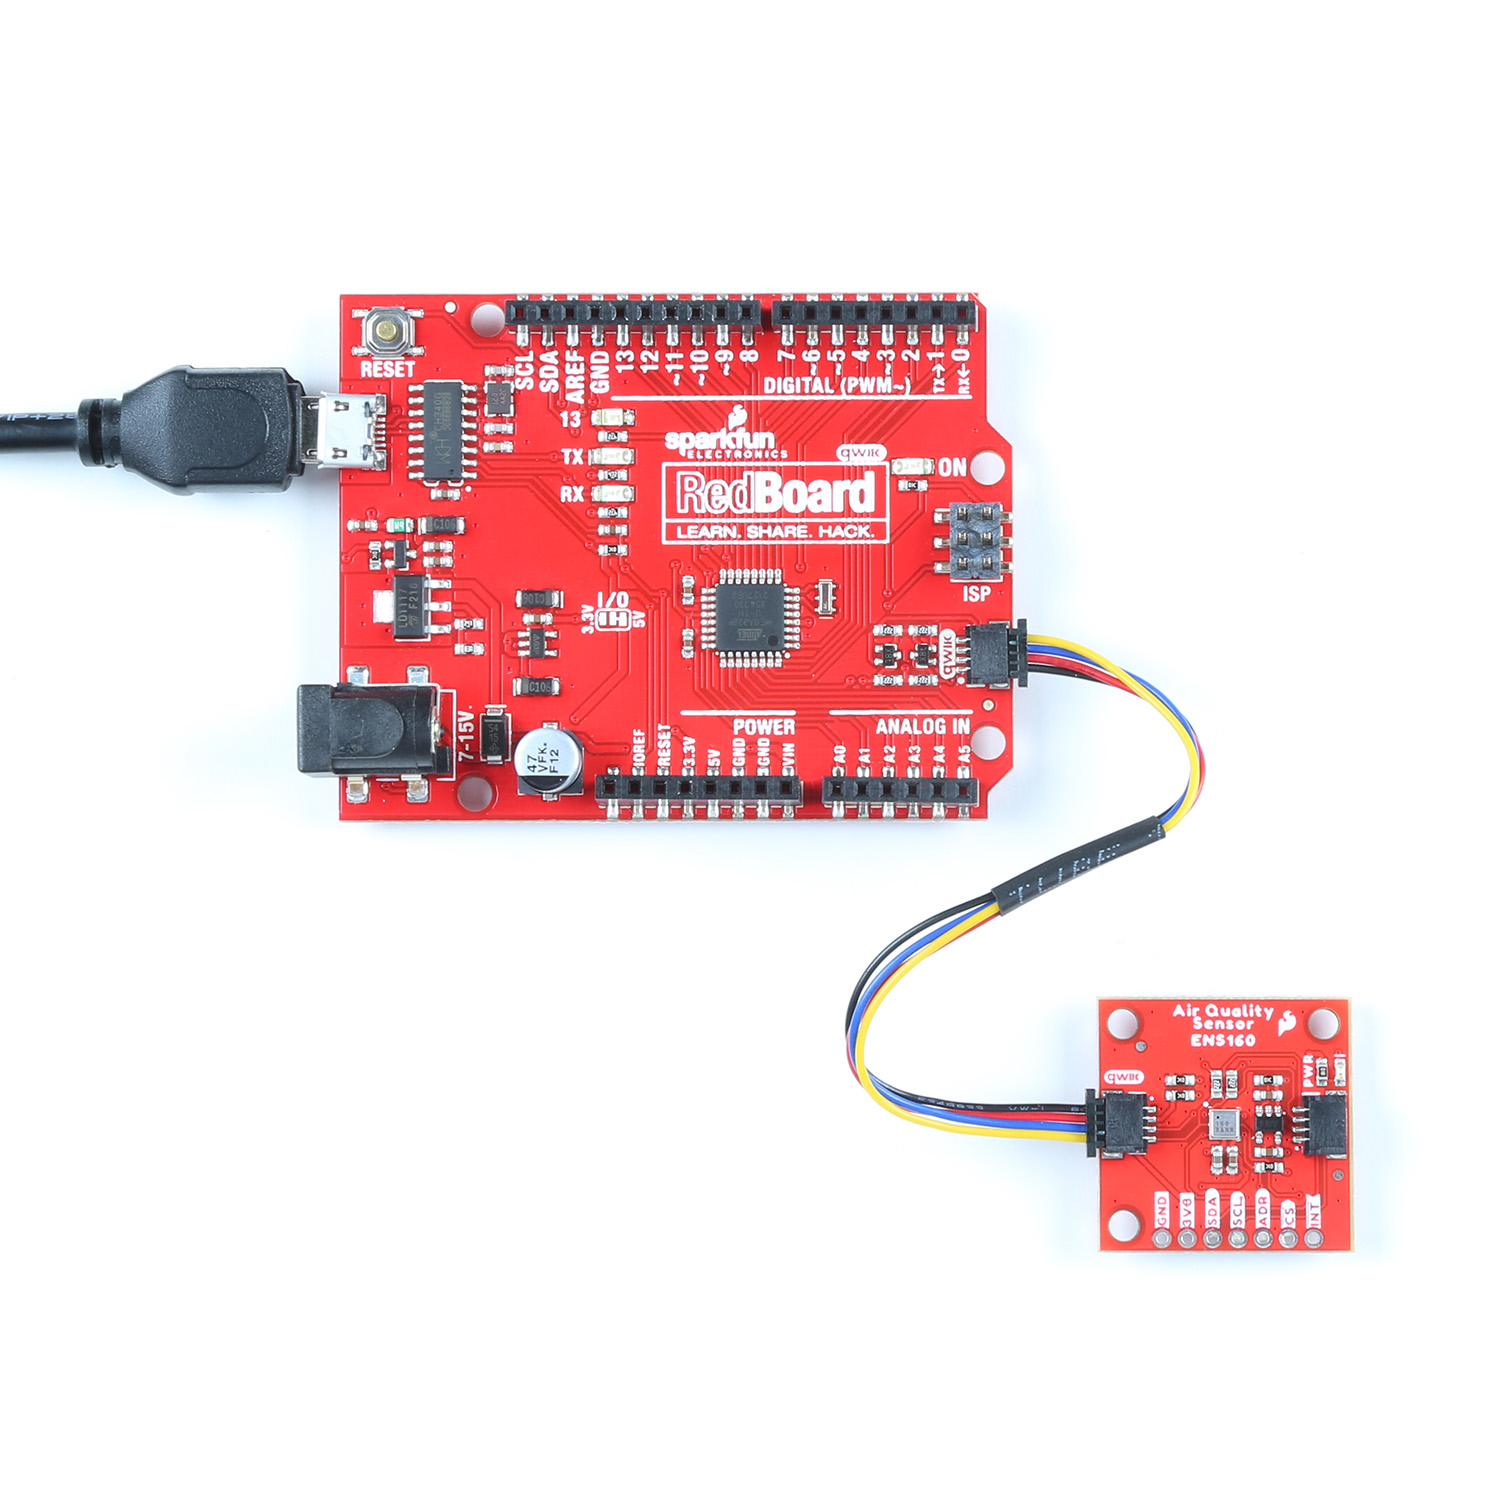
Hardware Hookup
The delightful thing about our Qwiic System is that it makes hooking up your project as easy as plug and play. Pop one end of your Qwiic connector into the controlling board and plug the other end of your Qwiic connector into your Air Quality Sensor board! Voila!
Software
SparkFun has written a library to work with the SparkFun Indoor Air Quality Sensor - ENS160 (Qwiic). You can obtain this library through the Arduino Library Manager by searching for "ENS160". Find the one written by SparkFun Electronics and install the latest version. If you prefer downloading libraries manually, you can grab them from the GitHub Repository.
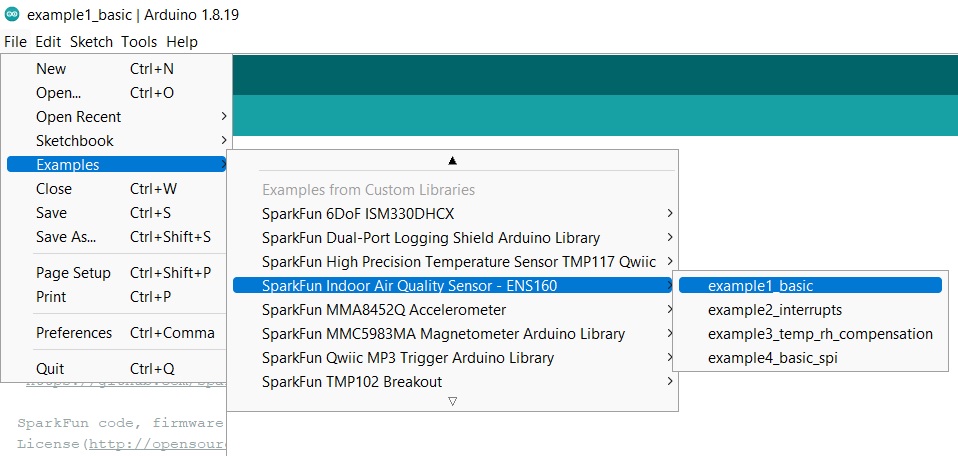
Example 1: Basic Readings
Once the library is installed, go ahead and open up File->Examples->SparkFun Indoor Air Quality Sensor - ENS160->example1_basic. Make sure to select your board (SparkFun RedBoard) and COM port before hitting upload to begin experimenting with the air quality sensor.
Alternatively, you can copy and paste the code below to a shiny new Arduino file:
language:c
/* example1_basic.ino

 This example shows basic data retrieval from the SparkFun Indoor Air Quality Sensor - ENS160.

 Written by:
    Elias Santistevan @ SparkFun Electronics October, 2022

 Product:
  https://www.sparkfun.com/products/20844

 Repository:
    https://github.com/sparkfun/SparkFun_Indoor_Air_Quality_Sensor-ENS160_Arduino_Library

 SparkFun code, firmware, and software is released under the MIT
 License(http://opensource.org/licenses/MIT).

*/
#include <Wire.h>
#include "SparkFun_ENS160.h"

SparkFun_ENS160 myENS;


void setup()
{
    Wire.begin();

    Serial.begin(115200);

    if( !myENS.begin() )
    {
        Serial.println("Did not begin.");
        while(1);
    }

    if( myENS.setOperatingMode(0xF0) )
        Serial.println("Ready.");

    delay(100);

    myENS.setOperatingMode(0x02);

    if( myENS.checkOperationMode() )
        Serial.println("Running.");

}

void loop()
{
    if( myENS.checkDataStatus() )
    {
        Serial.print("Air Quality Index (1-5) : ");
        Serial.println(myENS.getAQI());

        Serial.print("Total Volatile Organic Compounds: ");
        Serial.print(myENS.getTVOC());
        Serial.println("ppb");

        Serial.print("CO2 concentration: ");
        Serial.print(myENS.getECO2());
        Serial.println("ppm");
    }

    delay(200);
}
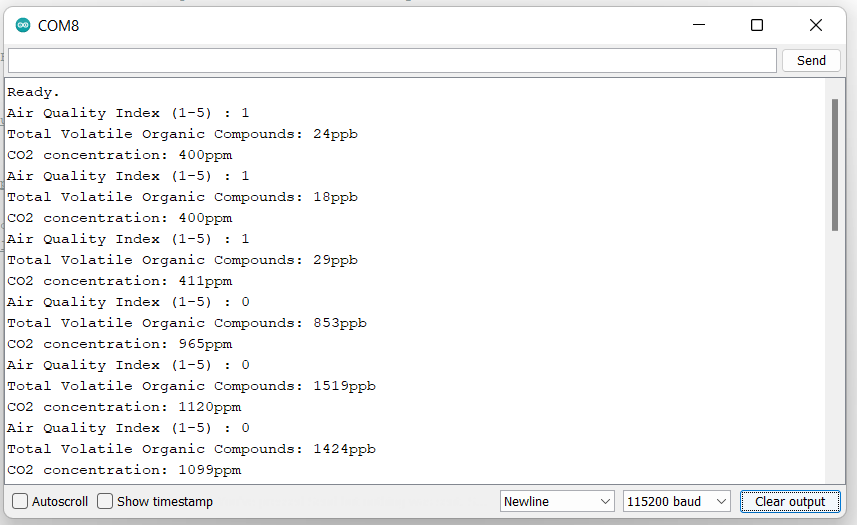
Once you've got your code uploaded, open up a Serial Monitor and check out your output. In the example below, you can see where the board gave me baselines, then readings from my breath. Maybe I should've held off on that peanut butter toast...
Example 2: Interrupts
Once the library is installed, go ahead and open up File->Examples->SparkFun Indoor Air Quality Sensor - ENS160->example2_interrupts. Make sure to select your board (SparkFun RedBoard) and COM port before hitting upload to begin experimenting with the air quality sensor.
Alternatively, you can copy and paste the code below into a nice new Arduino sketch:
language:c
/* example2_interrupts.ino

 This example shows how to configure interrupts for the SparkFun
 Indoor Air Quality Sensor - ENS160.

 Written by:
    Elias Santistevan @ SparkFun Electronics October, 2022

 Product:
  https://www.sparkfun.com/products/20844

 Repository:
    https://github.com/sparkfun/SparkFun_Indoor_Air_Quality_Sensor-ENS160_Arduino_Library

 SparkFun code, firmware, and software is released under the MIT
 License(http://opensource.org/licenses/MIT).

*/
#include <Wire.h>
#include "SparkFun_ENS160.h"

SparkFun_ENS160 myENS;

int ensInt = 2;
int ensStatus;

void setup()
{
    pinMode(ensInt, INPUT_PULLUP);

    Wire.begin();

    Serial.begin(115200);

    if( !myENS.begin() )
    {
        Serial.println("Did not begin.");
        while(1);
    }

    // Reset the indoor air quality sensor's settings.
    if( myENS.setOperatingMode(SFE_ENS160_RESET) )
        Serial.println("Ready.");

    delay(100);

    // Device needs to be set to idle to apply the following settings.
    myENS.setOperatingMode(SFE_ENS160_IDLE);

    //myENS.configureInterrupt(0x61); //If you want to do the following stuff but all at once.

    myENS.enableInterrupt();            // Enable physical interrupt.
    myENS.setDataInterrupt();           // Enable the data ready bit on the physical interrupt pin.
    //myENS.setInterruptPolarity(); // Changes interrupt from active low to active high.
    //myENS.setInterruptDrive();    //Changes interrupt from active low to push-pull.

    // Set to standard operation
    // Others args include SFE_ENS160_DEEP_SLEEP and SFE_ENS160_IDLE
    myENS.setOperatingMode(SFE_ENS160_STANDARD);

    delay(100);


    // There are four values here:
    // 0 - Operating ok: Standard Opepration
    // 1 - Warm-up: occurs for 3 minutes after power-on.
    // 2 - Initial Start-up: Occurs for the first hour of operation.
  //                                                and only once in sensor's lifetime.
    // 3 - No Valid Output
    ensStatus = myENS.getFlags();
    Serial.print("Gas Sensor Status Flag: ");
    Serial.println(ensStatus);
}

void loop()
{
    if( digitalRead(ensInt) == LOW )
    {
        Serial.print("Air Quality Index (1-5): ");
        Serial.println(myENS.getAQI());

        Serial.print("Total Volatile Organic Compounds: ");
        Serial.print(myENS.getTVOC());
        Serial.println("ppb");

        Serial.print("CO2 concentration: ");
        Serial.print(myENS.getECO2());
        Serial.println("ppm");
    }

    delay(200);
}
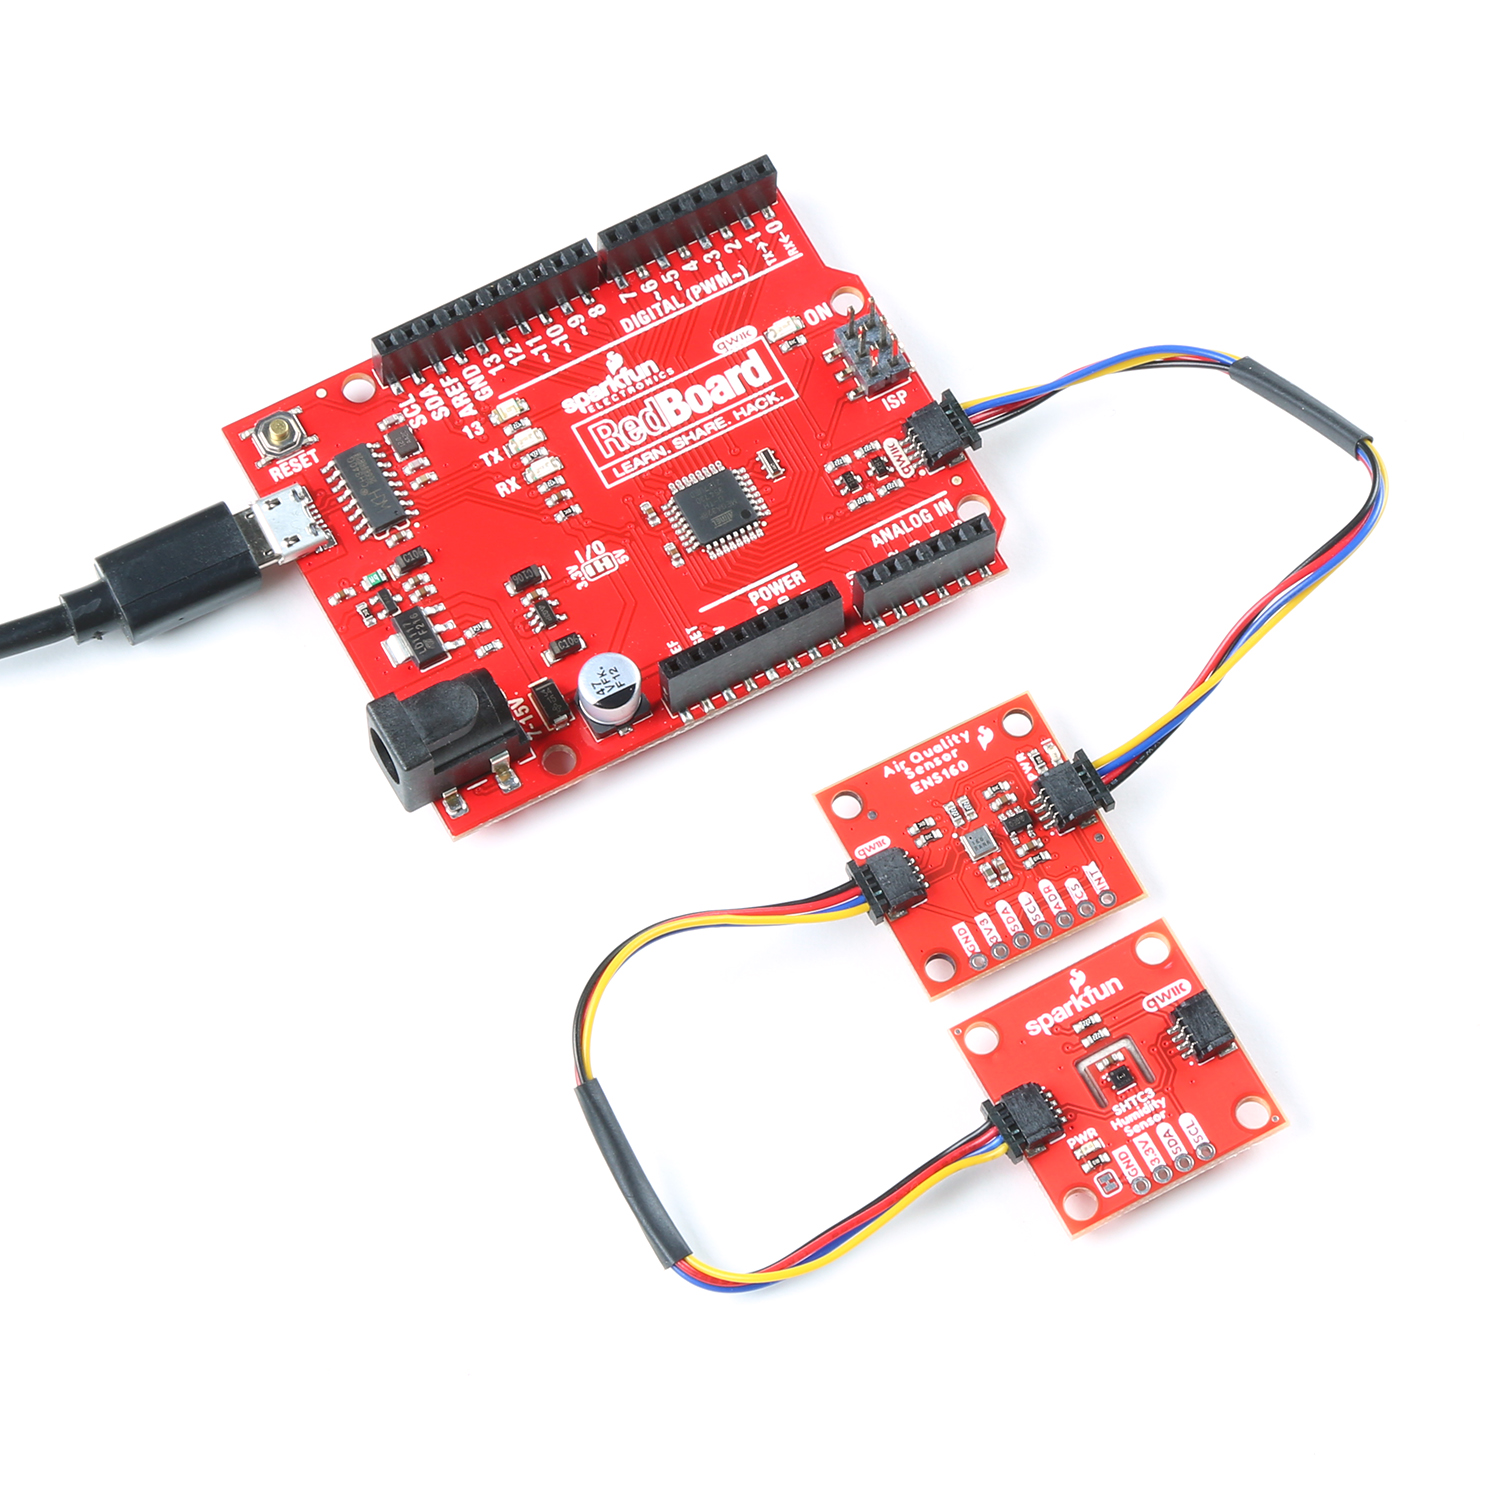
Note that depending on which processor board you are using, you may need to alter the Interrupt Pin. Since we're using a RedBoard here, our Interrupt Pin is 2 (ensInt = 2). Also, in this example, we've soldered headers to our Air Quality Sensor so that we can use the interrupt pin. Your hardware hookup should look something like the following:

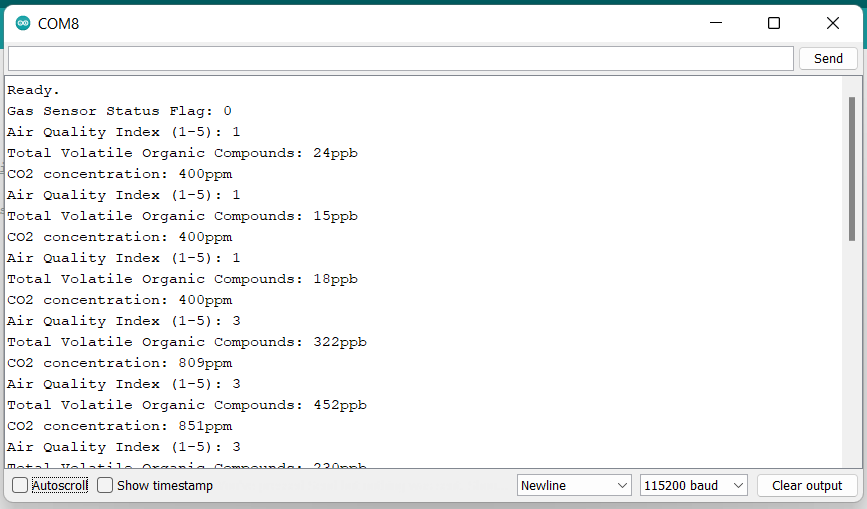
Once you've got your code uploaded, open up a Serial Monitor and check out your output. You should see something like the following:
Example 3: Temp RH Compensation
This example shows how to give the ENS160 Temperature and Relative Humidity Data for compensation. Note that the values that are given for compensation are not populated in their registers until the Air Quality Sensor is set to "Standard" operation and when data is ready i.e. the data ready bit is set. Also note that there will be some rounding of the temperature and relative humidity values when they're given to the sensor and again when they're read back.
Go ahead and open up File->Examples->SparkFun Indoor Air Quality Sensor - ENS160->example3_temp_rh_compensation. Make sure to select your board (SparkFun RedBoard) and COM port before hitting upload to begin experimenting with the air quality sensor.
Alternatively, you can copy and paste the code below into a nice new Arduino sketch:
language:c
/* example3_temp_rh_compensation.ino
This example shows how to give the ENS160 Temperature and Relative Humidity
Data for compensation. Note that the values that are given for compensation are not
populated in their registers until the Air Quality Sensor is set to "Standard" operation
and when data is ready i.e. the data ready bit is set. Also note that there will be some
rounding of the temperature and relative humidity values when they're given to the sensor
and again when they're read back.
Written by:
Elias Santistevan @ SparkFun Electronics October, 2022
Products:
Air Quality Sensor - https://www.sparkfun.com/products/20844
Humidity and Temperature Sensor - https://www.sparkfun.com/products/16467
Repository:
https://github.com/sparkfun/SparkFun_Indoor_Air_Quality_Sensor-ENS160_Arduino_Library
SparkFun code, firmware, and software is released under the MIT
License(http://opensource.org/licenses/MIT).
*/
#include <Wire.h>
#include "SparkFun_ENS160.h"
#include "SparkFun_SHTC3.h" // Click here to get the library: http://librarymanager/All#SparkFun_SHTC3
SHTC3 mySHTC3; // Humidity and Temp Sensor.
SparkFun_ENS160 myENS;
bool printedCompensation = false;
int ensStatus;
float rh;
float tempC;
SHTC3_Status_TypeDef result;
void setup()
{
Wire.begin();
Serial.begin(115200);
if( !myENS.begin() )
{
Serial.println("Air Quality Sensor did not begin.");
while(1);
}
if( mySHTC3.begin() != SHTC3_Status_Nominal )
{
Serial.println("Humidity and Temperature Sensor did not begin.");
while(1);
}
// Reset the indoor air quality sensor's settings.
if( myENS.setOperatingMode(SFE_ENS160_RESET) )
Serial.println("Ready.");
delay(100);
// Device needs to be set to idle to apply any settings.
myENS.setOperatingMode(SFE_ENS160_IDLE);
mySHTC3.update(); // Send command to take a measurement
if( mySHTC3.lastStatus != SHTC3_Status_Nominal )
{
Serial.println("Humidity and Temperature Sensor is not ready.");
while(1);
}
rh = mySHTC3.toPercent();
tempC = mySHTC3.toDegC();
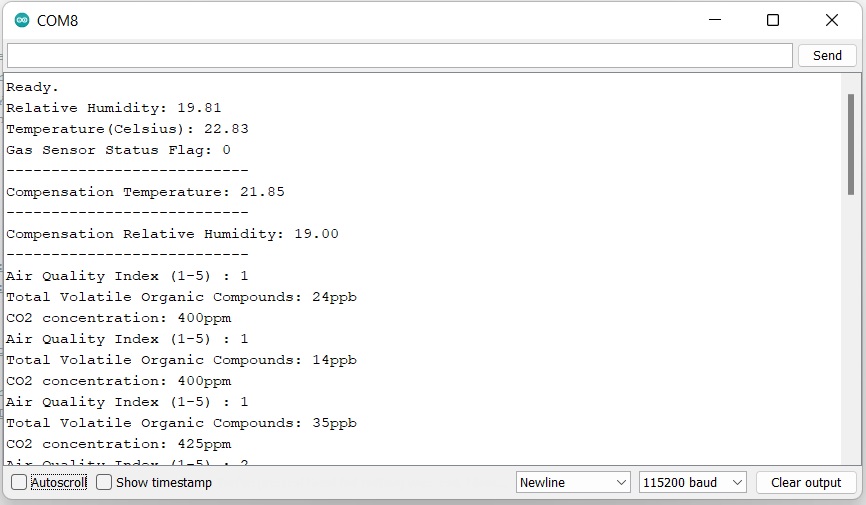
Serial.print("Relative Humidity: ");
Serial.println(rh);
Serial.print("Temperature(Celsius): ");
Serial.println(tempC);
// Give values to Air Quality Sensor.
myENS.setTempCompensationCelsius(tempC);
myENS.setRHCompensationFloat(rh);
delay(500);
// Set to standard operation
// Others include SFE_ENS160_DEEP_SLEEP and SFE_ENS160_IDLE
myENS.setOperatingMode(SFE_ENS160_STANDARD);
// There are four values here:
// 0 - Operating ok: Standard Opepration
// 1 - Warm-up: occurs for 3 minutes after power-on.
// 2 - Initial Start-up: Occurs for the first hour of operation.
// and only once in sensor's lifetime.
// 3 - No Valid Output
ensStatus = myENS.getFlags();
Serial.print("Gas Sensor Status Flag: ");
Serial.println(ensStatus);
}
void loop()
{
if( myENS.checkDataStatus() )
{
if( printedCompensation == false)
{
Serial.println("---------------------------");
Serial.print("Compensation Temperature: ");
Serial.println(myENS.getTempCelsius());
Serial.println("---------------------------");
Serial.print("Compensation Relative Humidity: ");
Serial.println(myENS.getRH());
Serial.println("---------------------------");
printedCompensation = true;
delay(500);
}
Serial.print("Air Quality Index (1-5) : ");
Serial.println(myENS.getAQI());
Serial.print("Total Volatile Organic Compounds: ");
Serial.print(myENS.getTVOC());
Serial.println("ppb");
Serial.print("CO2 concentration: ");
Serial.print(myENS.getECO2());
Serial.println("ppm");
}
delay(200);
}
Your hardware hookup should look something like the following:
Once you've got your code uploaded, open up a Serial Monitor and check out your output. You should see something like the following:
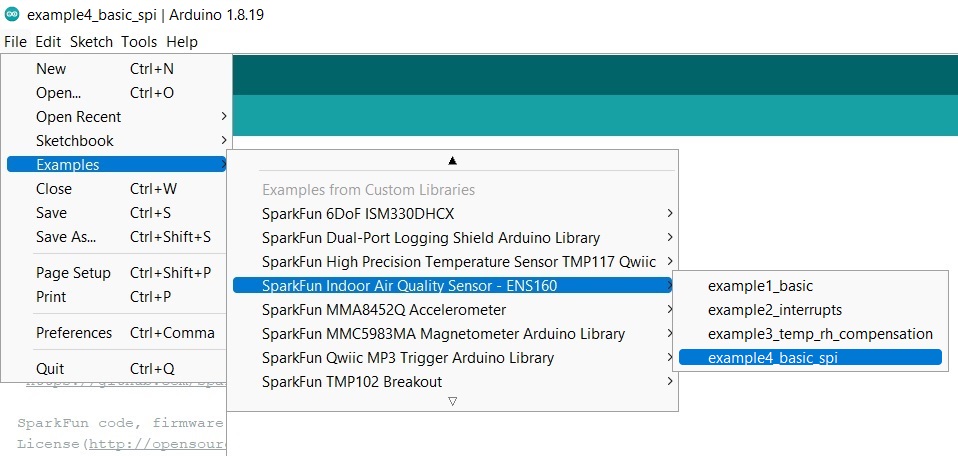
Example 4: Basic SPI
This example shows basic data retrieval from the SparkFun Indoor Air Quality Sensor - ENS160 using SPI.
Go ahead and open up File->Examples->SparkFun Indoor Air Quality Sensor - ENS160->example4_basic_spi. Make sure to select your board (SparkFun RedBoard) and COM port before hitting upload to begin experimenting with the air quality sensor.
Alternatively, you can copy and paste the code below into a nice new Arduino sketch:
language:c
/* example4_basic_example_spi.ino

 This example shows basic data retrieval from the SparkFun Indoor Air Quality Sensor - ENS160 using SPI.

 Written by:
    Elias Santistevan @ SparkFun Electronics October, 2022

 Product:
  https://www.sparkfun.com/products/20844

 Repository:
    https://github.com/sparkfun/SparkFun_Indoor_Air_Quality_Sensor-ENS160_Arduino_Library

 SparkFun code, firmware, and software is released under the MIT
 License(http://opensource.org/licenses/MIT).

*/
#include <SPI.h>
#include "SparkFun_ENS160.h"

SparkFun_ENS160_SPI myENS;

// Adjust pin select to suit your project's needs.
int chipSelect = 1;
int ensStatus = 0;

void setup()
{

    pinMode(chipSelect, OUTPUT);
    digitalWrite(chipSelect, HIGH);

    SPI.begin();

    Serial.begin(115200);

    if( !myENS.begin(chipSelect) )
    {
        Serial.println("Did not begin.");
        while(1);
    }

    // Reset the indoor air quality sensor's settings.
    if( myENS.setOperatingMode(SFE_ENS160_RESET) )
        Serial.println("Ready.");

    delay(100);

    // Device needs to be set to idle to apply any settings.
  //    myENS.setOperatingMode(SFE_ENS160_IDLE);


    // Set to standard operation
    // Others include SFE_ENS160_DEEP_SLEEP and SFE_ENS160_IDLE
    myENS.setOperatingMode(SFE_ENS160_STANDARD);
    Serial.print("Operating Mode: ");
    Serial.println(myENS.getOperatingMode());

    // There are four values here:
    // 0 - Operating ok: Standard Opepration
    // 1 - Warm-up: occurs for 3 minutes after power-on.
    // 2 - Initial Start-up: Occurs for the first hour of operation.
  //                                                and only once in sensor's lifetime.
    // 3 - No Valid Output
    ensStatus = myENS.getFlags();
    Serial.print("Gas Sensor Status Flag: ");
    Serial.println(ensStatus);
}

void loop()
{
    if( myENS.checkDataStatus() )
    {
        Serial.print("Air Quality Index (1-5) : ");
        Serial.println(myENS.getAQI());

        Serial.print("Total Volatile Organic Compounds: ");
        Serial.print(myENS.getTVOC());
        Serial.println("ppb");

        Serial.print("CO2 concentration: ");
        Serial.print(myENS.getECO2());
        Serial.println("ppm");
    }

    delay(200);
}
Hookup for this example is a bit more complicated.

Let's sort through all those wires:
| RedBoard Pin | Air Quality Sensor Pin |
|---|---|
| 3.3V | 3.3V |
| GND | GND |
| 13 | SCL |
| 12 | ADR/POCI |
| 11 | SDA/PICO |
| 10 | CS |
So! Everything is hooked up and you've got your code uploaded - now you can open up a Serial Monitor and check out your output. You should see something like the following:

Troubleshooting
If your product is not working as you expected or you need technical assistance or information, head on over to the SparkFun Technical Assistance page for some initial troubleshooting.
If you don't find what you need there, the SparkFun Forums are a great place to find and ask for help. If this is your first visit, you'll need to create a Forum Account to search product forums and post questions.
Resources and Going Further
Now that you've successfully got your SparkFun Indoor Air Quality Sensor - ENS160 (Qwiic) up and running, it's time to incorporate it into your own project!
For more information, check out the resources below:
- Schematic (PDF)
- Eagle Files (ZIP)
- Board Dimensions (PNG)
- ENS160 Datasheet (PDF)
- Fritzing Part
- Arduino Library
- GitHub Hardware Repo
Need some inspiration for your next project? Check out some of these related tutorials:
ESP32 LoRa 1-CH Gateway, LoRaWAN, and the Things Network
LTE Cat M1/NB-IoT Shield Hookup Guide
SparkFun Qwiic Alphanumeric Display Hookup Guide
SparkFun Arduino UNO R4 WiFi Qwiic Kit Hookup Guide
Or check out some of these blog posts for ideas: