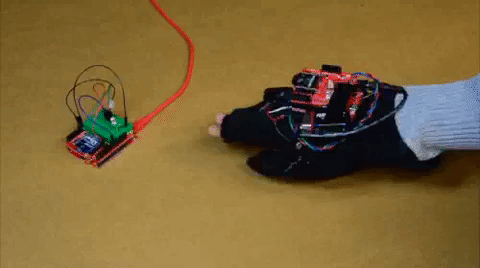
Wireless Glove Controller
 bboyho
Example 2: Controlling an RGB LED
Example 2a: RGB Wireless Glove Controller
We'll build on the first example and have the glove a send character to control an RGB LED. We'll use the snappable pins on the ring and pinky to switch between the colors.
Copy the code, paste it into the Arduino IDE, select your board (Arduino Uno), and COM port. Make sure to switch the COM port back what the glove enumerated to before uploading. When ready, upload the code to the glove.
language:c
// We'll use SoftwareSerial to communicate with the XBee:

#include <SoftwareSerial.h>

//For Atmega328P's
// XBee's DOUT (TX) is connected to pin 2 (Arduino's Software RX)
// XBee's DIN (RX) is connected to pin 3 (Arduino's Software TX)
SoftwareSerial XBee(2, 3); // RX, TX

//For Atmega2560, ATmega32U4, etc.
// XBee's DOUT (TX) is connected to pin 10 (Arduino's Software RX)
// XBee's DIN (RX) is connected to pin 11 (Arduino's Software TX)
//SoftwareSerial XBee(10, 11); // RX, TX


//SEND Button
const int button1Pin = 4; //push button
const int status_LED = 13;  //LED on the push button

char send_CHAR = 'A'; //default send character

//initialize variables to read buttons
int button1State;

//variables to check for button1 state
boolean prev_button1State = false;
boolean current_button1State = false;

//UP Button
const int button2Pin = 11; //push button

int button2State;
boolean prev_button2State = false;
boolean current_button2State = false;

//DOWN Button
const int button3Pin = 12;

int button3State;
boolean prev_button3State = false;
boolean current_button3State = false;

//LED Status Indicator
int ledR = 5;//hardware PWM
int ledG = 6;//hardware PWM
int ledB = 9; //hardware PWM

int pattern = 0; //pattern

/*******************Setup Loop***************************/
void setup() {

  //Declare pin modes
  pinMode(button1Pin, INPUT_PULLUP); //use internal pullup resistor with send button
  pinMode (status_LED, OUTPUT);//LED to indicate when character has been sent

  pinMode(button2Pin, INPUT_PULLUP); //use internal pullup resistor
  pinMode(button3Pin, INPUT_PULLUP); //use internal pullup resistor

  //Status LED to see if the Transmitting XBee is initializing
  for (int i = 0; i < 3; i++) {
    digitalWrite(status_LED, HIGH);//set Status LED on
    delay(50);
    digitalWrite(status_LED, LOW); //set Status LED off
    delay(50);
  }

  // initialize the digital pins as an output for LEDs
  pinMode(ledR, OUTPUT);
  pinMode(ledG, OUTPUT);
  pinMode(ledB, OUTPUT);

  sequenceTest();//visually initialization

  //Declare serial connections for debugging
  Serial.begin(9600);
  Serial.println("Arduino Serial Ready");

  XBee.begin(9600);
  Serial.println("Glove Controller's XBee Ready to Communicate");

}//end setup()

void loop() {

  button1State = digitalRead(button1Pin);
  button2State = digitalRead(button2Pin);
  button3State = digitalRead(button3Pin);
  /***buttonXstate
    - LOW or 0 means pressed
    - HIGH or 1 means not pressed
   ****/

  //-----------Check If SENT Button Has Been Pressed----------
  //if button is pressed, it will be pulled low
  if (button1State == LOW) {
    digitalWrite(status_LED, HIGH); //turn push button LED ON
    current_button1State = true; // button has been pressed once

    if (prev_button1State != current_button1State) //check to see if button is still being pressed
    {
      Serial.println("Button is pressed.");
      XBee.write(send_CHAR);//Tell Sequencer to change to mode by sending a character
    }
    else {
      //do nothing because finger is still on button
    }
    prev_button1State = current_button1State;
  }//-----------End Check for SENT Button----------

  //button has not been pressed, it will be high again
  else {
    current_button1State = false;
    digitalWrite(status_LED, LOW); // turn push button LED OFF

    prev_button1State = current_button1State;
  }//-----------End Check for SENT Button----------

  //-----------Check If UP Button Has Been Pressed----------
  if (button2State == LOW) {
    current_button2State = true; //UP button has been pressed once

    if (prev_button2State != current_button2State) { //check to see if button is still being pressed
      pattern = pattern + 1; //change LED pattern after button has been pressed
      if (pattern < 0 || pattern > 8) {
        //reset pattern
        pattern = 0;
      }

    }
    else { //do nothing because finger is still on button
    }
    prev_button2State = current_button2State;
  }
  //UP button has not been pressed, it will be high
  else {
    current_button2State = false;
    prev_button2State = current_button2State;
  }//-----------End Check for Up Button----------

  //-----------Check If DOWN Button Has Been Pressed----------
  if (button3State == LOW) {
    current_button3State = true; //button has been pressed once

    if (prev_button3State != current_button3State) { //check to see if button is still being pressed
      pattern = pattern - 1; //change LED pattern after button has been pressed
      if (pattern < 0 || pattern > 8) {
        //reset pattern
        pattern = 7;
      }
    }
    else { //do nothing because finger is still on button
    }
    prev_button3State = current_button3State;
  }
  //button has not been pressed, it will be high
  else {
    current_button3State = false;
    prev_button3State = current_button3State;
  }//-----------End Check for DOWN Button----------

  delay(50);

  //save send character into variable depending on button press and change status LED
  switch (pattern) {
    case 1:
      redON();
      delay(50);
      send_CHAR = 'B';
      break;
    case 2:
      magentaON();
      delay(50);
      send_CHAR = 'C';
      break;
    case 3:
      blueON();
      delay(50);
      send_CHAR = 'D';
      break;
    case 4:
      cyanON();
      delay(50);
      send_CHAR = 'E';
      break;
    case 5:
      greenON();
      delay(50);
      send_CHAR = 'F';
      break;
    case 6:
      yellowON();
      delay(50);
      send_CHAR = 'G';
      break;
    case 7:
      allOFF();
      delay(50);
      send_CHAR = 'H';
      break;
    default:
      allON();
      send_CHAR = 'A';
      break;
  }//end switch


}//end loop()

/*
  Check out the Venn Diagram on Basic Color Mixing:
  https://learn.sparkfun.com/tutorials/lilypad-protosnap-plus-activity-guide/2-basic-color-mixing

*/

void redON() {
  analogWrite(ledR, 255);
  analogWrite(ledG, 0);
  analogWrite(ledB, 0);
}

void magentaON() {
  analogWrite(ledR, 150);
  analogWrite(ledG, 0);
  analogWrite(ledB, 255);
}

void blueON() {
  analogWrite(ledR, 0);
  analogWrite(ledG, 0);
  analogWrite(ledB, 255);
}

void cyanON() {
  analogWrite(ledR, 0);
  analogWrite(ledG, 255);
  analogWrite(ledB, 255);
}

void greenON() {
  analogWrite(ledR, 0);
  analogWrite(ledG, 255);
  analogWrite(ledB, 0);
}

void yellowON() {
  analogWrite(ledR, 150);
  analogWrite(ledG, 255);
  analogWrite(ledB, 0);
}

void allOFF() {
  analogWrite(ledR, 0);
  analogWrite(ledG, 0);
  analogWrite(ledB, 0);
}

void allON() {//white
  analogWrite(ledR, 150);
  analogWrite(ledG, 255);
  analogWrite(ledB, 255);
}

void sequenceTest() {

  redON();
  delay(50);
  allOFF();
  delay(50);

  magentaON();
  delay(50);
  allOFF();
  delay(50);

  blueON();
  delay(50);
  allOFF();
  delay(50);

  cyanON();
  delay(50);
  allOFF();
  delay(50);

  greenON();
  delay(50);
  allOFF();
  delay(50);

  yellowON();
  delay(50);
  allOFF();
  delay(50);

  allON();
  delay(50);
  allOFF();
  delay(50);
}
Example 2b: RGB Receiving XBee Node
In this part of the example, we'll mimic the color being sent from the glove. Copy the code, paste it into the Arduino IDE, select your board (Arduino Uno), and COM port. Make sure to switch the COM port back to the receiving XBee's Arduino before uploading. When ready, upload the code to the receiving XBee's Arduino.
language:c
// We'll use SoftwareSerial to communicate with the XBee:

#include <SoftwareSerial.h>

//For Atmega328P's
// XBee's DOUT (TX) is connected to pin 2 (Arduino's Software RX)
// XBee's DIN (RX) is connected to pin 3 (Arduino's Software TX)
SoftwareSerial XBee(2, 3); // RX, TX

//For Atmega2560, ATmega32U4, etc.
// XBee's DOUT (TX) is connected to pin 10 (Arduino's Software RX)
// XBee's DIN (RX) is connected to pin 11 (Arduino's Software TX)
//SoftwareSerial XBee(10, 11); // RX, TX


//Declare character 'c_data'
char c_data;

//LED to check if the LED is initialized.
const int status_LED = 13;

//LED Status Indicator
int ledR = 5;//hardware PWM
int ledG = 6;//hardware PWM
int ledB = 9; //hardware PWM

/*******************Setup Loop***************************/
void setup() {
  // put your setup code here, to run once:

  //Declare pin modes
  pinMode (status_LED, OUTPUT);//LED to indicate when character has been sent

  //Status LED to see if the Receiving XBee is initializing
  for (int i = 0; i < 3; i++) {
    digitalWrite(status_LED, HIGH);//set Status LED on
    delay(50);
    digitalWrite(status_LED, LOW); //set Status LED off
    delay(50);
  }


  // initialize the digital pins as an output for LEDs
  pinMode(ledR, OUTPUT);
  pinMode(ledG, OUTPUT);
  pinMode(ledB, OUTPUT);

  sequenceTest();//visually initialization

  //Declare serial connections for debugging
  Serial.begin(9600);
  Serial.println("Arduino Serial Ready");

  XBee.begin(9600);
  Serial.println("XBee Ready to Receive");

}//end setup()

void loop() {

  //Check if XBee is receiving data from other XBee

  if (XBee.available() || Serial.available()) {
    if (XBee.available()) {
      c_data = XBee.read();//store received value from XBee into variable

    }

    else if (Serial.available()) {
      c_data = Serial.read();//store received value from Serial Monitor into variable

    }

    //Check to see if character sent is letter A
    if (c_data == 'A') {
      digitalWrite(status_LED, HIGH); //turn ON Status LED
      allON();
      Serial.println("Character Received, ");
      Serial.println(c_data);
    }

    else if (c_data == 'B') {
      digitalWrite(status_LED, HIGH); //turn ON Status LED
      redON();
      Serial.println("Character Received, ");
      Serial.println(c_data);
    }

    else if (c_data == 'C') {
      digitalWrite(status_LED, HIGH); //turn ON Status LED
      magentaON();
      Serial.println("Character Received, ");
      Serial.println(c_data);
    }

    else if (c_data == 'D') {
      digitalWrite(status_LED, HIGH); //turn ON Status LED
      blueON();
      Serial.println("Character Received, ");
      Serial.println(c_data);
    }

    else if (c_data == 'E') {
      digitalWrite(status_LED, HIGH); //turn ON Status LED
      cyanON();
      Serial.println("Character Received, ");
      Serial.println(c_data);
    }
    else if (c_data == 'F') {
      digitalWrite(status_LED, HIGH); //turn ON Status LED
      greenON();
      Serial.println("Character Received, ");
      Serial.println(c_data);
    }
    else if (c_data == 'G') {
      digitalWrite(status_LED, HIGH); //turn ON Status LED
      yellowON();
      Serial.println("Character Received, ");
      Serial.println(c_data);
    }
    else if (c_data == 'H') {
      digitalWrite(status_LED, HIGH); //turn ON Status LED
      allOFF();
      Serial.println("Character Received, ");
      Serial.println(c_data);
    }
    else {
      //do nothing
    }
  }

  delay(100);
  digitalWrite(status_LED, LOW); //turn OFF Status LED

}//end loop()

/*
  Check out the Venn Diagram on Basic Color Mixing:
  https://learn.sparkfun.com/tutorials/lilypad-protosnap-plus-activity-guide/2-basic-color-mixing

*/

void redON() {
  analogWrite(ledR, 255);
  analogWrite(ledG, 0);
  analogWrite(ledB, 0);
}

void magentaON() {
  analogWrite(ledR, 150);
  analogWrite(ledG, 0);
  analogWrite(ledB, 255);
}

void blueON() {
  analogWrite(ledR, 0);
  analogWrite(ledG, 0);
  analogWrite(ledB, 255);
}

void cyanON() {
  analogWrite(ledR, 0);
  analogWrite(ledG, 255);
  analogWrite(ledB, 255);
}

void greenON() {
  analogWrite(ledR, 0);
  analogWrite(ledG, 255);
  analogWrite(ledB, 0);
}

void yellowON() {
  analogWrite(ledR, 150);
  analogWrite(ledG, 255);
  analogWrite(ledB, 0);
}

void allOFF() {
  analogWrite(ledR, 0);
  analogWrite(ledG, 0);
  analogWrite(ledB, 0);
}

void allON() {//white
  analogWrite(ledR, 150);
  analogWrite(ledG, 255);
  analogWrite(ledB, 255);
}

void sequenceTest() {

  redON();
  delay(50);
  allOFF();
  delay(50);

  magentaON();
  delay(50);
  allOFF();
  delay(50);

  blueON();
  delay(50);
  allOFF();
  delay(50);

  cyanON();
  delay(50);
  allOFF();
  delay(50);

  greenON();
  delay(50);
  allOFF();
  delay(50);

  yellowON();
  delay(50);
  allOFF();
  delay(50);

  allON();
  delay(50);
  allOFF();
  delay(50);
}
What You Should See
By using the thumb to make contact with either the ring and pinky's snappable pin, the RGB LED will switch between colors. Pressing on the thumb and middle finger will send a character associated with the RGB LED. The receiving XBee should mimic the color of the RGB LED whenever a character is sent.