Wireless Audio Bluetooth Adapter w/ BC127
Introduction
It all started when my friend and I were running late for a local dance competition. As soon as we arrived, my friend quickly exited the car and grabbed his phone. Without realizing it, he had ripped the audio connector off the cable while it was still connected to his phone. It was at that point that I decided to upgrade my sound system by adding an audio Bluetooth.
Required Materials
To configure a BC127, make sure to have these parts:
To build the wireless audio Bluetooth adapter, you will need the following parts. You may not need everything though, depending on what you have and what you want to do. Add it to your cart, read through the guide, and adjust the cart as necessary depending on what you would like.
You will also need:
- Speakers w/ 3.5mm Audio Jack
- 3.5mm Audio Cable
- 5V Car Adapter
- Cardboard Box
Tools
You will also need:
- Soldering Iron
- Solder
- General Soldering Accessories
- Heat Shrink
- Hot Air Rework Station
- Wire Stripper
- Hobby Knife
- Mini Screwdriver
- Tape
- Pen
- Quarter (Or Any Coin)
Suggested Reading
If you aren’t familiar with the following concepts, we recommend checking out these tutorials before continuing.
How to Solder: Through-Hole Soldering
Installing an Arduino Library
Working with Wire
Bluetooth Basics
Understanding the BC127 Bluetooth Module
Configuring the BC127 as Sink
Before I started building the project, I needed to understand the commands to configure the audio Bluetooth. The user manual was a little confusing at first so I decided to test the commands using a USB-to-serial converter and a serial terminal. Through testing, I found that the BC127 would somehow re-configure itself as a source Bluetooth and it would not accept any new connections. I also did not like having HFP profile turned on when there was an incoming call. I decided to use a microcontroller to automate the commands as soon as I was able to configure these settings:
- Setting the Bluetooth's Name
- Setting as a Sink Bluetooth
- Become Discoverable
- Autoconnect with a Previous Paired Device
- Turning off the HFP
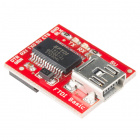
Configuring the BC127 with an FTDI
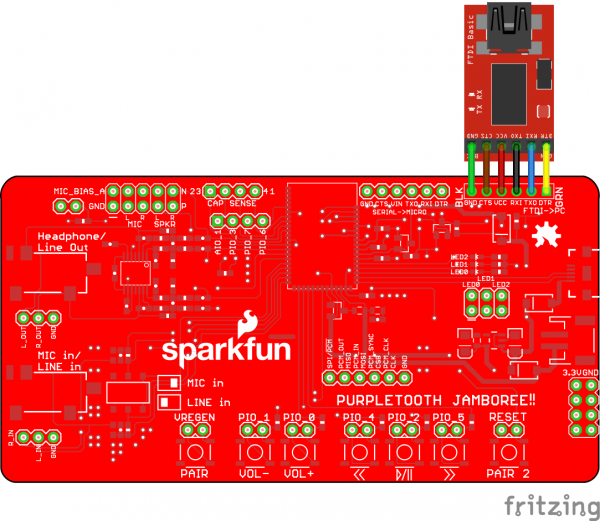
To configure, a USB-to-serial converter was needed to send serial commands. A 1x6 row of the right angle header was broken off and soldered to the pins to the BC127's FTDI port.
For advanced users, you can also use a microcontroller with a serial passthrough code to configure.
Once the FTDI was connected to a computer using a mini-B USB cable and the drivers were installed, the commands were tested through a serial terminal set at 9600 baud, 8-data bits, no parity, 1-stop bits, and no flow control.
Restoring the BC127
Just in case, the BC127 was restored to its default state with the commands listed below. In order to send a command, a carriage return was required. Make sure to press "Enter" on a keyboard when typing the commands and the serial terminal was not sending additional characters. The BC127 should respond with an "OK" after each command:
restore
write
reset
Naming the BC127
Next up was setting up the audio Bluetooth's name to make it easier to recognize. I decided to name the Bluetooth "BlueTank1750". To set the name of the BC127 from the default BlueCreation-XXXXXX to a custom name, the manual indicated that a set command needed to be issued with the configuration parameter equal to the new value. The following commands were issued:
set name=BlueTank1750
write
reset
To view if the name has been saved after reset, the following command was issued:
get name
As a result, the BC127 responded with the configuration parameter and value:
name=BlueTank1750
Setting the BC127 as Sink Bluetooth
To ensure that the BC127 was set to sink, the following commands were issued:
set classic_role=0
write
reset
Setting the BC127 as Discoverable
To test the BC127 with a smartphone's audio Bluetooth, the BC127 needed to be set to discoverable by issuing the following command:
DISCOVERABLE ON
Connecting a Source to a Sink Bluetooth
To connect, I found it easier to turn on a smartphone's source Bluetooth and have it scan for Bluetooths in range. The BC127 (in this case it was called BlueTank1750) was selected from the list of available Bluetooths to pair and connect. Once selected, a 3.5mm audio cable and speaker were connected to the audio jack labeled "Headphone / Line Out". Using the smartphone's music player, a track was played. After successfully playing music, I continued on to the next configuration setting.
Setting the BC127 for Auto Connect
To make the Bluetooth auto connect everytime it was powered up, the following commands were issued:
set autoconn=1
write
reset
After sending the commands, any smartphone with a "source" audio Bluetooth enabled was able connect to the BC127 as a "sink" as long as it was connected previously. The device will remember the Bluetooth address and connect to the first audio Bluetooth in its vicinity that it remembers.
Since the reset command was issued, the BC127 restarted and automatically searched for the next available Bluetooth that it was able to remember. In this case, it was the same smartphone that was used in the previous test.
Turning Off the HFP
The last feature to implement was the configuration of the HFP. To turn off the HFP the following commands were issued:
set enable_hfp=off
write
reset
Hardware Hookup
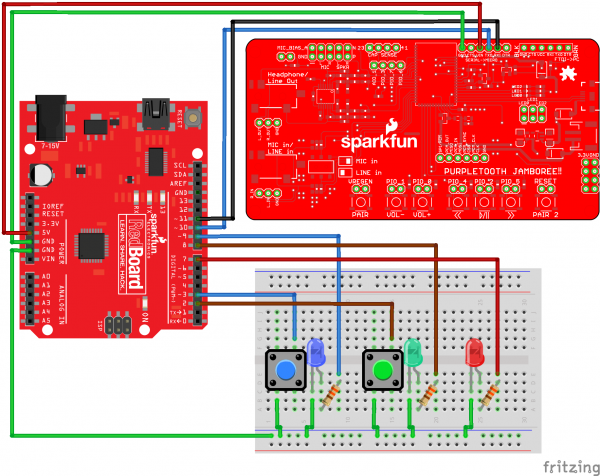
After configuring the BC127 and testing the BC127, I decided to automate the commands with button presses using a RedBoard programmed with Arduino. The code was written and tested on a breadboard before soldering anything together as shown below:
Soldering the Metal Pushbuttons
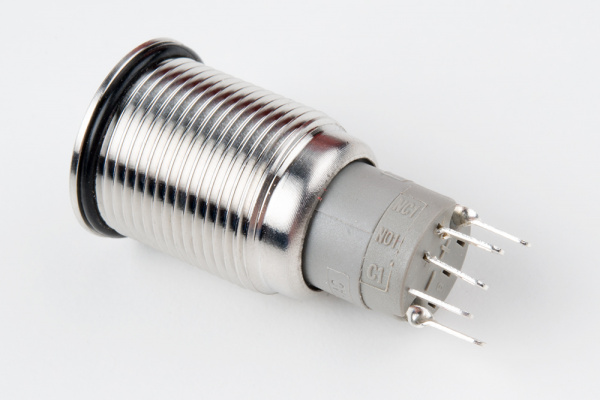
Once the code was tested and stable, I decided use panel mount momentary metal pushbuttons. The momentary push bushbutton acts like a normal momentary push button if you connect to the normally open (NO1) and common pin (C1). As a bonus, there are pins labeled "+" and "-" that connect to an LED ring.
I found that the metal pushbuttons also included a built-in resistor from user emc2, so the 330Ω resistor was not included when soldering to the buttons. Testing with a variable power supply, the LED did not appear to act like a short circuit when 5V was applied. The red LED was also removed since the project would always be connected to a power supply.
| Component | Component Pin | Arduino I/O Pin |
|---|---|---|
| Blue Momentary Metal Pushbutton | + : LED Anode Side | 9 |
| NC1: Normally Closed Pin | ||
| NO1: Normally Open Pin | 3 | |
| C1: Common Pin | GND | |
| -: LED Cathode Side | GND | |
| Green Momentary Metal Pushbutton | + : LED Anode Side | 8 |
| NC1: Normally Closed Pin | ||
| NO1: Normally Open Pin | 2 | |
| C1: Common Pin | GND | |
| -: LED Cathode Side | GND | |
| PurpleTooth Jamboree BC127 | GND | GND |
| VIN | 5V | |
| TXO | 10 | |
| RXI | 11 |
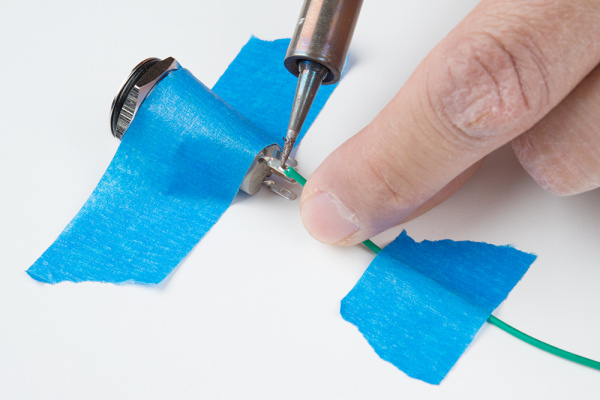
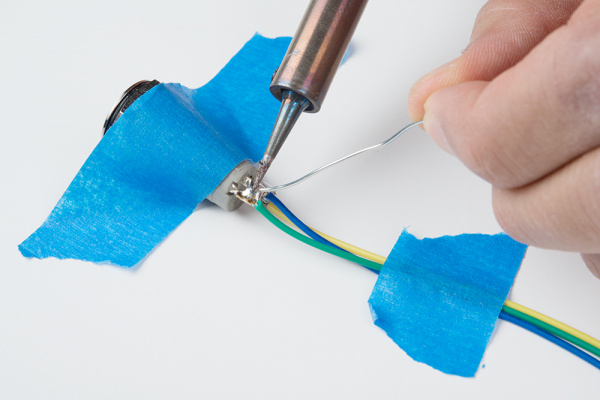
To connect the metal pushbuttons to the RedBoard's female headers, 12" male jumper wires were cut in half and stripped using wire strippers. The exposed wire was threaded and soldered to each metal pushbutton's pin. To assist in soldering, tape was used to hold down the wire and metal pushbutton.
An intentional solder jumper was added between the "-" and COM1 pin since both pins needed to be connected to GND.
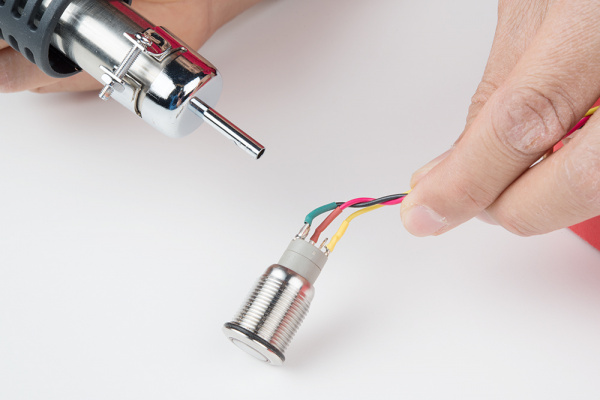
After testing the connections and LED with a multimeter, the solder joint was sealed with heatshrink using a hot air rework station.
Enclosure
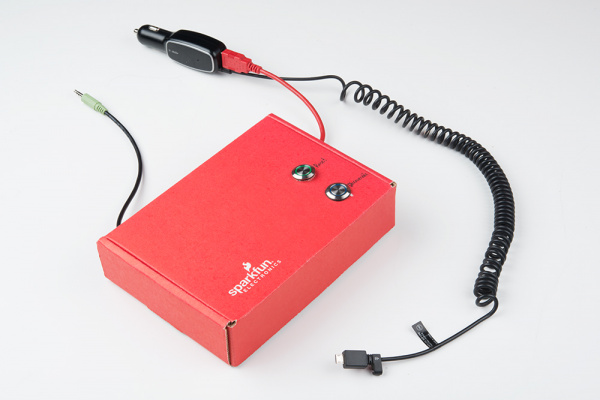
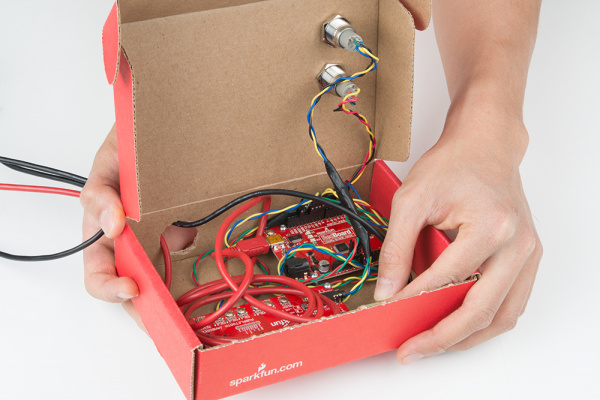
Once the parts were soldered together, I wanted to make a quick enclosure. I decided to use a red SparkFun cardboard box to hold and secure the parts.
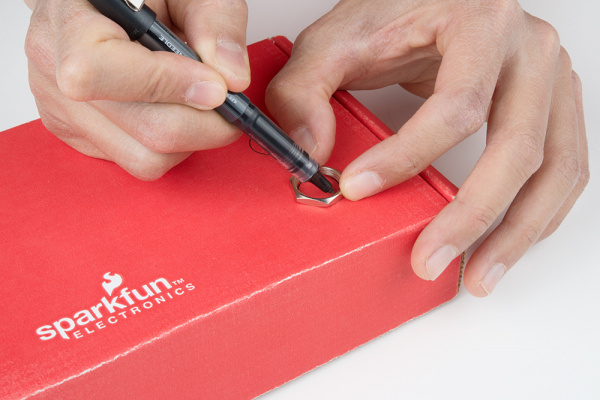
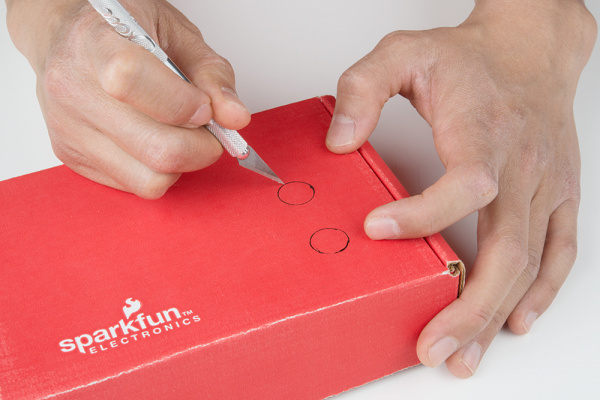
Using the metal pushbutton's provided hex nut, two circles were drawn on the top of the box.
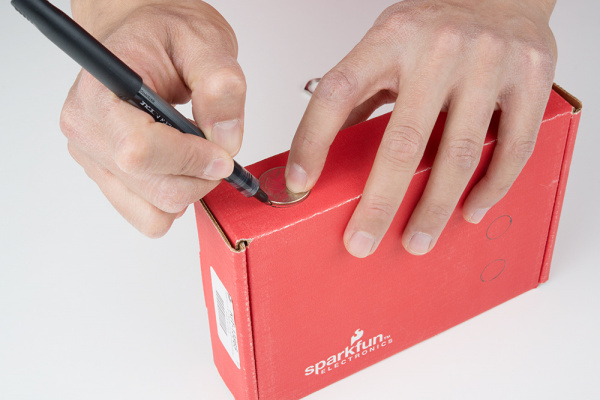
Using a coin, an additional hole was drawn for the power and audio cables.
Using a hobby knife, the holes were carefully cut. There was not a lot of tolerance available for the metal pushbutton's flange. A smaller hole was cut within the circle and adjusted as necessary when installing the metal pushbutton.
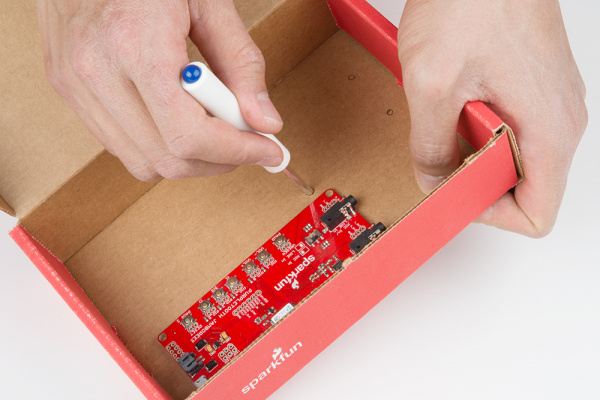
Next up were the mounting holes for the RedBoard and Purpletooth Jamboree. I planned the location for each component and made sure that the components did not interfere with each other when the box was closed. Holes were drawn for the mounting hole locations and created using the "+" side of a mini screwdriver.
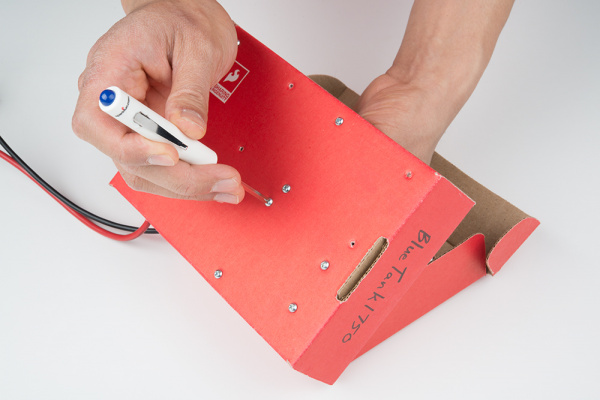
Two screws and a standoff were used for each mounting hole. The mini screwdriver was used to secure the hardware.
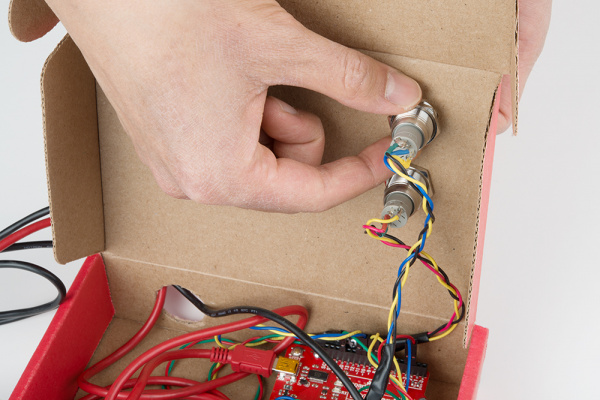
After braiding the wires and wiring the components together, the metal pushbuttons were mounted and secured with their respective hex nut. This was a good time to add the mini-B USB and audio cable.
Before closing the box, I made sure that the wires and components had enough room and were not causing any stress to the connections.
For power, I decided to use a 5V car adapter with a USB port. I made sure to label the buttons and the Bluetooth's name before connecting it to my car.
Example Code
Note: This example assumes you are using the latest version of the Arduino IDE on your desktop. If this is your first time using Arduino, please review our tutorial on installing the Arduino IDE. If you have not previously installed an Arduino library, please check out our installation guide.
The code to automate the features requires the SparkFun BC127 Arduino Library. Make sure to download it here:
The example code used for the wireless audio Bluetooth adapter can be found here:
The code is currently using "BlueBlock1750" as the BC127's name and the autoconnect was disabled. Make sure to adjust the custom name and autoconnect in the bluetoothReset() function. For my car, I adjusted the name to BlueTank1750 and made autoconn=1. Once the code was adjusted, I uploaded the code to the Arduino.
Connecting Your Source Bluetooth
With the wireless audio Bluetooth adapter built, any audio Bluetooth set as a source should be able to connect and stream music. Here are some general notes to connect your source's Bluetooth since each device can have different instructions. Most of the time, a smartphone (with a Android and iPhone) is used to connect. Any smartphone or laptop that has an audio Bluetooth should be able to connect. In this case, a smartphone was used.
General Steps to Connect
- Press the "Discoverable" button on the BC127.
- Turn on your device's source Bluetooth.
- Scan for the wireless audio Bluetooth adapter from your settings.
- Select the BC127's and begin pairing.
- Once paired, connect to the BC127.
- Open your music player app.
- Choose your favorite track or mixtape and hit play.
- Turn the volume up to safe levels on the speaker and phone once the music starts!
Stress Tests in the Field
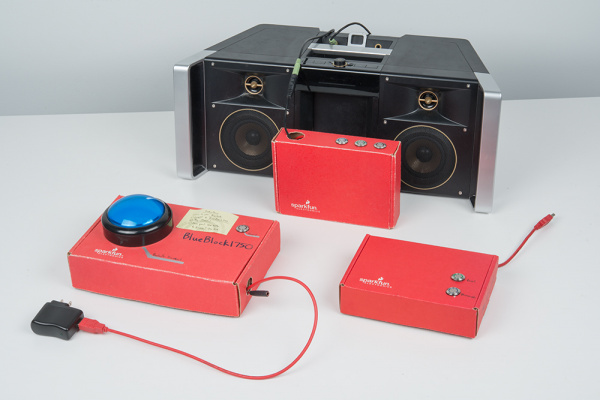
After the first build, I decide to built two more adapters! Here are some quick notes on the different builds using the initial connection diagram.
High Volume of Users and Range
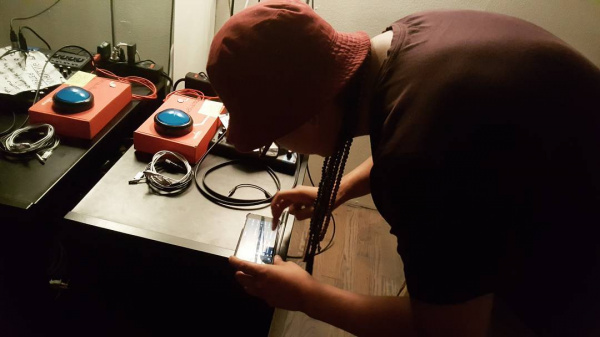
One of the adapters was donated to a local dance studio called Block 1750 to make it easier for users to connect to the studio speakers. A blue, big dome pushbutton replaced the blue metal push button as shown in the image below. The autoconnect seemed to cause confusion users connecting throughout the day so I decided to disable the feature in the Arduino's code. Depending on the smartphone being used, the range varied for the Bluetooth connection. Some would work as far as the other end of the studio (about 40 feet line of sight). Other devices would work within a few feet. The BC127 seemed more reliable when it was within 4 or 5 feet away. The image below shows a user streaming music to the wireless Bluetooth adapter.
Going Portable
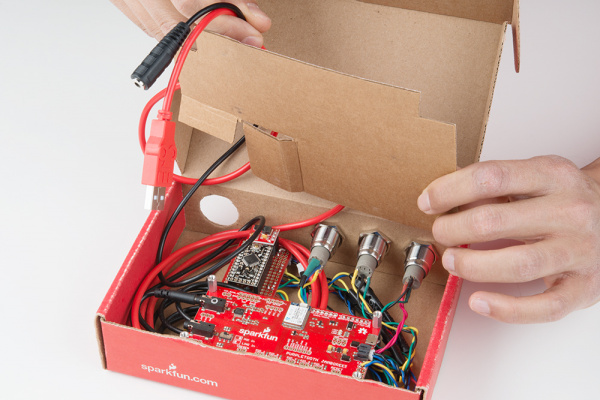
Since I also teach dance at different locations, I decided to make it a portable wireless Bluetooth adapter. In addition to the original design, a 1000mA rechargeable LiPo battery was included to make use of the BC127's LiPo charging feature. A red latching metal pushbutton was also connected between the battery and VIN so that power could be removed when not in use. I had a 5V step up converter attached to the 5V Arduino Pro Mini and solderable breadboard. With this setup, the adapter can stream music for about 3 hours before the next charge.
Jam On!
Since 2016, all three Bluetooths have been working great with amazing quality! The cardboard boxes holding the electronics have also withstood the test of time.
Troubleshooting
There were some issues that I ran into when trying to configure the BC127 and testing the BC127 initially. Below are a few tips for those that are using a BC127 audio bluetooth in a project.
BC127 Output Error and Not Connecting to a Source Bluetooth?
If you are seeing this error with your BC127:
OPEN_ERROR AG
OPEN_ERROR AG
, it's possible that the BC127 has somehow been set to source mode instead of sink mode. This can happen randomly or if you press and hold the momentary push button labeled VREGEN "long" on the Purpletooth Jamboree. BlueCreations defines a long as holding it down for 1000ms or more. Resending the commands should fix the issue:
set classic_role=0
write
reset
Auto Connect After the BC127 is Turned on
If the BC127 has been turned on before your smartphone's Bluetooth is enabled, try hitting the RESET button to power cycle the BC127 so that it can re-scan through its saved list of previously paired devices. You can also power cycle or send the reset command.
Resources and Going Further
For more information on the Purpletooth Jamboree and the BC127 module, check out these documents:
- SparkFun Purpletooth Jamboree - BC127 Development Board
- Module Datasheet
- Melody v5.0 Manual- this is the complete reference for the commands and behavior of the firmware that ships with the BC127 modules we sell
- Melody v5.2 Manual- this is a pre-release and unsupported version of the firmware which neither we nor BlueCreation will offer support for. If you update your module's firmware to this (which we will not tell you how to do), you're on your own!
- GitHub Code Repos
- SparkFun BC127 Arduino Library
- BlueBlock1750v3 - Example code that was used for the wireless audio Bluetooth adapter.
For more tutorial action, check out these related links related to audio and wireless audio projects. Note that you will need to adjust the code depending on your Bluetooth device if you decide to use a something other than the BC127.
