SparkFun Inventor's Kit for RedBot
This Tutorial is Retired!
This tutorial covers concepts or technologies that are no longer current. It's still here for you to read and enjoy, but may not be as useful as our newest tutorials.
View the updated tutorial: Experiment Guide for RedBot with Shadow Chassis
 bri_huang
Introduction
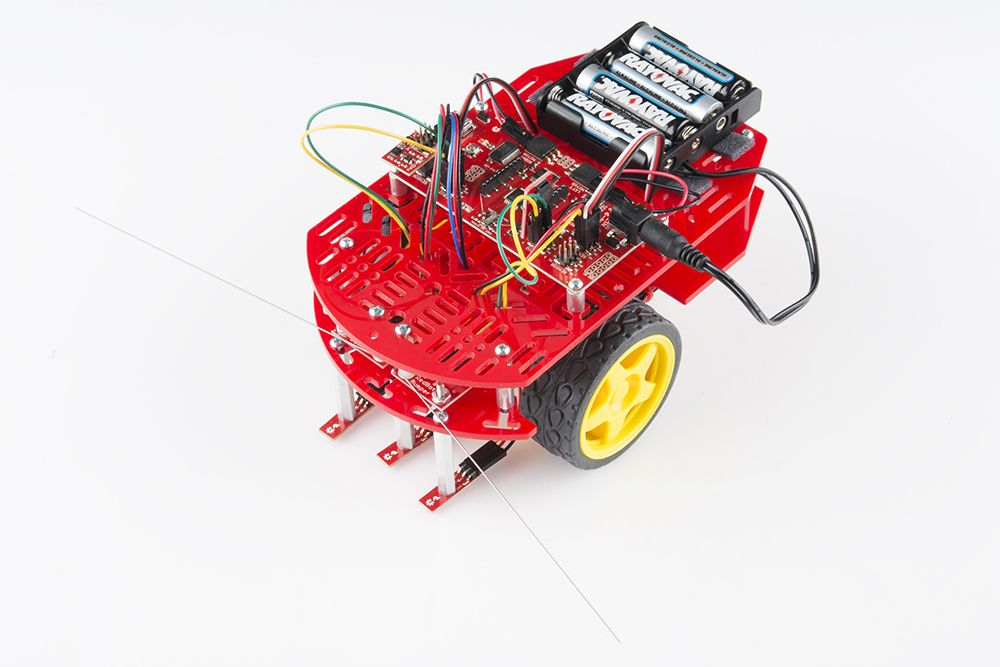
The SparkFun RedBot is a great way to get your feet wet in the world of robotics. However, once you have assembled your RedBot, you may be at a loss as to where to go from there. Enter: the SparkFun Inventor's Kit for RedBot, or the SIK for RedBot for short. This guide will go through nine different experiments, ranging from learning how to drive your RedBot to using an accelerometer to trigger your RedBot to move. Once you've mastered each experiment, you can take what you've learned in this guide and apply it to creating your own robot platform.
The 'brain' of the robot is the RedBot Mainboard, an integrated microcontroller board. The Mainboard is essentially a standard Arduino Uno with an integrated motor driver and various headers and connections, making it easy to connect motors, servos, and sensors for the RedBot.
Here is a simple example sketch to get you started. This sketch simply spins the left motor forward and reverse, and then spins both motors forward and reverse.
Before running this code, make sure your robot is in a safe place. It will start driving immediately after uploading. We suggest tipping the RedBot on its end so that the wheels are in the air.
Push the small reset button on the board to run the code again.
language:c
/*******************************************************************************
/ SimpleRedBotDrive Code - no libraries
/
/ Simple example code showing how to spin the right and left motors and braking.
/ This example requires no libraries to run, and has all of the pins used on the
/ RedBot Mainboard defined.
/
/ Before uploading this code to your RedBot, make sure that the RedBot is in a safe
/ place. It will start moving immediately after you upload the program. We suggest
/ placing the RedBot on it's end so that the wheels are up.
/
/ Push the small reset button on the board to run the program again.
/
/ Note: The RedBot Mainboard programs as an Arduino Uno
/******************************************************************************/

// H-Bridge motor driver pins
#define    L_CTRL1   2
#define    L_CTRL2   4
#define    L_PWM     5

#define    R_CTRL1   7
#define    R_CTRL2   8
#define    R_PWM     6

// XBee SW_Serial pins
#define    SW_SER_TX A0
#define    SW_SER_RX A1


/*******************
/ setup function
/*******************/
void setup()
{
    Serial.begin(9600);

    pinMode(L_CTRL1, OUTPUT);  // used as a debug pin for an LED.
    pinMode(L_CTRL2, OUTPUT);  // used as a debug pin for an LED.
    pinMode(L_PWM, OUTPUT);  // used as a debug pin for an LED.

    pinMode(R_CTRL1, OUTPUT);  // used as a debug pin for an LED.
    pinMode(R_CTRL2, OUTPUT);  // used as a debug pin for an LED.
    pinMode(R_PWM, OUTPUT);  // used as a debug pin for an LED.

    pinMode(13, OUTPUT);  // used as a debug pin for an LED.


    // spin the left Motor CW
    leftMotor(255);
    delay(2000);
    leftBrake();
    delay(1000);  // wait for 1000 milliseconds


    // spin the left Motor CCW
    leftMotor(-255);
    delay(2000);
    leftBrake();
    delay(1000);  // wait for 1000 milliseconds

    // spin both motors (drive forward) -- left CW, right CCW
    leftMotor(255);
    rightMotor(-255);
    delay(2000);  // wait for 2000 milliseconds
    leftBrake();
    rightBrake();

    // spin both motors (drive in reverse) -- left CCW, right CW
    leftMotor(-255);
    rightMotor(255);
    delay(2000);  // wait for 2000 milliseconds
    leftBrake();
    rightBrake();

}

/*******************
/ loop function
/*******************/
void loop()
{
    // no code here. All driving code is in the setup() -- so that it runs just once.
}

/*******************************************************************************/
void leftMotor(int motorPower)
{
    motorPower = constrain(motorPower, -255, 255);   // constrain motorPower to -255 to +255
    if(motorPower >= 0)
    {
        // spin CW
        digitalWrite(L_CTRL1, HIGH);
        digitalWrite(L_CTRL2, LOW);
        analogWrite(L_PWM, abs(motorPower));
    }
    else
    {
        // spin CCW
        digitalWrite(L_CTRL1, LOW);
        digitalWrite(L_CTRL2, HIGH);
        analogWrite(L_PWM, abs(motorPower));
    }
}

/*******************************************************************************/
void leftBrake()
{
    // setting both controls HIGH, shorts the motor out -- causing it to self brake.
    digitalWrite(L_CTRL1, HIGH);
    digitalWrite(L_CTRL2, HIGH);
    analogWrite(L_PWM, 0);
}
/*******************************************************************************/
void rightMotor(int motorPower)
{
    motorPower = constrain(motorPower, -255, 255);   // constrain motorPower to -255 to +255
    if(motorPower >= 0)
    {
        // spin CW
        digitalWrite(R_CTRL1, HIGH);
        digitalWrite(R_CTRL2, LOW);
        analogWrite(R_PWM, abs(motorPower));
    }
    else
    {
        // spin CCW
        digitalWrite(R_CTRL1, LOW);
        digitalWrite(R_CTRL2, HIGH);
        analogWrite(R_PWM, abs(motorPower));
    }
}

/*******************************************************************************/
void rightBrake()
{
    // setting both controls HIGH, shorts the motor out -- causing it to self brake.
    digitalWrite(L_CTRL1, HIGH);
    digitalWrite(L_CTRL2, HIGH);
    analogWrite(R_PWM, 0);
}
Experiment List:
Here is a breakdown of each experiment presented in this tutorial. Click on the link to jump to that section, or continue reading to get started with experiment 1.
- Software Install and Basic Test
- Drive Forward
- Turning
- Push to Start & Making Sounds
- Bumpers
- Line Following with IR Sensors
- Encoder
- Accelerometer
- Remote Control
Required Materials
In order to follow along with these experiments, you'll need to make sure you have the following materials first.
- RedBot Mainboard
- Magician Chassis, motors, wheels, screwdriver, hardware
- 1x Accelerometer RedBot Sensor
- 3x Line Follower RedBot Sensor
- 1x Wheel Encoder Kit
- 1x RedBot Buzzer
- 2x RedBot Mechanical Bumper
- 3x Jumper Wires F/F Pack of 10
Extra Supplies Needed
- 4x AA batteries
- USB miniB cable
- Tape, paint, markers, pencils, etc for IR Sensors
Suggested Reading
If you still need to assemble your RedBot, visit our RedBot Assembly Guide, for detailed instructions. Please note that are a couple of versions of the assembly guide, for older version of the RedBot Kit, please see this assembly guide.
Already put together the RedBot? Great! It's a good idea to double-check the wiring. If you hooked up the RedBot differently, you can either change the example code to reflect your changes or rewire you bot as per the assembly guide.
You will also need to learn a little more about the RedBot and sensors that comes along in the RedBot Inventor's Kit Guide. Please visit our Getting Started with the RedBot.
Before you go any further, you should probably make certain that you're familiar with these other topics:
- What is an Arduino? - Since the RedBot is based off the Arduino platform, it's a good idea to understand what that means.
- Installing the Arduino IDE - If you don't have the Arduino software installed, this guide will help you out.
- Installing an Arduino Library - To get the most out of the RedBot, you'll want to install our RedBot library. This tutorial will show you how to install any library.
- Accelerometer basics - One of the core sensors for the RedBot is an accelerometer. To find out more about accelerometers, check out this guide.
- Analog to digital conversion - Many useful sensors for the RedBot will be analog. This guide will help you interface with them and make the most of the data you get back.
- Pulse width modulation (PWM) - The RedBot includes two headers with PWM signals, and uses PWM to control the speed of the motors. It's probably a good idea to be familiar with the concept.
- I2C - The RedBot Accelerometer, which ships with the RedBot kit, uses I2C to communicate with the RedBot. While the accelerometer is accessible through the library with no knowledge of I2C required, if you want to get more out of it, you can check out this tutorial.