SparkFun Inventor's Kit for RedBot
This Tutorial is Retired!
This tutorial covers concepts or technologies that are no longer current. It's still here for you to read and enjoy, but may not be as useful as our newest tutorials.
View the updated tutorial: Experiment Guide for RedBot with Shadow Chassis
 bri_huang
Experiment 8: Accelerometer
The Advanced RedBot kit comes with an accelerometer board that can be used to detect bumps, or to tell whether the robot is on an incline. This example will use the accelerometer as an input to "wind up" the robot.
Let’s load this experiment onto the RedBot. Go to File > Examples > Exp8_1_AccelerometerRead or copy and paste the example code below:
Experiment 8.1 - Exploring the Accelerometer
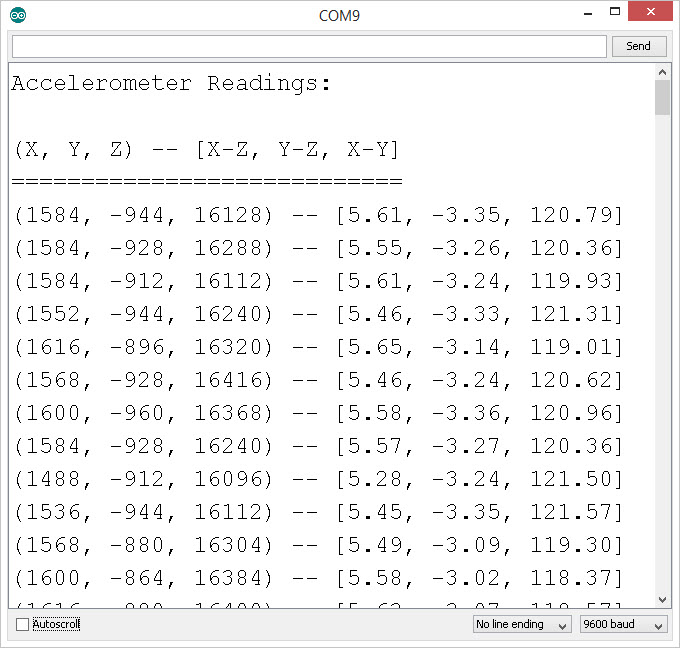
Upload this sketch to your RedBot and open up the Serial Monitor. This sketch shows how we read the accelerometer's X, Y, & Z axes as well as the X-Z, Y-Z, and X-Y angles.
language:c
/***********************************************************************
 * Exp8_1_AccelerometerRead -- RedBot Experiment 8.1
 *
 * Measuring speed, velocity, and acceleration are all key
 * components to robotics. This first experiment will introduce
 * you to using the Accelerometer sensor on the RedBot.
 *
 * Hardware setup:
 * You'll need to attach the RedBot Accelerometer board to hader on the upper
 * right side of the mainboard. See the manual for details on how to do this.
 *
 * This sketch was written by SparkFun Electronics, with lots of help from
 * the Arduino community. This code is completely free for any use.
 *
 * 8 Oct 2013 M. Hord
 * Revised, 31 Oct 2014 B. Huang
 *
 * 8 Oct 2013 M. Hord
 *
 * This experiment was inspired by Paul Kassebaum at Mathworks, who made
 * one of the very first non-SparkFun demo projects and brought it to the
 * 2013 Open Hardware Summit in Boston. Thanks Paul!
 ***********************************************************************/

#include <RedBot.h>
RedBotMotors motors;

// The RedBot library includes support for the accelerometer. We've tried
// to make using the accelerometer as easy as to use as possible.

RedBotAccel accelerometer;

void setup(void)
{
  Serial.begin(9600);
  Serial.println("Accelerometer Readings:");
  Serial.println();
  Serial.println("(X, Y, Z) -- [X-Z, Y-Z, X-Y]");
  Serial.println("============================");
}

void loop(void)
{
  accelerometer.read(); // updates the x, y, and z axis readings on the acceleromter

  // Display out the X, Y, and Z - axis "acceleration" measurements and also
  // the relative angle between the X-Z, Y-Z, and X-Y vectors. (These give us
  // the orientation of the RedBot in 3D space.

  Serial.print("(");
  Serial.print(accelerometer.x);
  Serial.print(", ");  // tab

  Serial.print(accelerometer.y);
  Serial.print(", ");  // tab

  Serial.print(accelerometer.z);
  Serial.print(") -- ");  // tab

  Serial.print("[");
  Serial.print(accelerometer.angleXZ);
  Serial.print(", ");
  Serial.print(accelerometer.angleYZ);
  Serial.print(", ");
  Serial.print(accelerometer.angleXY);
  Serial.println("]");

  // short delay in between readings/
  delay(100);
}
What You Should See
This simple sketch introduces us to the RedBotAccelerometer class object/ The RedBotAccelerometer class has a .read() method that reads the current X, Y, and Z accelerometer readings and calculates the X-Z, Y-Z, and X-Z angles. Upload this sketch to your RedBot, open up the Serial Monitor, and rotate / tilt the RedBot around to see how the values change.
What is the maximum values that you see for any one axis?
Code to Note
RedBotAccel is another class in the RedBot library. This line initializes the accelerometer object. The Accelerometer sensor uses a protocol called I2C. For this, the sensor must be connected to pins A4 & A5 on the RedBot Mainboard. This is why the accelerometer must be plugged into the front-right corner of the RedBot.
language:c
RedBotAccel accelerometer;
The RedBotAccel class has one method (function) that we need to use. It is the .read() method. This sends the commands to the sensor to read the X, Y, and Z axis accelerations and calculate the X-Z, Y-Z, and X-Y angles. The accelerometer works by measuring the vector force of gravity on a small mass in the X, Y, and Z directions. By using the component values of each vector, you can determine the orientation of the RedBot with respect to Earth's gravitational pull.
language:c
accelerometer.read(); // updates the x, y, and z axis readings on the accelerometer
After we have called the .read() method, the accelerometer values are stored in public variables that are part of the class. These variables are: x, y, z, angleXZ, angleYZ, and angleXY. The variables x, y, and z return an integer that represents the raw accelerometer values. The variables angleXZ, angleYZ, and angleXY return a floating point number representing the angle in each of these planes:
language:c
int xAccel = accelerometer.x;
int yAccel = accelerometer.y;
int zAccel = accelerometer.z;

float XZ = accelerometer.angleXZ;
float YZ = accelerometer.angleYZ;
float XY = accelerometer.angleXY;
The raw x, y, and z readings indicate acceleration along each of these axes. You can see the markings on the sensor indicating the direction. X points in the forward direction, Y points to the left, and Z is straight up. The absolute reading should vary between something close to 16,000 to -16,000, and when the robot is neutral or flat, the reading will be near zero (+/- perhaps 500 counts, depending on how level it is).
Things to Try
Can you figure out what mathematical function is used to calculate the angle in each plane -- XZ, YZ, and XY? (Hint: Think back to you triangles and trig identities).
Experiment 8.2 - Wind-up
This is a fun demo that uses the accelerometer reading to detect the tilt / incline of the Redbot. As you tilt the RedBot, the wheels should start to spin. This mimics a "wind-up" toy action. Set it down on the floor and watch it drive slowly to a stop.
Go to File > Examples > RedBot_Experiments > Exp8_2_WindUp or copy and paste the example code below:
language:c
/***********************************************************************
 * Exp8_2_WindUp -- RedBot Experiment 8.2
 *
 * This is a fun demo of using the accelerometer to "wind up" the the redBot
 * As you tilt the Redbot forward, it should speed up. When you place it flat
 * it will race forward for 3 seconds and then stop.
 *
 * Hardware setup:
 * You'll need to attach the RedBot Accelerometer board to hader on the upper
 * right side of the mainboard. See the manual for details on how to do this.
 *
 * This sketch was written by SparkFun Electronics, with lots of help from
 * the Arduino community. This code is completely free for any use.
 *
 * 8 Oct 2013 M. Hord
 * Revised, 31 Oct 2014 B. Huang
 *
 * 8 Oct 2013 M. Hord
 *
 * This experiment was inspired by Paul Kassebaum at Mathworks, who made
 * one of the very first non-SparkFun demo projects and brought it to the
 * 2013 Open Hardware Summit in Boston. Thanks Paul!
 ***********************************************************************/

#include <RedBot.h>
RedBotMotors motors;
int motorPower;  // variable for setting the drive power

// The RedBot library includes support for the accelerometer. We've tried
// to make using the accelerometer as easy as to use as possible.

RedBotAccel accelerometer;

void setup(void)
{
  Serial.begin(9600);
}

void loop(void)
{
  accelerometer.read(); // updates the x, y, and z axis readings on the accelerometer

  int xAccel = accelerometer.x;
  int yAccel = accelerometer.y;
  int zAccel = accelerometer.z;

  float XZ = accelerometer.angleXZ;  // read in the XZ angle
  float YZ = accelerometer.angleYZ;  // read in the YZ angle
  float XY = accelerometer.angleXY;  // read in the XY angle

  Serial.print(XZ, 2);  // prints out floating point number with 2 decimal places
  Serial.print("\t");   // tab
  Serial.println(motorPower);  // prints out motorPower

    // if the angle is greater than 20 degrees
  if (XZ > 20)
  {
    // while the angle is greater than 20, speed up or down (match the speed to the angle)
    while(XZ > 15)  // 5 degree buffer
    {
      motorPower = map(XZ, 0, 90, 0, 255);
      motors.drive(motorPower);   // Adjust the motor power with the scaled
      //  value from the accelerometer.
      accelerometer.read();       // Update the readings, so the while() loop
      XZ = accelerometer.angleXZ; // Update the variable for the XZ angle

      // debug print statements
      Serial.print(XZ, 2);  // prints out XZ angle with 2 decimal places
      Serial.print("\t");   // tab
      Serial.println(motorPower);  // prints out motorPower
      delay(200);  // give you a chance to set the robot down
    }
  }
  // If our accelerometer reading is less than 1500, we just want to let
  //  the motor run, but slow it down a little bit at a time.
  else
  {
    motors.drive(motorPower);
    delay(200);     // We don't want to slow the motor too fast, so while
    //  we're slowing the motor, let's put in a delay so we don't blow through loop() quite as fast.
    if (motorPower > 50)
    {
      motorPower = motorPower - 1;  // reduce motorSpeed by 1 each time -- until it is less than 50, then just stop.
    }
    else
    {
      motorPower = 0;
    }
  }
}
What You Should See
If your Redbot is sitting up-right, you should see the Redbot motors start spinning. As you change the incline or tilt of the position of the Redbot, it will change speed. Set the robot on the floor, and it should slow to a stop.
Code to Note
In robotics and electronics, we often have the need to scale our inputs to a different range of values. In Arduino, there is a nifty function called map() that does this for us. map() uses 5 parameters or inputs. map(value, fromLOW, fromHIGH, toLOW, toHIGH). Basically, it scales a value that is in a range of between fromLOW to fromHIGH to a new range that is toLOW to toHIGH. In this example, we are scaling the angle from 0 to 90 degrees to an output value of 0 to 255 for the motorPower.
language:c
motorSpeed = map(XZ, 0, 90, 0, 255);
Things to Try
What other things can we do with the accelerometer? How about a tilt sensor that lights up different LEDs to indicate what direction the RedBot is tilted? How about a sound maker that varies the pitch of the sound based on the angle of the RedBot? You have access to the three independent vectors (X, Y, & Z) and the three relative angles in the X-Z, Y-Z, and X-Y planes. Come up with something fun to do based on the accelerometer readings!
Learn More: Accelerometer
The accelerometer sensor is an add-on for your RedBot that provides bump and motion detection. The sensor works by measuring acceleration forces on the x, y, and z axis. By measuring the amount of acceleration (or lack thereof) your robot can get a better understanding of its movements.
To learn more about accelerometers, please check out our Accelerometer Basics tutorial.
Going Further
Use the accelerometer to start a program. Shut down when things have gone wrong (turned over). After doing that, try to combine what you have learn to make the RedBot start driving around a line when the accelerometer is bumped.
Troubleshooting
The accelerometer values in the Serial window aren't changing! - Check to make sure your accelerometer board is installed correctly. - If you still can't get it working, contact SparkFun tech support.