SparkFun Inventor's Kit for RedBot
This Tutorial is Retired!
This tutorial covers concepts or technologies that are no longer current. It's still here for you to read and enjoy, but may not be as useful as our newest tutorials.
View the updated tutorial: Experiment Guide for RedBot with Shadow Chassis
 bri_huang
Experiment 2: Drive Forward
Let's get your RedBot moving! Let's start by writing a few lines of code to make your robot drive forward and stop.
To help us out, we are going to utilize parts of the RedBot library. To do this, we need to add a line at the top of our code #include <RedBot.h>. (Remember, Arduino code is case sensitive. This must be typed in exactly the way it's shown here -- otherwise it won't work.) This "#include" statement will allow us to create a RedBotMotors object that has methods (functions or behaviors) for driving and controlling the RedBot.
RedBotMotors motors;
This line creates an object called motors that allows us to control the right and left motors and drive the robot. See more details below in the Code to Note section.
Before uploading this example code, make sure that the RedBot is in a safe position. The program will start immediately after uploading, and it might drive off your desk, knock over your drink, or stomp through your lunch. We suggest standing the RedBot upright on the flat edge of the rear end so that the wheels are off the table.
Note: When uploading, the power must be on, the motors must be connected, and the board must be powered by a battery. Also, the motor switch should be set to RUN.
Upload this code onto the RedBot.
Go to File > Examples > RedBot_Experiments > Exp2_DriveForward or copy and paste the example code below:
language:c
/***********************************************************************
 * Exp2_DriveForward -- RedBot Experiment 2
 *
 * Drive forward and stop.
 *
 * Hardware setup:
 * The Power switch must be on, the motors must be connected, and the board must be receiving power
 * from the battery. The motor switch must also be switched to RUN.
 *
 * 23 Sept 2013 N. Seidle/M. Hord
 * 04 Oct 2014 B. Huang
 ***********************************************************************/

#include <RedBot.h>  // This line "includes" the RedBot library into your sketch.
// Provides special objects, methods, and functions for the RedBot.

RedBotMotors motors; // Instantiate the motor control object. This only needs
// to be done once.

void setup()
{
  motors.drive(255);   // Turn on Left and right motors at full speed forward.
  delay(2000);         // Waits for 2 seconds
  motors.stop();       // Stops both motors
}

void loop()
{
  // Nothing here. We'll get to this in the next experiment.
}
What You Should See
After you upload, you should see both motors on at full speed for two seconds, and stop. The right motor should spin clockwise (CW) and the left motor should spin counter clockwise (CCW).
Unplug the USB cable from your RedBot and set the RedBot on the floor. Hit the reset button to manually restart your program and watch your RedBot go!
How far did your RedBot move? How long does it drive for? (Can you verify this with a stopwatch?) Be sure to run a few trials. What is the average speed of your robot?
Learn More: Motors
Curious on how motors work? Visit our Motors and Selecting the Right One to learn more about different types of motors and how they work!
Code To Note
Adding the #include <RedBot.h> to the top of your code gives us access to a number of classes, functions, objects, and methods that make controlling the RedBot much easier. The RedBot library has custom routines for creating objects such as:
- RedBotMotors -- motor drive class
- RedBotAccel -- accelerometer sensors
- RedBotBumper -- whisker switch bumpers
- RedBotEncoder -- wheel encoder control
- RedBotSensor -- general purpose sensors
- RedBotSoftwareSerial -- SoftwareSerial for Xbee control
Our focus here is going to be only on the RedBotMotors class. The RedBotMotors class has a number of methods for controlling the motors. In programming, methods are behaviors or questions you ask of an object.
language:c
RedBotMotors motors; // Instantiate the motor control object.
Recall that this line declares an object called motors using the RedBotMotors class. This is sometimes called "instantiating" an object. Now, we can use any of the methods that are a part of this class. To use (or "call") a method, the command will start with motors. followed by the name of the method. Let's look at a few examples:
Driving Forward / Reverse
motors.drive([motorPower]) turns both motors. This method takes one input parameter, [motorPower]. [motorPower] can be any integer value from -255 to +255. Values > 0 will cause the robot to drive forward -- spinning the right motor clockwise (CW) and the left motor counter-clockwise (CCW) -- driving the robot forward. Values < 0 will do the opposite causing the robot to drive in reverse.
language:c
motors.drive(255);  // drives forward at full power.  motors.drive(-255); // drives reverse at full power.
Sometimes running the motors at full power causes the wheels to spin-out. If you notice traction issues, you may want to try playing around with slower speeds.
Stopping
motors.stop() turns off power to both motors and coasts to a stop.
language:c
motors.stop();   // sets the motor speeds to 0 and coasts to a stop.
Sometimes, you might want a more precise stop. the RedBotMotors class also has a brake() method that forces the motors to come to a more abrupt stop.
Try replacing the motors.stop() with motors.brake() in your example code. Measure the distance your robot travels. How much farther does it travel when it "coasts" compared to "braking"?
language:c
motors.brake();       // Stops both motors and applies "brakes" by shorting out the motors
When might you use stop() and when might you want to use brake()?
Going Further
Now that you have control of driving the robot, see if you can get your robot to drive forward for 1 second, stop, and reverse for 1 second. Repeat your test a few times. Does your robot always return to where it started?
How far from your starting point does it return to? What factors might cause it not to come back to it's starting point?
How might this be useful for robotics applications?
Experiment / Activity
- Adjust the [motorPower] for your robot so that it drives about 2 - 3 feet in 2 seconds. Approximate this. Write down the motorPower here: ______
We'll use this motorPower later.
- Run a minimum of 5 trials with your robot and measure how far your robot travels in 2 seconds.
- Calculate the average speed of your robot (in inches per second) using the equation:
avgSpeed = distance / time.
Writing your own custom sub-routine \ function - driveDistance()
We've already seen two functions used in every Arduino sketch -- setup() and loop(). Arduino contains a wealth of built-in functions that are useful for all kinds of things. Visit the Arduino site for a list. In addition to these, you can also easily create your own functions. First, we need to declare & define the function.
When you write your own functions, you make your code neater and easier to re-use. Visit the Arduino FunctionDeclaration page for more information about functions. Every function declaration has the following format:

The return type is void if the function does not return a value or any information. In this case, driveDistance() will simply execute some commands. The functionName will be used in your code to call or reference your function, and the parameters are values or information that you will pass into the function.
In this example, this function will use the the average speed you calculated above to make motion planning easier. It computes the delay used for the driveTime based on a given distance by re-arranging the equation above to: time = distance / avgSpeed
Copy and paste this block of code to the end of your program -- after the void loop(){}
language:c
void driveDistance(int distance)
{
// this function takes a distance input parameter and the avgSpeed of your
// RedBot to compute a delayTime for driving forward.
    int avgSpeed = 16;  // average speed in inches per second.

    long driveTime;
    driveTime = (long) 1000 * distance / avgSpeed;
    motors.drive(200);  // make sure you're using the same motorPower as your tests.
    delay(driveTime);
    motors.brake();
}
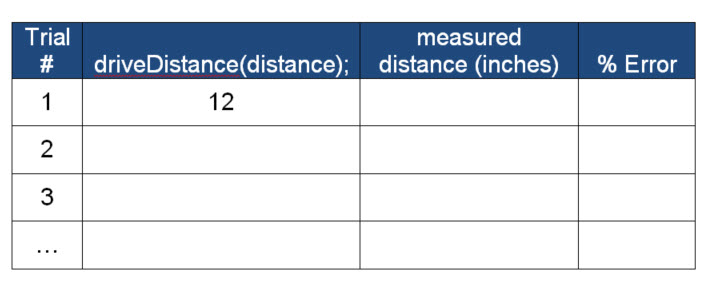
Now, replace your own drive code with a function call driveDistance(12); Upload and test. Your RedBot should have driven 12 inches. How far did it go? If it drove too far, then adjust the variable avgSpeed until your RedBot is within 1/2 an inch of 12 inches. Change the driveDistance(12); to driveDistance(24); and test this again. How far did your RedBot go?
Sample Data Table
Create a data table like this to track your results.
motorPower = ______
avgSpeed = ______
Troubleshooting
Compile Error -- 'RedBotMotors' does not name a type
language:c
Exp2_DriveForward:18: error: 'RedBotMotors' does not name a type
Exp2_DriveForward.ino: In function 'void setup()':
Exp2_DriveForward:23: error: 'motors' was not declared in this scope
This indicates that the RedBot library is not properly included into your sketch. This is usually a result of one of two things:
- #include <RedBot.h> -- this line must be at the top of your code, and RedBot.h must be spelled and capitalized exactly as it is shown here.
- The RedBot library is not in the Arduino libraries folder. Go back to Experiment 1 and make sure that you have properly installed the RedBot library.
My motors aren't turning!
- Check the "MOTOR" switch on the board and make sure that it's switched over to RUN.
- Do you have external power connected? The RedBot's motors need more power than a USB plug can supply, so they won't run unless a power supply is connected to the barrel jack on the board.
- Make sure that the motors are correctly connected; it may be that you have connected one wire from each board to each power header, or that the wires are plugged into the wrong locations. Match the wire colors to the labels on the board.
My RedBot moves, but spins in a circle!
If the right side and the left side both spin in the same direction (i.e. CCW or CW), then your RedBot will pivot in place. During assembly, it's important that the motors be mounted on the chassis properly: with the red wire farthest from the underside of the chassis. If you assembled the robot the other way, you can either dis-assemble and flip the motors or flip the wires in the motor headers.
Flipping the wires is usually the easiest fix. Identify which motor is spinning in the wrong direction, and flip the red wire with the black one.
My RedBot is not driving straight! It drives in a curve!
- This is a pretty common thing for the RedBot, and for all robots with independent drive wheels. There are lots of reasons for it, but it's something that simply must be dealt with.
- First -- check to make sure that there is nothing rubbing on either the wheels or on the magnetic motor encoder. Move the wheels out so that they are not rubbing, but still tightly seated into the motor. Any added friction on one side will cause one side to drive faster than the other (resulting it the RedBot pulling to one side.)
- Second -- Driving straight requires equal power on both wheels. This requires equal amounts of traction on both wheels. Running the motors up at full power sometimes causes the wheels to "spin out" and lose traction. Try reducing the motorPower to something lower than 255.
- Third -- use an encoder to ensure that both wheels turn the same distance each time. "What's an encoder?" Shucks -- we'll cover encoders later on in Experiment 8.