SparkFun gator:environment Hookup Guide
 Englandsaurus
 Introduction
Do you have an experiment involving environmental changes?
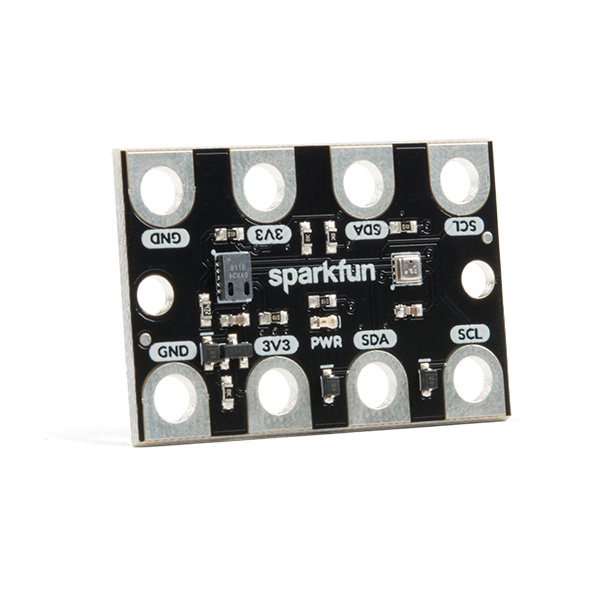
The gator:environment is the solution for any environmental experimentation. It utilizes both the CCS811 and BME280 ICs for all of your climate and atmospheric quality readings. The CCS811 is an exceedingly popular sensor, providing readings for equivalent CO2 (or eCO2) in the parts per million (PPM) and equivalent total volatile organic compounds (or eTVOC) in the parts per billion (PPB). While, the BME280 provides a combined humidity, temperature, and barometric pressure readings. This tutorial will show you how to get started using this environmental sensor with the gator:bit (v2) in the micro:bit development environment.
Required Materials
To get started, you'll need a micro:bit to control everything. Each of the products below includes a micro:bit, but the kit and bundle also include some additional accessories that you may want as well.

micro:bit Board
DEV-14208
micro:bit Go Bundle
DEV-14336
SparkFun Inventor's Kit for micro:bit
KIT-15228To easily use the gator board ecosystem, a gator:bit (v2) will help breakout the necessary pins and you will also need alligator and/or banana cables to connect the gator:bit to the gator:environment.


Banana to Banana Cable - Right Angle
CAB-15368(*These banana cables have a special diameter on the attachment points designed specifically for use with the micro:bit ecosystem. They may or may not be compatible with the banana cables used on your test equipment.)
You may already have some of these materials, so feel free to modify your cart as necessary.
Suggested Reading
The gator:environment uses two separate sensors a BME280 and CCS811. The operation of the BME280 is fairly straight forward, but the CCS811 is a slightly more complicated metal oxide sensor. You may find the following concepts and tutorials useful with the gator:environment:
Logic Levels
I2C
micro:climate Kit Experiment Guide
CCS811/BME280 (Qwiic) Environmental Combo Breakout Hookup Guide
If you aren't familiar with the micro:bit, we recommend reading here for an overview.
We would also recommend taking a look at the following tutorials if you aren't familiar with them.
Getting Started with the micro:bit
Getting Started with MicroPython and the SparkFun Inventor's Kit for micro:bit
How to Load MicroPython on a Microcontroller Board
SparkFun gator:bit v2 Hookup Guide
Hardware Overview
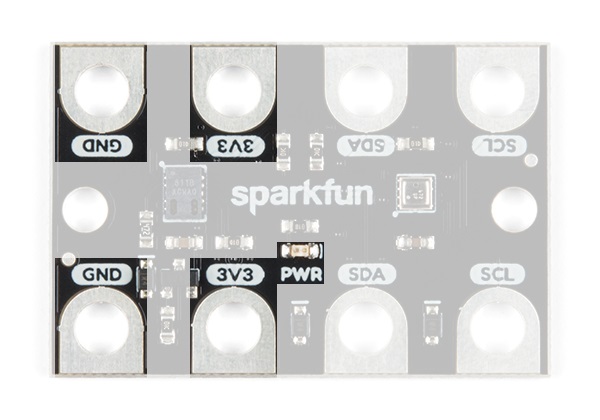
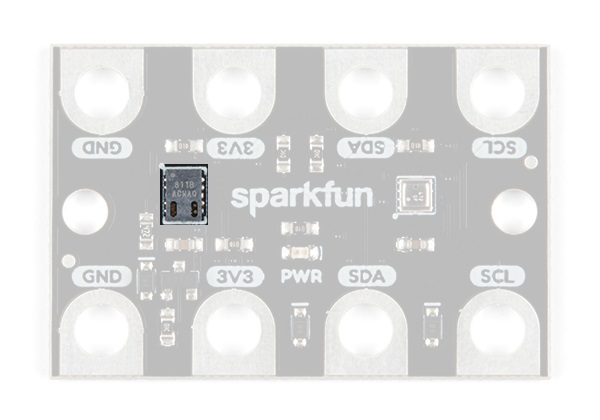
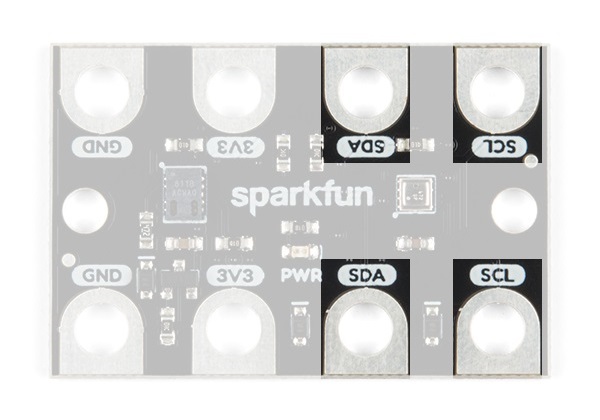
The gator:environment consists of 4 pads for power and data.
| Contacts | Direction | Description |
|---|---|---|
| GND | N/A | Ground: Reference voltage and ground loop. |
| 3.3V | In | Power: Provides 3.3V to board. |
| SDA | Bi-directional | Data: Data and commands are transmitted between the sensor and microcontroller. |
| SCL | In | Clock: The microcontroller provides the timing needed to communicate on the data line. |
Power
The specified operating voltage for the BME280 is between 1.71V - 3.6V and 1.8V - 3.6V for the CCS811. For use with the gator:bit (v2) and micro:bit, you should provide 3.3V through the 3V3 and GND pads to keep the logic levels consistent; the 3.3V input is then regulated to 3.1V for the sensors.
On average, both sensors will consume about 5 mA of current, with a maximum of 13 mA.
BM280
The BME280 is a combined digital humidity, pressure, and temperature sensor that communicates over an I2C bus. For the most part, users will only need to know I2C addresses to prevent address conflicts with other devices or sensors.

Here are some of the characteristics of the BME280 sensor from the datasheet:
| Characteristic | Range |
|---|---|
| Operating Voltage | 1.71V to 3.6V |
| Supply Current | < 714 µA |
| Humidity |
Range: 0 to 100% RH Resolution: .008% RH Absolute Accuracy Tolerance: ±3% from 20 - 80% |
| Temperature |
Range: -40°C to 85°C Absolute Accuracy: ±(0.5 - 1.25) °C Resolution: 0.01 °C |
| Pressure |
Range: 300 to 1100 hPa (30,000 - 110,000 Pa or approx. 4.35 - 15.95 Psi) Absolute Accuracy: ±(1 - 1.7) hPa Relative Accuracy: ±0.12 hPa Maximum Resolution: 0.18 Pa |
| I2C Address | 0x77 (HEX) |
What is Humidity?
Humidity is a measurement of the amount of water vapor in the air. A simple demonstration of humidity is when you breathe on a cold piece of glass, the water vapor from your breath condenses into beads of liquid water. The humidity measurement from the BME280 is reported in terms of relative humidity. Humidity is often associated with various topics in science. For example:
- Humidity affects your body's ability to regulate temperature through perspiration.
- In civil engineering, humidity affects how concrete cures and contributes to the overall strength.
- In various climates, humidity can factor into conditions like precipitation or fog for meteorological reports.
What is Temperature?
Temperature for the most part is the quantification of how hot or cold something is. The BME280 measures the ambient temperature (or temperature of the relative environment). Temperature is reported in different scales or units, the BME280 measures temperature in degrees Celsius. Temperature is an essential unit of measurement that affects all aspects of physical science1. Some applications of the BME280 for temperature are:
- Measurements of the ambient temperature for weather meters.
- Replicating the original Joule experiment for measuring a calorie (waterproofing required).
- Measuring solar radiation as used by solar water heaters.
What is Pressure?
The BME280 measures pressure, specifically atmospheric or barometric pressure. Pressure is usually described as the perpendicular force applied to the surface of an object per unit area; in fluid mechanics, it is also referred to as the compressive stress at a particular point. The BME280 reports pressure units in Pascals. Pressure measurements are useful in a variety of applications:
- Experiments relating to the Ideal Gas Law or related principles.
- Altimeter: Used to determine (pressure) altitude of above a fixed level, which is based on the Barometric formula.
- Atmospheric pressure has a direct relation to wind and local weather.
CCS811
The CCS811 is a digital metal oxide (MOX) gas sensor that detects wide range of Volatile Organic Compounds (VOCs). With an integrated microcontroller that implements special algorithms to process the raw measurements, the CCS811 outputs the equivalent total VOC (eTVOC) and equivalent CO2 (eCO2) values over an I2C connection. For the most part users will only need to know I2C addresses to prevent address conflicts with other devices or sensors.
Here are some of the characteristics of the CCS811 sensor from the datasheet:
| Characteristic | Range |
|---|---|
| Operating Voltage | 1.8V to 3.6V |
| Operational Environment |
Temperature: -5 to 50°C Humidity: 10 to 95% RH |
| Supply Current | 30 mA (average) |
| Equivalent Total VOCs (eTVOC) | 0 - 32768 ppb (parts per billion) |
| Equivalent CO2 (eCO2) | 400 - 29206 ppm (parts per million) |
| I2C Address | 0x5B (HEX) |
- The CCS811 implements a highly reliable micro-hotplate for the gas sensor. However, the performance in terms of resistance levels and sensitivities varies in the early stages. Therefore, AMS recommends that you run (or burn-in) this sensor for 48 hours on your first use. After the burn-in conditioning, a run-in period is required after long idle periods. The run-in time for the CCS811 is 20 minutes, before sensor stabilizes and accurate readings are generated.
(*Essentially, run the board by taking readings for 48 hours the first time you use it to burn-in the sensor. Additionally, after extended periods between uses, you may also need to run the sensor for 20 minutes to stabilize the outputs due to the run-in period.) - To help with the sensor accuracy, the BME280 is also used to provide temperature and humidity compensation. Therefore, any discrepancies between the BME280 readings and the conditions of the ambient air will produce imprecise results. A good example of this is if the board is heated above the temperature of the ambient air; the heating would offset the BME280 and result in inaccurate measurements.
- A baseline correction it is maintained on-the-fly in software, which is enabled automatically after initial device operation. There is the capability for manual correction, but it has not been implemented to simplify the sensor operation.
Equivalent TVOC: What are Volatile Organic Compounds?
MOX sensors are a great method for volatile organic compound (VOC) detection. VOCs are organic chemicals, usually with a high vapor pressure or high volatity, due to their low boiling point at room temperature. For indoor air quality (IAQ), these compounds are often attributed to health effects from mild irritation in brief exposures to more serious health risks with compounding long-term exposure.
Here is a list of VOCs detected by the CCS811:
- Alcohols
- Aldehydes
- Ketones
- Organic Acids
- Amines
- Aliphatic and Aromatic Hydrocarbons
For more information about VOC and their effects on IAQ, check out these resources.
- Volatile Organic Compounds' Impact on Indoor Air Quality
- Fact Sheet: Total Volatile Organic Compounds
- ECA Report No. 19: Total Volatile Organic Compounds (TVOC) in Indoor Air Quality Investigations
Here are some ideas for experiments involving VOCs:
- TeachEngineering: I've Gotta Get Some Air
- Sensing Air Pollution (Safety: adult supervision and open air environment required)
- VOC emission experiments in nature and lab
Note: Unfortunately, the standards associating specific chemical compounds and their health effects are wide and varied. Additionally, the number of VOCs are so numerous that it is impossible for a single sensor to detect each compound. Most sensors, like the CCS811, target specific VOCs and then use algorithms to estimate an equivalent total volatile organic compound (eTVOC) values. This sensor is valuable in providing information for the presence of contaminants in indoor air, but it is trend data and not recommended for exact measurements of VOCs.
[Source- Guidelines for CO2 Sensor Selection]
Equivalent CO2: What is Carbon Dioxide?
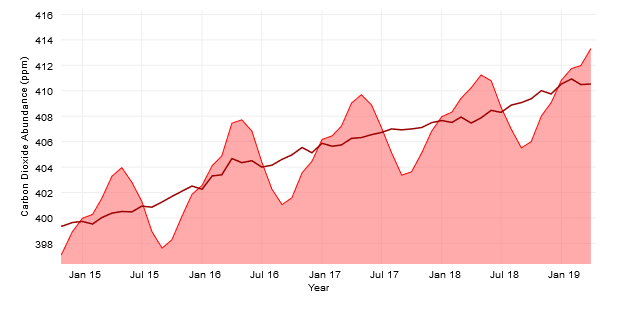
Carbon Dioxide (CO2) is a trace gas in Earth's atmosphere and it is a naturally occurring due to its solubility and dissolution in water. CO2 is also a common byproduct of combustion, aerobic, and decomposition reactions. It is highly versatile and extensively used in multiple industrial applications.
A common topic about CO2 is its growing abundance in Earth's atmosphere and the affect that has on climate change, as a greenhouse gas. The Scripps Institution of Oceanography at UC San Diego, has maintained continuous measurements of the accumulation of atmospheric carbon dioxide since 1958. A graph based on those measurements, taken from the Mauna Loa Observatory in Hawaii, is referred to as the Kneeling curve (named after Charles David Keeling).
Here are resources to some simple experiments involving carbon dioxide:
For more information on carbon dioxide concentration levels in the atmosphere, check out these resources:
- Scripps CO2 Program:
- Related News Articles:
Note: Unfortunately, CO2 isn't a VOC and MOX type of sensors can't directly measure CO2, despite being great at VOC detection. However, in an indoor setting, humans are a primary source of VOCs through the process of breathing. The equivalent CO2 (eCO2) values are then estimated based on algorithms that are used to analyze the sensor data to determine the TVOC attributed by the presence of humans. This type of sensor should not be used in applications that directly requires the measurement of CO2; it is an inferred value.
[Source- Guidelines for CO2 Sensor Selection]
I2C Connection
I2C is a communication protocol used to transfer data between master and slave devices. It is a 2-wire connection consisting of SDA (data) and SCL (clock). The protocol is pretty well defined so it can be shared with multiple devices. This is beneficial for daisy chaining multiple devices together on a single bus. The primary thing users will need to watch out for is address conflicts (you can't have devices with the same address).
Hardware Assembly
Connecting your gator:environment to the gator:bit (v2) is simple. The board can also be daisy-chained with other I2C boards. This can easily be done with alligator cables or these special banana cables.
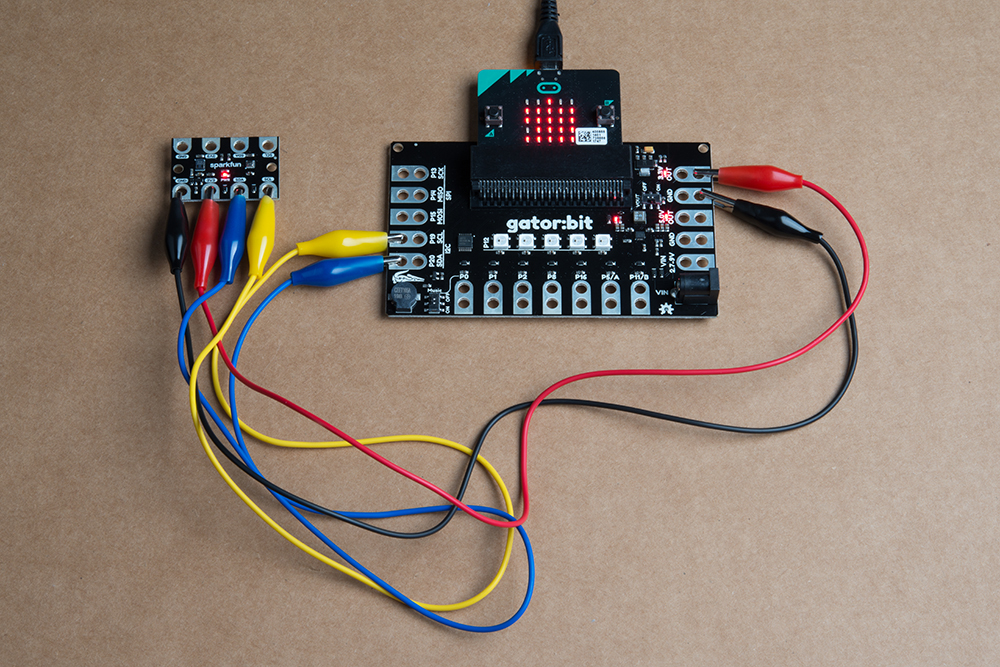
Hardware assembly of connections used in example. Click to enlarge.

Example of daisy chaining multiple I2C gator boards. Click to enlarge.
| gator:environment | GND | 3V3 | SDA | SCL |
|---|---|---|---|---|
| gator:bit (v2) | GND | 3.3V OUT | P20 (SDA) | P19 (SCL) |
Adding the MakeCode Extension
- If you have not previously used MakeCode, please check out the Quick Start Guide fro micro:bit.
- If this is your first time using a micro:bit, please review our Getting Started with the micro:bit guide.
- If this is your first time using the gato:bit (v2), please review our SparkFun gator:bit v2 Hookup Guide.
The easiest way to get started using the gator:environment is to use Microsoft MakeCode, a web-based block editor. This tutorial assumes you are familiar with the with MakeCode, the gato:bit (v2), and the micro:bit development board. If this is your first time check out this guides linked in the suggested reading section (above).
Installing Extensions
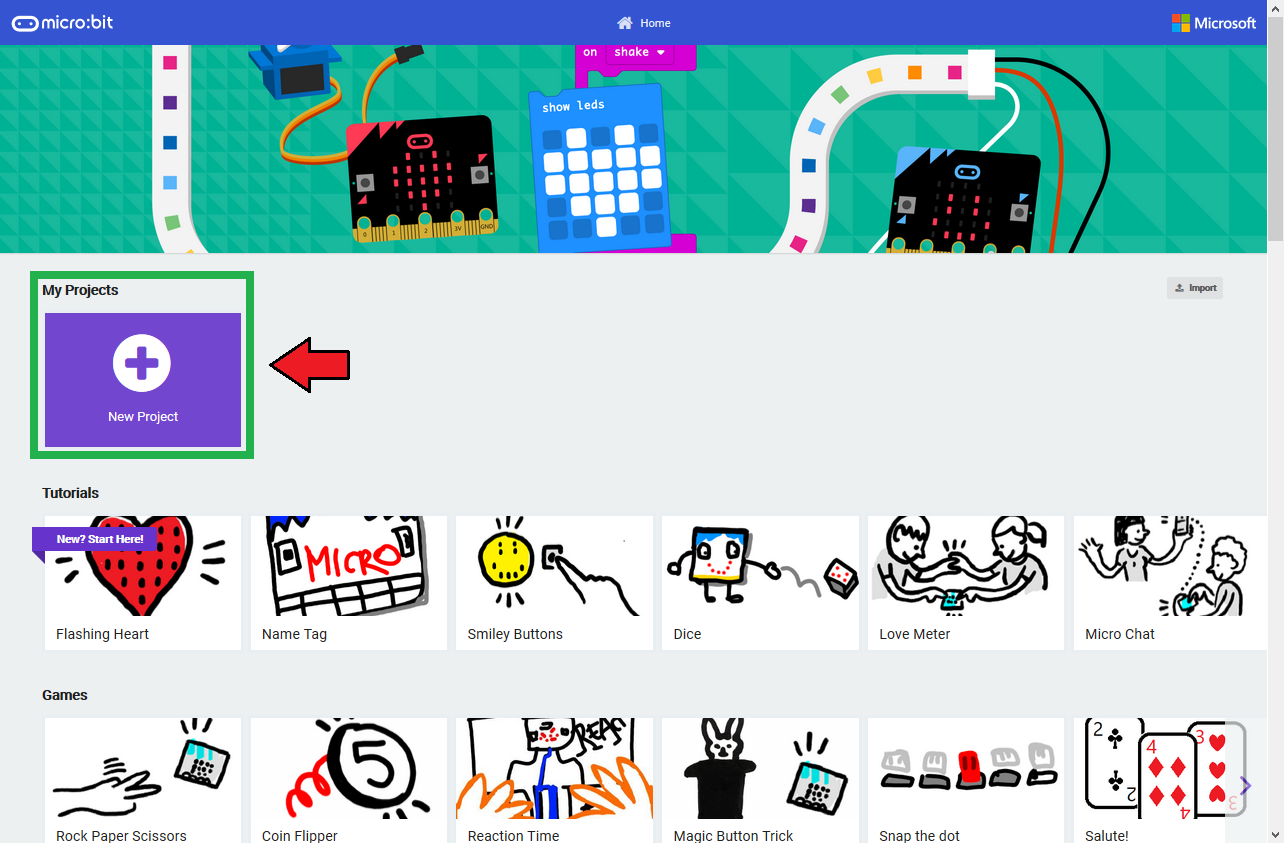
To get started with using MakeCode with the miccro:bit, head over to the MakeCode for micro:bit website by Microsoft. Then, click the New Project button to start a new project and open the Editor. (*Yes, all you only need to get start coding is a computer with internet access, an up-to-date web browser, and an available USB port!)
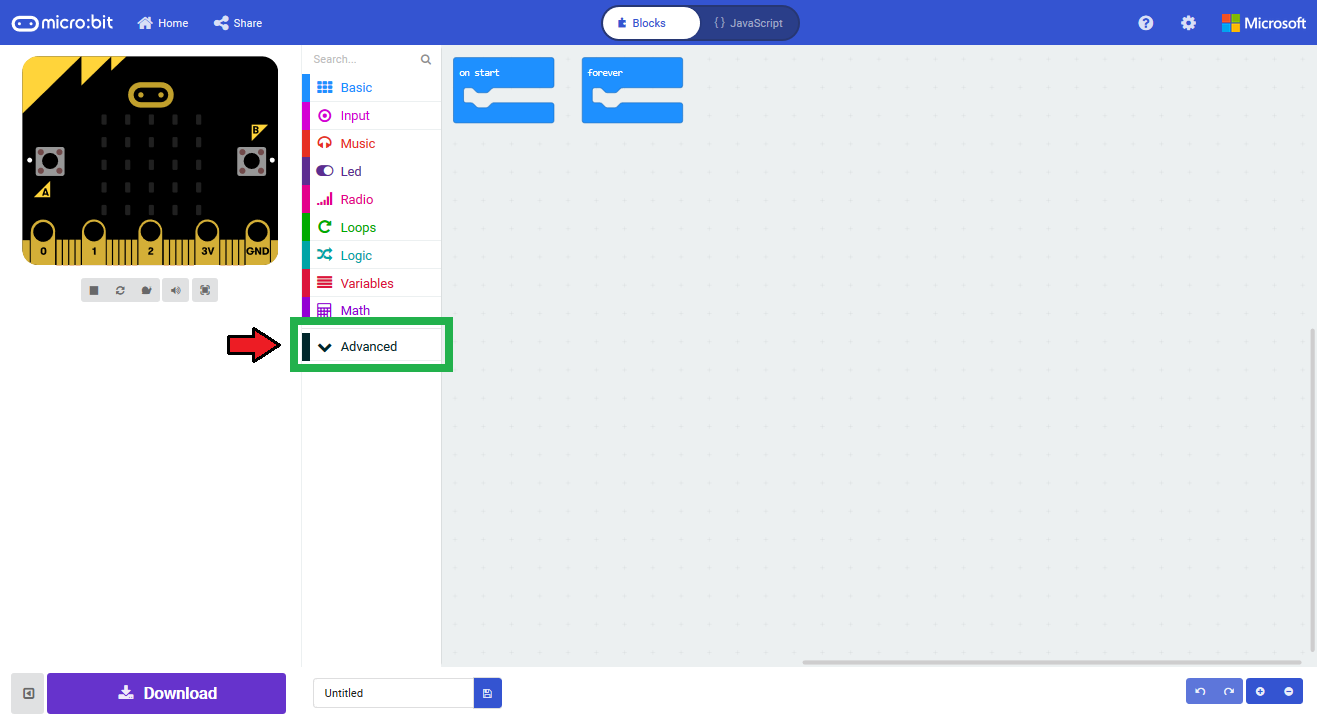
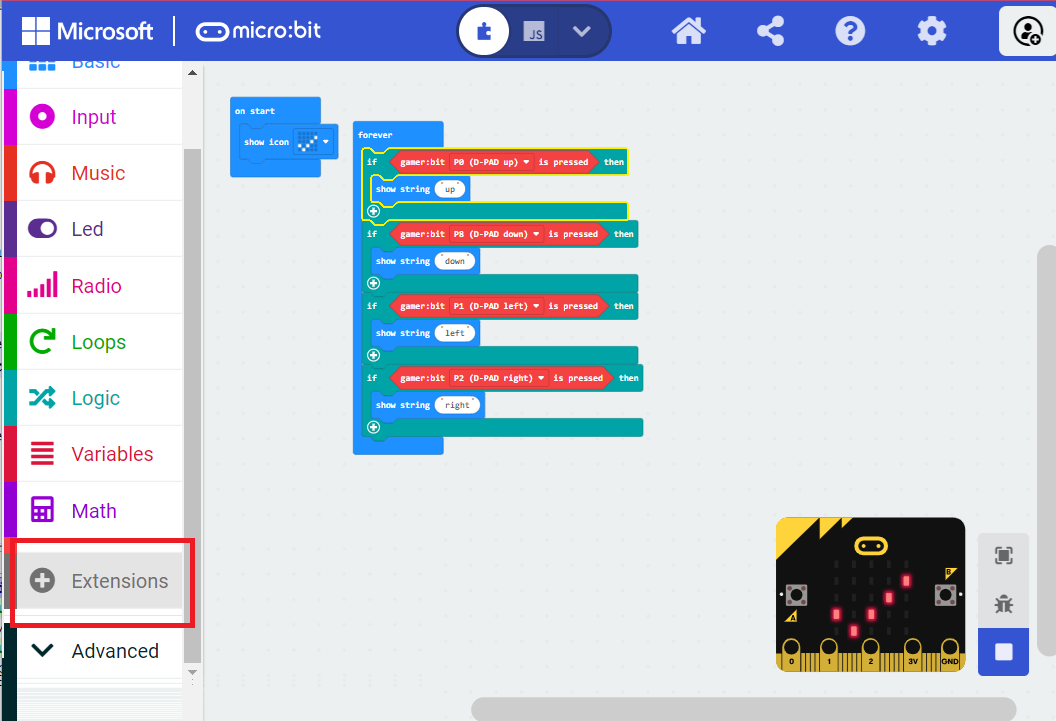
Once you have the editor up, click on the the Advanced block in the block library to reveal the drop down menu.
Finally, click on the Extensions block. This should bring up the extensions page. (*Alternatively, you could also click on the extensions link from the settings menu.)

There are two methods for finding the gator:environment extension:
- Search for the name used on the extension3.
- Use the link to the GitHub repository for the pxt-package as the search term.
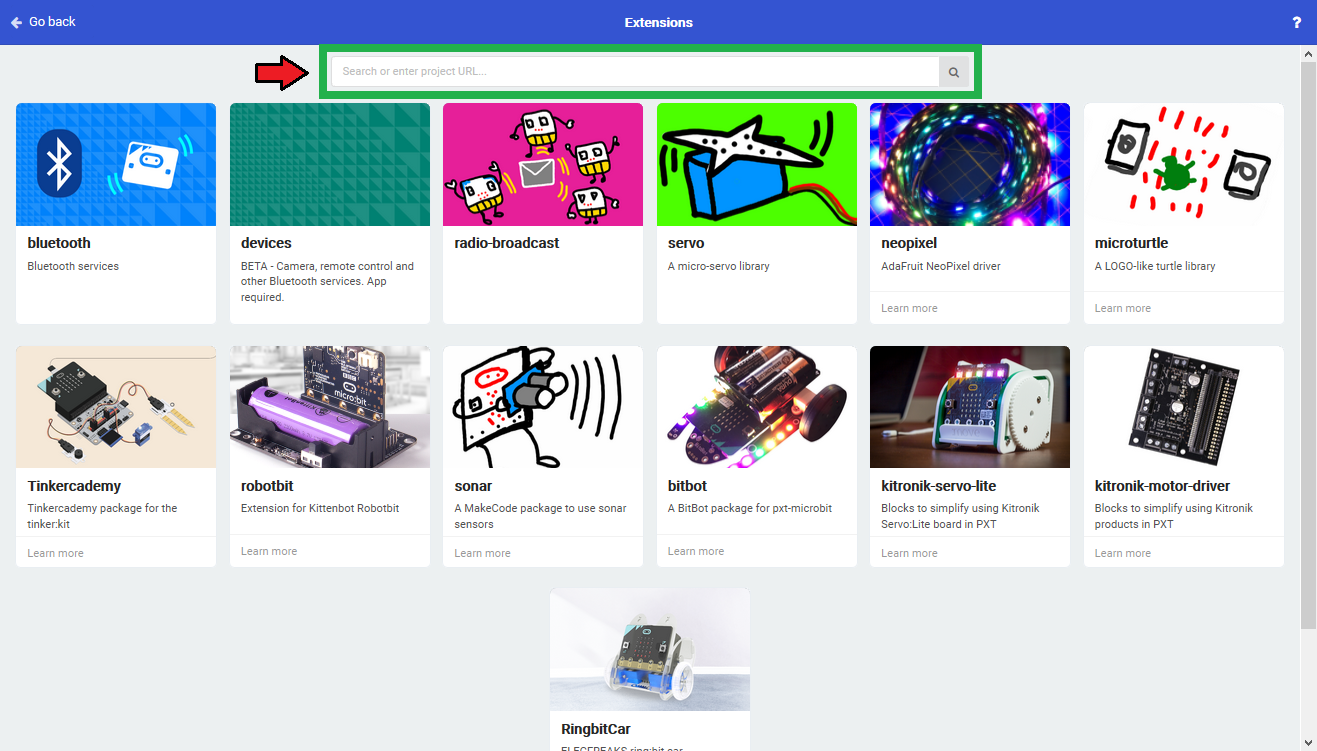
Search for the PXT-Package
Search for the gator:environment extension using the GitHub repository link to the pxt-package:
https://github.com/sparkfun/pxt-gator-environment

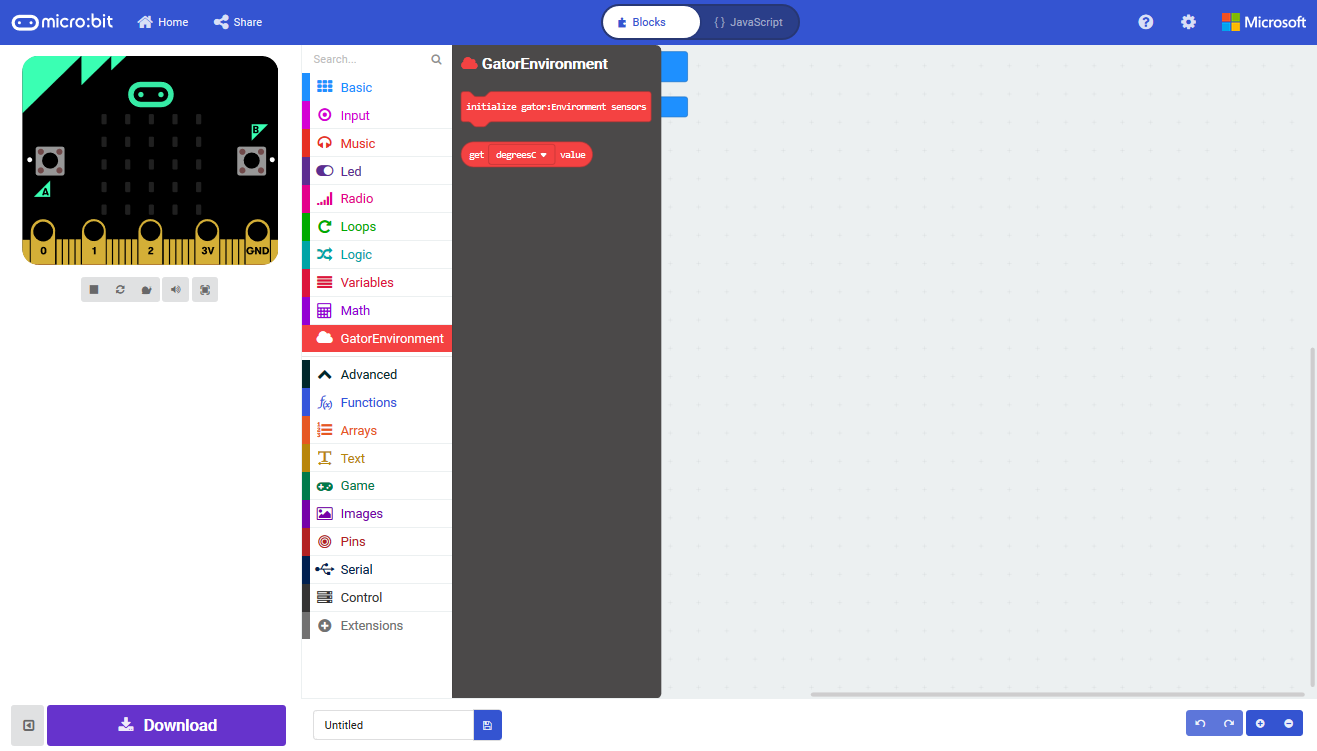
Then, click on the box for the extension to add it to the block library. The gator:environment extension should now appear in the block library.

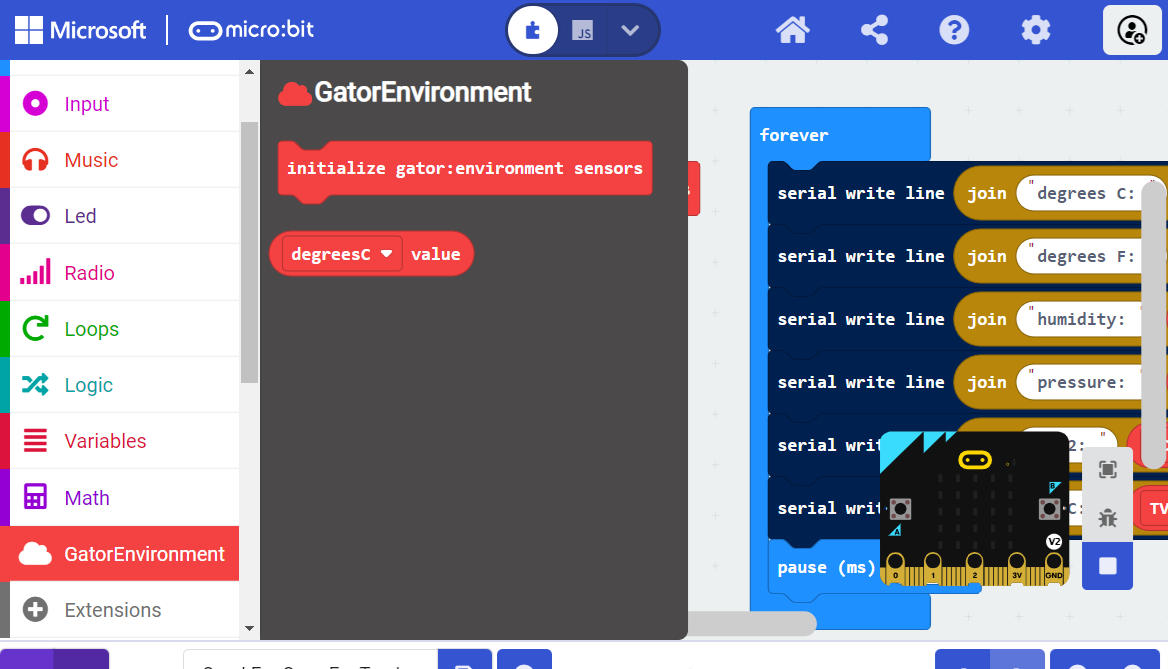
To verify that you have added the extension, click on the gator:environment block to make sure that your drop down menu options match the image below.
MakeCode Examples
Now that you have added the gator:environment extension to the Editor, lets start with some example code. Plug the micro:bit into your computer using an USB micro-B cable after you have assembled your hardware with the instructions from the previous section. The micro:bit should appear on your computer as a removable storage device.
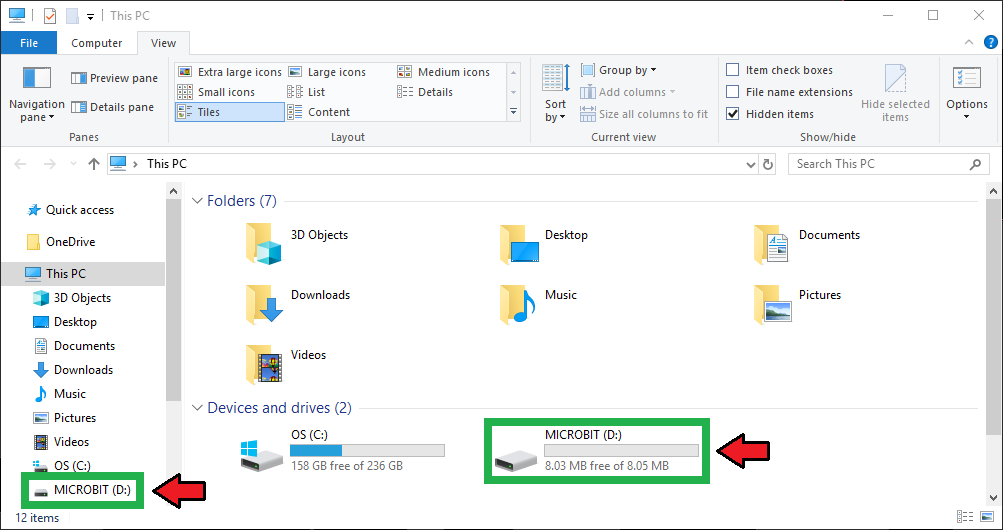
To upload new code, this is where you will be copying the downloaded .hex file to later.
Block Functions
initialize gator:environment sensor
This block should be pretty self explanatory, it sets the sensor up to be used. You should use this within the on start block.
_____ value
This is a value block as indicated by the block's shape. There is a drop down menu with selectable options for the output value of the block. Below is a description of the available menu options:
degreeC- Reports temperature reading from BME280 in Celsius (°C).degreeF- Reports temperature reading from BME280 in Fahrenheit (°F).humidity- Reports humidity reading from BME280 in relative humidity (RH%).pressure- Reports pressure reading from BME280 in Pascals (Pa).eCO2- Reports equivalent CO2 reading from CCS811 in parts per million (ppm).TVOC- Reports equivalent TVOC reading from CCS811 in parts per billion (ppb).
Basic Read
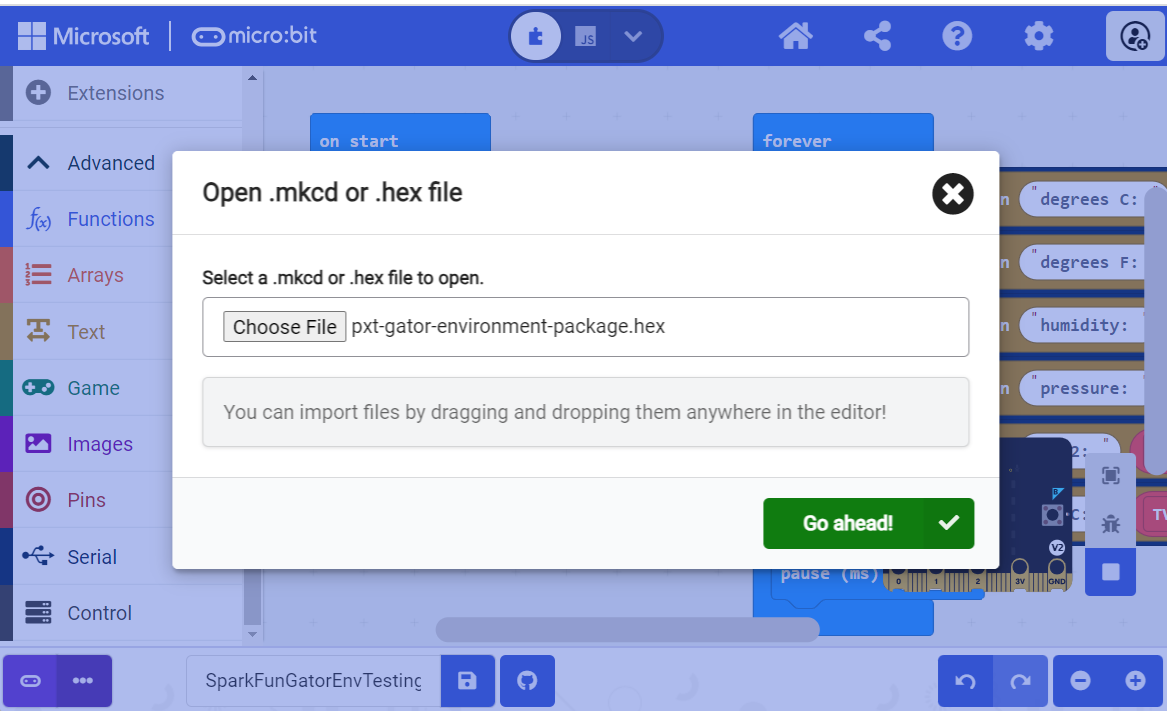
Below, is a simple example of how to take simple measurements from the sensor. To use this example, there are multiple options for accessing the .hex file:
- Replicate the block functions from the display below to copy the example project. Then download the
.hexfile. - Expand the display widow to pull up the example project. Then download the
.hexfile. - Use this link to pull up the example project. Then download the
.hexfile. Download the
.hexfile from the button below or the link on the bottom of the display.
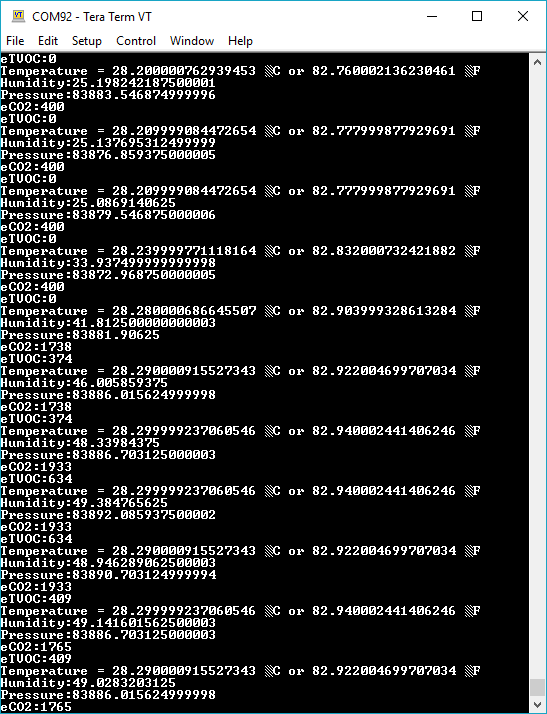
The output is redirected over the serial port to avoid conflicts on pins P0 and P1, which are also used for serial communication. To read the sensor values, pull up your favorite serial terminal emulator. Then, connect to the serial port that the micro:bit is on; the default baud rate is 115200 bps. Below, is an example of the sensor output for the example code.
Troubleshooting the Extension
This product's extension has a dependency on Microsoft's build process. If the usual method of installing the MakeCode extension gives an error, you will need to manually install the MakeCode extension. We have provided a local build of this extension that can be uploaded to MakeCode:
To manually install this extension in makecode, go to the "Extensions" tab on the left side of the makecode site:
In the location you'd normally search for an extension, you'll notice an upload button on the right:
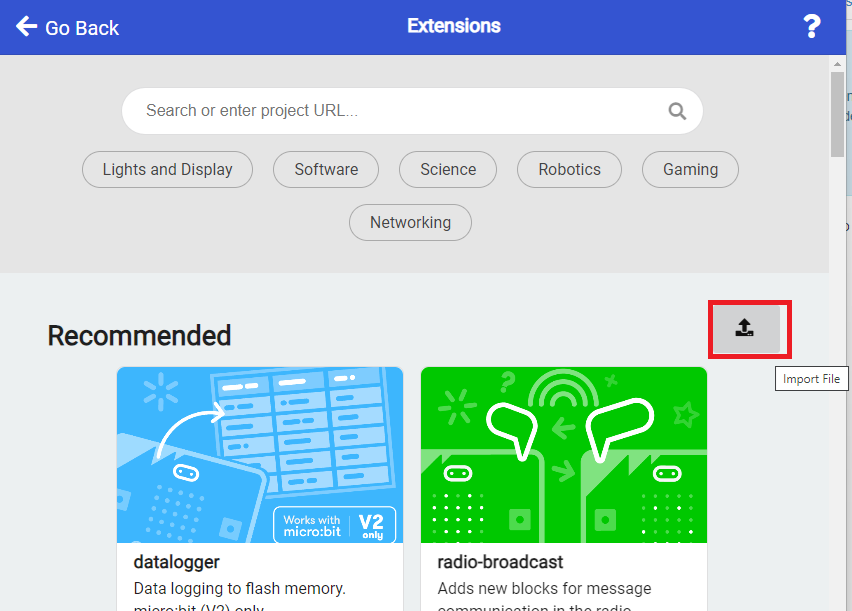
Click on this, and you'll get a window allowing you to upload your own built extension. Navigate to where you saved the above extension hex, and upload it to your project.
You should be able to see the extension and its functions now. In addition, you'll be able to build and download your project to your variant of micro:bit.
Other Troubleshooting Tips
Here are a few tips for troubleshooting this device.
Sensor Heating
The CCS811 is a MOX sensor that uses a hotplate to detect the VOCs. Additionally, the CCS811 relies on the BME280 for ambient air temperature and humidity to compensate the MOX readings. The heat generated from the CCS811 should be isolated from the BME280 to prevent the heat from affecting the BME280 and thus affecting the compensation values. However, this doesn't take into account any external heating which would also affect the temperature and humidity for compensation of the CCS811.
Equivalent CO2 and TVOC
As mentioned in the Hardware Overview section, the CO2 and TVOC values are equivalent; they are interpreted values. If you are trying to measure CO2 directly, the CCS811 sensor will not be able to detect it. Additionally, the CCS811 only measures specific VOCs.
If you still have questions or issues with this product, please create a post on our forum under the Gator Products topic.
Additionally, if you are an educator and you have class or application based questions, please create a post on our forum under the Educational Products topic.
Resources and Going Further
For more product information, check out the resources below:
- Schematic (PDF)
- Eagle Files (ZIP)
- BME280 Datasheet (PDF)
- CCS811 Datasheet (PDF)
- CCS811 Design Guide (PDF)
- CCS811 Factsheet (PDF)
- gator:environment PXT Package
- GitHub Product Repo
- micro:bit Landing Page
- SFE Product Showcase
Interested in the micro:bit? Check out some of these other micro:bit products:
Need some inspiration for your next project? Check out some of these other micro:bit product tutorials:
SparkFun Inventor's Kit for micro:bit Experiment Guide
micro:climate Kit Experiment Guide
How to Load MicroPython on a Microcontroller Board
How to Create a MakeCode Package for Micro:Bit
For more information on the CCS811 or BME280, check out the resources below: