SparkFun expLoRaBLE Hookup Guide
 QCPete, santaimpersonator
 LoRaWAN Example
Regional Configuration: The (ported) basicmac library includes configurations required for the SPI pins use by the NM180100 to connect the Apollo3 MCU to the SX1262 module. Additionally, it also contains modifications to pre-configure the library to use the SX1262, the US LoRa frequency band, and defaults to a spreading factor of 7 (SF7).
In order to change the regional configuration (for outside the US), users will need to go into the library files to make the necessary modifications to the target configuration file (target-conf.h). The configuration file can be found with the following file path BasicMAC>src>hal>target-config.h; on Windos 10, the file path is C:\Users\"username"\Documents\Arduino\libraries\BasicMAC\src\hal\target-config.h.
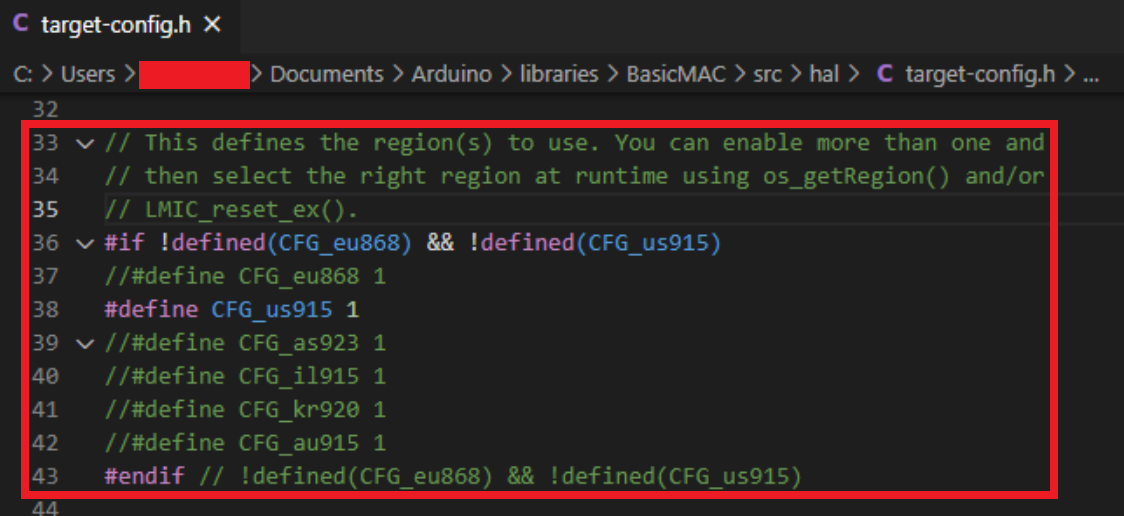
Lines 36-43 in the
target-conf.h file used to configure the regional settings. (Click to enlarge)
On lines 36-43, users will find the available regional options. To make the required modifications, users simply need to comment in/out their configuration choice and save the file, before uploading their code. (*It is recommended that users also close and re-open the Arduino IDE before uploading their code, to ensure the modifications are in place.)
Register a Device on The Things Network
In order to utilize this example, users will need access to a gateway that is connected to The Things Network. Additionally, users should have their own account on The Things Network and have registered a device for their node. A device must be registered, in order to receive the Network Session Key, App Session Key, and Device Address required for the SparkFun expLoRaBLE to operate as a node and have its data passed to The Things Network servers. For those who are unfamiliar with LoRaWAN and The Things Network, please refer to the information provided below.
Users will need an account on The Things Network for this example. Please, use the information in either of the following tutorials to create an account and register a device on The Things Network.
LoRaWAN with ProRF and The Things Network
SparkFun SAMD21 Pro RF Hookup Guide
Once a device has been registered (*the device activation method should be configure to ABP), the Network Session Key, App Session Key, and Device Address are displayed on the Device Overview page. In order for the expLoRaBLE to have its data passed to The Things Network, the Network Session Key, App Session Key, and Device Address must be hard coded on the device. By default, the Network Session Key and App Session Key fields are obscured for security reasons. Click the
icon to show the code and click the <> button to show the codes in a C-style format. Below, is a diagram explaining which field on the Device Overview page corresponds to the variables in the provided example code.

A screen shot from the Device Overview page with labels. (Click to enlarge)
Additional Resources
For more information, feel free to utilize the documentation from The Things Network to:
- Create or Register an Account
- Add an Application through the Console
- Register a Device in the Application
- Once registered, in the device settings:
- Configure the activation method to ABP (activation by personalization)
- Disable (uncheck) the Frame counter checks
- Learn about Working with Bytes
LoRa Example Code
Once users have a device registered on The Things Network, the example code will need to be downloaded and a few modifications are required before uploading.
Credentials
Lines 36-47 of the example code, need to be modified to hard code the credentials required for the payload from the node to be passed to The Things Network:
language:c
// LoRaWAN NwkSKey, network session key
// This is the default Semtech key, which is used by the early prototype TTN
// network.
static const PROGMEM u1_t NWKSKEY[16] = { 0x##, 0x##, 0x##, 0x##, 0x##, 0x##, 0x##, 0x##, 0x##, 0x##, 0x##, 0x##, 0x##, 0x##, 0x##, 0x## };

// LoRaWAN AppSKey, application session key
// This is the default Semtech key, which is used by the early prototype TTN
// network.
static const u1_t PROGMEM APPSKEY[16] = { 0x##, 0x##, 0x##, 0x##, 0x##, 0x##, 0x##, 0x##, 0x##, 0x##, 0x##, 0x##, 0x##, 0x##, 0x##, 0x## };

// LoRaWAN end-device address (DevAddr)
static const u4_t DEVADDR =  0x######## ; // <-- Change this address for every node! For example, our device address is 26022DEN. We will need to replace "DEVICE_ADDRESS_HERE" as 0x26022DEB.
Transmission Interval
Lines 62-64 of the example code, are used to set the transmission intervals between payloads:
language:c
// Schedule TX every this many milliseconds (might become longer due to duty
// cycle limitations).
const unsigned TX_INTERVAL = 20000;
Payload Data
Lines 329-336 of the example code, is where the contents of the payload can be modified. The contents of the transmission on can be viewed on The Things Network through the Application Data page, once the node begins broadcasting. To access the Application Data page, click on the Data tab from the Device Overview page on The Things Network console.
language:c
void send_packet() {
  // Prepare upstream data transmission at the next possible time.
  uint8_t mydata[] = "<Enter Text>";
  LMIC_setTxData2(1, mydata, sizeof(mydata) - 1, 0);
  Serial.println(F("Packet queued"));

  last_packet = millis();
}
mydata[]) can take 3 different formats: text (as shown above), integers (8-bit unsigned), or an array. Any data sent as an array, must be in the following format: { 0x01, 0x02, 0x03, ... up to ... 0x13} (i.e. up to 13 hexadecimal numbers in an array).
Before You Upload the Code
Regional Configuration: Before uploading the code, be sure to make any necessary regional configuration changes, as mentioned at the beginning of this section, to avoid breaking any laws.
Note: For those utilizing our LoRa Gateway - 1-Channel (ESP32), the code on lines 288-300 will need to be uncommented. The modification forces the device/node to only use channel 8; instead of randomly picking a channel to broadcast on. This is important as the single channel gateeway only receives transmissions on channel 8 and if the device were broadcasting on channels randomly, only a portion of the transmissions would reach The Things Network.
// disable channels 0-7 for (int i = 0; i <= 7 ; i++) { LMIC_disableChannel(i); } // note, leave channel 8 enabled // disable all other higher channels for (int i = 9; i <= 63 ; i++) { LMIC_disableChannel(i); }
Code in Operation
Once the example code has been modified and uploaded to the SparkFun expLoRaBLE, users can monitor the serial terminal (or SerialMonitor on the Arduino IDE) for successful transmissions. Additionally, users can use The Things Network to decode the data packets to verify the data transmission.

Mapping with Node
For those looking to test out the range of their setup configuration, The Things Network has an application called TTN Mapper. To get started follow the Mapping Gateway Coverage using a Things Node. There is also an option to map using a either an Android phone or iPhone. For more information on the app, please cheack out the documentation on The Things Network.
To generate the images below, the Android guide was followed. The steps were relatively simple:
- Download the App
- Link a Device by:
- Logging-in to The Things Network
- Select an Application
- Select Device
- Power on Device
- Walk Around
The TTN Mapper app uses the phone's positioning and ties it to the data transmission from the linked device. Therefore, users will need to enable their phone's data and location for the application to work properly.
| Patch Antenna | Whip Antenna |
|---|---|
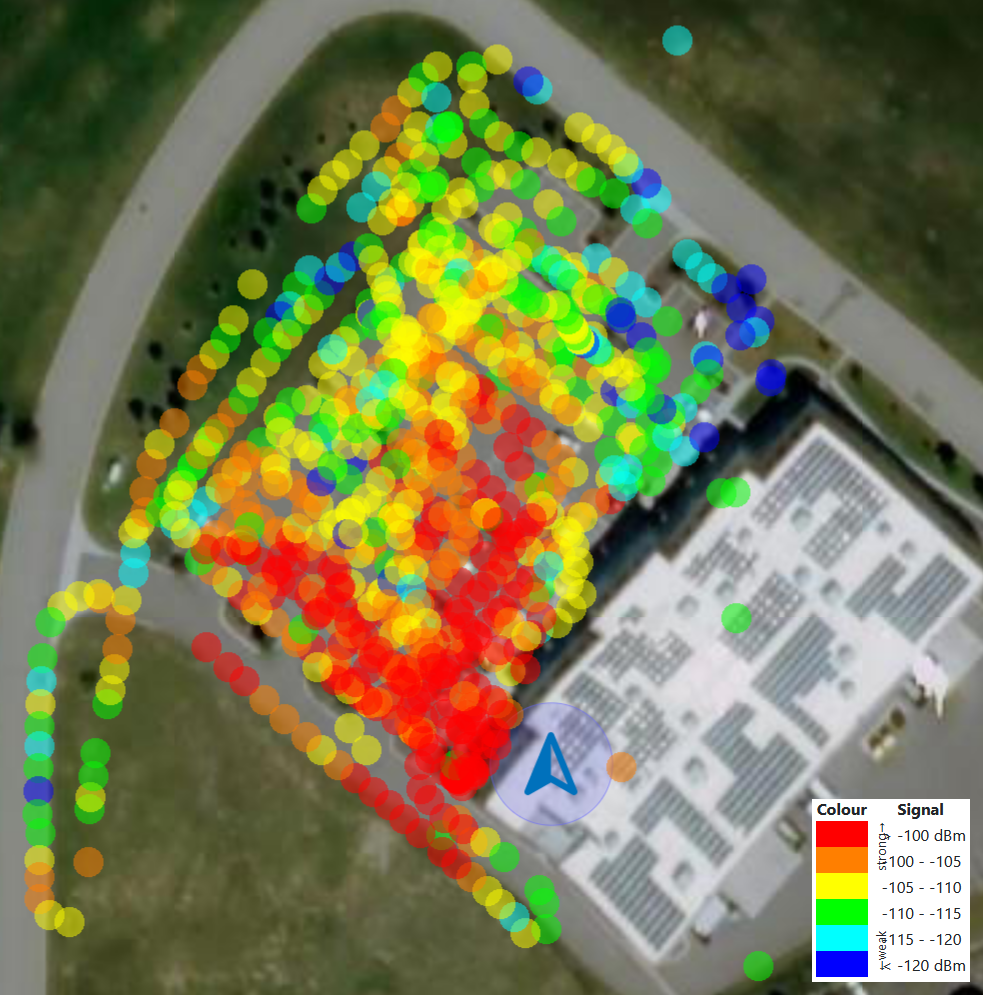
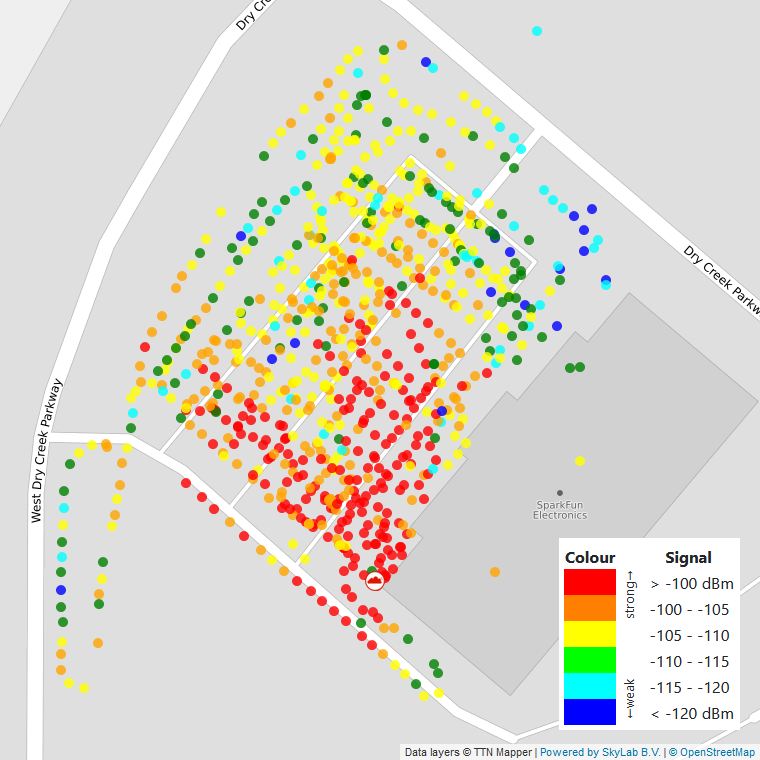
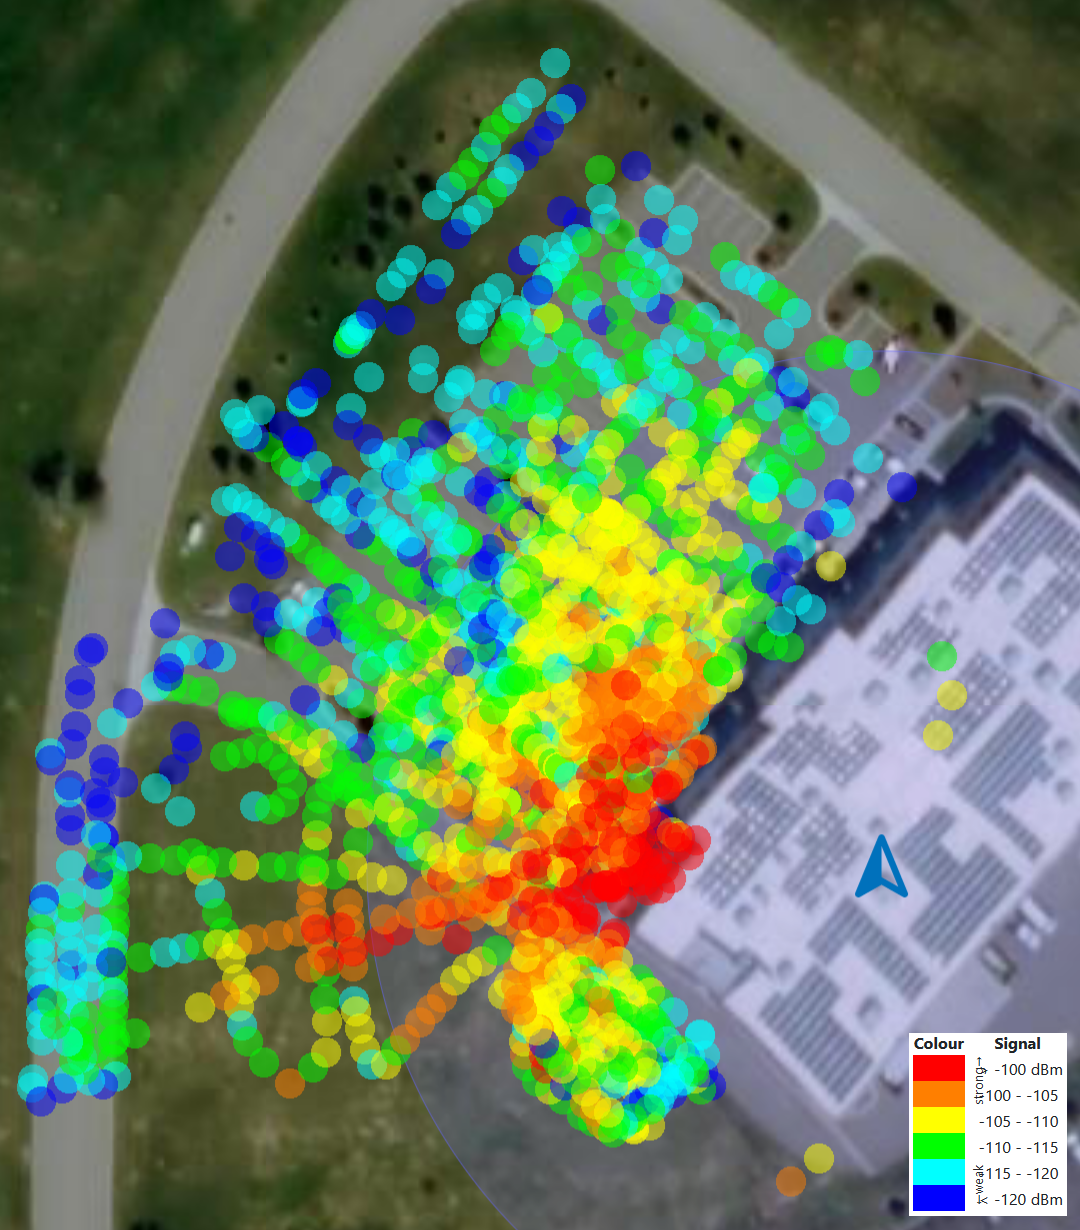
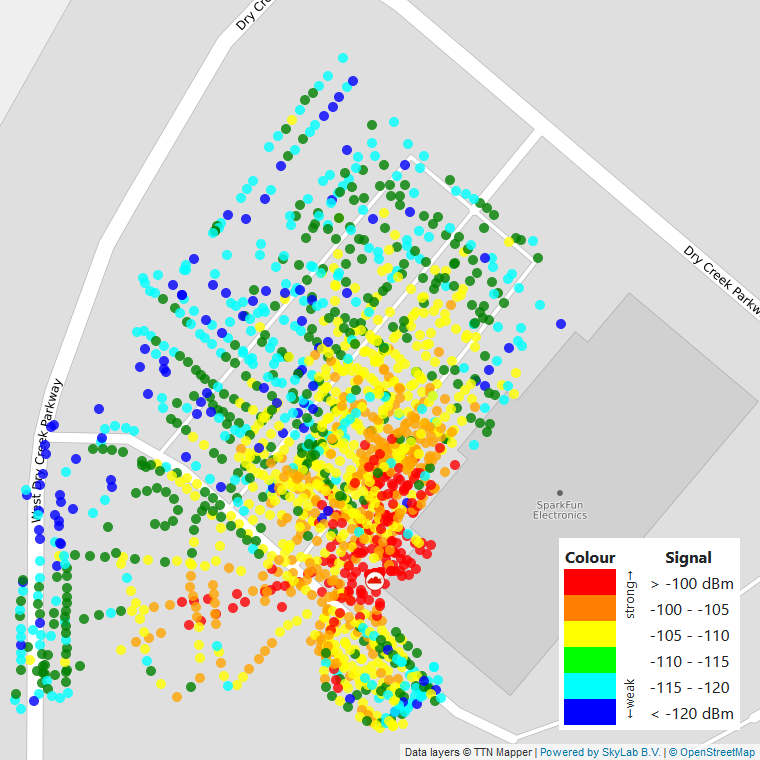
SF7), for two different antennas. You can even publish your data online, to get a radar-like coverage map for a gateway:
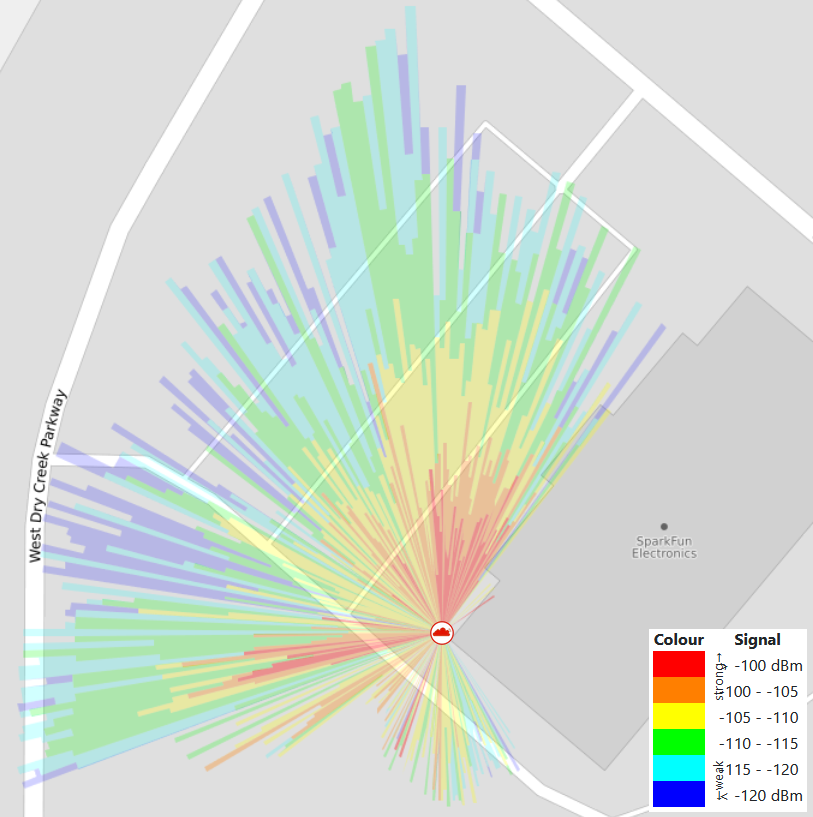
There were some vehicles parked to the northwest and northwest-by-north of where the gateway was positioned; as well as a tree and post to the immediate west and west-by-north. The image illustrates how the signal strength to the west drops off significantly, due to the proximity of the trees and poles. Additionally, how the signal strength in the northwest gradually falls from interference by the vehicles. The signal coverage to the south of the gateway was spotty since it was around the corner of the building.