SIK Experiment Guide for the Arduino 101/Genuino 101 Board (Spanish)
This Tutorial is Retired!
This tutorial covers concepts or technologies that are no longer current. It's still here for you to read and enjoy, but may not be as useful as our newest tutorials.
 D___Run___
 Experimento 4: Controlar varios LED
Introducción
Ahora que ha conseguido que el LED parpadee, ha llegado el momento de darle un poco de emoción al asunto: vamos a conectar seis LED a la vez. También haremos una pequeña prueba de la placa 101 mediante la creación de varias secuencias de iluminación. Este experimento es perfecto para comenzar a practicar con la escritura de sus propios programas y hacerse una idea de cómo funciona la placa 101.
Junto con el control de los LED, aprenderá algunos trucos de programación que mantendrán el código limpio y ordenado.
Necesitará los siguientes elementos:
- 1x placa de pruebas
- 1x placa Arduino 101 o Genuino 101
- 6x LED
- 6x resistencias de 100 Ω
- 7x cables puente
¿No tiene el SIK?
Si está realizando este experimento y no dispone del SIK, le sugerimos que use estos elementos:


También necesitará una placa Arduino 101 O Genuino 101.

Arduino 101
DEV-13787
Genuino 101
DEV-13984Conexión del hardware
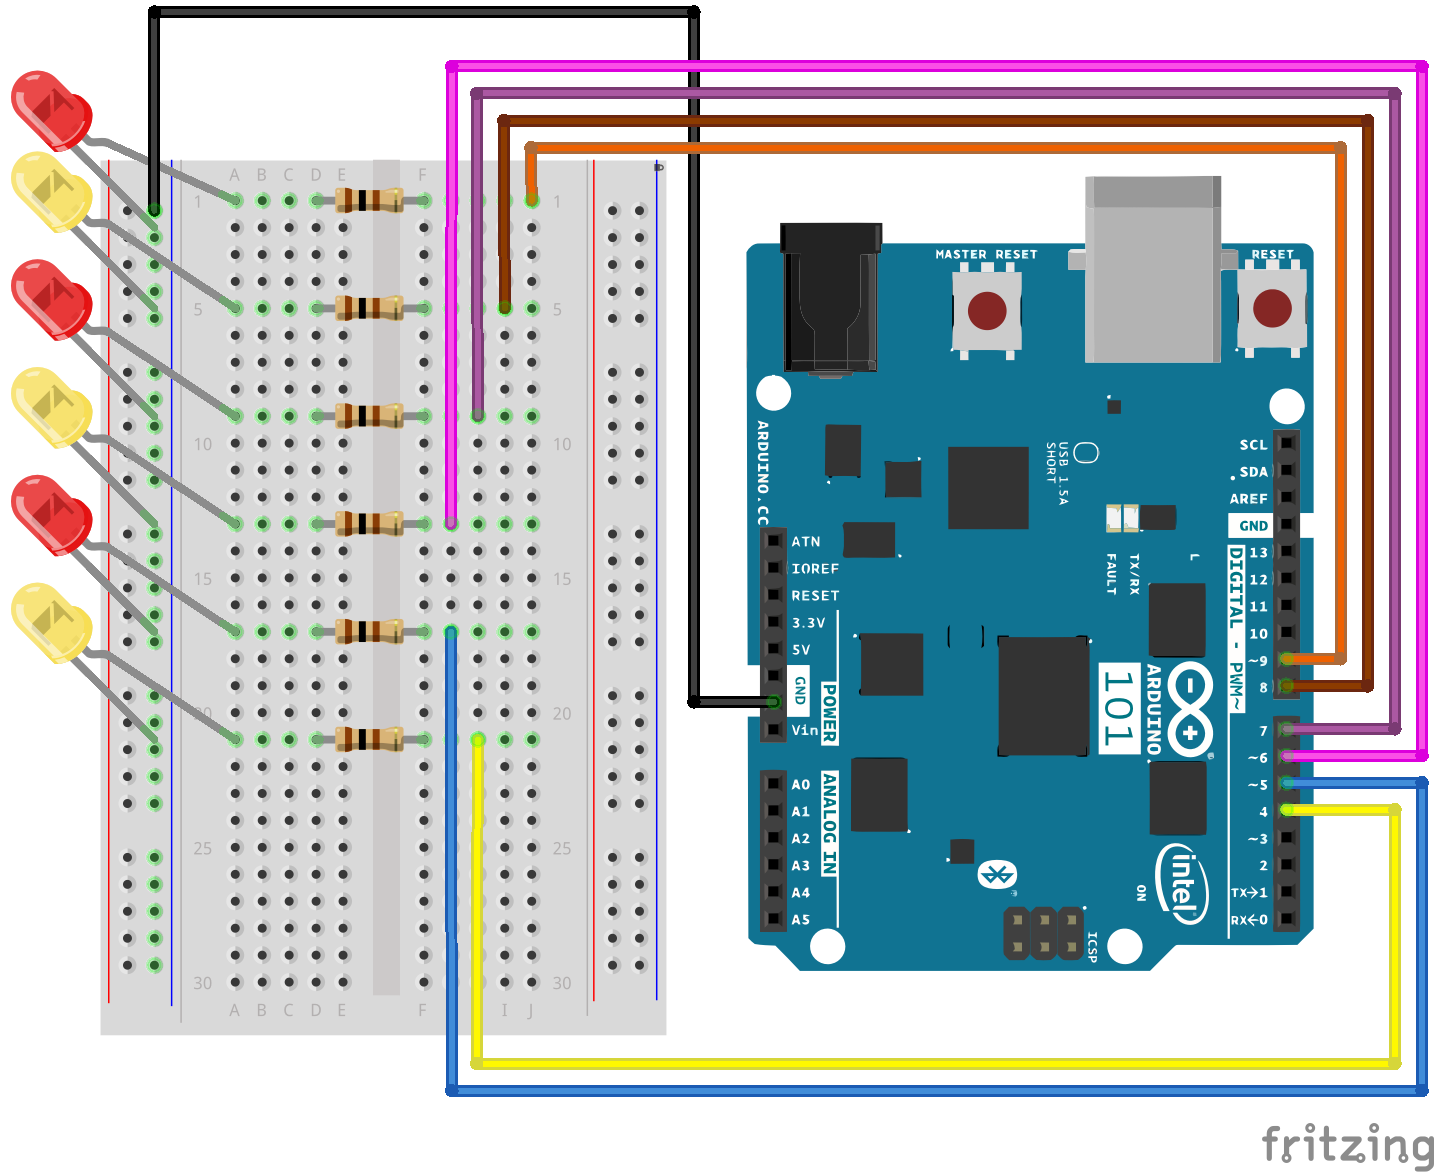
¿Está preparado para comenzar a conectar todo? Consulte el diagrama de cableado y la tabla de conexión siguientes para ver cómo está conectado todo.
| Componentes polarizados | Preste especial atención a las marcas de los componentes que indican cómo colocarlo en la placa de pruebas. Los componentes polarizados solo se pueden conectar a un circuito en una sola dirección. |
Diagrama de cableado del experimento
Abrir el boceto
Abra el software IDE de Arduino en su ordenador. La codificación en el lenguaje de Arduino controlará el circuito. Abra el código del circuito 4; para ello, acceda a "101 SIK Guide Code" (Guía de códigos de SIK 101) que ha descargado y guardado en la carpeta "Examples" (Ejemplos) anteriormente.
Para abrir el código vaya a: File > Examples > 101 SIK Guide Code > Circuit_04 (Archivo > Ejemplos > Guía de códigos de SIK 101 > Circuito_04)
También puede copiar y pegar el siguiente código en el IDE de Arduino. Cárguelo y vea qué es lo que ocurre.
language:cpp
/*
SparkFun Inventor's Kit
Example sketch 04

MULTIPLE LEDs

  Make six LEDs dance. Dance LEDs, dance!

This sketch was written by SparkFun Electronics,
with lots of help from the Arduino community.
This code is completely free for any use.
Visit http://learn.sparkfun.com/products/2 for SIK information.
Visit http://www.arduino.cc to learn more about Arduino.
*/

// To keep track of all the LED pins, we'll use an "array."
// An array lets you store a group of variables, and refer to them
// by their position, or "index." Here we're creating an array of
// six integers, and initializing them to a set of values:
int ledPins[] = {4,5,6,7,8,9};

void setup()
{
  //create a local variable to store the index of which pin we want to control
  int index;

  // For the for() loop below, these are the three statements:

  //   1\. index = 0;    Before starting, make index = 0.
  //   2\. index <= 5;   If index is less or equal to 5, run the following code
  //   3\. index++   Putting "++" after a variable means "add one to it".

  // When the test in statement 2 is finally false, the sketch
  // will continue.

  // This for() loop will make index = 0, then run the pinMode()
  // statement within the brackets. It will then do the same thing
  // for index = 2, index = 3, etc. all the way to index = 5.

  for(index = 0; index <= 5; index++)
  {
    pinMode(ledPins[index],OUTPUT);
  }
}

void loop()
{
  // This loop() calls functions that we've written further below.
  // We've disabled some of these by commenting them out (putting
  // "//" in front of them). To try different LED displays, remove
  // the "//" in front of the ones you'd like to run, and add "//"
  // in front of those you don't to comment out (and disable) those
  // lines.

  // Light up all the LEDs in turn
  oneAfterAnotherNoLoop();

  // Same as oneAfterAnotherNoLoop, but less typing
  //oneAfterAnotherLoop();

  // Turn on one LED at a time, scrolling down the line
  //oneOnAtATime();

  // Light the LEDs middle to the edges
  //pingPong();

  // Chase lights like you see on signs
  //marquee();

  // Blink LEDs randomly
  //randomLED();
}

/*
oneAfterAnotherNoLoop()
This function will light one LED, delay for delayTime, then light
the next LED, and repeat until all the LEDs are on. It will then
turn them off in the reverse order.
*/

void oneAfterAnotherNoLoop()
{
// time (milliseconds) to pause between LEDs
  int delayTime = 100;

  // turn all the LEDs on:

  digitalWrite(ledPins[0], HIGH);  //Turns on LED #0 (pin 4)
  delay(delayTime);                //wait delayTime milliseconds
  digitalWrite(ledPins[1], HIGH);  //Turns on LED #1 (pin 5)
  delay(delayTime);                //wait delayTime milliseconds
  digitalWrite(ledPins[2], HIGH);  //Turns on LED #2 (pin 6)
  delay(delayTime);                //wait delayTime milliseconds
  digitalWrite(ledPins[3], HIGH);  //Turns on LED #3 (pin 7)
  delay(delayTime);                //wait delayTime milliseconds
  digitalWrite(ledPins[4], HIGH);  //Turns on LED #4 (pin 8)
  delay(delayTime);                //wait delayTime milliseconds
  digitalWrite(ledPins[5], HIGH);  //Turns on LED #5 (pin 9)
  delay(delayTime);                //wait delayTime milliseconds

  // turn all the LEDs off:

  digitalWrite(ledPins[5], LOW);   //Turn off LED #5 (pin 9)
  delay(delayTime);                //wait delayTime milliseconds
  digitalWrite(ledPins[4], LOW);   //Turn off LED #4 (pin 8)
  delay(delayTime);                //wait delayTime milliseconds
  digitalWrite(ledPins[3], LOW);   //Turn off LED #3 (pin 7)
  delay(delayTime);                //wait delayTime milliseconds
  digitalWrite(ledPins[2], LOW);   //Turn off LED #2 (pin 6)
  delay(delayTime);                //wait delayTime milliseconds
  digitalWrite(ledPins[1], LOW);   //Turn off LED #1 (pin 5)
  delay(delayTime);                //wait delayTime milliseconds
  digitalWrite(ledPins[0], LOW);   //Turn off LED #0 (pin 4)
  delay(delayTime);                //wait delayTime milliseconds
}

/*
oneAfterAnotherLoop()

This function does exactly the same thing as oneAfterAnotherNoLoop(),
but it takes advantage of for() loops and the array to do it with
much less typing.
*/

void oneAfterAnotherLoop()
{
  int index;
  int delayTime = 100; // milliseconds to pause between LEDs
                       // make this smaller for faster switching

  // Turn all the LEDs on:

  // This for() loop will step index from 0 to 5
  // (putting "++" after a variable means add one to it)
  // and will then use digitalWrite() to turn that LED on.

  for(index = 0; index <= 5; index++)
  {
    digitalWrite(ledPins[index], HIGH);
    delay(delayTime);
  }

  // Turn all the LEDs off:

  // This for() loop will step index from 5 to 0
  // (putting "--" after a variable means subtract one from it)
  // and will then use digitalWrite() to turn that LED off.

  for(index = 5; index >= 0; index--)
  {
    digitalWrite(ledPins[index], LOW);
    delay(delayTime);
  }
}

/*
oneOnAtATime()

This function will step through the LEDs,
lighting only one at at time.
*/

void oneOnAtATime()
{
  int index;
  int delayTime = 100; // milliseconds to pause between LEDs
                       // make this smaller for faster switching

  // step through the LEDs, from 0 to 5

  for(index = 0; index <= 5; index++)
  {
    digitalWrite(ledPins[index], HIGH);  // turn LED on
    delay(delayTime);                    // pause to slow down
    digitalWrite(ledPins[index], LOW);   // turn LED off
  }
}

/*
pingPong()

This function will step through the LEDs,
lighting one at at time in both directions.
*/

void pingPong()
{
  int index;
  int delayTime = 100; // milliseconds to pause between LEDs
                       // make this smaller for faster switching

  // step through the LEDs, from 0 to 5

  for(index = 0; index <= 5; index++)
  {
    digitalWrite(ledPins[index], HIGH);  // turn LED on
    delay(delayTime);                    // pause to slow down
    digitalWrite(ledPins[index], LOW);   // turn LED off
  }

  // step through the LEDs, from 5 to 0

  for(index = 5; index >= 0; index--)
  {
    digitalWrite(ledPins[index], HIGH);  // turn LED on
    delay(delayTime);                    // pause to slow down
    digitalWrite(ledPins[index], LOW);   // turn LED off
  }
}

/*
marquee()

This function will mimic "chase lights" like those around signs.
*/

void marquee()
{
  int index;
  int delayTime = 200; // milliseconds to pause between LEDs
                       // Make this smaller for faster switching

  // Step through the first four LEDs
  // (We'll light up one in the lower 3 and one in the upper 3)

  for(index = 0; index <= 2; index++) // Step from 0 to 3
  {
    digitalWrite(ledPins[index], HIGH);    // Turn a LED on
    digitalWrite(ledPins[index+3], HIGH);  // Skip four, and turn that LED on
    delay(delayTime);                      // Pause to slow down the sequence
    digitalWrite(ledPins[index], LOW);     // Turn the LED off
    digitalWrite(ledPins[index+3], LOW);   // Skip four, and turn that LED off
  }
}

/*
randomLED()

This function will turn on random LEDs. Can you modify it so it
also lights them for random times?
*/

void randomLED()
{
  int index;
  int delayTime;

  // The random() function will return a semi-random number each
  // time it is called. See http://arduino.cc/en/Reference/Random
  // for tips on how to make random() even more random.

  index = random(5);    // pick a random number between 0 and 5
  delayTime = 100;

  digitalWrite(ledPins[index], HIGH);  // turn LED on
  delay(delayTime);                    // pause to slow down
  digitalWrite(ledPins[index], LOW);   // turn LED off
}
Código a tener en cuenta
int ledPins[] = {4,5,6,7,8,9};
Cuando tiene que gestionar una gran cantidad de variables, una "matriz" es una forma práctica para agruparlas. Aquí crearemos una matriz de enteros, denominada ledPins, con seis elementos. Se hace referencia a cada elemento por su índice. El primer elemento es el índice de [0].
digitalWrite(ledPins[0], HIGH);
Puede hacer referencia a los elementos de una matriz por su posición. El primer elemento se encuentra en la posición 0, el segundo en la posición 1, etc. Puede hacer referencia a un elemento mediante "ledPins[x]", donde x es la posición. Aquí creamos un pin digital 4 con valor ALTO, ya que el elemento de la matriz en la posición 0 es "4".
index = random(5);
Los ordenadores prefieren seguir la misma pauta cada vez que se ejecutan. No obstante, es posible que desee hacer cosas aleatoriamente, como simular el lanzamiento de un dado. La función random() es un buen método para conseguir esto. Consulte http://arduino.cc/en/reference/random para obtener más información.
Lo que debería ver
Esto es similar al experimento 1, pero en vez de un LED, debe ver todos los LED parpadear. Si no es así, asegúrese de que ha montado el circuito correctamente y ha verificado y cargado código en la placa o consulte la sección Solución de problemas.

Solución de problemas
Algunos LED no se iluminan
Es fácil insertar un LED al revés. Compruebe los LED que no funcionan y asegúrese de que están en la orientación correcta.
Funcionan de manera irregular
Con ocho cables, es bastante fácil que se mezclen. Vuelva a comprobar que el primer LED está conectado al pin 4, el siguiente al pin posterior, y así sucesivamente.
Empezar de cero
Es fácil conectar incorrectamente un cable sin darse cuenta. A menudo, lo mejor es extraerlos todos y volver a empezar de cero en lugar de buscar el problema.