Setting Up the Pi Zero Wireless Pan-Tilt Camera
 SFUptownMaker
Configure the Raspberry Pi
Now that we've hooked up our Pi Servo Hat and assembled the hardware, we're ready to boot the Raspberry Pi Zero W for the first time! To configure the Raspberry Pi, we need to:
- Power the Pi Zero W.
- Connect the Pi Servo Hat's Serial-to-USB Converter.
- Connect to the serial debugging console on the Pi Zero W.
- Enable camera interface, I2C, and SSH on the Pi Zero W.
- Update the software on the Pi Zero W.
- Download and install the camera interface software from GitHub.
- Make some changes to enable the pan-tilt control functionality.
- Download the Pi Servo Hat interface software from GitHub.
- Make some changes to start the Pi Servo Hat interface software on boot.
Let's walk through these steps in more detail!
Power the Pi Zero W
Using a sufficient 5V wall adapter, we can power the Pi Zero W. Plug the wall adapter into a wall outlet for power. Then connecting the micro-b from the power supply to the Pi Zero W's micro-b connector labeled as "PWR IN."
Connect the Pi Servo Hat's Serial-to-USB Converter
With the Pi Servo Hat stacked on the Pi Zero W, take a micro-B USB cable and connect it to the Pi Servo Hat's micro-B connector. Insert the other end to a computer's standard USB port. This will allow you to connect the Pi through a serial port connection.
Open a Serial Terminal
Start by checking out our serial terminal basics tutorial. This will get you up and running with a serial terminal. Open a serial terminal program (i.e. PuTTY) to connect.
When you make your connection to the Raspberry Pi, you'll need to connect the serial terminal to the COM port that it enumerated on and connect at a baudrate of 115200. Failure to use the proper baud rate setting will result in weird characters and your connection failing to work.
To figure out which port to connect to, I recommend using the Arduino IDE. Under the "Tools" menu, there is a sub-menu for "Port". Since we had connected the USB cable to a computer's COM port already, make note of the items on the listed COM Ports. Then unplug a micro-B USB cable from your computer. Give it a few seconds, then re-open that sub-menu to see what item has disappeared. By process of elimination, we can determine the COM port that the Raspberry Pi enumerated to. Reconnect the cable to the COM port to verify. The COM port should reappear as the same COM number in the sub-menu.
Windows
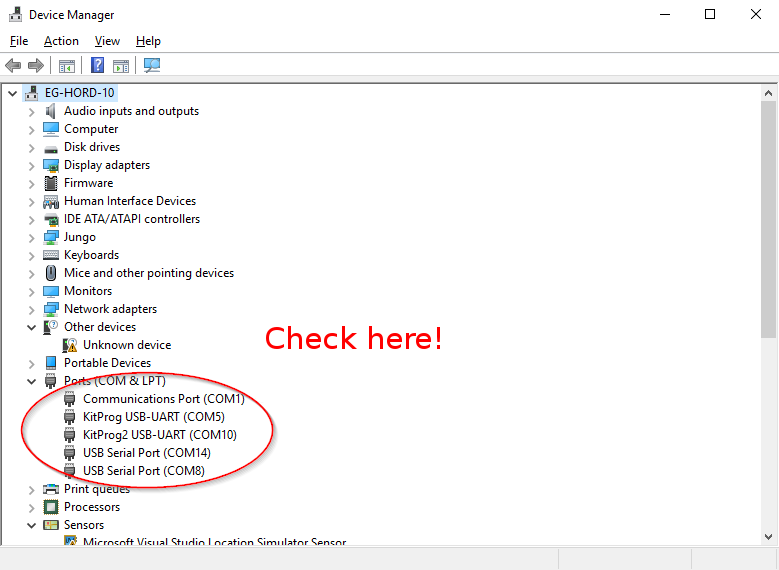
If you don't have the Arduino IDE installed and don't want to install it, you can find the same information using built in tools. Under Windows, open up your device manager (if you don't know how to do this, do a search online for OS specific information on how to do it since it's slightly different under various versions of Windows). Take note of the devices on the list, then unplug the Pi and see which port on the list disappears. The port which disappeared from the list is the one you want.
Mac
Using a Mac OS, you'll need to open a terminal window. To figure out which port the Pi has connected to, type this command:
language:bash
ls /dev/cu.usbserial-*
This will return a list of USB-Serial converter ports on the system. Take note of the devices on the list, then unplug the Pi and see which port on the list disappears. The port which disappeared from the list is the one you want. You can then connect to the port in question by typing
language:bash
screen /dev/cu.usbserial-XXXXXXXX 115200
where the XXXXXXXXX is replaced by information gleaned from the first command.
Linux
Under Linux, the process is similar to Mac OS, only use this command to identify the serial port:
language:bash
ls /dev/ttyUSB*
You may use "screen" to connect to the Pi:
language:bash
screen /dev/ttyUSBX 115200
Again, the "X" should be replaced with information gleaned from the ls command above. If you receive an error about screen not being installed, you can install screen by typing this command:
language:bash
sudo apt-get install screen
Then re-enter the above command to connect via screen.
Log In to the Pi
When the Pi finishes booting (about 30 seconds) you should see a prompt on your serial terminal screen that looks like the image below. If you don't, try hitting the enter (or return) key. This will bring up the login information if it printed before you had your serial terminal ready.
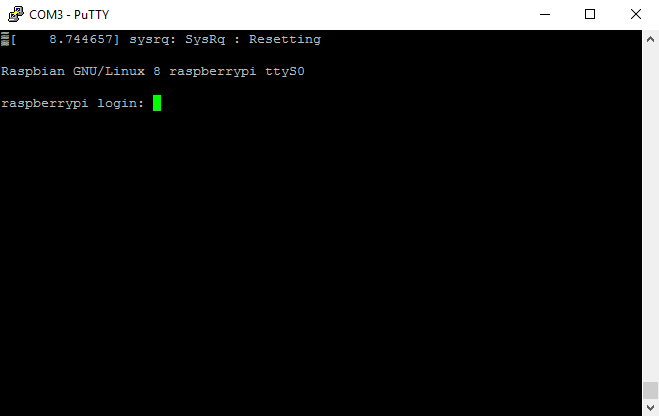
Log in to the system using the username "pi" and the password "raspberry". You're now logged in to the Raspberry Pi, and everything else we do we'll do from this command prompt.
Use the raspi-config Utility to Enable Camera, I2C, and SSH
There's a nifty text-only utility called "raspi-config" that will allow you to enable the camera interface, I2C, and remote access via SSH. To use it simply type this command:
language:bash
sudo raspi-config
If you're curious, the "sudo" portion of the command tells the OS to run the command as a superuser -- basically, a user with full system permissions. This is the menu that you'll then be presented with:
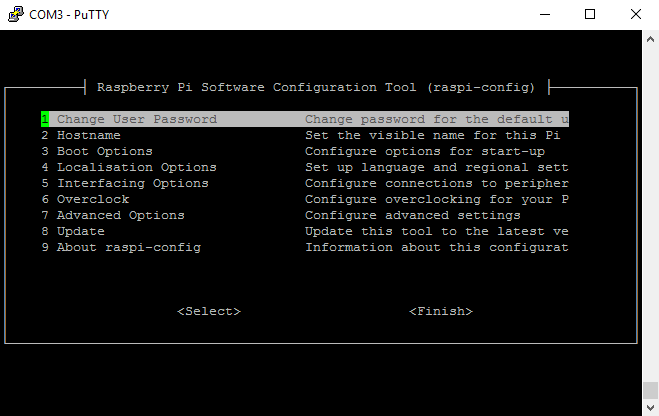
From here you can make several changes. The first change you should make is to change the password for the default user. Highlight option 1 and hit enter. You'll get a warning that you will be asked to change the password, then a prompt will appear at the bottom of the screen asking you to enter a new password. You'll be asked to repeat it, just to make sure that the password is as you intended, then you'll receive a message that the password has been changed.
Now, use the arrow keys to move down to choice 5, "Interfacing Options". You'll be presented with this menu:
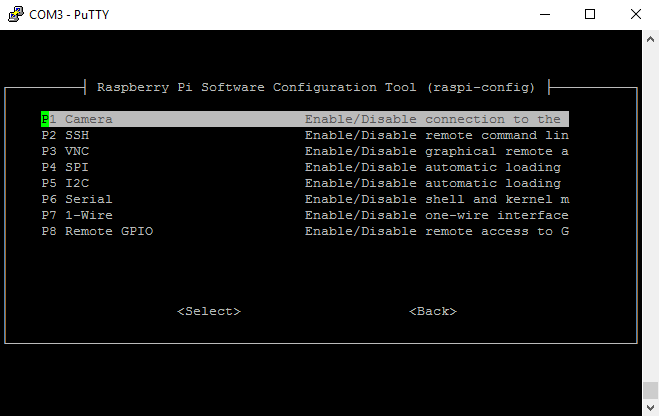
Highlight option "P1 Camera", and hit enter. That will bring up this screen:
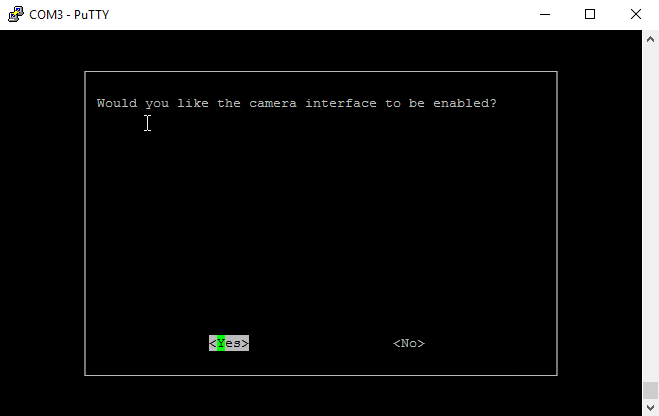
Highlight "Yes" and hit enter. You'll receive a confirmation message:

Hit enter to leave this screen. You'll be back at the main menu. Return to the "Interfacing Options" menu again and repeat the process two more times, once for the "I2C" option and once for the "SSH" option.
This concludes the work you need to do with the raspi-config utility. From the main menu, press tab twice to highlight "Finish", then hit enter. If you're asked whether to reboot now, select "Yes" and hit enter. Again, it will take as much as 30 seconds for the login prompt to reappear.
Configure the /etc/network/interfaces File
You'll now need to tell the Raspberry Pi to use the "wpa_supplicant.conf" file that you created earlier. Type the following command in the serial terminal:
language:bash
sudo nano /etc/network/interfaces
Add the following lines to the end of the file:
language:bash
auto wlan0
allow-hotplug wlan0
iface wlan0 inet dhcp
wpa-conf /etc/wpa_supplicant/wpa_supplicant.conf
Hit CTRL+O and enter to save the file, then CTRL+X to quit the nano text editor.
Now reboot the Raspberry Pi by typing:
language:bash
sudo reboot
Update the Pi
You must now update your Pi's software to the latest version. To do this, enter these two commands at the command prompt:
language:bash
sudo apt-get update
sudo apt-get dist-upgrade
This will ensure that your Pi software is up-to-date. The first command takes a minute or two to run, but the second will take much longer. Be patient!
Install the Remote Camera Web Interface Software
You'll now want to download and install the camera interface software. To do so, execute the following four commands in order:
language:bash
git clone https://github.com/silvanmelchior/RPi_Cam_Web_Interface.git
cd RPi_Cam_Web_Interface
chmod u+x *.sh
./install.sh
The first command fetches the software from GitHub. You don't need a GitHub account for this to work. However, if you enter the command or URL wrong, git may ask for a username. The second enters the directory that was just fetched from GitHub. The third changes the user permission of the shell scripts in that directory so a user can execute them. The fourth runs the install script for the software.
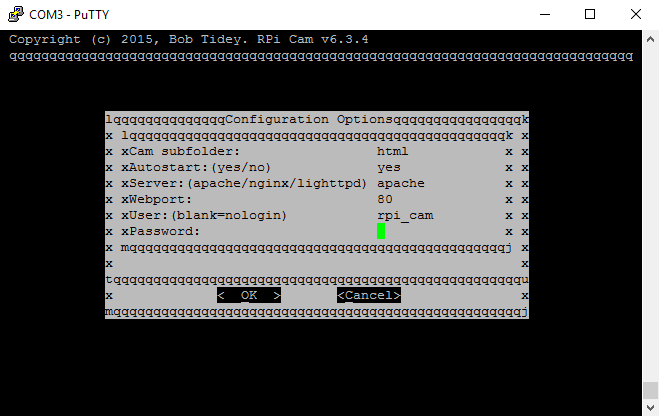
Running the fourth command will launch an interactive script allowing you to change various settings about how the software is set up. We'll walk you through it so your setup mirrors ours for the sake of the rest of the tutorial. It takes a minute or two for the interactive section to come up. Again, patience!
Here's the interactive interface for the installation script. Use the arrow keys, not TAB, to move through the fields! Note that we've left everything the same. The only exception is that we added a username and password (but that's not shown). Once you've finished entering a username and password, you may hit the TAB key to go to the "OK" button and hit "Enter" to select it.
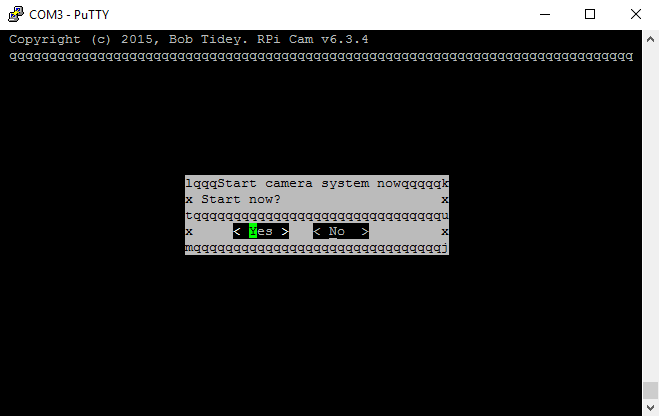
The installation script will download and install all of the dependencies for the project. This can take some time (up to several minutes) so be patient. When everything is finished, you'll be asked if you want to start the service now. Select "Yes".