Sending Sensor Data Over WiFi
 ROB-24601
Step 3: Uploading the Code
For this example we have two Arduino sketches - one for the data transmitter, and one for the data receiver.
Copy this sketch and upload it to your transmitting board, the one with the Qwiic Environmental Combo connected to it. Make sure that before you upload it, you insert the MAC address of your receiving board on line 34 of the sketch, so that, in our case,
uint8_t broadcastAddress[] = {0xFF, 0xFF, 0xFF, 0xFF, 0xFF, 0xFF};
would become
uint8_t broadcastAddress[] = {0x94, 0x3C, 0xC6, 0x96, 0x38, 0xB4};
Full Transmitter Code
The proper board (SparkFun ESP32 Thing Plus) should still be selected, just make sure you've connected to the proper COM port, and upload the following sketch.
/* WiFi Peer-to-Peer example, Transmitter Sketch
 * Rob Reynolds, SparkFun Electronics, November 2021
 * This example uses a pair of SparkFun ESP32 Thing Plus Wroom modules
 * (https://www.sparkfun.com/products/15663, a SparkFun Qwiic Environmental
 * Combo Breakout (https://www.sparkfun.com/products/14348), and a SparkFun
 * Qwiic 20x4 SerLCD - RGB Backlight (https://www.sparkfun.com/products/16398).
 *
 * Feel like supporting our work? Buy a board from SparkFun!
 * https://www.sparkfun.com/
 *
 * License: MIT. See license file for more information but you can
 * basically do whatever you want with this code.
 *
 * Based on original code by
 * Rui Santos
 * Complete project details at https://RandomNerdTutorials.com/esp-now-esp32-arduino-ide/
 *
 * Permission is hereby granted, free of charge, to any person obtaining a copy
 * of this software and associated documentation files.
 *
 * The above copyright notice and this permission notice shall be included in all
 * copies or substantial portions of the Software.
*/

#include <esp_now.h>
#include <WiFi.h>

#include <Wire.h>            // Used to establish serial communication on the I2C bus
#include "SparkFunBME280.h"  // Install library for the BME280
BME280 mySensor;             // Define sensor


// REPLACE WITH YOUR RECEIVER MAC Address
uint8_t broadcastAddress[] = {0xFF, 0xFF, 0xFF, 0xFF, 0xFF, 0xFF};

// Structure example to send data
// Must match the receiver structure
typedef struct struct_message {
  float a;
  float b;
  float c;
} struct_message;

// Create a struct_message called myData
struct_message myData;

// callback when data is sent
void OnDataSent(const uint8_t *mac_addr, esp_now_send_status_t status) {
  Serial.print("\r\nLast Packet Send Status:\t");
  Serial.println(status == ESP_NOW_SEND_SUCCESS ? "Delivery Success" : "Delivery Fail");
}

void setup() {
  Serial.begin(115200);
  Serial.println("Reading basic values from BME280");

  Wire.begin();

  //**********Setup for BME280 module**********//
  if (mySensor.beginI2C() == false) //Begin communication over I2C
  {
    Serial.println("The sensor did not respond. Please check wiring.");
    while(1); //Freeze
  }

  // Set device as a Wi-Fi Station
  WiFi.mode(WIFI_STA);

  // Init ESP-NOW
  if (esp_now_init() != ESP_OK) {
    Serial.println("Error initializing ESP-NOW");
    return;
  }

  // Once ESPNow is successfully Init, we will register for Send CB to
  // get the status of Trasnmitted packet
  esp_now_register_send_cb(OnDataSent);

  // Register peer
  esp_now_peer_info_t peerInfo;
  memcpy(peerInfo.peer_addr, broadcastAddress, 6);
  peerInfo.channel = 0;
  peerInfo.encrypt = false;

  // Add peer
  if (esp_now_add_peer(&peerInfo) != ESP_OK){
    Serial.println("Failed to add peer");
    return;
  }
}

void loop() {
  // Set values to send
  //strcpy(myData.a, "THIS IS A CHAR");
  myData.a = (mySensor.readTempF());
  myData.b = (mySensor.readFloatHumidity());
  myData.c = (mySensor.readFloatPressure());

  // Send message via ESP-NOW
  esp_err_t result = esp_now_send(broadcastAddress, (uint8_t *) &myData, sizeof(myData));

  // The following is only used for testing, to check data in Serial Monitor
  Serial.print("Temperature in Fahrenheit: ");
  Serial.println(myData.a);
  Serial.print("Humidity: ");
  Serial.println(myData.b);
  Serial.print("Pressure: ");
  Serial.println(myData.c);

  if (result == ESP_OK) {
    Serial.println("Sent with success");
  }
  else {
    Serial.println("Error sending the data");
  }
  delay(2000); // Send data every two seconds
}
The crux of this sketch happens in this line (line 103):
esp_err_t result = esp_now_send(broadcastAddress, (uint8_t *) &myData, sizeof(myData));
Since we've already established the receiving board's MAC address in the variable broadcastAddress[] and established each of the three myData variables esp_now_send() sends to the receiving board all of our myData variables. (Note that we could certainly send more than the three we are using, but for the sake of simplicity and display size, I've kept the number low.)
In the original code by Rui Santos on which these sketches are based, the receiver will ping back to let the transmitter know that data was received. I’ve left this in the sketches, as it’s great during the testing phase. Once this sketch is uploaded, open the Serial Monitor. You should see the data as it’s being recorded, plus the message “Sent with success”. Following that, however, you’ll see the ominous message “Last Packet Send Status: Delivery Fail”. That’s okay, because we have nothing receiving the data. Let’s take care of that. Grab the other ESP32 Thing Plus, connect the SerLCD using the Qwiic connector, and upload the following sketch. (Make sure you change the COM port to that of this new board.)
Full Receiver Code
/* WiFi Peer-to-Peer example, Receiver Sketch
 * Rob Reynolds, SparkFun Electronics, November 2021
 * This example uses a pair of SparkFun ESP32 Thing Plus Wroom modules
 * (https://www.sparkfun.com/products/15663, a SparkFun Qwiic Environmental
 * Combo Breakout (https://www.sparkfun.com/products/14348), and a SparkFun
 * Qwiic 20x4 SerLCD - RGB Backlight (https://www.sparkfun.com/products/16398).
 *
 * Feel like supporting our work? Buy a board from SparkFun!
 * https://www.sparkfun.com/
 *
 * License: MIT. See license file for more information but you can
 * basically do whatever you want with this code.
 *
 * Based on original code by
 * Rui Santos
 * Complete project details at https://RandomNerdTutorials.com/esp-now-esp32-arduino-ide/
 *
 * Permission is hereby granted, free of charge, to any person obtaining a copy
 * of this software and associated documentation files.
 *
 * The above copyright notice and this permission notice shall be included in all
 * copies or substantial portions of the Software.
*/

#include <esp_now.h>
#include <WiFi.h>

#include <SerLCD.h> //Click here to get the library: http://librarymanager/All#SparkFun_SerLCD
SerLCD lcd; // Initialize the library with default I2C address 0x72


// Structure example to receive data
// Must match the sender structure
typedef struct struct_message {
    float a;
    float b;
    float c;
    float d;
} struct_message;

// Create a struct_message called myData
struct_message myData;


void setup() {
  // Initialize Serial Monitor
  Serial.begin(115200);

  // Set device as a Wi-Fi Station
  WiFi.mode(WIFI_STA);

  Wire.begin();
  //********** Setup for LCD display**********//
  lcd.begin(Wire); //Set up the LCD for I2C communication

  lcd.setBacklight(50, 55, 255); //Set backlight to bright white
  lcd.setContrast(5); //Set contrast. Lower to 0 for higher contrast.

  lcd.clear(); //Clear the display - this moves the cursor to home position as well
  lcd.print(" Current Conditions");
  lcd.setCursor(0, 1);
  lcd.print("Temperature: ");
  lcd.setCursor(0,2);
  lcd.print("Humidity: ");
  lcd.setCursor(0,3);
  lcd.print("Pressure: ");

  // Init ESP-NOW
  if (esp_now_init() != ESP_OK) {
    Serial.println("Error initializing ESP-NOW");
    return;
  }

  // Once ESPNow is successfully Init, we will register for recv CB to
  // get recv packer info
  esp_now_register_recv_cb(OnDataRecv);
}

void loop() {

}


// callback function that will be executed when data is received
void OnDataRecv(const uint8_t * mac, const uint8_t *incomingData, int len) {
  memcpy(&myData, incomingData, sizeof(myData));

  // Use this for testing in Serial Monitor if you're not seeing anything on the LCD display
  Serial.print("Temperature F: ");
  Serial.println(myData.a);
  Serial.print("Humidity: ");
  Serial.println(myData.b);
  Serial.print("Pressure: ");
  Serial.println(myData.c);
  Serial.println();
  lcd.setCursor(13, 1);
  lcd.print(String(myData.a) + (char)223 + " F");
  lcd.setCursor(13, 2);
  lcd.print(String(myData.b) + (char)37);
  lcd.setCursor(13, 3);
  lcd.print(String(myData.c, 1)); // The comma followed bt 1 limits output to 1 decimal place

}
In the receiving script, the line we want to focus on is here inside the onDataRecv() function (line 86):
memcpy(&myData, incomingData, sizeof(myData));
This takes the the incoming data and moves it to myData so it can be displayed. Just make sure that the the data structure in the receiving sketch matches the data structure in the transmitting sketch. (That is, the data type for each of your variable to be sent matches the data types that the receving sketch expects.)
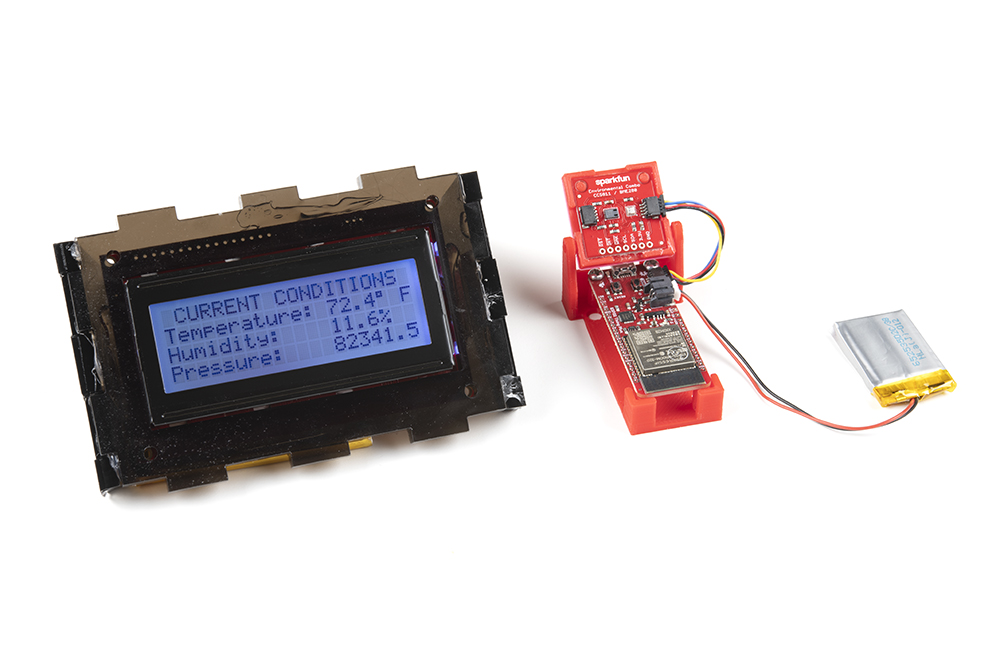
Once you've got the code loaded to both boards, powering them up will connect them, and you should see incoming data after only a few seconds.