Reading and Writing Serial EEPROMs
 Nate,
Nate,  Nick Poole
Reading and Writing
Most of the time when you're using an EEPROM in conjunction with a microcontroller you won't actually need to see all of the contents of the memory at once. You'll just read and write bytes here and there as needed. In this example, however, we're going to write an entire file to EEPROM and then read all of it back off so we can view it on our computer. This should get us comfortable with the idea of using EEPROM and also give us a feeling for how much data can really fit on a small device.
To send and receive files using the example Arduino sketches below, you'll need a terminal program such as TeraTerm. Once you have that downloaded and installed, we can get down to business.
Write Something
Our example sketch will simply take any byte that comes in over the serial port and write it to the EEPROM, keeping track along the way of how many bytes we've written to memory.
Writing a byte of memory to the EEPROM generally happens in three steps:
- Send the Most Significant Byte of the memory address that you want to write to.
- Send the Least Significant Byte of the memory address that you want to write to.
- Send the data byte that you would like to store at this location.
There are probably a few key words there that bare explaining:
Memory Addresses
If you imagine all of the bytes in a 256 Kbit EEPROM standing in a line from 0 to 32000 — because there are 8 bits to a byte and therefore you can fit 32000 bytes on a 256 Kbit EEPROM — then a memory address is the place in line where you would find a particular byte. We need to send that address to the EEPROM so it knows where to put the byte that we're sending.
Most Significant and Least Significant Bytes
Because there are 32000 possible places in a 256 Kbit EEPROM — and because 255 is the largest number you can encode in one byte — we need to send this address in two bytes. First we send the Most Significant Byte (MSB) — the first 8 bits in this case. Then we send the Least Significant Byte (LSB) — the second 8 bits. Why? Because this is how the device expects to receive them, that's all.
Page Writing
Writing one byte at a time is fine, but most EEPROM devices have something called a "page write buffer" which allows you to write multiple bytes at a time the same way you would a single byte. We'll be taking advantage of this in our example sketch.
The EEPROM uses an internal counter that automatically increases the memory location with each following data byte it receives. Once a memory address has been sent we can follow it with up to 64 bytes of data. The EEPROM assumes (rightly) that an address of 312 followed by 10 bytes will record byte 0 at address 312, byte 1 at address 313, byte 2 at address 314, and so on.
Arduino Sketch Example Write Something
Note: This example assumes you are using the latest version of the Arduino IDE on your desktop. If this is your first time using Arduino, please review our tutorial on installing the Arduino IDE.
Here's an example sketch to write some data to the EEPROM. Walk through the comments in the code for an explanation about what's going on.
language:c
//Include the Wire I2C Library
#include <Wire.h>

/*This address is determined by the way your address pins are wired.
In the diagram from earlier, we connected A0 and A1 to Ground and
A2 to 5V. To get the address, we start with the control code from
the datasheet (1010) and add the logic state for each address pin
in the order A2, A1, A0 (100) which gives us 0b1010100, or in
Hexadecimal, 0x54*/

#define EEPROM_ADR 0x54

/*Theoretically, the 24LC256 has a 64-byte page write buffer but
we'll write 16 at a time to be safe*/

#define MAX_I2C_WRITE 16

byte tempStore[MAX_I2C_WRITE];

void setup()
{

//Start the I2C Library
  Wire.begin();
  Wire.setClock(400000);

//Start the serial port
  Serial.begin(19200);

//Here is where we'll keep track of where in the memory we're writing
  long currentSpot = 0;
  long timerReset = 0;
  byte counter = 0;

  //Here we listen for bytes on the serial port and increment
  //the counter as we store them in our tempStore variable
  while (1)
  {
    while (Serial.available())
    {
      tempStore[counter++] = Serial.read(); //Read this byte into the array

      if (counter == MAX_I2C_WRITE)
      {
      //Once we've collected a page worth, go ahead and do
      //a page write operation
        writeEEPROMPage(currentSpot);
        counter = 0; //Reset
        currentSpot += MAX_I2C_WRITE;
      }

      timerReset = millis();
    }

    if (millis() - timerReset > 2000)
    {
      Serial.println(currentSpot);
      timerReset = millis();
    }
  }

}

void loop()
{
    // Don't do anything here
}

/* This is the 3 step memory writing procedure that
we talked about. First we send the MSB of the address.
Then we send the LSB of the address. Then we send the
data that we want to store. */

void writeEEPROMPage(long eeAddress)
{

  Wire.beginTransmission(EEPROM_ADR);

  Wire.write((int)(eeAddress >> 8)); // MSB
  Wire.write((int)(eeAddress & 0xFF)); // LSB

  //Write bytes to EEPROM
  for (byte x = 0 ; x < MAX_I2C_WRITE ; x++)
    Wire.write(tempStore[x]); //Write the data

  Wire.endTransmission(); //Send stop condition
}
Upload this code to your Arduino board and open the terminal program that you installed earlier. For the purposes of this tutorial, I'll assume you're using TeraTerm.
When you open TeraTerm, it will ask you to setup a new connection:
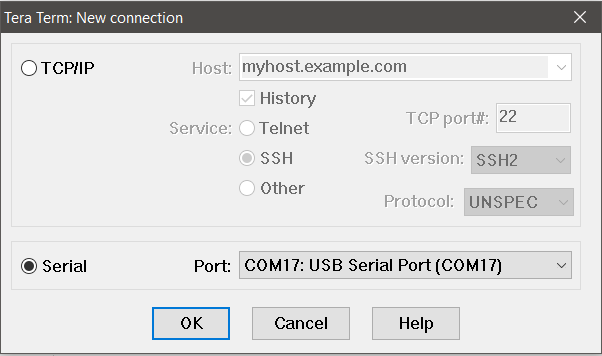
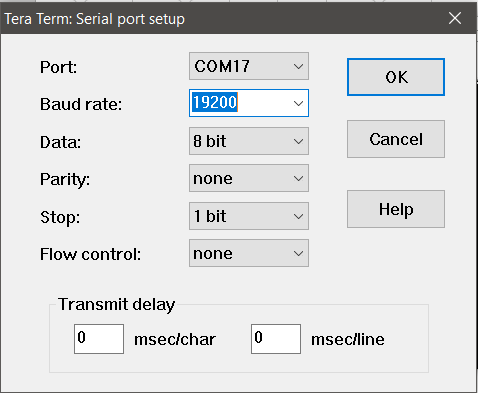
You'll need to select the serial port that your Arduino is connected to. Once you've pressed OK on that, go to Setup > Serial Port and set your Baud Rate to the one we selected in the code above (19200) then press OK.
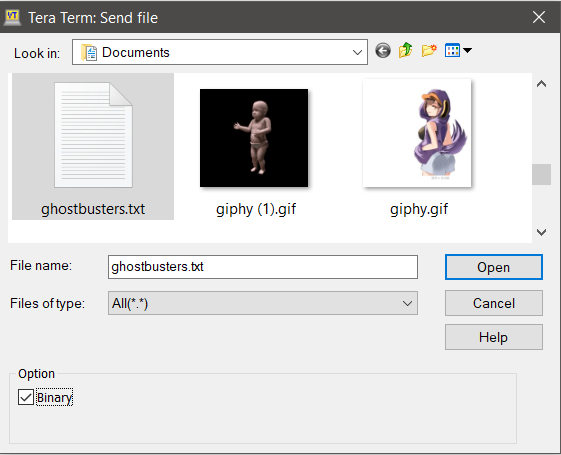
Now you should be seeing a bunch of zeros appearing in your terminal window. This is our sketch telling us how many bytes we've written. So far we've written nothing; let's change that! Go to File > Send File... and select a file to send through the terminal. For testing purposes, I suggest using the complete text of the Ghostbusters theme as written and performed by Ray Parker Jr. You can get the text file below.
Select that file and be sure to click on the "binary" button, so that the file is written byte-for-byte over the serial port.
When you press "Open" you'll see a file transfer window for just a moment as the file is dumped to the terminal.
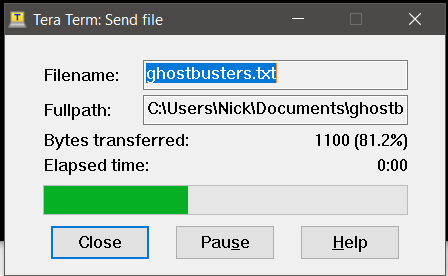
Now the number in your terminal window should be 1344, representing the memory location that we're sitting at after writing the complete text of the Ghostbusters theme as written and performed by Ray Parker Jr. You can go ahead and close TeraTerm, it worked! Well... we don't actually know if it worked until we read it back, so let's read it back!
Read Something
Reading from the EEPROM basically follows the same three step process as writing to the EEPROM:
- Send the Most Significant Byte of the memory address that you want to write to.
- Send the Least Significant Byte of the memory address that you want to write to.
- Ask for the data byte at that location.
Arduino Sketch Example Read Something
Here's an example sketch to write some data to the EEPROM. Walk through the comments in the code for an explanation about what's going on.
language:c
//Include the Wire I2C Library
#include <Wire.h>

/*This address is determined by the way your address pins are wired.
In the diagram from earlier, we connected A0 and A1 to Ground and
A2 to 5V. To get the address, we start with the control code from
the datasheet (1010) and add the logic state for each address pin
in the order A2, A1, A0 (100) which gives us 0b1010100, or in
Hexadecimal, 0x54*/

#define EEPROM_ADR 0x54

void setup()
{

//Start the I2C Library
  Wire.begin();
  Wire.setClock(400000);

//Start the serial port
  Serial.begin(115200);

  //Output raw bytes to terminal
  //In this case we're going to read all of the bytes
  //which is 32000, or in hex, 0x7D00
  for (long x = 0 ; x < 0x7D00 ; x++) //Read all 131,071 bytes from EERPOM
  {
    byte val = readEEPROM(x);
    Serial.write(val);
  }
}

void loop()
{
  //Nothing to do, just hang out.
}

/* This is the 3 step memory reading procedure that
we talked about. First we send the MSB of the address.
Then we send the LSB of the address. Then we ask for the
number of bytes that we want to receive. Here, we're
going 1 byte at a time*/

byte readEEPROM(long eeaddress)
{
  Wire.beginTransmission(EEPROM_ADR);

  Wire.write((int)(eeaddress >> 8)); // MSB
  Wire.write((int)(eeaddress & 0xFF)); // LSB
  Wire.endTransmission();

  Wire.requestFrom(EEPROM_ADR, 1);

  byte rdata = 0xFF;
  if (Wire.available()) rdata = Wire.read();
  return rdata;
}
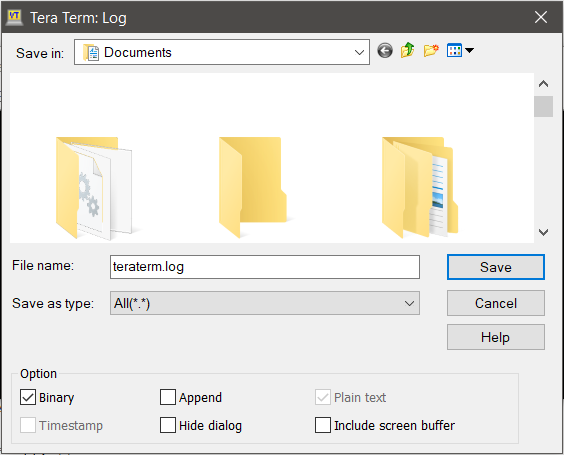
Now load this sketch onto your Arduino and open TeraTerm again. Once again, you'll need to open the correct serial port but before we set the correct baud rate and get things moving, let's create a file to store all the memory that we're about to read. Go to File > Log... and create a logfile. Make sure to uncheck the "Append" option and check the "Binary" option. This makes sure that the terminal will start a fresh logfile and write to it byte-for-byte what comes over the terminal.
When you press "Save" another dialog window will appear but it may pop under the current window Go find it, it will come in handy in a second. Now go to Setup > Serial Port and set your Baud Rate to the one we selected in the code above (115200) then press OK. Check the logfile window and see how many bytes have been transferred.
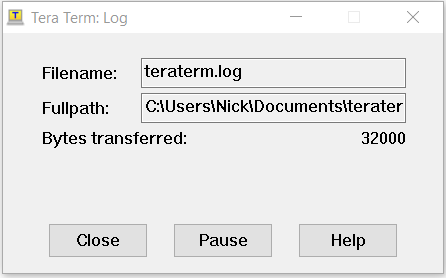
Once we've transferred 32000 bytes, we've got everything on the chip. Now close everything and open up that logfile in a text editor. You should now be face to face with, you guessed it, the complete text of the Ghostbusters theme as written and performed by Ray Parker Jr. Oh yeah, plus a bunch of junk that represents the unwritten space in memory.