Qwiic Flex Glove Controller Hookup Guide
 Englandsaurus
Example Code
Now that we know how our library works, let's go ahead and get started pulling values from our flex sensors.
Example 1 - Basic Readings
To get started with the first example, open up File > Examples > SparkFun ADS1015 Arduino Library > Qwiic Flex Glove Controller > Example1_BasicReadings. In this example, we begin by creating an ADS1015 object called fingerSensor and then initializing our sensor object in the setup() loop. We then get the values from each finger by looping through and reading each channel on the ADS1015. The code for this is shown below.
language:c
#include <SparkFun_ADS1015_Arduino_Library.h>

ADS1015 fingerSensor;

void setup() {

  Wire.begin();
  Serial.begin(115200);

  if (fingerSensor.begin(Wire, 100000, ADS1015_ADDRESS_GND) == false) {
     Serial.println("Device not found. Check wiring.");
     while (1);
  }

}

void loop() {
  uint16_t data;
  for (int finger = 0; finger < 2; finger++) {
    data = fingerSensor.getAnalogData(finger);
    Serial.print(finger);
    Serial.print(": ");
    Serial.print(data);
    Serial.print(",");
  }
  Serial.println();
}
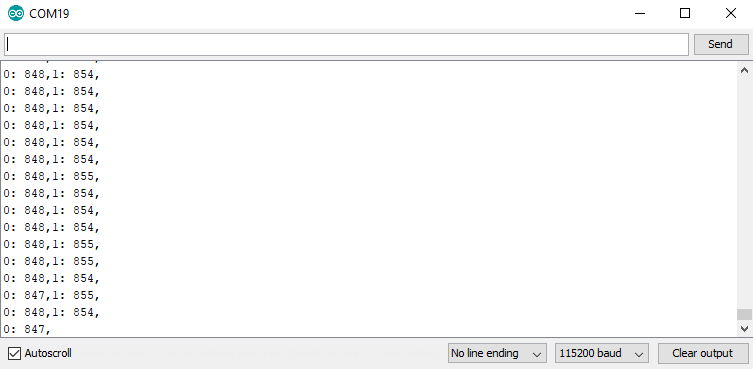
Uploading this sketch and opening the Serial Monitor to 115200 bps will yield an output somewhat like the below image.
Example 2 - Setup hand
In this example, we'll see how to setup an entire hand of flex sensors. To get started with this example, open up File > Examples > SparkFun ADS1015 Arduino Library > Qwiic Flex Glove Controller > Example2_SetupHand. In this example, we create two ADS1015 objects, naming them indexSensor and pinkySensor to correspond with their locations on the glove. We also create an array with 4 spots to hold the data for the hand called hand. We then populate hand with values from each sensor. The code that accomplishes this is shown below.
language:c
#include <SparkFun_ADS1015_Arduino_Library.h>

ADS1015 pinkySensor;
ADS1015 indexSensor;
uint16_t hand[4] = {0, 0, 0, 0};

void setup() {
  Wire.begin();
  Serial.begin(115200);

  if (pinkySensor.begin(Wire, 100000, ADS1015_ADDRESS_SDA) == false) {
     Serial.println("Pinky not found. Check wiring.");
     while (1);
  }
  if (indexSensor.begin(Wire, 100000, ADS1015_ADDRESS_GND) == false) {
     Serial.println("Index not found. Check wiring.");
     while (1);
  }
}

void loop() {
  uint16_t data;
  for (int finger = 0; finger < 2; finger++) {
    hand[finger] = indexSensor.getAnalogData(finger);
    hand[finger + 2] = pinkySensor.getAnalogData(finger);
  }
  for (int finger = 0; finger < 4; finger++)
  {
    Serial.print(finger);
    Serial.print(": ");
    Serial.print(hand[finger]);
    Serial.print(" ");
  }
  Serial.println();
}
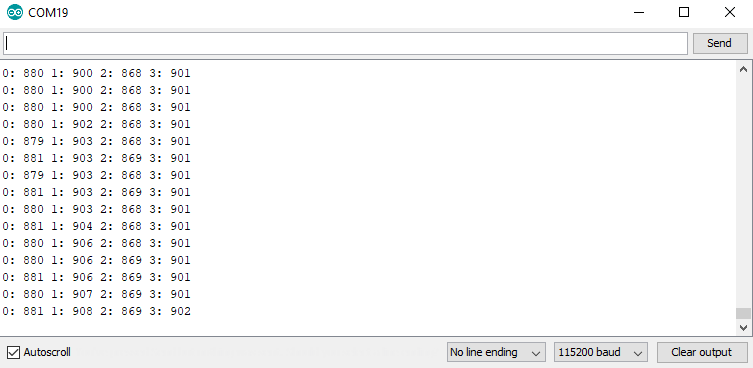
Uploading this sketch and opening the Serial Monitor to 115200 bps will yield an output somewhat like the below image.
Example 3 - Calibration
The second example will show us how to calibrate our flex sensor so we get 0 when our finger is closed and 1 when it is open. To get started, open up File > Examples > SparkFun ADS1015 Arduino Library > Qwiic Flex Glove Controller > Example3_Calibration. In this example we will calibrate our sensor's maximum and minimum values in order to find the range for our sensor.
language:c
#include <SparkFun_ADS1015_Arduino_Library.h>
#include <Wire.h>

ADS1015 fingerSensor;

void setup() {

  Wire.begin();
  Serial.begin(115200);

  if (fingerSensor.begin(Wire, 100000, ADS1015_ADDRESS_GND) == false) {
     Serial.println("Device not found. Check wiring.");
     while (1);
  }
  Serial.println("Calibrating, send 'e' when finished");
}

void loop() {
  uint8_t incoming;
  do
  {
    fingerSensor.calibrate();

    if(Serial.available())
    {
       incoming = Serial.read();
    }
  } while (incoming != 'e');
  Serial.println("Calibrated");

  for (int channel; channel < 2; channel++)
  {
    Serial.print("Channel ");
    Serial.print(channel);
    Serial.print(": ");
    for (int hiLo = 0; hiLo < 2; hiLo++)
    {
      switch (hiLo)
      {
        case 0:
        Serial.print("Low: ");
        Serial.print(fingerSensor.getCalibration(channel, hiLo));
        break;
        case 1:
        Serial.print(" High: ");
        Serial.print(fingerSensor.getCalibration(channel, hiLo));
        break;
      }
    }
    Serial.println();
  }
}
The sensor is initialized in the same manner as the first example, then our loop() begins calibrating the sensors. To calibrate the sensors, simply flex them to their maximum and minimum bend radii, then send an e over the Serial Monitor when you're finished. This will save the current calibration and show you the values that have been saved. Uploading this sketch and opening the Serial Monitor to 115200 bps will yield an output somewhat like the below image once you've sent e and saved the calibration.

Example 4 - Calibrated Hand
You don't necessarily want to calibrate your hand every single time you put on a glove with the flex controllers built in, so let's figure out how to manually set our calibration if we know it already. To get started, open up File > Examples > SparkFun ADS1015 Arduino Library > Qwiic Flex Glove Controller > Example4_ManualCalibration. We can see in the preamble to our code that we have an array of all of our calibration values, which were obtained using the previous example sketch. We then use a loop in the setup function along with our setCalibration() function to set the individual calibration values. The code for this is shown below.
language:c
#include <SparkFun_ADS1015_Arduino_Library.h>
#include <Wire.h>

ADS1015 pinkySensor;
ADS1015 indexSensor;
float hand[4] = {0, 0, 0, 0};
uint16_t handCalibration[4][2] = {
//{hi , low}
  {722, 1080},//index
  {600, 980},//middle
  {680, 900},//ring
  {736, 907} //pinky
};

void setup() {

  Wire.begin();
  Serial.begin(115200);

  //Begin our finger sensors, change addresses as needed.
  if (pinkySensor.begin(Wire, 100000, ADS1015_ADDRESS_SDA) == false)
  {
     Serial.println("Pinky not found. Check wiring.");
     while (1);
  }
  if (indexSensor.begin(Wire, 100000, ADS1015_ADDRESS_GND) == false)
  {
     Serial.println("Index not found. Check wiring.");
     while (1);
  }

  //Set the calibration values for the hand.
  for (int channel; channel < 2; channel++)
  {
    for (int hiLo = 0; hiLo < 2; hiLo++)
    {
      indexSensor.setCalibration(channel, hiLo, handCalibration[channel][hiLo]);
      pinkySensor.setCalibration(channel, hiLo, handCalibration[channel + 2][hiLo]);
    }
    Serial.println();
  }
}

void loop() {
  for (int channel = 0; channel < 2; channel++)
  {
    //Keep in mind that getScaledAnalogData returns a float
    hand[channel] = indexSensor.getScaledAnalogData(channel);
    hand[channel + 2] = pinkySensor.getScaledAnalogData(channel);
  }
  for (int finger = 0; finger < 4; finger++)
  {
    Serial.print(finger);
    Serial.print(": ");
    Serial.print(hand[finger]);
    Serial.print(" ");
  }
  Serial.println();
}
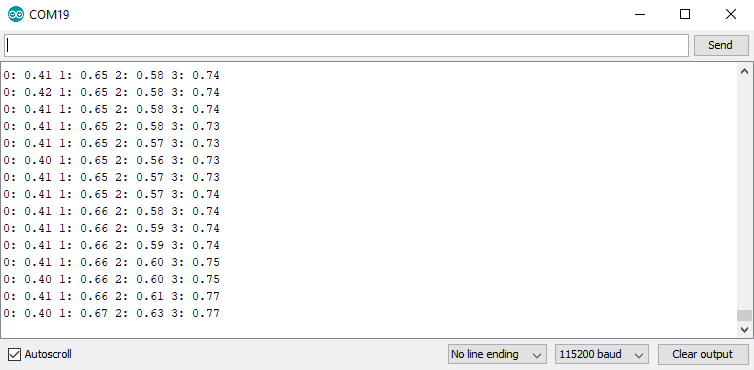
Uploading this sketch and opening the serial monitor will show a stream of calibrated values. Use these to scale any other variable you'd like in your project.