OpenScale Applications and Hookup Guide
 Nate,
Nate,  LightningHawk
 Overview
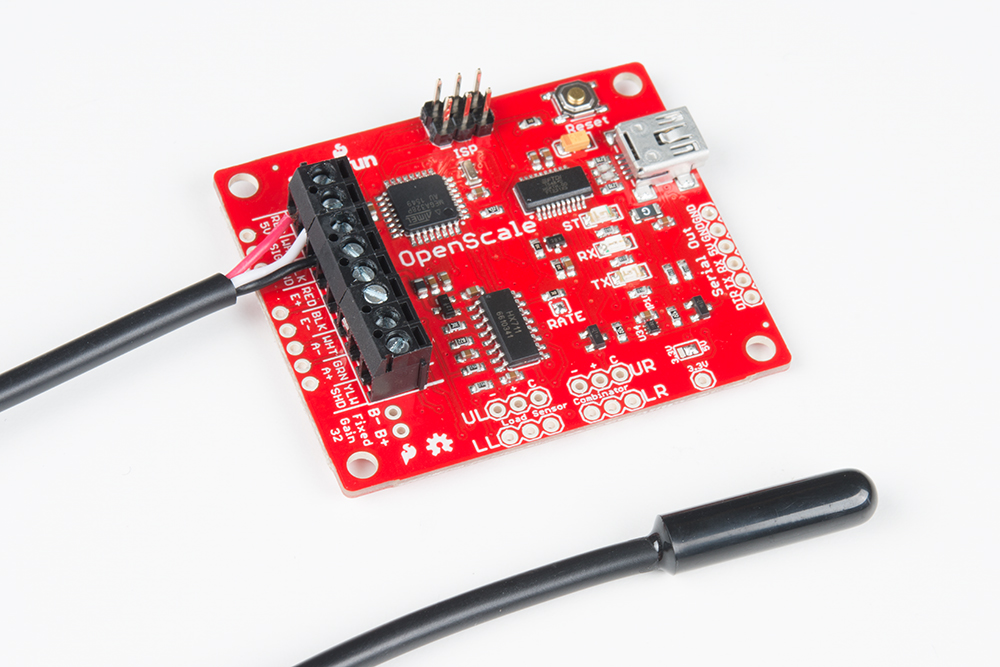
The SparkFun OpenScale makes reading load cells easy. Attach a four-wire or five-wire load cell of any capacity, plug OpenScale into a USB port, open a terminal window at 9600bps, and you’ll immediately see mass readings. To learn more about load cells see our tutorial on Getting Started with Load Cells. This board also has the Load Cell Combinator built in so you'll be able to read four load sensors as 1 load cell as well.

OpenScale combines the HX711 breakout board with an Atmega328P running Arduino and extensive pre-loaded configuration firmware to create an off-the-shelf solution for load cell reading.
OpenScale was designed for projects and applications where the load was static (for example a bee hive) or where constant readings are needed without user intervention (for example on a conveyor belt system). A load cell with OpenScale can remain in place for months without needing user interaction.
OpenScale makes it easy to zero and calibrate your scale via a simple to use configuration menu. Serial output and control is available through the mini-B USB port or through an FTDI compatible connection. This allows OpenScale to be attached seamlessly with a datalogger (OpenLog) or to a wireless Bluetooth transmitter (such as SparkFun Bluetooth Mate Silver). In the bee scale application , OpenScale is hooked up to Blynk Board and the data collected is pushed to a data-streaming services.
A precision digital temperature sensor is included on OpenScale to report the local temperature. An external connection is also available for a DS18B20 compatible temperature sensor to take temperature readings of the load cell. Please note that OpenScale reports the local and remote temperature readings but it does not alter the scale reading due to temperature fluctuations. It is up to the user to properly calibrate and post process these temperature readings to get the maximum scale accuracy.
OpenScale is fully open source hardware and software. OpenScale comes with a Arduino Uno compatible bootloader (STK500, 115200bps, 16MHz). Making modifications to the firmware is as easy as loading new code onto an Arduino. You can find the all the source in the OpenScale repository on GitHub.
Required Materials
We will just be hooking up a load cell with the OpenScale's HX711 amplifier, and showing how you would hook up four load sensors. To follow along, you'll need:
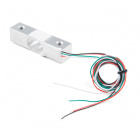

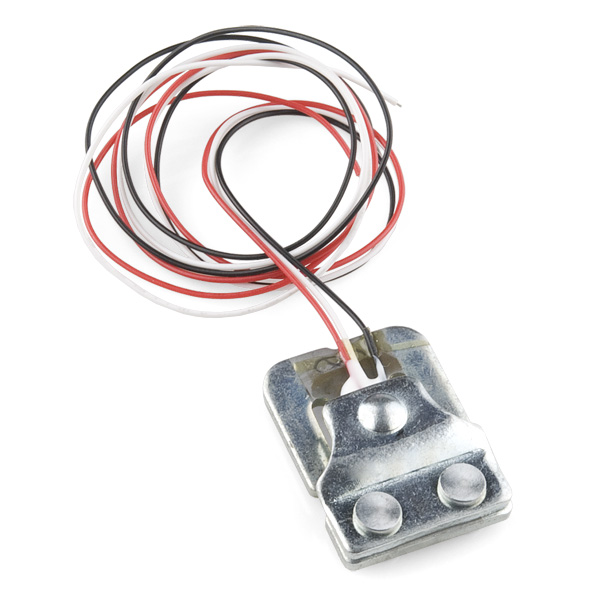
If you are planning on using load sensors, you will need to obtain or purchase four units to connect the single strain gauges into a wheatstone bridge type load cell. (Single strain gauge load cells only have three wires instead of four.)
Suggested Reading
If you aren't familiar with the following concepts, we recommend reviewing them before following along with the project example at the end of the tutorial.
Sunny Buddy Solar Charger V13 Hookup Guide
Getting Started with Load Cells
OpenLog Hookup Guide
Load Cell Amplifier HX711 Breakout Hookup Guide
Hardware Features
Power Cycling
When the report rate is above 500ms OpenScale will automatically turn off the power to the load cell between readings. This saves power and limits the amount of localized heating of the strain gauges. The HX711 requires around 500ms after power-up to stabilize. If the report rate is set below 500ms OpenScale will keep the HX711 on all the time. This will not damage the load cell but it may affect the accuracy of the readings over multiple hours of consecutive readings.
Rate Jumper
The Rate jumper selects between two rates: 10 samples per second (SPS) or 80 samples per second. By default there is a short between the two pads on the board connecting the HX711 RATE pin to ground and setting the rate at 10SPS. This decreases the sample input noise to 50nV (makes the readings less noisy) but increases the startup time (from power save mode) to 400ms.
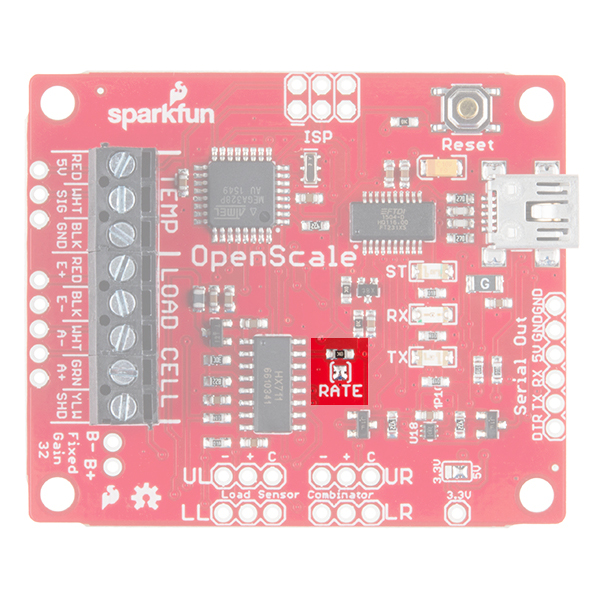
Opening the jumper will set the sample rate to 80SPS, increasing the noise to 90nV, and decreasing the startup time to 100ms. Open the jumper by cutting this jumper with a hobby knife. The jumper can be closed again with solder if necessary.
Local Temperature Sensor
OpenScale has a built-in TMP102 digital temperature sensor. When enabled via the configuration menu OpenScale will print the temperature in Celsius with the user selected number of decimals. The TMP102 sensor is very precise but calibration will be needed for the greatest accuracy.
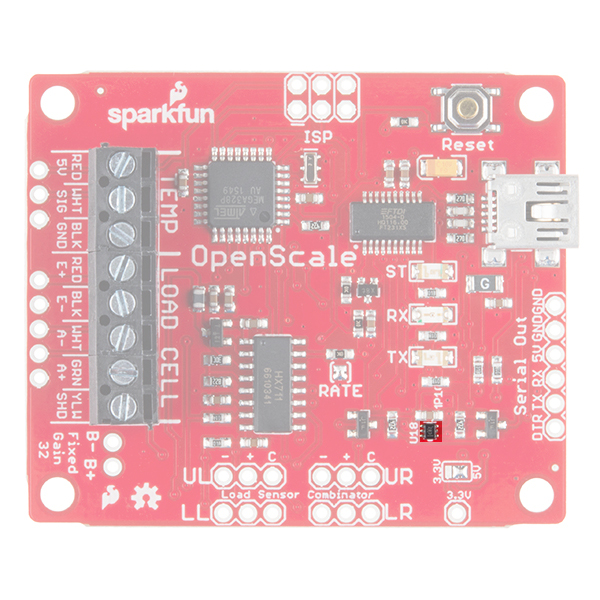
External Temperature Sensor
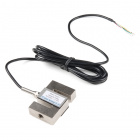
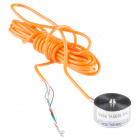
There is a 3-pin 0.1” spaced footprint to connect a DS18B20 compatible sensor. A 4.7k Ohm resistor is connected between VCC and the signal pin to allow one-wire communication. The Waterproof DS18B20 Sensor is an excellent way to detect temperatures of a remote load cell.
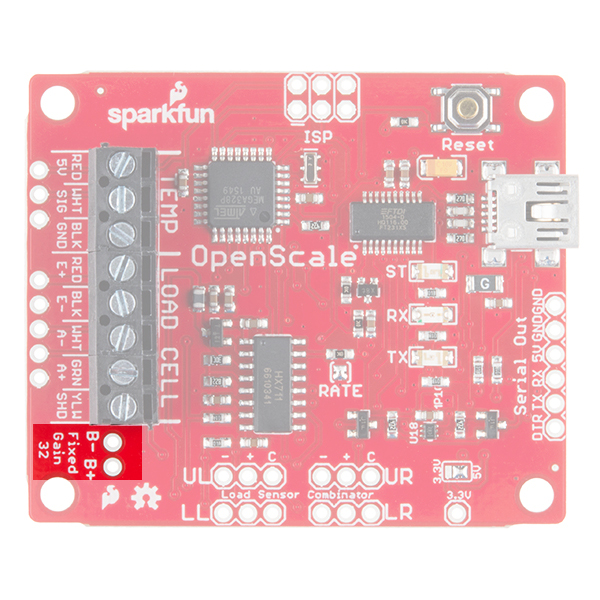
Fixed and Adjustable Gain
The HX711 features an active low noise programmable gain amplifier with gains of 32, 64 and 128. Use channel B inputs for A+ and A- and you will get an automatic gain of 32. Please refer to the datasheet for specifications and diagrams.
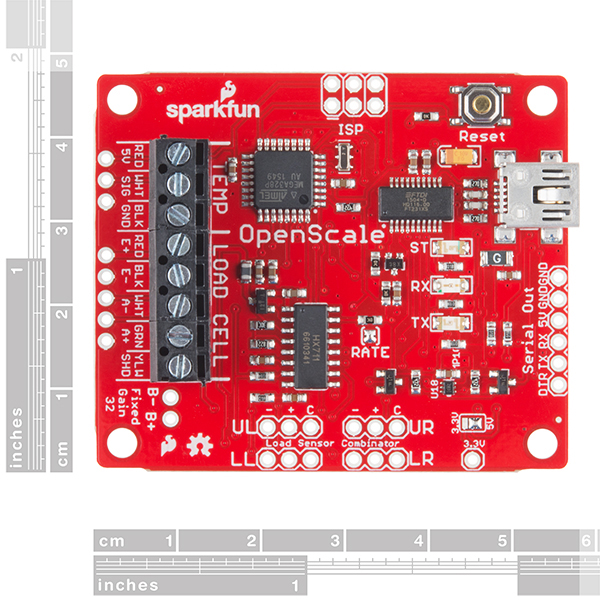
Physical Characteristics
Dimensions
OpenScale is approximately 1.8 by 2.25”.
Voltage
OpenScale is designed to be powered over USB but can be externally powered from a regulated 5V source.
Current Consumption
Different types of load cells will utilize different sized resistors in its wheatstone bridge. The smaller the resistors the greater the current at 5V. Additionally, OpenScale will attempt to power cycle the load cell to reduce localized strain gauge heating and overall power consumption. The status LED and USB-to-Serial ICs will also affect the current usage. Those factors in mind, the user can expect around 80 to 100mA at 5V for a regular setup.
The base current consumption is approximately 18mA under the following conditions:
- 5V regulated into 5V pin on FTDI connector (no USB connected)
- No load connected
- Status LED disabled
It is recommended to use the Serial Trigger mode of OpenScale for low power applications. This mode will allow OpenScale to power down the instrumentation amplifier and enter the lowest possible power state.
Interface Specifications
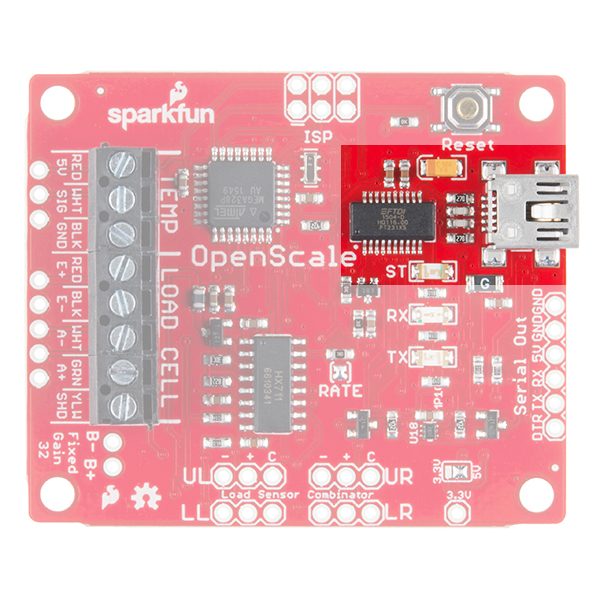
Built-In USB-to-Serial Converter
OpenScale communicates at TTL level 9600bps 8-N-1 by default. The baud rate is configurable from from 1200bps to 1,000,000bps. Most users will use the USB mini-B connection to connect to a computer. See How to Install FTDI Drivers tutorial for more information.
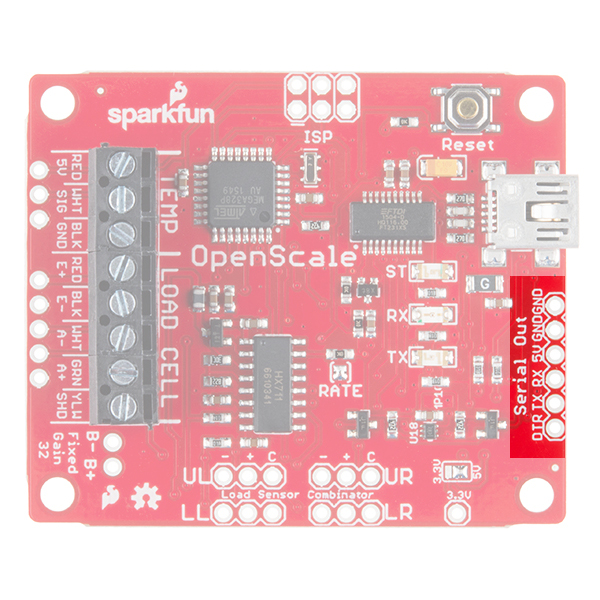
Serial UART Pins
Users may also communicate via the 6-pin serial interface. This is the common FTDI-type pinout. This interface is useful if you need to attach OpenScale to an embedded system that does not support USB host. Assuming that you are powering off the OpenScale, the minimum connection between the OpenScale -> another UART device are three wires: 5V->5V, GND->GND and TX->RX.
Serial Output
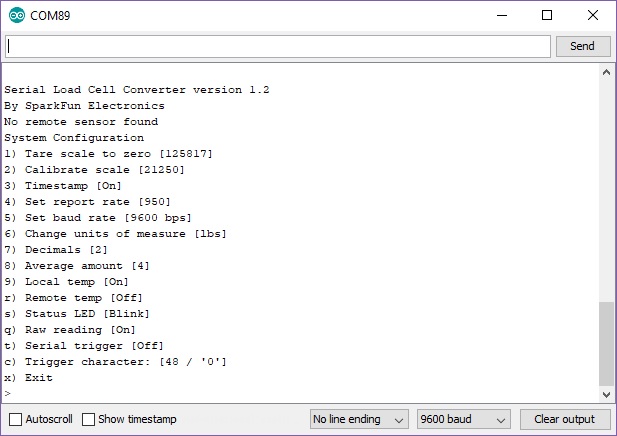
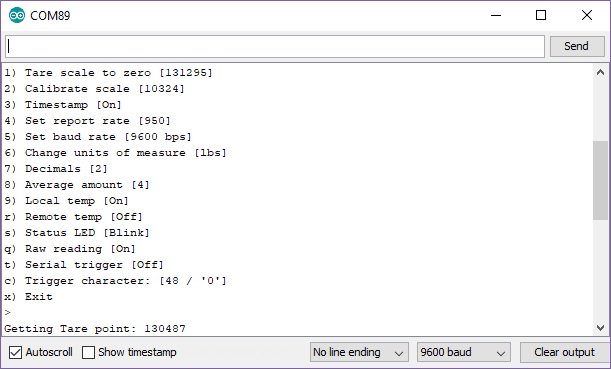
OpenScale is configured via visible ASCII characters and a text menu system. Attach OpenScale via USB and use your favorite terminal software to open the COM port that OpenScale is connected to. By default, the OpenScale communicates at 9600bps 8-N-1. You should see the following displayed every few hundred miliseconds.
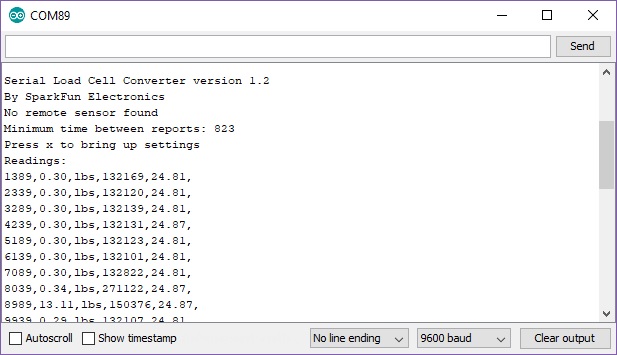
Pressing x (or sending the character via the Arduino Serial Monitor with the Enter key) at any time will bring up the configuration menu as explained later in the tutorial.
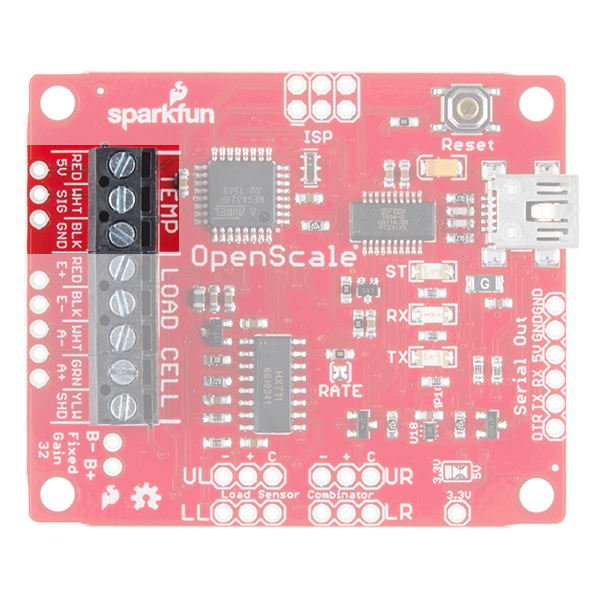
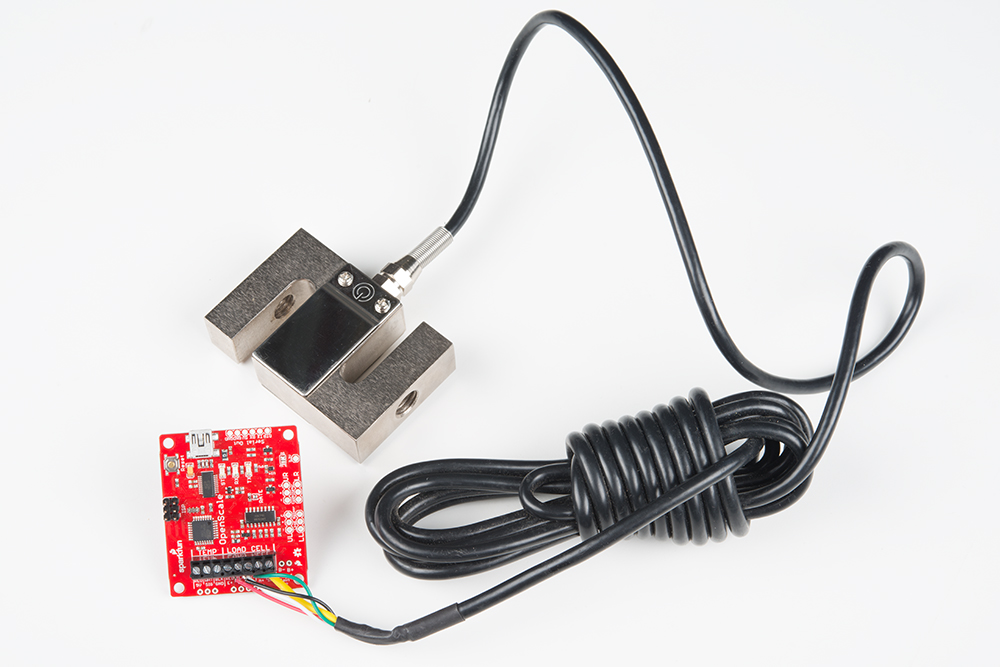
Attaching the Load Cell and Temperature Sensor
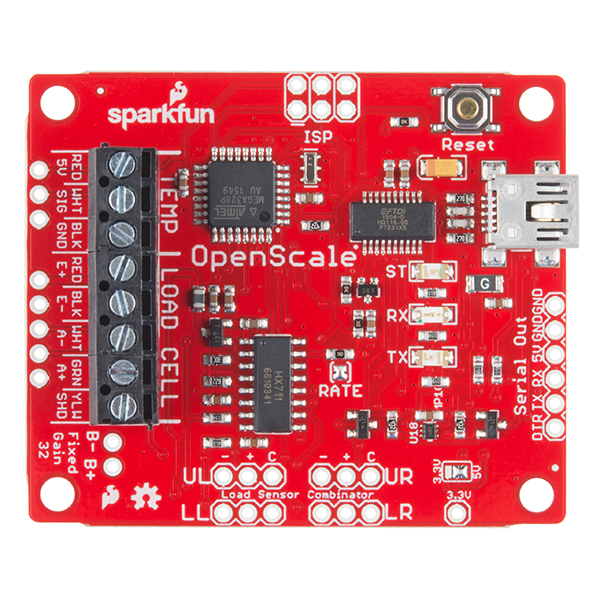
The OpenScale uses 3.5mm screw terminals to connect to the load cell wires and external temperature sensor. The Pocket Screwdriver Set as well as any precision screw drivers fit the screws well.
 |
 |
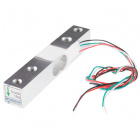
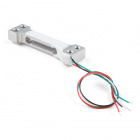
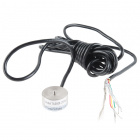
| 200kg load cell | DS18B20 external temperature sensor |
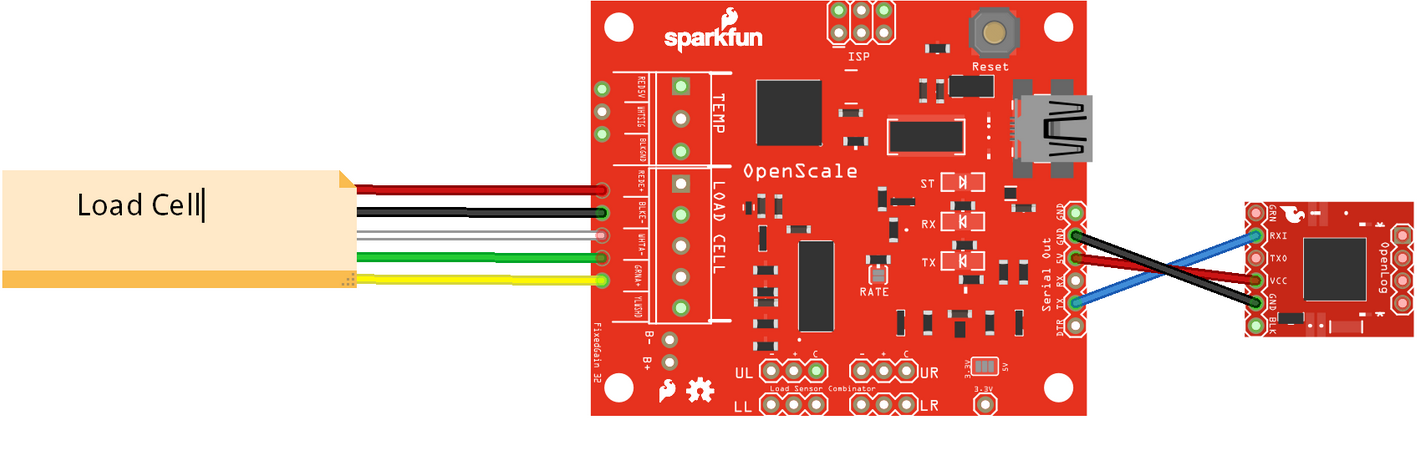
Most load cells will have a Red/Black/White/Green wire color configuration. Insert these wires into the screw terminal and tighten the terminal to finger tight. A few load cells use a blue wire in place of the green wire - don't worry, it will still work! Load cells with a large capacity or a long connecting cable may have an additional yellow wire that is used to shield the four signal wires. If you have this wire available attach it as well.

Single Strain Gauges
If you are using discrete strain gauges (for example our 50kg load sensor) you will need to use the built-in Load Cell Combinator to combine four strain gauges into a wheatstone bridge configuration. See the Load Cell Combinator Hookup Guide for more information.
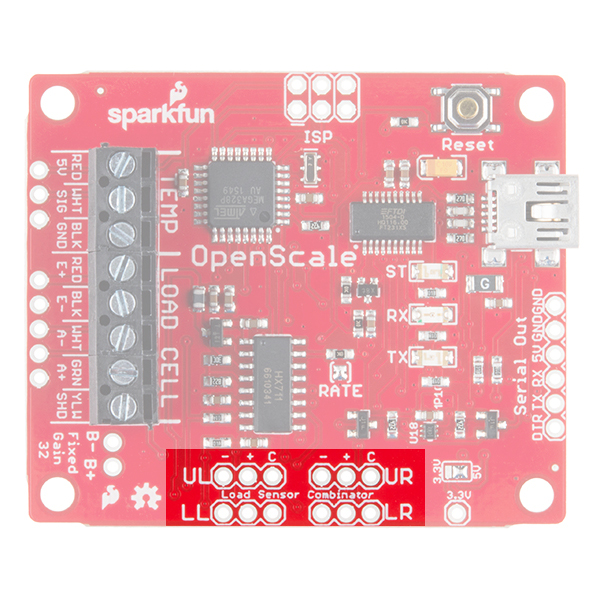
OpenScale also has the Load Cell Combinator built-in. The markings UL, UR, LL and LR stand for upper left, upper right, lower left and lower right respectively. Just like you would see in a bathroom scale. The C mark is for the "center tap" which is explained in the strain gauge tutorial.
Configuration
Once OpenScale is connected and reporting to your terminal window press 'x' (or sending the character via the Arduino Serial Monitor with the Enter key) to bring up the configuration menu.
Press the corresponding letter or number to control that setting.
Tare Scale to Zero
Use this to tell OpenScale what the base reading is. Remove everything from the scale that will not be there permanently and tare scale to zero by sending a value of 1 in the configuration menu. OpenScale will take a series of readings, average them, and store this value in non-volatile EEPROM. At each power-up OpenScale will use this value as 'zero'.
Calibrate Scale
Use this to calibrate your scale to a known value. First, remove everything from the scale that will not be there permanently and tare the scale to zero (see ‘Tare Scale to Zero’).
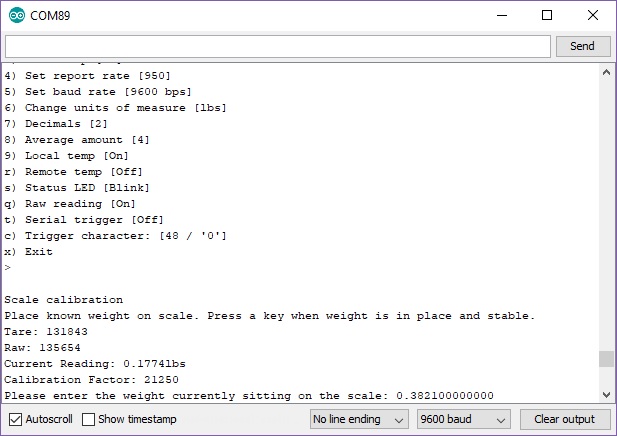
Next place an accurate and known mass onto your scale. Then select ‘Calibrate scale’ by sending 2 in the configuration menu.
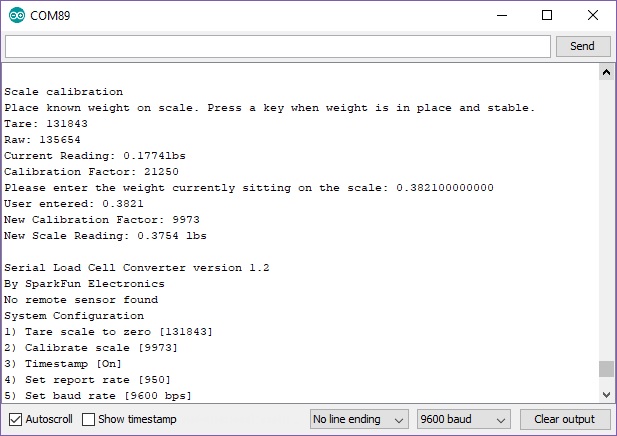
If you are using Serial Load Cell Converter version 1.2, the prompt will tell you to place a known weight on the scale. After placing a known weight on the scale, send another character to move on to the next step of the calibration process. You will be prompted to enter the known weight on the scale. In this case, a smartphone was measured with another scale and recored as 0.3821 lbs. After entering 0.3821, additional trailing 0's needed to be entered to fill in the array.
Once the array is filled with 0.382100000000, you will be taken back to the configuration menu.
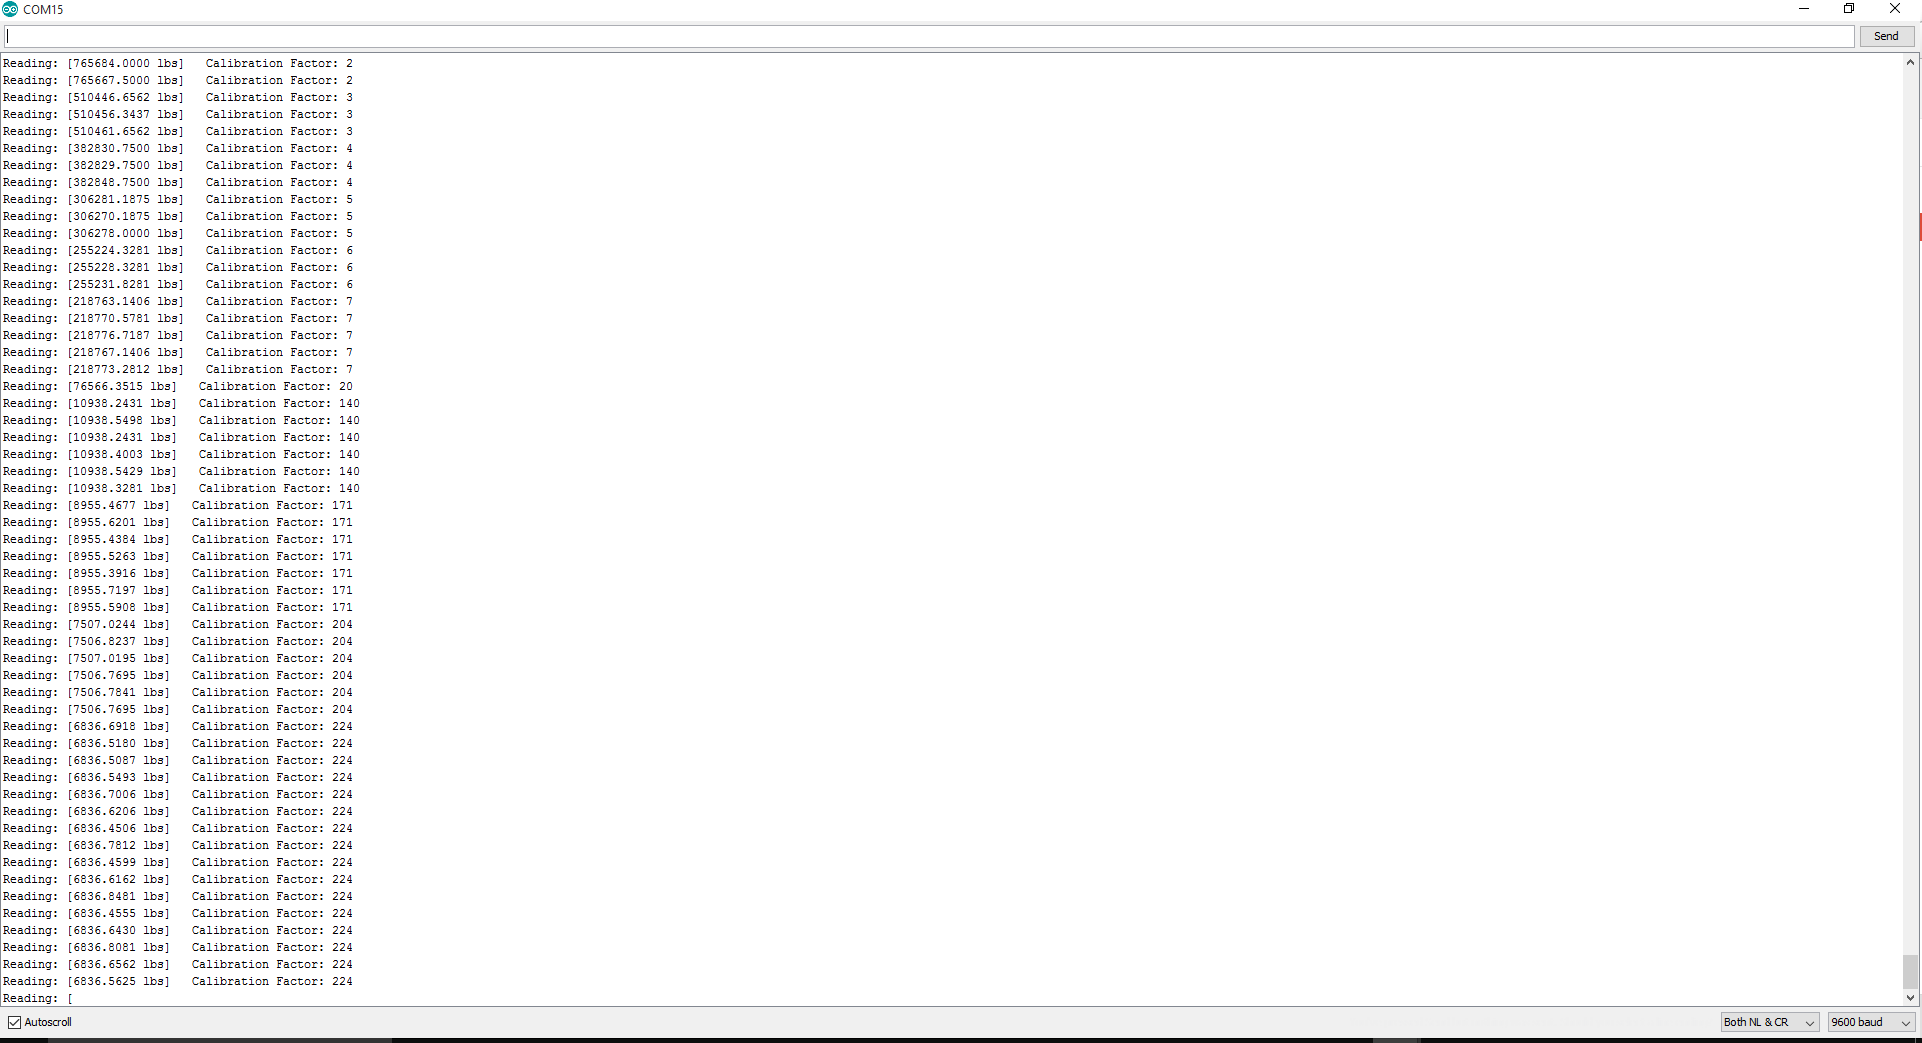
Next use the ‘a’ and ‘z’ keys to increase or decrease the reading to match your mass. Holding ‘a’ or ‘z’ will change the calibration factor at a faster rate. Press ‘x’ once the reading closely matches the known weight.
Click the image for a closer look
Timestamp
This will enable or disable the millisecond timestamp shown at the start of every reading. The default is to show a timestamp.
Set Report Rate
This controls how often OpenScale reports a reading. This is handy if you need a very accurate amount of time between readings or wish to limit the number of data points. Once selected from the configuration menu use the ‘a’ and ‘z’ keys to increase or decrease the time between readings. The default is 5Hz or 200ms between reports.
The report rate is calculated at power up and when the user selects ‘Set report Rate’ from the configuration menu. The fastest possible report rate is about 10.98Hz or 91ms between reports. This rate is affected by many things:
- Faster baud rates (115200bps) allows for faster printing of text
- Turning off time stamp and temperature readings require less characters to be printed
- Lowering the ‘average amounts’ setting will decrease the amount of time it takes to read the load cell.
- If attached, the remote temperature sensor takes around 19ms to read
- Decreasing the number of decimals decreases the number of characters to print
Set Baud Rate
This controls the baud rate that OpenScale communicates. OpenScale runs at 9600bps by default. Type in the baud rate you would like and press return. OpenScale will immediately go to this baud rate. This is configurable from 1200 to 1,000,000bps but standard baud rates (multiples of 1200: 9600, 57600, 115200, etc) are recommended. OpenScale will attempt to go to the user inputted baud rate but the timing errors for exotic baud rates may become significant enough to make communication impossible.
Change Units of Measure
This toggles the measurements between pounds (lbs) and kilograms (kgs). Setting the units from lbs to kgs will change the calibration factor to properly convert units. This will also change the text displayed with each report. The default is pounds.
Decimals
This controls the number of decimals displayed. The default is two.
Average amount
This controls how many readings to average across. The default is four. Decreasing the average amount will allow for faster report rates but will increase the noise in reports.
Local Temp
This controls reading of the on board temperature sensor. The default is to show the local temperature. This is helpful if you need to calibrate your scale readings with local temperature readings. The onboard sensor is the TMP102 digital temperature sensor. It is very precise but will need calibration by the end user.
Remote Temp
This controls the reading of the off board temperature sensor. The default is to show the remote temperature if a sensor is detected at power on. A DS18B20 one-wire temperature sensor can be connected to the board to read the temperature of the load cell if further accuracy is needed. It is very precise but will need calibration by the end user.
Enable Status LED
By default the onboard status LED blinks with every other reading. This can be turned off to conserve power and users’ eyesight.
Serial Trigger
Once powered OpenScale will report a weight reading after each report period has passed (see Set Report Rate). Once the serial trigger option is enabled OpenScale will stop reporting and wait to be triggered by an incoming serial character. Any incoming character will cause OpenScale to wake up, take a reading, report, and return to low-power sleep. This setting is valuable for remote applications where power saving is important. To maximize power savings it is recommended that the Status LED be disabled as well. The default is to not be triggered by incoming serial characters.
Calibration Suggestions
Creep is the change in load cell signal occurring with time while under constant load and with all environmental conditions and other variables also remaining constant. Load cells tend to creep meaning they will change their output slightly over time when a weight is left on the scale for long (30+ minutes) periods of time. To calibrate for something such as a bee hive that will be permanently left on a scale:
- Place everything on the scale that will be the zero state (the hive plus any static ballast)
- Leave the scale for 30+ minutes
- Tare the scale with these weights
- Place two calibration weights onto the scale
- Leave the scale for 30+ minutes
- Calibrate the scale to this combined weight
- Remove one of the calibration weights and verify scale output
More information about load cells and creep can be found here. Creep is also load cell specific. You will find a section on creep in the data sheet for your specific load cell. This calibration method may need to be repeated every season with changing temperatures and humidity.
Upgrading the Firmware
If this is your first time using Arduino, please review our tutorial on installing the Arduino IDE. If you have not previously installed an Arduino library, please check out our installation guide. If you've never connected an FTDI device to your computer before, you may need to install drivers for the USB-to-serial converter. Check out our How to Install FTDI Drivers tutorial for help with the installation.
From time to time there will be new features for OpenScale. Using the Arduino IDE it is very easy to load new firmware or your own custom firmware onto OpenScale.
OpenScale ships with the Optiboot serial bootloader (115200bps, 16MHz). This allows the board to be reprogrammed under the Arduino IDE by selecting ‘Arduino/Genuino Uno’ on the boards submenu.
To compile and load the latest version of firmware onto your OpenScale:
- Connect OpenScale to your computer over USB.
- Download the OpenScale firmware either directly from the GitHub repo or by checking out the repository (more advanced and not necessary for most people).
- Download and install bogde's HX711 library.
- Download and install PJRC's OneWire library.
- Open the OpenScale.ino sketch located in the /firmware/OpenScale/ directory and hit Verify.
- Select the “Arduino Uno” under the Tools -> Boards submenu.
- Select the right COM port under the Tools -> Port submenu.
- Upload the code.
- High five your nearest neighbor.
Project: Rabbit Research
This section will cover a small project you can make with your OpenScale.
Background
I moved to Colorado about seven months ago from Las Vegas, NV. I've never had grass. I had rocks and pavement. My home in Loveland has a 1/3rd of an acre of grass and we love it (Moose, my dog, too). At first, I though the four rabbits were cute. But, they started to reproduce, and now there are more than ten. My grass has become patchy from their insatiable tastes for backyard greens. I won't even bring up all the tiny turds I sweep on the regular, but I just did. I am determined to put an end their grass lust.
Enter the OpenScale. My plan is to create a inviting and friendly trap with an old dog house, fill it with rabbit food, keep a scale under the feeder and log and use the weight measurement along with the time stamp to track when the little varmints feed. After a sufficient amount of data is collected, I will remove the dog house and set my sprinklers to go off during feeding times in an effort to deter these adorable lawn destroyers. In the event there is no pattern to their feed times I will give up, add an additional dog house with gourmet food and hope they keep off the grass.
For this project, you will need the following parts:

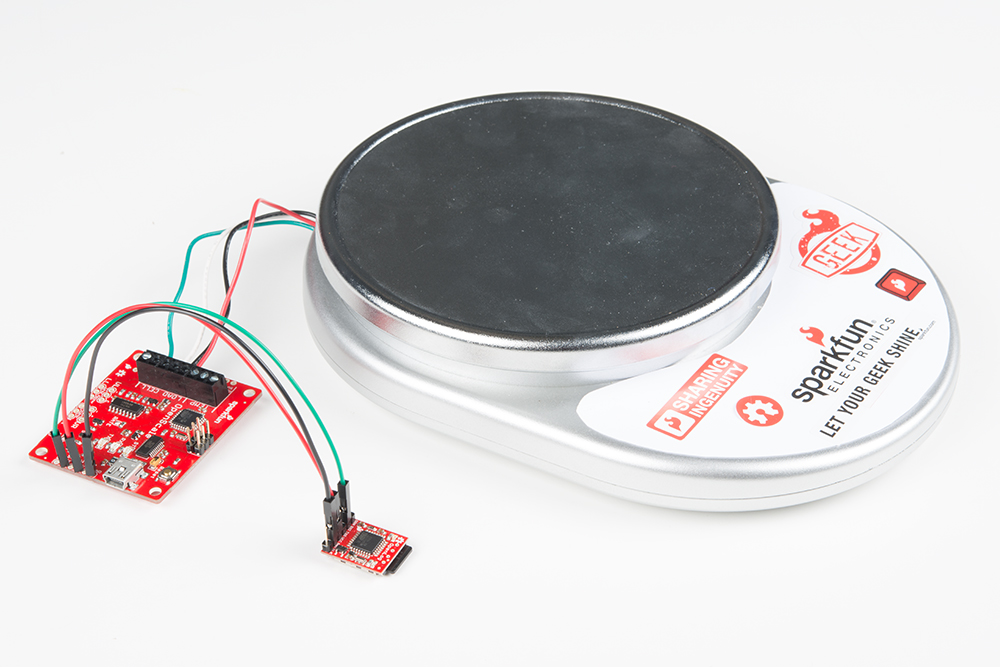
This is a kitchen scale, ripped apart and put back together with OpenScale. You can see in the picture above that inside is just simple a 10kg load cell, like the Load Cell SparkFun sells. I didn't want to change the mounting of the load cell since that is the trickiest part, so I added some colored wire to easily hook up to OpenScale's screw terminals.


Hardware
The connections are straightforward. The load cell is hooked up by matching the colored wires to the corresponding screw terminal on OpenScale. OpenLog is connected through the "Serial Out" port, although only TX to RX, 5V to VCC and GND to GND (OpenScale to OpenLog order) are necessary for logging the data. Power through USB, and open a serial terminal at a baud rate of 9600. It also helps to change the setting at the bottom to "No Line Ending" to keep the config menu from popping up a couple of times. From here you can tare, calibrate and weigh.
To make your application mobile, add an external power supply with a rechargeable battery pack, solar cell along with the Sunny Buddy, and your offsite weigh scale will be self sustaining.
Software
There is no additional software needed! But, there are some steps in the configuration menu that need to be completed. When your project is put together, power the OpenScale through USB, and open a serial terminal window. I just use the terminal in Arduino. To keep the configuraion menu from popping up several times in the monitor, change the setting at the bottom right to "No line ending". Send the command "1" to tare to scale. Send the command "2" and follow the process to calibrate, and you'll be ready to go.
Putting It All Together
Once the OpenScale is calibrated and the OpenLog is ready to accept data, it's ready to set the trap and wait for some data! You can learn more about the rabbit scale in the video below.
Resources and Going Further
Now that you've successfully got your OpenScale up and running, it's time to incorporate it into your own project! For more information, check out the resources below:
- Schematic (PDF)
- Eagle Files (ZIP)
- Arduino Code (ZIP)
- Particle Sketch (ZIP)
- GitHub
- SFE Product Showcase
Google is your friend. Checkout the Scale Manufacturer's Load Cell Application Guide. Also search for 'beehive load cell' to see how users are monitoring the growth and health of beehives. Need some inspiration? Check out the SparkFun Beehive project, which makes use of the OpenScale to monitor a hive located at the SparkFun headquarters, using the link below.
Or check out some of these related tutorials:
IoT Industrial Scale
IoT Weight Logging Scale
Qwiic Scale Hookup Guide
Please report typos, inaccuracies, and especially unclear explanations to us by commenting on the tutorial. Suggestions for improvements are welcome and greatly valued. For firmware requests or bugs please post an issue on the GitHub issues page of the OpenScale repo.