MicroView Hookup Guide
 Joel_E_B, Marcus Schappi
Creating Fonts for MicroView
Though there are several different fonts that come programmed into the MicroView, you have the option to create your own fonts! Read on to find out how to do so.
In the OLED Memory Map section, we covered how the MicroView library allocates 384 bytes of RAM as screen buffer from ATmega328P to perform graphic operations before transferring this block of memory to the SSD1306 OLED controller’s memory. The following diagram shows how two 5x8 pixel characters are drawn on the screen buffer.
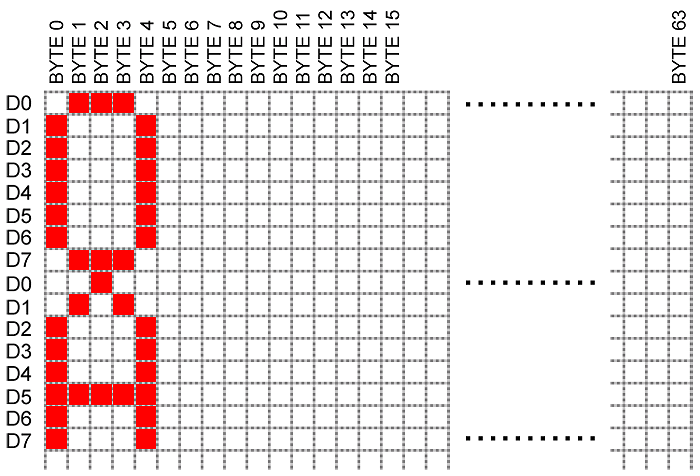
From the diagram, the “O” character appeared on ROW0, and took up 5 bytes of RAM from the screen buffer in the following order:
BYTE0 = 0x7e
BYTE1 = 0x81
BYTE2 = 0x81
BYTE3 = 0x81
BYTE4 = 0x7e
Character “A,” which was shown on ROW1, took up 5 bytes of RAM from the screen buffer in the following order:
BYTE64 = 0xfc
BYTE65 = 0x22
BYTE66 = 0x21
BYTE67 = 0x22
BYTE68 = 0xfc
A 8x16 font will take up 16 bytes of RAM from the screen buffer as shown in the next diagram:
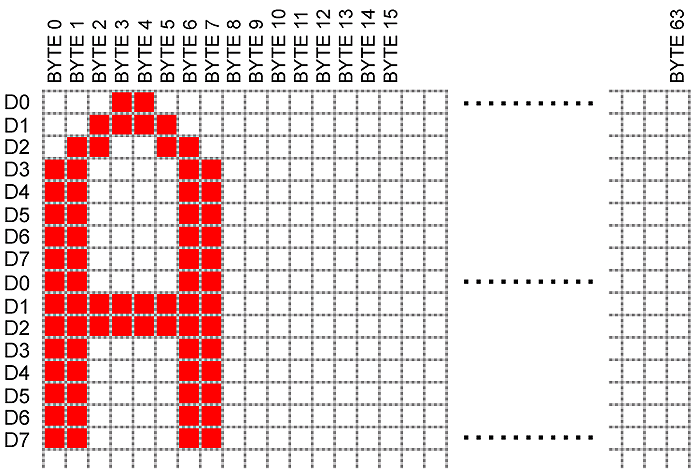
With the 8x16 font using RAM from screen buffer’s ROW0 and ROW1, the data of the above diagram will occupy the screen buffer’s BYTE0 – BYTE7 and BYTE64 – BYTE71.
BYTE0 = 0xf8
BYTE1 = 0xfc
BYTE2 = 0x06
BYTE3 = 0x03
BYTE4 = 0x03
BYTE5 = 0x06
BYTE6 = 0xfc
BYTE7 = 0xf8
BYTE64 = 0xff
BYTE65 = 0xff
BYTE66 = 0x06
BYTE67 = 0x06
BYTE68 = 0x06
BYTE69 = 0x06
BYTE70 = 0xff
BYTE71 = 0xff
Manually plotting fonts and text is very tedious! It's much easier to use the font-printing functions within the MicroView library. Displaying text in MicroView is as simple as: uView.print("Hello");
Although MicroView’s library includes four different types of font, these fonts might not suit your needs. By following these steps, you can make your own fonts and include them within the MicroView library:
- Convert fonts to bitmap.
- Generate font source file from bitmap.
- Add font source file to MicroView library.
Converting Fonts to Bitmap
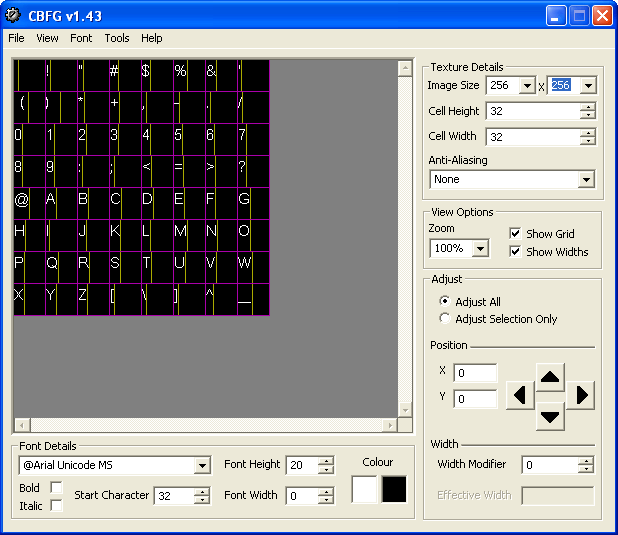
Once we understand how a character is being mapped to the MicroView’s screen buffer, we can choose to manually draw a font to the screen buffer or, alternatively, we can use software to convert a computer’s font to bitmap and then convert the bitmap into C char definition used by the MicroView library.
We have had good results using Codehead’s Bitmap Font Generator to convert a font into a bitmap. If you have had success with using other tools, please let us know, and we’ll update this article.
Let’s quickly run through a few simple steps to convert a computer’s font into a bitmap. Assuming we need the numbers 0 to 9 of the Courier font in 12x24 pixels, the following steps will generate the required bitmap:
- Select “Courier” from the Font Details dropdown combo box.
- Enter 48 as the Cell Height.
- Enter 12 as the Cell Width.
- Enter 128x32 as the Image Size (this Image Size need to be larger than 12x24x10(number of characters) ).
- Enter 48 as the Start Character (48 ASCII code is the number 0).
- Enter 200% as the Zoom.
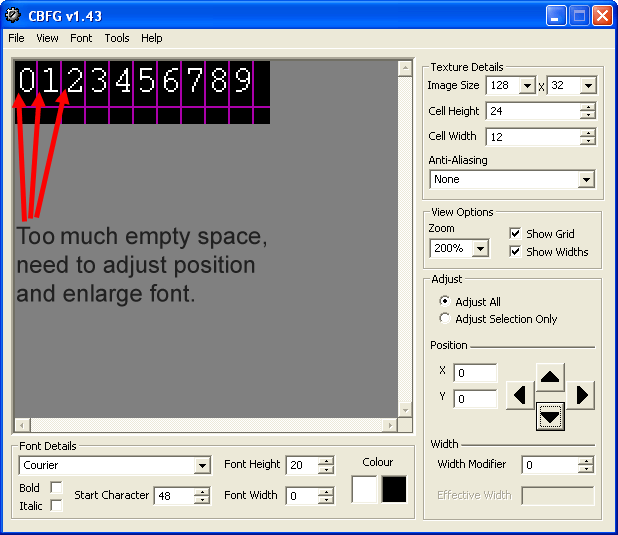
From the generated result, it is clear that there is too much space on the left of the numbers and the glyphs are not taking full advantage of the 12x48 pixel cells.
Let’s further improve the font:
- Enter or slowly increase Font Height to a suitable value---in this case, 26
- Adjust the Position (X,Y) using the arrow button with option “Adjust All” selected (in this case, X=-4, Y=-1)
After the adjustment, we should see the following result:

This result is almost perfect except there is still empty space on the right of the “9” glyph and at the bottom of all the numbers. We can’t further improve the font spacing in Codehead Font Generator because it doesn’t allow custom image sizes, so we’ll correct the font in an image editor later.
Click File, then Export Bitmap (BMP), save the file as 12x24Font.bmp.
Using an image editor like Photoshop or GIMP, open the 12x24Font.bmp file, then make a selection to crop a 120x24 frame from the image.
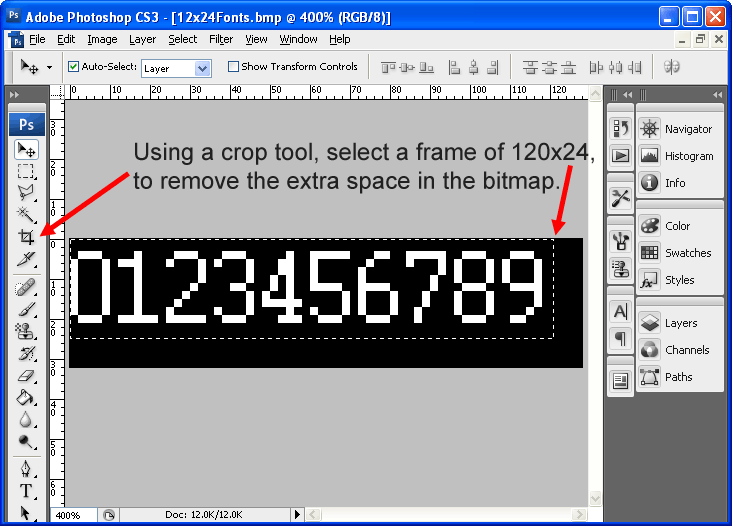
If you want a WHITE text on BLACK background, you will need to INVERT the color now.
Save the image and then proceed to next step. You can also save the hassle by downloading the 12x24Font.bmp already prepared by us.
You have now successfully created a customized bitmap font!
Generating Font Source File from Bitmap
In order to convert the font from bitmap to C char definition, we will be using LCD Assistant. Run LCD Assistant and load the 12x24Font.bmp file previously saved.
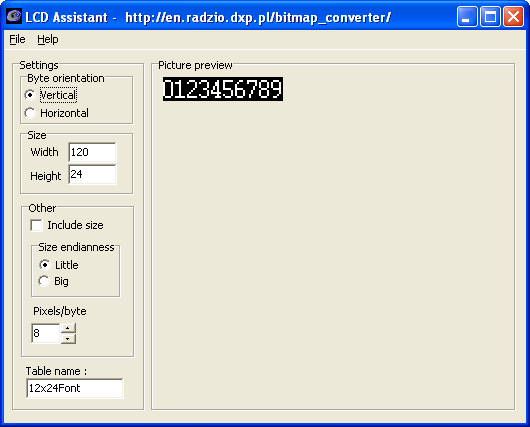
Make sure that following options are correct:
- Picture preview is the right bitmap.
- Byte Orientation has Vertical selected.
- Width is 120, and Height is 24.
- Include Size not selected.
- Size Endianness has Little selected.
- Pixels/byte is 8.
- Table name is 12x14Font (can be any name).
Once all the options are correctly selected, click File, then save the output and type in the filename as 12x24Font.h.
Using a text file editor, open 12x24Font.h.
Locate
language:c
const unsigned char 12x24Font [] = {
and replace with
language:c
#ifndef FONT12X24_H
#define FONT12X24_H
#include <avr/pgmspace.h>
static const unsigned char font12x24 [] PROGMEM = {
// first row defines - FONTWIDTH, FONTHEIGHT, ASCII START CHAR, TOTAL CHARACTERS, FONT MAP WIDTH HIGH, FONT MAP WIDTH LOW (2,56 meaning 256)
    12,24,48,10,1,20,
FONT MAP WIDTH is basically the WIDTH of the BITMAP file used to generate the fonts. In this situation, the WIDTH of the BITMAP file is 120. So the HIGH number is 1, and the LOW number is 20.
Then replace
language:c
};
with
language:c
};
#endif
You should get the following result:
language:c
//------------------------------------------------------------------------------
// File generated by LCD Assistant
// http://en.radzio.dxp.pl/bitmap_converter/
//------------------------------------------------------------------------------

#ifndef FONT12X24_H
#define FONT12X24_H
#include <avr/pgmspace.h>
static const unsigned char font12x24 [] PROGMEM = {
    // first row defines - FONTWIDTH, FONTHEIGHT, ASCII START CHAR, TOTAL CHARACTERS, FONT MAP WIDTH HIGH, FONT MAP WIDTH LOW (2,56 meaning 256)
    12,24,48,10,1,20,
    0x1F, 0x1F, 0xE7, 0xE7, 0xE7, 0xE7, 0xE7, 0xE7, 0x1F, 0x1F, 0xFF, 0xFF, 0x9F, 0x9F, 0x9F, 0x9F,
    0x07, 0x07, 0xFF, 0xFF, 0xFF, 0xFF, 0xFF, 0xFF, 0x9F, 0x9F, 0xE7, 0xE7, 0xE7, 0xE7, 0xE7, 0xE7,
    0x1F, 0x1F, 0xFF, 0xFF, 0x9F, 0x9F, 0xE7, 0xE7, 0xE7, 0xE7, 0xE7, 0xE7, 0x1F, 0x1F, 0xFF, 0xFF,
    0xFF, 0xFF, 0xFF, 0xFF, 0x1F, 0x1F, 0x07, 0x07, 0xFF, 0xFF, 0xFF, 0xFF, 0x07, 0x07, 0xE7, 0xE7,
    0xE7, 0xE7, 0xE7, 0xE7, 0xE7, 0xE7, 0xFF, 0xFF, 0x7F, 0x7F, 0x9F, 0x9F, 0xE7, 0xE7, 0xE7, 0xE7,
    0xFF, 0xFF, 0xFF, 0xFF, 0x87, 0x87, 0xE7, 0xE7, 0xE7, 0xE7, 0xE7, 0xE7, 0x07, 0x07, 0xFF, 0xFF,
    0x1F, 0x1F, 0xE7, 0xE7, 0xE7, 0xE7, 0xE7, 0xE7, 0x1F, 0x1F, 0xFF, 0xFF, 0x1F, 0x1F, 0xE7, 0xE7,
    0xE7, 0xE7, 0xE7, 0xE7, 0x1F, 0x1F, 0xFF, 0xFF, 0x00, 0x00, 0xFF, 0xFF, 0xFF, 0xFF, 0xFF, 0xFF,
    0x00, 0x00, 0xFF, 0xFF, 0xFF, 0xFF, 0xFF, 0xFF, 0x00, 0x00, 0xFF, 0xFF, 0xFF, 0xFF, 0xFF, 0xFF,
    0xFF, 0xFF, 0x7F, 0x7F, 0x9F, 0x9F, 0xE7, 0xE7, 0xF8, 0xF8, 0xFF, 0xFF, 0xFF, 0xFF, 0xFF, 0xFF,
    0xE7, 0xE7, 0xE7, 0xE7, 0x18, 0x18, 0xFF, 0xFF, 0x1F, 0x1F, 0x61, 0x61, 0x7E, 0x7E, 0x00, 0x00,
    0x7F, 0x7F, 0xFF, 0xFF, 0xE0, 0xE0, 0xE7, 0xE7, 0xE7, 0xE7, 0xE7, 0xE7, 0x1F, 0x1F, 0xFF, 0xFF,
    0x00, 0x00, 0xE7, 0xE7, 0xE7, 0xE7, 0xE7, 0xE7, 0x1F, 0x1F, 0xFF, 0xFF, 0xFF, 0xFF, 0xFF, 0xFF,
    0x1F, 0x1F, 0xE1, 0xE1, 0xFE, 0xFE, 0xFF, 0xFF, 0x18, 0x18, 0xE7, 0xE7, 0xE7, 0xE7, 0xE7, 0xE7,
    0x18, 0x18, 0xFF, 0xFF, 0xF8, 0xF8, 0xE7, 0xE7, 0xE7, 0xE7, 0xE7, 0xE7, 0x00, 0x00, 0xFF, 0xFF,
    0xF8, 0xF8, 0xE7, 0xE7, 0xE7, 0xE7, 0xE7, 0xE7, 0xF8, 0xF8, 0xFF, 0xFF, 0xE7, 0xE7, 0xE7, 0xE7,
    0xE0, 0xE0, 0xE7, 0xE7, 0xE7, 0xE7, 0xFF, 0xFF, 0xE1, 0xE1, 0xE6, 0xE6, 0xE7, 0xE7, 0xE7, 0xE7,
    0xE7, 0xE7, 0xFF, 0xFF, 0xF9, 0xF9, 0xE7, 0xE7, 0xE7, 0xE7, 0xE7, 0xE7, 0xF8, 0xF8, 0xFF, 0xFF,
    0xFE, 0xFE, 0xFE, 0xFE, 0xE6, 0xE6, 0xE0, 0xE0, 0xE6, 0xE6, 0xFF, 0xFF, 0xF9, 0xF9, 0xE7, 0xE7,
    0xE7, 0xE7, 0xE7, 0xE7, 0xF8, 0xF8, 0xFF, 0xFF, 0xF8, 0xF8, 0xE7, 0xE7, 0xE7, 0xE7, 0xE7, 0xE7,
    0xF8, 0xF8, 0xFF, 0xFF, 0xFF, 0xFF, 0xE1, 0xE1, 0xFE, 0xFE, 0xFF, 0xFF, 0xFF, 0xFF, 0xFF, 0xFF,
    0xF8, 0xF8, 0xE7, 0xE7, 0xE7, 0xE7, 0xE7, 0xE7, 0xF8, 0xF8, 0xFF, 0xFF, 0xFF, 0xFF, 0xE7, 0xE7,
    0xE7, 0xE7, 0xF9, 0xF9, 0xFE, 0xFE, 0xFF, 0xFF,
};
#endif
You have now successfully converted the bitmap font to a C header file!
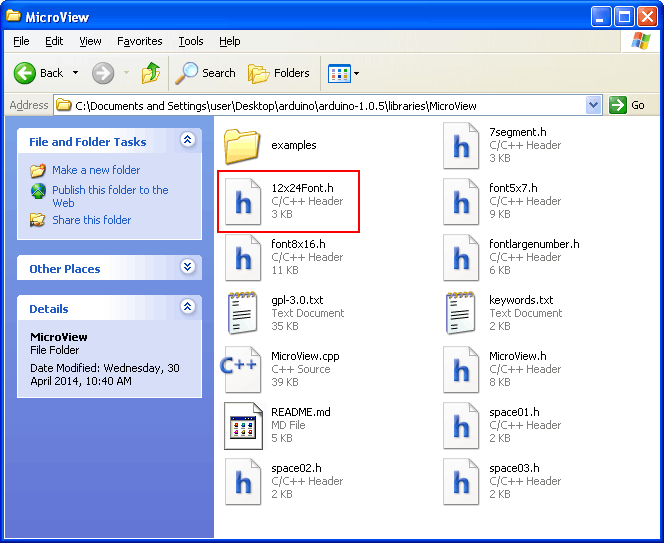
Adding the Font Source File to MicroView Library
Move the edited 12x24Font.h file to MicroView’s library folder. You should be able to see the 12x24Font.h in the same folder as the rest of the MicroView’s files.
Using a text file editor, open MicroView.cpp, and perform the following steps:
Locate
language:c
// Add header of the fonts here.  Remove as many as possible to conserve FLASH memory.
Add after this line
language:c
#include <12x24Font.h>
Locate
language:c
// Change the total fonts included
#define TOTALFONTS      7
Change to
language:c
// Change the total fonts included
#define TOTALFONTS      8
Locate
language:c
const unsigned char *MicroView::fontsPointer[]={
    font5x7
    ,font8x16
    ,sevensegment
    ,fontlargenumber
    ,space01
    ,space02
    ,space03
};
Change to
language:c
const unsigned char *MicroView::fontsPointer[]={
    font5x7
    ,font8x16
    ,sevensegment
    ,fontlargenumber
    ,space01
    ,space02
    ,space03
    ,font12x24
};
The font that we have just added is at the 7th position starting from position 0 (font5x7) in the MicroView::fontsPointer array; therefore, the new font is now fontType 7. Save MicroView.cpp once you have made your changes.
Run the following sketch to test your new font:
language:c
#include <MicroView.h>

void setup() {
  uView.begin();
  uView.clear(PAGE);
  uView.setFontType(7);
  uView.print("1234");
  uView.display();
}

void loop () {
}
You have now successfully hacked MicroView's library to add your own custom font!