Measuring Internal Resistance of Batteries
 Shawn Hymel
 Introduction
Batteries are incredibly useful devices for transforming chemical reactions into electrical energy. We use them every day in things like flashlights, cars, video game controllers, and so on. To learn how batteries work, check out the following video:
To get a more in-depth explanation of batteries, see this article:
What is a Battery?
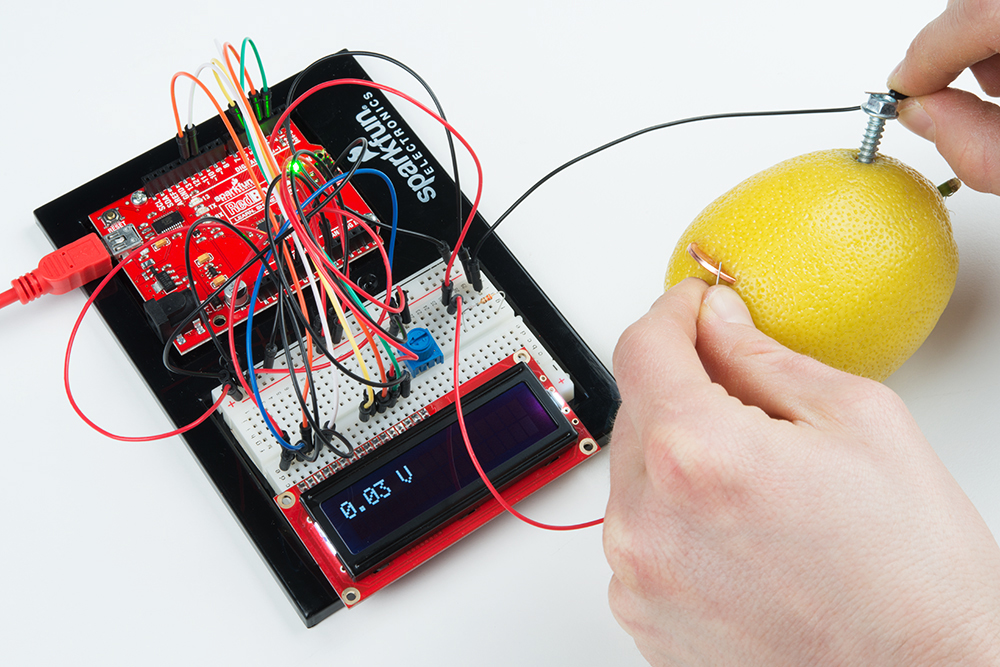
In this tutorial, we will make a crude battery out of a lemon, a zinc-plated screw, and a copper-plated coin. The metals in the screw and the coin react with the acid in the lemon to create a flow of electrons.
Lemons, in reality, make for poor batteries. One reason is that the zinc continues to react with the lemon without a circuit present. This means that the battery would only have a shelf life of a few hours.
Another factor is the internal resistance of the lemon battery. We will discuss internal resistance in the next section and why it is important for batteries.
Required Materials

- Lemon
- Zinc-plated nail or screw
- Penny (or other copper-coated piece of metal)
- AA battery
In addition to these materials, you will need a way to measure voltage. A multimeter will offer the best accuracy, but you can also build your own voltmeter from parts found in the SparkFun Inventor's Kit.
If you want to build your own voltmeter, here is what you will need:
Tools
In addition, you will need a hobby knife to cut a slit into the lemon.
Suggested Reading
Before continuing with this project, we suggest you be familiar with a few concepts:
Internal Resistance
When designing a circuit with a battery, we often assume that the battery is an ideal voltage source. This means that no matter how much or little load we attach to the battery, the voltage at the source's terminals will always stay the same.

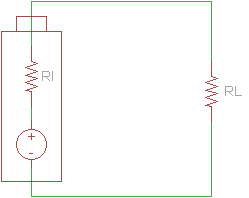
In reality, several factors can limit a battery's ability to act as an ideal voltage source. Battery size, chemical properties, age, and temperature all affect the amount of current a battery is able to source. As a result, we can create a better model of a battery with an ideal voltage source and a resistor in series.
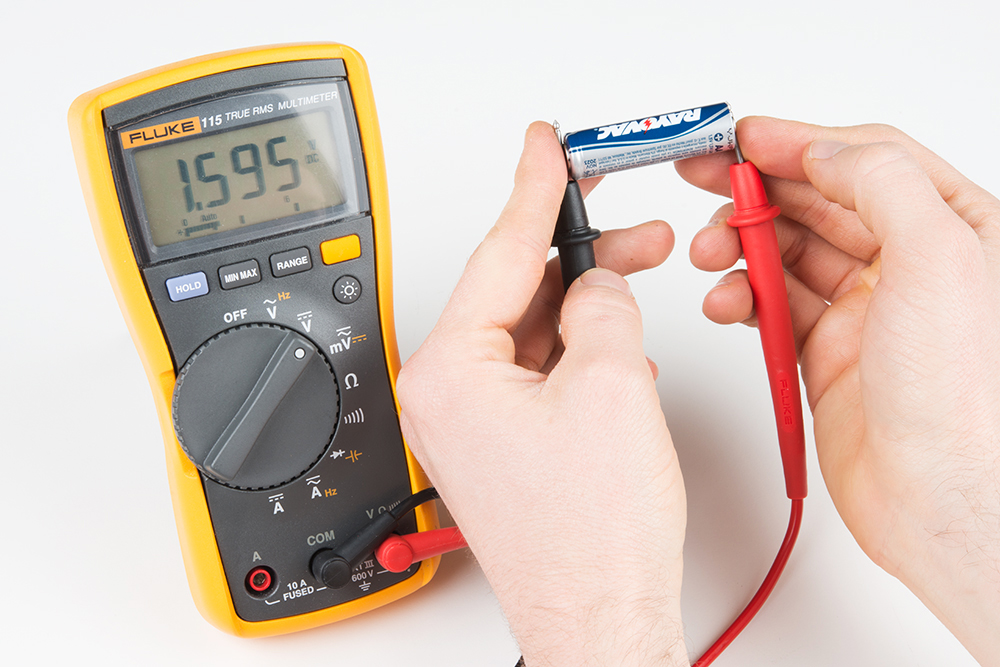
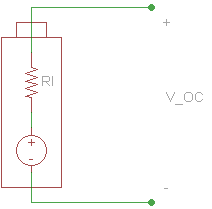
We can measure the voltage of a battery across its terminals without any load connected. This is known as the open-circuit voltage (VOC).
Note that because no current is flowing across the internal resistor, the voltage drop across it is 0 V. Therefore, we can assume that VOC is equal to the voltage of the ideal voltage source in the battery.
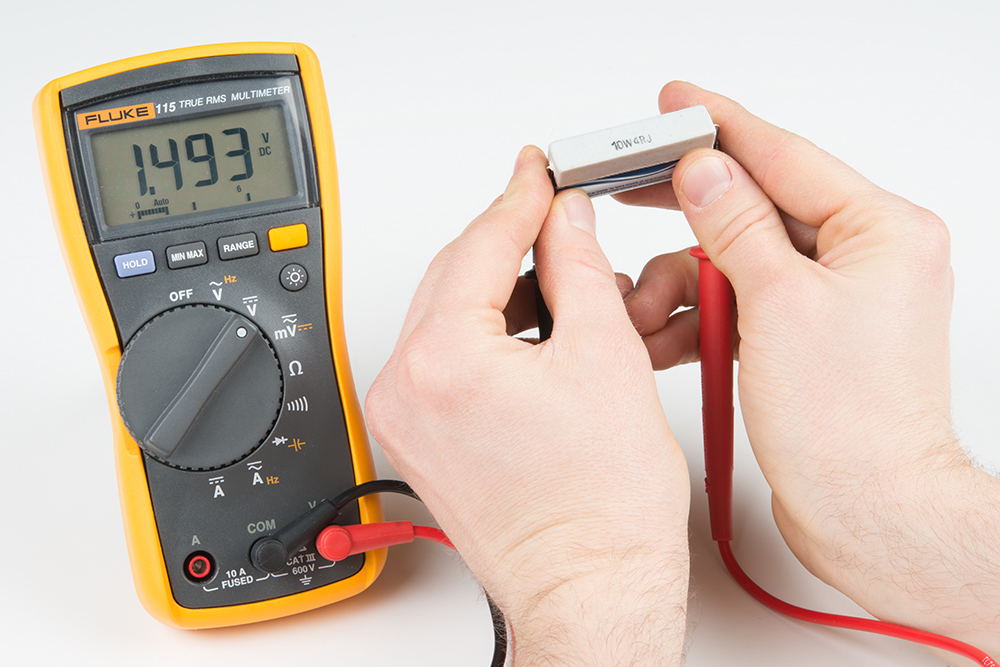
If we connect a load across the battery, the voltage across the terminals drops.
This drop in voltage is caused by the internal resistance of the battery. We can calculate the internal resistance if we take readings of the open-circuit voltage and the voltage across the battery's terminals with a load attached.
To start, we create a diagram showing our circuit.
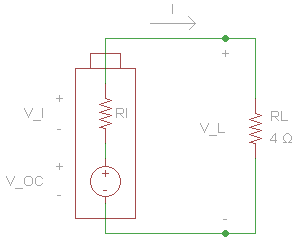
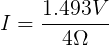
We can plug in the loaded voltage we measured (VL) and the value of the resistor (RL) into Ohm's Law to get the current flowing through the circuit (I).


We also need to get the voltage across the internal resistor. We can do that using Kirchhoff's Voltage Law. Simplified for this circuit, we can say that the voltage drop across both resistors must add up to the voltage of the ideal voltage source.


Now that we know the voltage drop across the internal resistor and the current through it, we can use Ohm's Law again to find its resistance.


From this, we can see that the internal resistance (at this moment) of the AA cell is 0.273 Ω.
Build a Voltmeter
Hardware Hookup
Connect the components as shown in the Fritzing diagram:
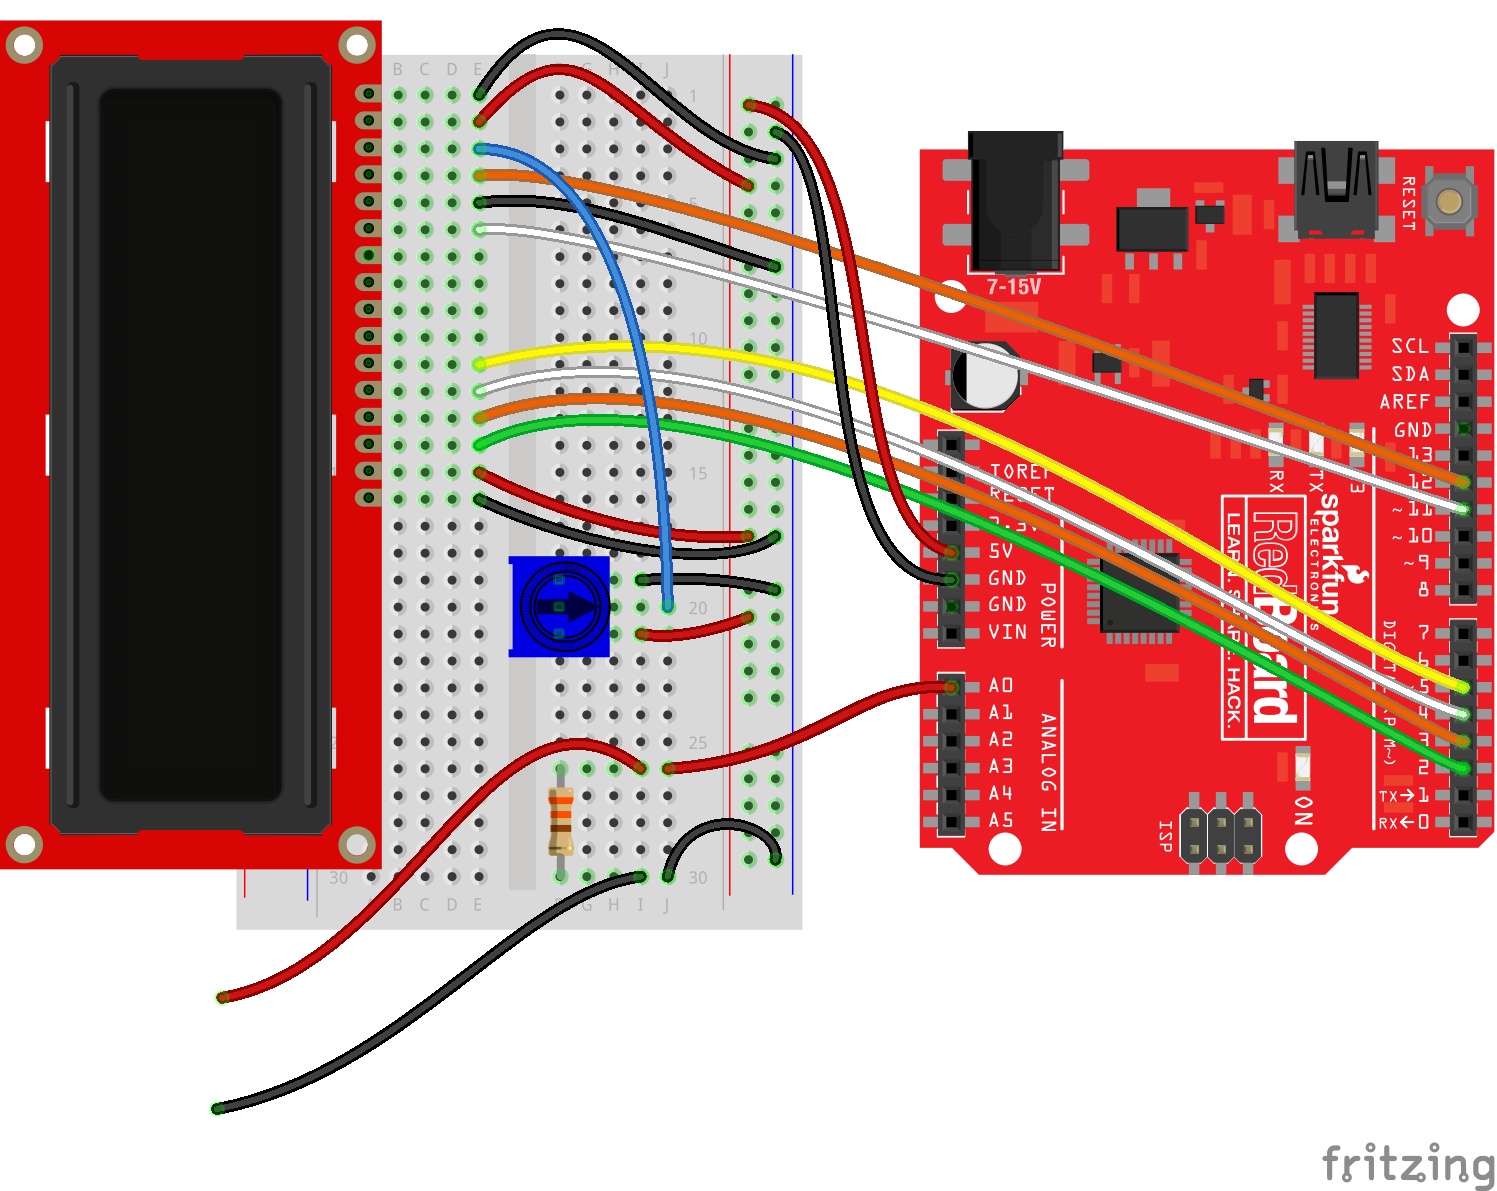
Once you are done, you should have 2 wires hanging out from the side of your breadboard. These will be your probes for testing voltage across terminals.
Note that we have a 330 Ω resistor across the probes. This will act as our load for the first test.
The Code
Note: This example assumes you are using the latest version of the Arduino IDE on your desktop. If this is your first time using Arduino, please review our tutorial on installing the Arduino IDE.
If you have not previously installed an Arduino library, please check out our installation guide.language:c
/**
* SparkFun Inventor's Kit Project
* Voltmeter
* Date: May 3, 2016
*
* Description:
* Connect a resistor between A0 and GND to measure the loaded
* voltage across a voltage source, such as a battery. Remove
* the resistor to measure the open circuit voltage.
*
* NOTE: The voltmeter is only capable of sensing 0 - 5V.
*
* License:
* Public Domain
*/
#include <LiquidCrystal.h>
// Constants
int VOLTAGE_PIN = A0;
// Global variables
LiquidCrystal lcd(12, 11, 5, 4, 3, 2);
void setup() {
// Initialize the LCD and clear it
lcd.begin(16, 2);
lcd.clear();
}
void loop() {
int sensorValue;
float voltage;
// Read the analog value from A0
sensorValue = analogRead(VOLTAGE_PIN);
// Convert the analog value to a voltage
voltage = ((float)sensorValue * 5.0) / 1023;
// Display the voltage on the LCD
lcd.setCursor(0, 0);
lcd.print(voltage);
lcd.print(" V");
// Wait 200 ms before taking another reading
delay(200);
}
What You Should See
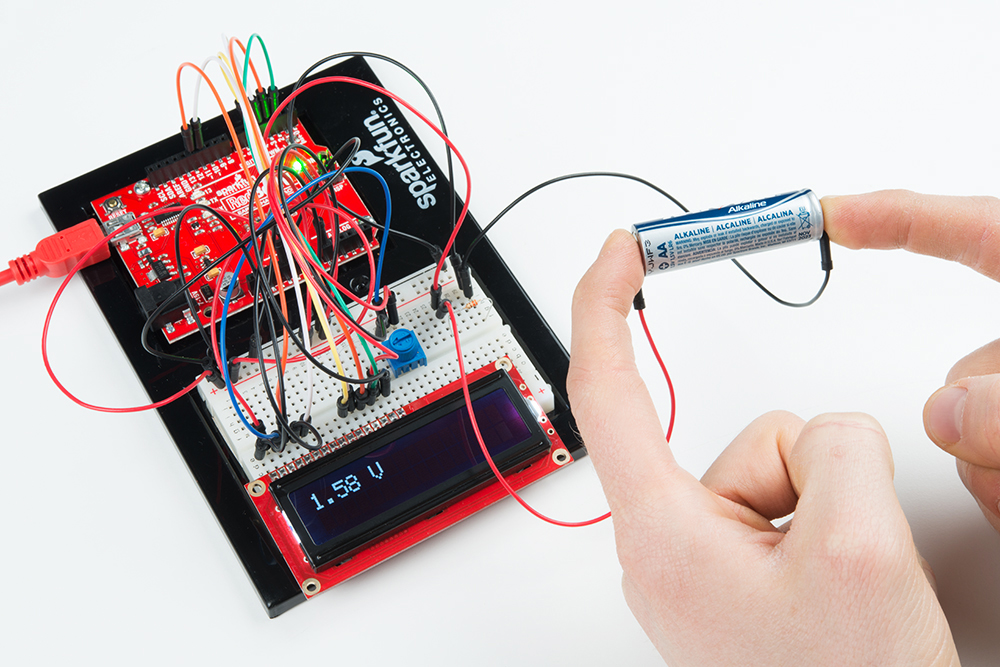
Once you have uploaded the code to the RedBoard, try touching the ends of the probes across the terminals of the AA battery. You should see a voltage reading appear on the LCD.
Build a Lemon Battery
We get to build a battery! This is a crude fruit-based battery that will not last very long nor drive much current. However, it is useful for measuring internal resistance.
Insert the zinc screw or nail into one side of the lemon.

Use the hobby knife to cut a slit in the other end of the lemon.

Insert a penny into the slit so that half of the penny is still outside the lemon's skin.

And that's it! We successfully created a battery. Make sure that the penny and screw cannot touch each other, or you will create a short circuit between the electrodes. While the short circuit will not start any fires, it will not produce a voltage for our experiments.
Take Voltage Measurements
Measurement Sheet
Create a table for recording voltages:
| Voltages | 330 Ω Load | 10k Ω Load | Open Circuit |
| Lemon Battery |
330 Ω Load
Touch the negative probe (black wire in the picture) to the anode (nail/screw) on the battery, and touch the positive probe (red wire in the picture) to the cathode (penny) terminal on the battery. Record the voltage under "330 Ω Load."
10k Ω Load
Replace the 330 Ω resistor with a 10k Ω. Repeat the process to measure the voltage across the battery. Record the voltage under "10k Ω Load."
Open Circuit Voltage
Remove the resistor from the breadboard and take another measurement. Record the voltage under "Open Circuit."

Calculate the Internal Resistance
Using the voltage readings from the "10k Ω Load" and the "No Load" (open circuit), calculate the internal resistance of the lemon battery.
Hint: Refer to the Internal Resistance section to see how to calculate this value.
Questions
- Does the internal resistance of the lemon battery seem high or low?
- What is the maximum current your lemon battery can provide? (Hint: imagine connecting a wire between the terminals. How much current would flow through the circuit?)
- Re-calculate the internal resistance using the "330 Ω Load" and "No Load" values. Does it match your first calculation? If not, what do you think would cause the difference?
- Perform the whole experiment again using a consumer-grade battery, such as a AA alkaline cell. What is the maximum current a AA can provide?
Resources and Going Further
Taking the Next Steps
Now that you've measured and calculated the internal resistance in a real battery, here's how you can experiment even more:
- Try making batteries out of different fruits and vegetables. Which have the best voltage and current sourcing capabilities?
- Connect several fruit-powered batteries to light up an LED. How many do you need?
- Measure and calculate the internal resistance of different consumer batteries.
Other Projects
Want to use a battery in a real project? Check out some of these tutorials for inspiration:
LED Butterfly Pop Up Card
ESP8266 Powered Propane Poofer
Blynk Board Washer/Dryer Alarm
Interested in learning more foundational topics?
See our Engineering Essentials page for a full list of cornerstone topics surrounding electrical engineering.
