Lockitron Hardware Hookup Guide
This Tutorial is Retired!
This tutorial covers concepts or technologies that are no longer current. It's still here for you to read and enjoy, but may not be as useful as our newest tutorials.
Example Code
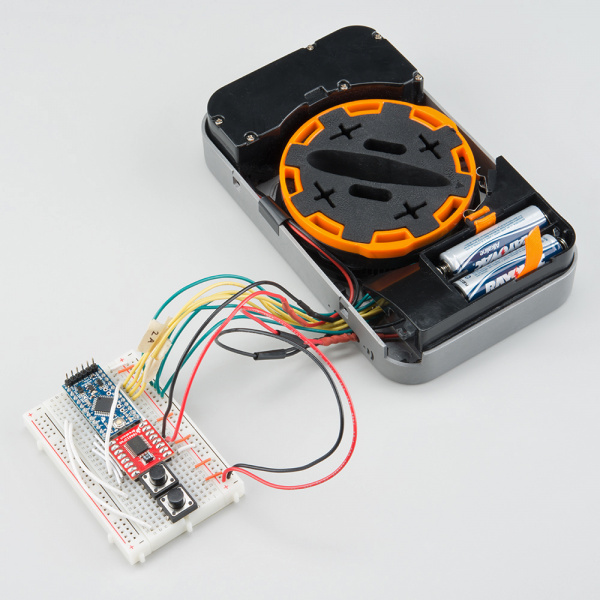
With all of the wires connected, we can upload some code to the Pro Mini.
Note: This example assumes you are using the latest version of the Arduino IDE on your desktop. If this is your first time using Arduino, please review our tutorial on installing the Arduino IDE.
If you have not previously installed an Arduino library, please check out our installation guide.- You generally don't want to control your door lock with just 2 buttons. You will probably want to add Bluetooth, RFID, fingerprint scanning, etc.
- Also, the code runs a "reset" loop when if first boots up. This just moves the two rings into a known setting that should fit on most locks. You will want to modify this part of the code for your own door (or, at the very least, let it run before installing the Lockitron) so you don't draw too much continuous current through the motor driver board if it gets stuck trying to move the deadbolt.
Example Sketch
Plug in the FTDI breakout to your Pro Mini, and connect a USB cable from it to your computer. Copy and paste the code into your Arduino IDE.
language:c
    /****************************************************************
Lockitron_Demo.ino
Shawn Hymel @ SparkFun Electronics
July 7, 2015

Controls the lock and unlock functions of a Lockitron motor with
2 buttons. Note that on boot, the Arduino will attempt to rotate
the motor to a "home" position. This might be bad if the
Lockitron in on a door.

This code is beerware; if you see me (or any other SparkFun
employee) at the local, and you've found our code helpful, please
buy us a round!

Distributed as-is; no warranty is given.
****************************************************************/

// Debug mode. 0 = Motor functional. 1 = Serial output only.
#define DEBUG 0

// Constants
const uint8_t LOCK_OPEN = 0;
const uint8_t LOCK_CLOSED = 1;
const uint8_t MSG_LOCK = 0x10;
const uint8_t MSG_UNLOCK = 0x11;
const uint8_t MSG_STATE_REQ = 0x12;

// Motor speed and direction definitions
const uint8_t MOTOR_SPEED = 200;
const uint8_t MOTOR_CW = 0;
const uint8_t MOTOR_CCW = 1;

// Pin definitions
const uint8_t BTN_UNLOCK_PIN = 2;
const uint8_t BTN_LOCK_PIN = 3;
const uint8_t SW_1A_PIN = A0;
const uint8_t SW_1B_PIN = A1;
const uint8_t SW_2A_PIN = A2;
const uint8_t SW_2B_PIN = A3;
const uint8_t AIN1_PIN = 7;
const uint8_t AIN2_PIN = 8;
const uint8_t PWMA_PIN = 9;

// Button states
uint8_t btn_lock;
uint8_t btn_unlock;
uint8_t prev_btn_lock;
uint8_t prev_btn_unlock;

// Switch state variables
uint8_t sw_1a;
uint8_t sw_1b;
uint8_t sw_2a;
uint8_t sw_2b;

// Lock state
uint8_t lock_state;

void setup() {

#if DEBUG
  Serial.begin(9600);
#else
  // Set up motor pins
  pinMode(AIN1_PIN, OUTPUT);
  pinMode(AIN2_PIN, OUTPUT);
  pinMode(PWMA_PIN, OUTPUT);
#endif

  // Set up switch and button pins
  pinMode(BTN_UNLOCK_PIN, INPUT_PULLUP);
  pinMode(BTN_LOCK_PIN, INPUT_PULLUP);
  pinMode(SW_1A_PIN, INPUT_PULLUP);
  pinMode(SW_1B_PIN, INPUT_PULLUP);
  pinMode(SW_2A_PIN, INPUT_PULLUP);
  pinMode(SW_2B_PIN, INPUT_PULLUP);

  // Reset the lock to unlocked position
  resetLock();
  lock_state = LOCK_OPEN;
  prev_btn_lock = 1;
  prev_btn_unlock = 1;
}

void loop() {

#if DEBUG

  // Read pins
  sw_1a = digitalRead(SW_1A_PIN);
  sw_1b = digitalRead(SW_1B_PIN);
  sw_2a = digitalRead(SW_2A_PIN);
  sw_2b = digitalRead(SW_2B_PIN);

  // Print results
  Serial.print("1A:");
  Serial.print(sw_1a);
  Serial.print(" 1B:");
  Serial.print(sw_1b);
  Serial.print(" 2A:");
  Serial.print(sw_2a);
  Serial.print(" 2B:");
  Serial.print(sw_2b);
  Serial.println();

  delay(100);

#endif

  // Read button states and lock or unlock on push
  btn_lock = digitalRead(BTN_LOCK_PIN);
  btn_unlock = digitalRead(BTN_UNLOCK_PIN);
  if ( (btn_lock == 0) && (prev_btn_lock == 1) ) {
#if DEBUG
    Serial.println("Locking");
#else
    lock();
#endif
  }
  if ( (btn_unlock == 0) && (prev_btn_unlock == 1) ) {
#if DEBUG
    Serial.println("Unlocking");
#else
    unlock();
#endif
  }
  prev_btn_lock = btn_lock;
  prev_btn_unlock = btn_unlock;
}

void resetLock()
{
  // Move motor to reset its position
  moveMotor(MOTOR_SPEED, MOTOR_CCW);
  do
  {
    sw_1a = digitalRead(SW_1A_PIN);
    sw_1b = digitalRead(SW_1B_PIN);
    sw_2a = digitalRead(SW_2A_PIN);
    sw_2b = digitalRead(SW_2B_PIN);
  }
  while ( !((sw_2a == 1) && (sw_2b == 1)));
  stopMotor();
}

void lock()
{
  // Move motor to lock the deadbolt
  moveMotor(MOTOR_SPEED, MOTOR_CW);
  do
  {
    sw_1a = digitalRead(SW_1A_PIN);
    sw_1b = digitalRead(SW_1B_PIN);
    sw_2a = digitalRead(SW_2A_PIN);
    sw_2b = digitalRead(SW_2B_PIN);
  }
  while ( !((sw_1a == 0) && (sw_1b == 1) &&
            (sw_2a == 0) && (sw_2b == 1)) );
  stopMotor();
  delay(100);

  // Move motor back to starting position
  moveMotor(MOTOR_SPEED, MOTOR_CCW);
  do
  {
    sw_1a = digitalRead(SW_1A_PIN);
    sw_1b = digitalRead(SW_1B_PIN);
    sw_2a = digitalRead(SW_2A_PIN);
    sw_2b = digitalRead(SW_2B_PIN);
  }
  while ( !((sw_2a == 1) && (sw_2b == 1)) );
  stopMotor();
  lock_state = LOCK_OPEN;
}

void unlock()
{
  // Move motor to lock the deadbolt
  moveMotor(MOTOR_SPEED, MOTOR_CCW);
  do
  {
    sw_1a = digitalRead(SW_1A_PIN);
    sw_1b = digitalRead(SW_1B_PIN);
    sw_2a = digitalRead(SW_2A_PIN);
    sw_2b = digitalRead(SW_2B_PIN);
  }
  while ( !((sw_1a == 1) && (sw_1b == 0) &&
            (sw_2a == 1) && (sw_2b == 0) ));
  stopMotor();
  delay(100);

  // Move motor back to starting position
  moveMotor(MOTOR_SPEED, MOTOR_CW);
  do
  {
    sw_1a = digitalRead(SW_1A_PIN);
    sw_1b = digitalRead(SW_1B_PIN);
    sw_2a = digitalRead(SW_2A_PIN);
    sw_2b = digitalRead(SW_2B_PIN);
  }
  while ( !((sw_2a == 1) && (sw_2b == 1)) );
  stopMotor();
  lock_state = LOCK_CLOSED;
}

void moveMotor(uint8_t spd, uint8_t dir)
{
  boolean ain1;
  boolean ain2;

  // Define direction pins
  if ( dir )
  {
    ain1 = HIGH;
    ain2 = LOW;
  }
  else
  {
    ain1 = LOW;
    ain2 = HIGH;
  }

  // Set motor to GO!
  digitalWrite(AIN1_PIN, ain1);
  digitalWrite(AIN2_PIN, ain2);
  analogWrite(PWMA_PIN, spd);
}

void stopMotor()
{
  analogWrite(PWMA_PIN, 0);
}
Run
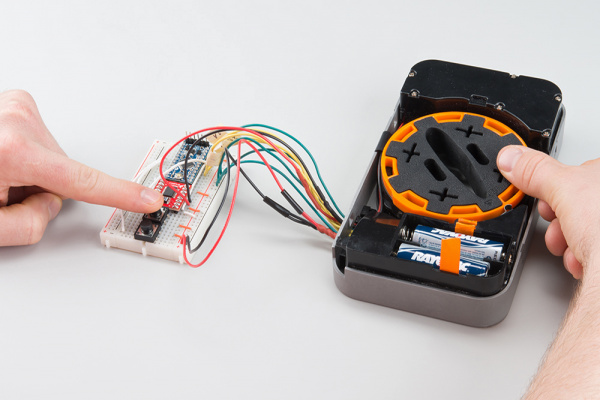
Once the program has successfully uploaded to your Pro Mini, disconnect the FTDI breakout from the Pro Mini. Add 4x AA batteries to the battery holder, and the motor should rotate to a "home" position.
Try pushing the two buttons to mimic the "lock" (top button) and "unlock" (bottom button) functions.

