IR Communication
Introduction
IR, or infrared, communication is a common, inexpensive, and easy to use wireless communication technology. IR light is very similar to visible light, except that it has a slightly longer wavelength. This means IR is undetectable to the human eye - perfect for wireless communication. For example, when you hit a button on your TV remote, an IR LED repeatedly turns on and off, 38,000 time a second, to transmit information (like volume or channel control) to an IR photo sensor on your TV.
This tutorial will first explain the inner workings of common IR communication protocols. Then we will go over two examples that will allow you to transmit and receive IR data using an Arduino. In the first example, we will read incoming IR data from a common remote control using the TSOP382 IR photo sensor. The next example will show you how to transmit data from an IR LED to control a common appliance, for example your home stereo.
Required Software
All of the gritty signal processing is handled by a great Arduino library written by Ken Shirriff and allows you to easily send and receive IR data. For additional details on how the IR Arduino library works, see Ken Shirriff's blog: A Multi-Protocol Infrared remote Library for the Arduino. Also, the code examples used in this tutorial are found in the examples directory in the library.
Suggested Reading
Here are some concepts that we will be covering in this tutorial.
How to Solder: Through-Hole Soldering
Installing an Arduino Library
Light
Pulse Width Modulation
Light-Emitting Diodes (LEDs)
How to Read a Schematic
IR Communication Basics
IR radiation is simply light that we cannot see, which makes it great for communication. IR sources are all around us. The sun, light bulbs, or any anything with heat is very bright in the IR spectrum. When you use your TV remote, an IR LED is used to transmit information to your TV. So, how does the IR receiver in your TV pick out signals from your remote among all of the ambient IR? The answer is that the IR signal is modulated. Modulating a signal is like assigning a pattern to your data, so that the receiver knows to listen.
A common modulation scheme for IR communication is something called 38kHz modulation. There are very few natural sources that have the regularity of a 38kHz signal, so an IR transmitter sending data at that frequency would stand out among the ambient IR. 38kHz modulated IR data is the most common, but other frequencies can be used.
When you hit a key on your remote, the transmitting IR LED will blink very quickly for a fraction of a second, transmitting encoded data to your appliance.
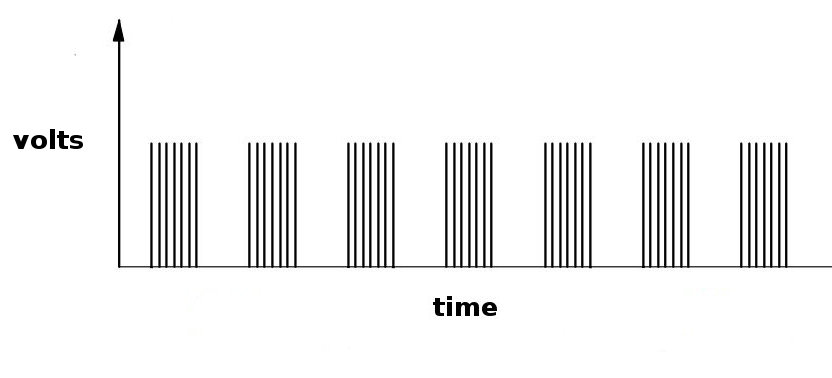
If you were to hook an oscilloscope up to your TV remote's IR LED, you would see a signal similar to the one above. This modulated signal is exactly what the receiving system sees. However, the point of the receiving device is to demodulate the signal and output a binary waveform that can be read by a microcontroller. When you read the OUT pin of the TSOP382 with the wave from above, you will see something like this:
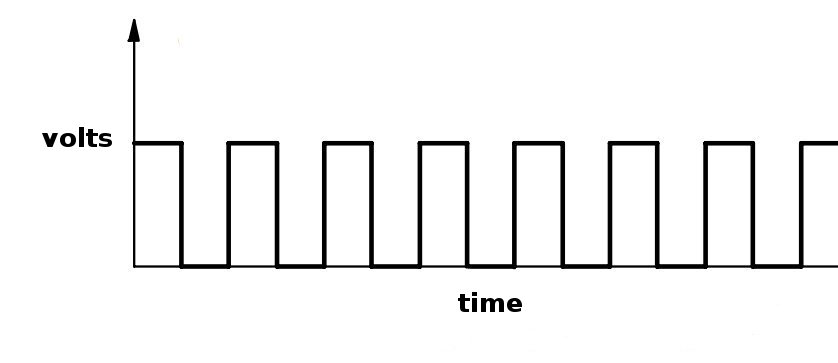
By controlling the spacing between the transmitted modulated signals, the waveform can be read by an input pin on a microcontroller and decoded as a serial bit stream.
Below is conceptual view of how an IR transmitter receiver pair works.
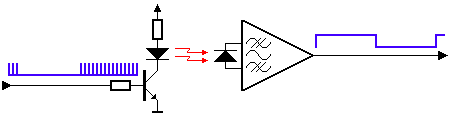
An Arduino or other microcontroller can be connected to either end of the system to transmit data (left side) or receive data (right side).
Hardware Hookup
For the hardware in this tutorial, you will need the following materials. You may not need everything though depending on what you have. Add it to your cart, read through the guide, and adjust the cart as necessary.
You will be setting up two separate circuits both using an Arduino. The first example circuit uses a TSOP382 IR photo sensor to receive and demodulate the IR signal from a common remote control. The second example circuit uses a 950nm IR LED and current limiting resistor to transmit IR codes to a common appliance, for example a home stereo or TV.
Circuit Diagram
Here is the complete setup for connecting to an Arduino:
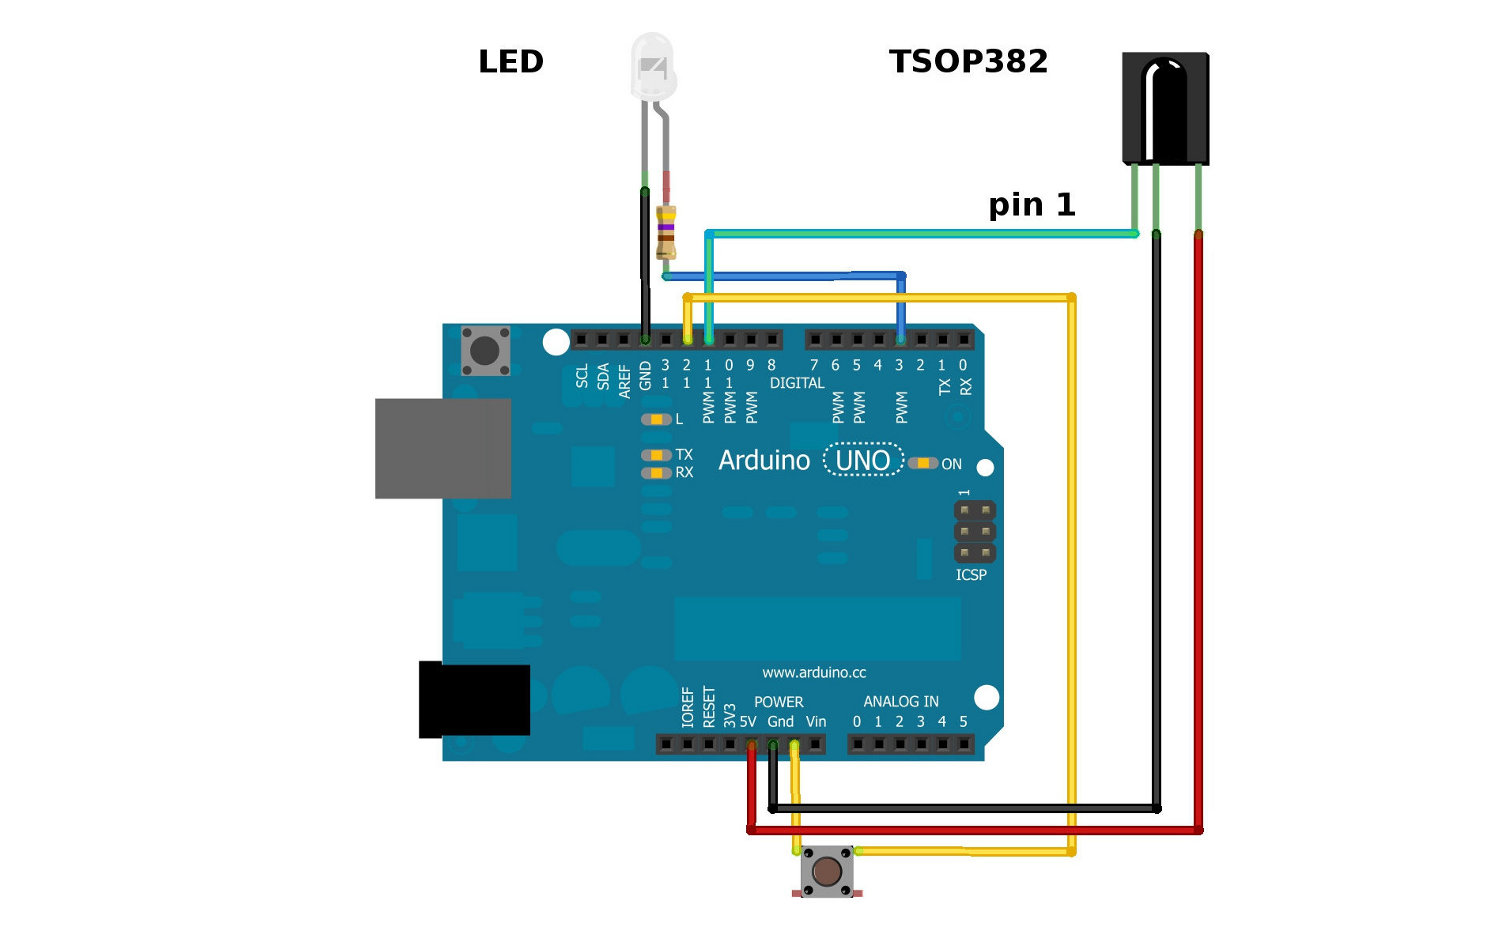
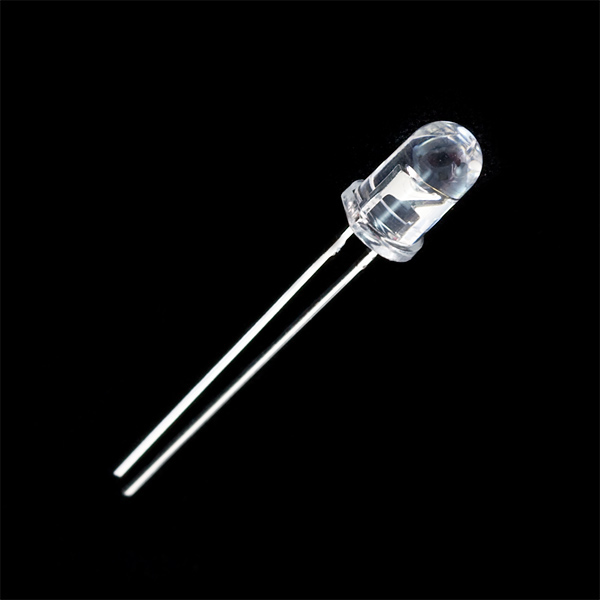
Be sure to connect your LED correctly! The long leg is positive and connects to the resistor, then to the Arduino’s output pin. The short leg is negative and is connected to ground (GND).
Also, you cannot see IR LED light with your eyes, since IR radiation is outside of the visible spectrum. However, most cellphone cameras can detect short wave IR and can see the LED faintly glowing.

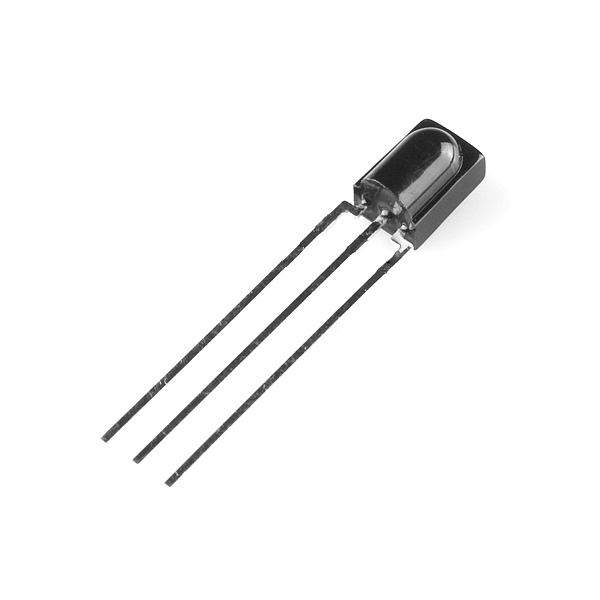
Also, pay attention to the polarity of the TSOP382. Refer to the TSOP382 datasheet for the pinout of the sensor.
The current limiting resistor attached to the LED can have values down to 100Ω (40mA) for full power and longest range. If you use a larger value resistor, the LED won't light as bright and your range will suffer. With a 330Ω resistor, you should be able to operate the IR LED across a dimly lit room.
Library Overview
Download and Install Ken Shirriff's IRremote Library
To quickly and easily add IR control to your Arduino, we recommend you download Ken Shirriff's IRremote library. Shirriff has written a library for IR remote. You can obtain this library through the Arduino Library Manager. Search for IRremote by shirriff and you should be able to install the latest version. If you prefer downloading the libraries manually you can grab them from the GitHub repository:
The IRremote library is a powerful tool for adding IR to your project. Whether you want to send IR codes out to an appliance, or transmit IR codes from a remote to your Arduino (or both!). We'll go over some of the simple stuff you can do with the library. For more help using it, check out Ken Shirriff's blog.
Receiving IR Example
IR remote controls are as ubiquitous as their appliance counterparts. What if you could put all of those old remote controls to use in your next project? This example will show you how to read IR remote codes from any IR remote using the TSOP382 IR receiver and an Arduino. Once you can receive codes from individual button presses, your remote control and Arduino become a general purpose, short range, communication interface!
Assuming that you have the IR library, go to your Arduino project directory: Arduino/libraries/IRremote/examples/IRrecvDemo and open the IRrecvDemo.ino. Upload the sketch to your Arduino.
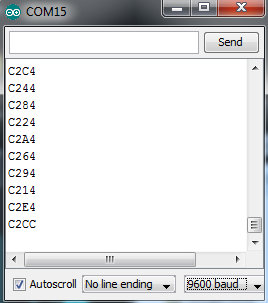
The sketch will automatically decode the type of remote you are using and identify which button on your remote is pressed. Open the serial port in the Arduino IDE at 9600 bps and hit different buttons on your remote.
When specific buttons are pressed, you can use the incoming values to do something else in your code, for example turn on and off a motor or LED.
The results from each button press can be found by calling the value() method:
language:c
results.value
You can print the values to the terminal window:
language:c
Serial.println(results.value, HEX); //prints the hex value a a button press
Or you might need read the values to run a conditional statement:
language:c
if(irrecv.decode(&results)) //this checks to see if a code has been received
{
    if(results.value == 0xC284) //if the button press equals the hex value 0xC284
    {
        //do something useful here
    }
    irrecv.resume(); //receive the next value
}
Transmitting IR Example
In this example, your Arduino and an IR LED imitate an IR remote to control an appliance (TV, stereo, etc.). In order to control your appliance with the LED, you need to know what type of IR protocol your appliance uses. The easiest way to find this out is to have the remote that comes with the appliance. This example receives a remote key press with the TSOP382 IR receiver, copies the data, then sends it out of the IR LED.
Assuming that you have the IRremote library, go to your Arduino project directory: Arduino/libraries/IRremote/examples/IRrecord and open the IRrecord.ino. Upload the sketch to your Arduino.
After you have loaded the sketch, open the Arduino serial monitor to 9600bps. Point your remote directly at the TSOP382 and hit a button. You should see specific codes in the terminal window, corresponding to the button you hit on the remote.
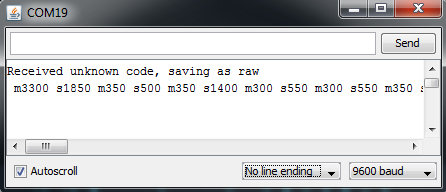
Now if you point the LED at your appliance and hit the push button that is connected to your Arduino, the code for the button press on your remote will be sent. Once you know which codes correspond to each button, you can create your own remote with the Arduino and IR LED.
For example, the transmitting IR example circuit received an unknown code when the volume up button on my Panasonic remote was hit. The data bytes on the second line are the raw codes displayed as mark and space timings for the volume up command.
If you received an unknown code and want to send it, use this line in your Arduino sketch:
language:c
irsend.sendRaw(rawCodes, codeLen, 38);
If you don’t have the appliance’s remote or if you are lucky enough to have a remote that uses a common protocol, then you can try the pre-loaded manufacturer codes from the IRSendDemo.ino example in the IRremote library.
For example, if you have a Sony TV and want the LED to turn your TV on/off, you can use this piece of code:
language:c
for (int i = 0; i < 3; i++)
{
    irsend.sendSony(0xa90, 12); // Sony TV power code
    delay(40);
}
Different appliance manufacturers use different protocols to send commands. This is why you have to define the manufacturer of the appliance to use this library. Also, note that the Sony command needs to be sent three times using a for() loop. Every protocol will have its own intricacies. A good reference for un-official commands to common IR protocols can be found on San Bergmans' website:
There are a few common protocols the IR Arduino library supports. They are: NEC, Sony SIRC, Philips RC5, Philips RC6, and raw formats. Here are the methods you can use in your Arduino code for different manufacturers:
language:c
void sendNEC(unsigned long data, int nbits);
void sendSony(unsigned long data, int nbits);
void sendRC5(unsigned long data, int nbits);
void sendRC6(unsigned long data, int nbits);
void sendDISH(unsigned long data, int nbits);
void sendSharp(unsigned long data, int nbits);
void sendPanasonic(unsigned int address, unsigned long data);
void sendJVC(unsigned long data, int nbits, int repeat);
void sendRaw(unsigned int buf[], int len, int hz);
You will need to fill in the data and nbits fields with a information specific to the protocol you are using. More information on how use this feature can be found in the IR Arduino library blog post (see the "Details of the sending library" section).
If you want to drive an IR LED properly, consider using the IR LED with a transistor and resistor that was used in the design of the old SparkFun Max Power IR LED kit. To control, simply provide it with voltage (5V), ground, and connect the CTL pin to a digital pin on your Arduino, and you can drive this kit just like a normal LED. However, a 330Ω attached to your IR LED should give about 10 feet of range.
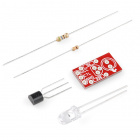
SparkFun Max Power IR LED Kit
KIT-10732Resources and Going Further
If you're looking for more documents and resources related to the IR LED or receiver, check out some of these links:
- Datasheet
- Wikipedia: Infrared
- SB-Projects: IR Remote Control Theory
- IRremote Library
If you're looking for general information on infrared communication SparkFun Engineer Chris Taylor's IR Project video:
ReplaceMeOpen
ReplaceMeClose
And there's also Jeff Branson, starring in an IR Communication video tutorial using our IR Emitter/Detector Pair:
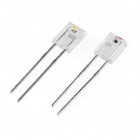
Infrared Emitters and Detectors
SEN-00241Now you should be prepared to create an IR communication system of your own. What are you going to control with this extravisible, modulated light source? Need some inspiration? Check out some of these tutorials:
- Light
- Illuminate
- TV-B-Gone
- LED Light Bar Hookup -- If you need some visible light in your life, these LED light bars are an especially bright way to get it
- Using the OpenSegment -- Along the lines of visible displays, the OpenSegment 4-digit 7-segment displays are an easy tool to add data displays to your project.
- Rebuilding the Illumitune -- Learn how we integrated IR into the Illumitune project we helped rebuild.
- Laser Limbo -- Build a "Laser" limbo using IR LEDs and IR Receivers!
IR Control Kit Hookup Guide
Boss Alarm
Roshamglo Hookup Guide
Roshamglo Project: TV-B-Gone
Or check out some of these blog posts for ideas: