I2S Audio Breakout Hookup Guide
 Alex the Giant
Examples
This board should work with any microcontroller or single board computer that has I2S capable pins. In these examples, we're going to look at a pretty powerful library that allows you to use an ESP32 Thing to play audio from a wide variety of sources. First, we'll play an audio file which is stored in the ESP32's program memory, and once we have that working we'll look at creating a MP3 trigger. The following libraries are needed to run the examples that were originally written for the ESP8266, but also work with the ESP32.
ESP8266Audio Arduino Library
You'll need to install the ESP8266 Audio Arduino Library, written by Earle F. Philhower, which you can get from the link below. This library will allow you to play a wide variety of audio formats including: AAC, FLAC, MIDI, MOD, MP3, RTTTL, and WAV. To use the library, you can add the library from Arduino by selecting Sketch ** > **Include Library ** > **Add .ZIP Library... and selecting the .zip file from wherever you store your file downloads.
ESP8266_Spiram Arduino Library
The ESP8266 Audio library depends on the ESP8266 Spiram library, written by Giancarlo Bacchio, which will also need to be downloaded. You can download the library from the link below. Installing the library follows the same process as outlined above.
First Test
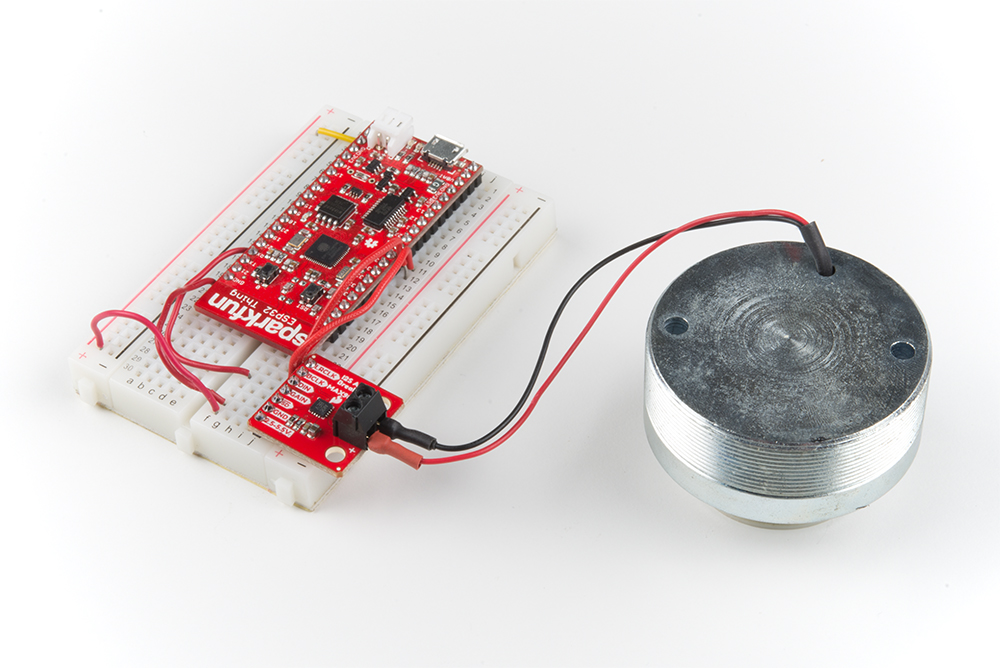
In this first example, we'll run a quick example sketch to make sure the I2S audio breakout board is wired correctly and is working.
Required Materials
The parts used in this example are listed in the wishlist below. You may not need everything though depending on what you have. Add it to your cart, read through the example, and adjust the cart as necessary.
Hookup Table
The connections that need to be made to the ESP32 are list below.
| ESP32 Pin | I2S Audio Breakout Pin |
|---|---|
| VUSB/3V3 | VDD |
| GND | GND |
| GPIO 22 | DIN |
| GPIO 26 | BCLK |
| GPIO 25 | LRCLK |
Make sure to also connect a speaker to the I2S audio breakout board's output pins.
Example Code
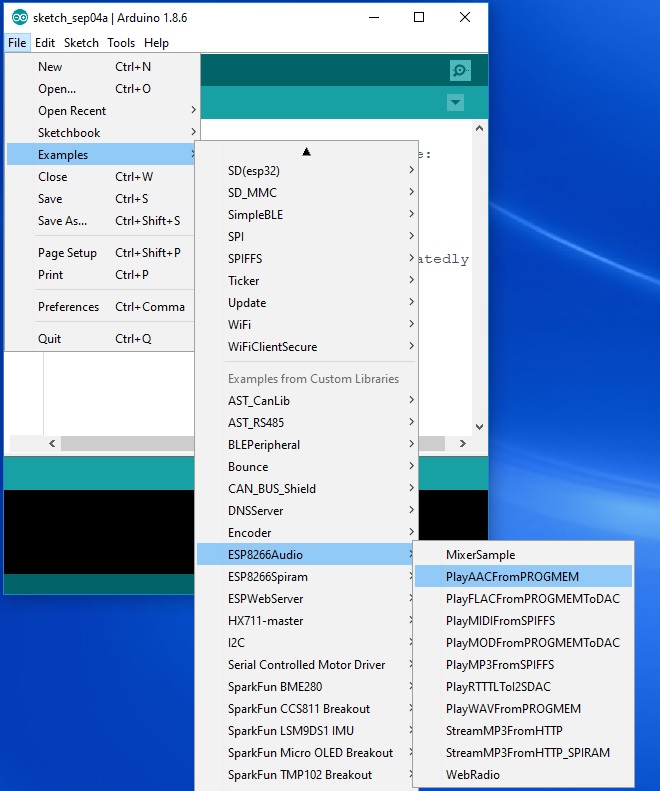
We're going to use one of the examples that comes with the library named "PlayAACFromPROGMEM". With the library installed, open the example located in: File > Examples > ESP8266Audio > PlayAACFromPROGMEM .
Before we upload the code, we're going to add two lines of code (as highlighted in the image below). The first line is going to adjust the volume, which we add after we initialize the I2S output (out = new AudioOutputI2S();). After the output is initialized, we're going to add out -> SetGain(0.125);. As the name suggests this sets the gain of the output, which takes a floating point number and has a maximum value of 4.0. The second line will reduce hum at the end of the audio clip by adding aac -> stop(); in the else statement in the main loop(). After you upload the sketch to your ESP32, you should hear Homer Simpson's thoughts of perpetual motion machines if everything is working.

ESP32 MP3 Trigger
Now that we know the board is working, let's take it up a notch. In this next example, we'll create a MP3 trigger that works similar to our MP3 Trigger.
Required Materials
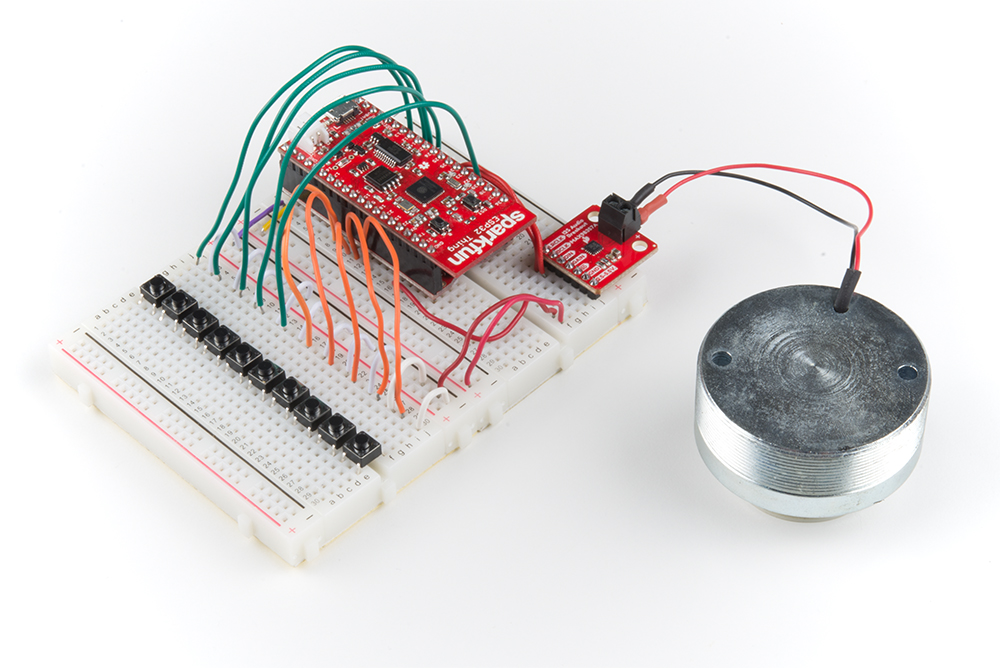
For this example, we'll need to add a few more parts to the ones we used in the previous example (including a second breadboard). You may not need everything though depending on what you have. Add it to your cart, read through the example, and adjust the cart as necessary.
Before we add code, we'll need some audio files to play. Any MP3 audio file should work, you'll just need to copy them over to your microSD card using a microSD USB Reader. Before ejecting the microSD card from your computer, make sure to relabel the files TRACKn.mp3, where n is a integer number between 0-9. The I2S audio breakout board has the same pin connections as the previous example, but this time we're going to change the audio source from PROGMEM to our microSD card. The last step before adding the code below, is to add headers to the ESP32 Thing, as well as the Motion Shield, as outlined in the hookup guide.
language:c
/* SparkFun I2S Audio Breakout Demo
 * Created by: Alex Wende
 * 8/3/2018
 *
 * Uses a ESP32 Thing to create a MP3 trigger using
 * the I2S Audio Breakout board.
 *
 * Parts you'll need:
 * - I2S Audio Breakout board (https://www.sparkfun.com/products/14809)
 * - ESP32 Thing (https://www.sparkfun.com/products/13907)
 * - Micro SD Breakout (https://www.sparkfun.com/products/544)
 * - A microSD card (https://www.sparkfun.com/products/13833)
 * - Speaker (4-8ohms)
 *
 * The following libraries need to be installed before
 * uploading this sketch:
 * - ESP8266 Audio (https://github.com/earlephilhower/ESP8266Audio)
 * - SRam Library (https://github.com/Gianbacchio/ESP8266_Spiram)
 */

#include <Arduino.h>
#include "AudioGeneratorMP3.h"
#include "AudioOutputI2S.h"
#include "AudioFileSourceSD.h"
#include "driver/i2s.h"
#include <SD.h>

//define trigger pins
#define TRIGGER0 13
#define TRIGGER1 12
#define TRIGGER2 14
#define TRIGGER3 27
#define TRIGGER4 32
#define TRIGGER5 5
#define TRIGGER6 15
#define TRIGGER7 2
#define TRIGGER8 0
#define TRIGGER9 4

//Initialize ESP8266 Audio Library classes
AudioGeneratorMP3 *mp3;
AudioFileSourceSD *file;
AudioOutputI2S *out;

volatile bool playing = 0;
volatile byte loadTrack = 0;

//External Interrupt function with software switch debounce
void IRAM_ATTR handleInterrupt()
{
  static unsigned long last_interrupt_time = 0;
  unsigned long interrupt_time = millis();
  // If interrupts come faster than 200ms, assume it's a bounce and ignore
  if (interrupt_time - last_interrupt_time > 200)
  {
    //Figure out which switch was triggered, and which track to play
    if(!digitalRead(TRIGGER0)) loadTrack = 1;
    else if(!digitalRead(TRIGGER1)) loadTrack = 2;
    else if(!digitalRead(TRIGGER2)) loadTrack = 3;
    else if(!digitalRead(TRIGGER3)) loadTrack = 4;
    else if(!digitalRead(TRIGGER4)) loadTrack = 5;
    else if(!digitalRead(TRIGGER5)) loadTrack = 6;
    else if(!digitalRead(TRIGGER6)) loadTrack = 7;
    else if(!digitalRead(TRIGGER7)) loadTrack = 8;
    else if(!digitalRead(TRIGGER8)) loadTrack = 9;
    else if(!digitalRead(TRIGGER9)) loadTrack = 10;
    playing = 1;
  }
  last_interrupt_time = interrupt_time;
}

void setup()
{
  Serial.begin(115200);

  //Configure trigger pins to inputs with internal pull-up resistors enabled
  pinMode(TRIGGER0,INPUT_PULLUP);
  pinMode(TRIGGER1,INPUT_PULLUP);
  pinMode(TRIGGER2,INPUT_PULLUP);
  pinMode(TRIGGER3,INPUT_PULLUP);
  pinMode(TRIGGER4,INPUT_PULLUP);
  pinMode(TRIGGER5,INPUT_PULLUP);
  pinMode(TRIGGER6,INPUT_PULLUP);
  pinMode(TRIGGER7,INPUT_PULLUP);
  pinMode(TRIGGER8,INPUT_PULLUP);
  pinMode(TRIGGER9,INPUT_PULLUP);

  //Create interrupts for each trigger
  attachInterrupt(digitalPinToInterrupt(TRIGGER0),handleInterrupt,FALLING);
  attachInterrupt(digitalPinToInterrupt(TRIGGER1),handleInterrupt,FALLING);
  attachInterrupt(digitalPinToInterrupt(TRIGGER2),handleInterrupt,FALLING);
  attachInterrupt(digitalPinToInterrupt(TRIGGER3),handleInterrupt,FALLING);
  attachInterrupt(digitalPinToInterrupt(TRIGGER4),handleInterrupt,FALLING);
  attachInterrupt(digitalPinToInterrupt(TRIGGER5),handleInterrupt,FALLING);
  attachInterrupt(digitalPinToInterrupt(TRIGGER6),handleInterrupt,FALLING);
  attachInterrupt(digitalPinToInterrupt(TRIGGER7),handleInterrupt,FALLING);
  attachInterrupt(digitalPinToInterrupt(TRIGGER8),handleInterrupt,FALLING);
  attachInterrupt(digitalPinToInterrupt(TRIGGER9),handleInterrupt,FALLING);

  out = new AudioOutputI2S();
  mp3 = new AudioGeneratorMP3();

  delay(1000);
  Serial.print("Initializing SD card...");
  if (!SD.begin(33))
  {
    Serial.println("initialization failed!");
    return;
  }
  Serial.println("initialization done.");
  delay(100);
}

void loop()
{
  if(loadTrack) //Load the track we want to play
  {
    //Stop the current track if playing
    if(playing && mp3->isRunning()) mp3->stop();

    if(loadTrack == 1) file = new AudioFileSourceSD("/TRACK0.mp3");
    else if(loadTrack == 2) file = new AudioFileSourceSD("/TRACK1.mp3");
    else if(loadTrack == 3) file = new AudioFileSourceSD("/TRACK2.mp3");
    else if(loadTrack == 4) file = new AudioFileSourceSD("/TRACK3.mp3");
    else if(loadTrack == 5) file = new AudioFileSourceSD("/TRACK4.mp3");
    else if(loadTrack == 6) file = new AudioFileSourceSD("/TRACK5.mp3");
    else if(loadTrack == 7) file = new AudioFileSourceSD("/TRACK6.mp3");
    else if(loadTrack == 8) file = new AudioFileSourceSD("/TRACK7.mp3");
    else if(loadTrack == 9) file = new AudioFileSourceSD("/TRACK8.mp3");
    else if(loadTrack == 10) file = new AudioFileSourceSD("/TRACK9.mp3");

    out -> SetGain(0.08); //Set the volume
    mp3 -> begin(file,out); //Start playing the track loaded
    loadTrack = 0;
  }

  if(playing && mp3->isRunning()) {
    if (!mp3->loop())
    {
      mp3->stop();
      playing = 0;
      Serial.println("Stopped");
    }
  }
}
With the code on the board, we can see what the sketch does. You can connect momentary pushbutton switches to each of the trigger pins outlined in the table below, with the other end of the switch connected to ground. Another option is to take a ground wire and touch it to one of the trigger pins. When the pin is pulled down to ground, it triggers the corresponding track to play. If a track is still playing when a new pin is triggered, that track will stop and the new track will play.
| Audio File | ESP32 GPIO Pin |
|---|---|
| TRACK0.mp3 | 13 |
| TRACK1.mp3 | 12 |
| TRACK2.mp3 | 14 |
| TRACK3.mp3 | 27 |
| TRACK4.mp3 | 32 |
| TRACK5.mp3 | 5 |
| TRACK6.mp3 | 15 |
| TRACK7.mp3 | 2 |
| TRACK8.mp3 | 0 |
| TRACK9.mp3 | 4 |