GPS Shield Hookup Guide
Code Example
For this example, you will need to install the TinyGPSPlus library. Take a look at our Arduino library install tutorial if you've never installed an Arduino library before.
Mikal Hart's Arduiniana.org has a full overview of all of the capabilities of the TinyGPS++ library, but the most important one is parsing the GPS module's NMEA sentence output into latitude and longitude.
Press your completed Arduino shield (with headers soldered and your GPS plugged in or soldered on) onto your Arduino, and connect your Arduino to your computer with your USB cable.
You will be using software serial for this example, so leave the switch in DLINE.
Upload the example sketch below to your Arduino.
language:c
#include <TinyGPS++.h>
#include <SoftwareSerial.h>
/*
 This example uses software serial and the TinyGPS++ library by Mikal Hart
 Based on TinyGPSPlus/DeviceExample.ino by Mikal Hart
 Modified by acavis
*/

// Choose two Arduino pins to use for software serial
// The GPS Shield uses D2 and D3 by default when in DLINE mode
int RXPin = 2;
int TXPin = 3;

// The Skytaq EM-506 GPS module included in the GPS Shield Kit
// uses 4800 baud by default
int GPSBaud = 4800;

// Create a TinyGPS++ object called "gps"
TinyGPSPlus gps;

// Create a software serial port called "gpsSerial"
SoftwareSerial gpsSerial(RXPin, TXPin);

void setup()
{
  // Start the Arduino hardware serial port at 9600 baud
  Serial.begin(9600);

  // Start the software serial port at the GPS's default baud
  gpsSerial.begin(GPSBaud);

  Serial.println(F("DeviceExample.ino"));
  Serial.println(F("A simple demonstration of TinyGPS++ with an attached GPS module"));
  Serial.print(F("Testing TinyGPS++ library v. ")); Serial.println(TinyGPSPlus::libraryVersion());
  Serial.println(F("by Mikal Hart"));
  Serial.println();
}

void loop()
{
  // This sketch displays information every time a new sentence is correctly encoded.
  while (gpsSerial.available() > 0)
    if (gps.encode(gpsSerial.read()))
      displayInfo();

  // If 5000 milliseconds pass and there are no characters coming in
  // over the software serial port, show a "No GPS detected" error
  if (millis() > 5000 && gps.charsProcessed() < 10)
  {
    Serial.println(F("No GPS detected"));
    while(true);
  }
}

void displayInfo()
{
  Serial.print(F("Location: "));
  if (gps.location.isValid())
  {
    Serial.print(gps.location.lat(), 6);
    Serial.print(F(","));
    Serial.print(gps.location.lng(), 6);
  }
  else
  {
    Serial.print(F("INVALID"));
  }

  Serial.print(F("  Date/Time: "));
  if (gps.date.isValid())
  {
    Serial.print(gps.date.month());
    Serial.print(F("/"));
    Serial.print(gps.date.day());
    Serial.print(F("/"));
    Serial.print(gps.date.year());
  }
  else
  {
    Serial.print(F("INVALID"));
  }

  Serial.print(F(" "));
  if (gps.time.isValid())
  {
    if (gps.time.hour() < 10) Serial.print(F("0"));
    Serial.print(gps.time.hour());
    Serial.print(F(":"));
    if (gps.time.minute() < 10) Serial.print(F("0"));
    Serial.print(gps.time.minute());
    Serial.print(F(":"));
    if (gps.time.second() < 10) Serial.print(F("0"));
    Serial.print(gps.time.second());
    Serial.print(F("."));
    if (gps.time.centisecond() < 10) Serial.print(F("0"));
    Serial.print(gps.time.centisecond());
  }
  else
  {
    Serial.print(F("INVALID"));
  }

  Serial.println();
}
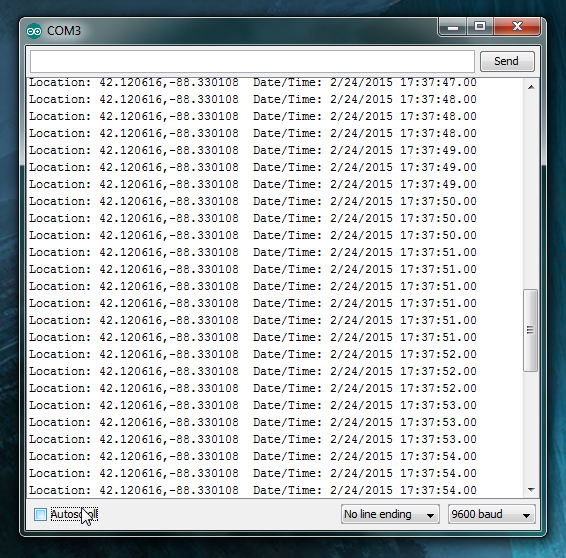
Open your Arduino serial terminal by going to Tools > Serial Monitor
Latitude, longitude, and time stamp values should be streaming by! You'll never get lost in front of your computer again!
