Flexible Grayscale OLED Hookup Guide
 Englandsaurus
 Introduction
We've been hearing about and seeing flexible screens at CES for years now, but now you can finally get one in your hands and bend a screen! You can’t fold it like paper but this flexible grayscale OLED from Wisechip can be bent to a 40mm radius without damage. The display is less than 0.5mm thick, less than 0.5 grams, and can display some impressive graphics with great contrast.
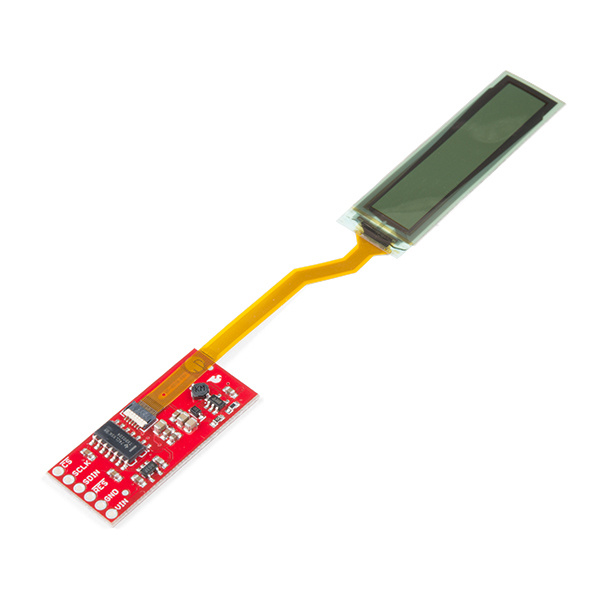
The OLED display is 1.81" long with 160x32 4-bit grayscale pixels. The interface is 3-wire SPI and each pixel requires 4 bits. This means you will need a processor capable of storing a local array of 80*32 = 2,560 bytes in order to truly flex (pun intended) the power of the grayscale display. Basic 8-bit Arduinos can communicate with the display and do things like text but graphics will be tricky.
Required Materials
To get started, you'll need a microcontroller to control everything in your project.


Particle Photon (Headers)
WRL-13774
Raspberry Pi 3
DEV-13825Tools
You will need a soldering iron, solder, and general soldering accessories.


Weller WLC100 Soldering Station
TOL-14228Suggested Reading
If you aren't familiar with the following concepts, we recommend checking out these tutorials before continuing.
How to Solder: Through-Hole Soldering
Serial Peripheral Interface (SPI)
Logic Levels
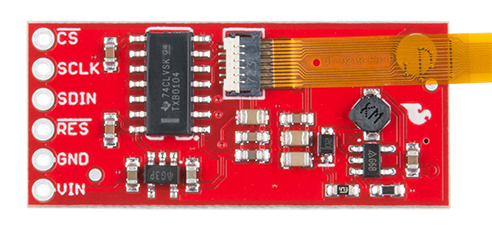
Hardware Overview
Let's look over a few characteristics of the flexible OLED so we know a bit more about how it behaves.
| Characteristic | Range |
|---|---|
| Operating Voltage | 3.5V - 5V |
| Operating Temperature | -40°C - 60°C |
| Resolution | 160 x 32 |
| Bend Radius | 40 mm |
| Pixel Density | 88 DPI |
| Grayscale Resolution | 4 bit |
Pins
The characteristics of the available pins on the flexible OLED breakout are outlined in the table below.
| Pin Label | Pin Function | Notes |
|---|---|---|
| CS | Chip Select | Chip Select, active low, part of SPI interface. 3.3V or 5V logic |
| SCLK | Serial Clock | Provides the clock signal for the serial interface. 3.3V or 5V logic |
| SDIN | Master Output | Data output from master. All image data is sent on this line. 3.3V or 5V logic |
| RES | Reset | Resets the display, active low. 3.3V or 5V logic |
| GND | Ground | 0V/common voltage. |
| VIN | Power Supply | Should be between 3.5V - 5V |
Hardware Assembly
The flexible OLED is fairly simple to connect to your microcontroller. You can either solder headers to the OLED breakout or solder wires straight to the breakout pins. If you've not soldered headers to a board, make sure to check out our tutorial here on soldering.
Hookup Table
The onboard buffer means that you can hook the display straight up to 3.3V or 5V logic without the need for any logic conversion circuitry. Therefore, you can just connect the pins directly to the I/O on your microcontroller. Simply connect the pins to their assignments in the below table and we'll be ready to go. These pins can be changed in software later if you need to use any of them to control other parts of your project.
| Flexible Grayscale OLED Breakout Board Pin | Arduino Pin |
|---|---|
| VIN | Should be between 3.5V - 5V |
| GND | 0V/common voltage |
| RES | Pin 9 |
| SDIN | Pin 11 |
| SCLK | Pin 13 |
| CS | Pin 10 |
Library Overview
Note: This example assumes you are using the latest version of the Arduino IDE on your desktop. If this is your first time using Arduino, please review our tutorial on installing the Arduino IDE. If you have not previously installed an Arduino library, please check out our installation guide.
First, you'll need to download and install the Sparkfun Flexible Grayscale OLED Brekaout library. You can do this through the Arduino library manager or manually installing it by clicking the button below.
Before we get started developing a sketch, let's look at the available functions of the library.
void command(uint8_t c);--- Sends the display a command byte.void data(uint8_t c);--- Sends the display a data byte.void setColumnAddress(uint8_t add);--- Sets the column address.void setPageAddress(uint8_t add);--- Sets the page address.
LCD Drawing Functions
void clearDisplay(uint8_t mode):--- Clears the screen buffer in the OLED's memory, pass inmode = CLEAR_DISPLAYto clear the memory of the display,mode = CLEAR_BUFFERto clear the display buffer, ormode = CLEAR_ALLto clear both.void display(void);--- Moves display memory to the screen to draw the image in memory.void setCursor(uint8_t x, uint8_t y);--- Set cursor position to (x, y).void invert(boolean inv);--- Turns every black pixel white, turns all white pixels black.void setContrast(uint8_t contrast);--- Changes the contrast value anywhere between 0 and 255.void flipVertical(boolean flip);--- Does a vertical mirror of the screen.void flipHorizontal(boolean flip);--- Does a horiontal mirror of the screen.void setPixel(uint8_t x, uint8_t y);--- Draw a pixel using the current fore color and current draw mode in the screen buffer's x,y position.void setPixel(uint8_t x, uint8_t y, uint8_t color, uint8_t mode);--- Draw a pixel with NORM or XOR draw mode in the screen buffer's x,y position.void line(uint8_t x0, uint8_t y0, uint8_t x1, uint8_t y1);--- Draw line using current fore color and current draw mode from x0,y0 to x1,y1 of the screen buffer.void line(uint8_t x0, uint8_t y0, uint8_t x1, uint8_t y1, uint8_t color, uint8_t mode);--- Draw line using color and mode from x0,y0 to x1,y1 of the screen buffer.void lineH(uint8_t x, uint8_t y, uint8_t width);--- Draw horizontal line using current fore color and current draw mode from x,y to x+width,y of the screen buffer.void lineH(uint8_t x, uint8_t y, uint8_t width, uint8_t color, uint8_t mode);--- Draw horizontal line using color and mode from x,y to x+width,y of the screen buffer.void lineV(uint8_t x, uint8_t y, uint8_t height);--- Draw vertical line using current fore color and current draw mode from x,y to x,y+height of the screen buffer.void lineV(uint8_t x, uint8_t y, uint8_t height, uint8_t color, uint8_t mode);--- Draw vertical line using color and mode from x,y to x,y+height of the screen buffer.void rect(uint8_t x, uint8_t y, uint8_t width, uint8_t height);--- Draw rectangle using current fore color and current draw mode from x,y to x+width,y+height of the screen buffer.void rect(uint8_t x, uint8_t y, uint8_t width, uint8_t height, uint8_t color , uint8_t mode);---Draw rectangle using color and mode from x,y to x+width,y+height of the screen buffer.void rectFill(uint8_t x, uint8_t y, uint8_t width, uint8_t height);--- Draw filled rectangle using current fore color and current draw mode from x,y to x+width,y+height of the screen buffer.void rectFill(uint8_t x, uint8_t y, uint8_t width, uint8_t height, uint8_t color , uint8_t mode);--- Draw filled rectangle using color and mode from x,y to x+width,y+height of the screen buffer.void circle(uint8_t x, uint8_t y, uint8_t radius);--- Draw circle with radius using current fore color and current draw mode with center at x,y of the screen buffer.void circle(uint8_t x, uint8_t y, uint8_t radius, uint8_t color, uint8_t mode);--- Draw circle with radius using color and mode with center at x,y of the screen buffer.void circleFill(uint8_t x0, uint8_t y0, uint8_t radius);--- Draw filled circle with radius using current fore color and current draw mode with center at x,y of the screen buffer.void circleFill(uint8_t x0, uint8_t y0, uint8_t radius, uint8_t color, uint8_t mode);--- Draw filled circle with radius using color and mode with center at x,y of the screen buffer.void drawChar(uint8_t x, uint8_t y, uint8_t c);--- Draws a character at position (x, y).void drawChar(uint8_t x, uint8_t y, uint8_t c, uint8_t color, uint8_t mode);--- Draws a character using a color and mode at position (x, y)void drawBitmap(uint8_t * bitArray);--- Draws a preloaded bitmap.uint16_t getDisplayWidth(void);--- Gets the width of the OLED.uint16_t getDisplayHeight(void);--- Gets the height of the OLED.void setDisplayWidth(uint16_t);--- Sets the width of the OLED.void setDisplayHeight(uint16_t);--- Sets the height of the OLED.void setColor(uint8_t color);--- Sets the color of the OLEDvoid setDrawMode(uint8_t mode);--- Sets the drawing mode of the OLEDuint8_t *getScreenBuffer(void);---
Font Settings
uint8_t getFontWidth(void);--- Gets the current font width as a byte.uint8_t getFontHeight(void);--- Gets the current font height as a byte.uint8_t getTotalFonts(void);--- Return the total number of fonts loaded into the MicroOLED's flash memory.uint8_t getFontType(void);--- Returns the font type number of the current font (Font types shown below).boolean setFontType(uint8_t type);--- Sets the font type (Font types shown below).
| Font Type | Maximum Columns | Maximum Rows | Description |
|---|---|---|---|
| 0 | 10 | 6 | Smallest, 5x7-pixel characters. |
| 1 | 6 | 3 | Medium, 8x16-pixel characters. |
| 2 | 5 | 3 | 7-segment display style characters, 10x16-pixels each. |
| 3 | 5 | 1 | Large, 12x48 (the entire screen height) characters. |
uint8_t getFontStartChar(void);--- Returns the starting ASCII character of the current font.uint8_t getFontTotalChar(void);--- Return the total characters of the current font.
Rotation and Scrolling
The following functions will scroll the screen in the various specified directions of each function. Start and stop indicate the range of rows/columns that will be scrolling.
void scrollRight(uint8_t start, uint8_t stop);void scrollLeft(uint8_t start, uint8_t stop);void scrollUp(uint8_t start, uint8_t stop);void scrollStop(void);
Example Code
Now that we have our library installed, we can get started playing around with our examples to learn more about how the screen behaves.
Example 1 - Text
To get started, open up Example1_Text under File > Examples > SparkFun Flexible Grayscale OLED Breakout > Example1_Text. Upon opening this example, you'll notice that our void loop() is empty. This is because we only need to draw the image to our OLED one time in order for it to stay there. We first initialize our screen with CS connected to pin 10 and RES connected to pin 9, with the line SSD1320 flexibleOLED(10, 9);. Then in our setup loop we use flexibleOLED.begin(160, 32); to begin a display that is 160x32 pixels. We then use the following lines to first clear the display, set the font, the location where we'd like to type, and the text we'd like to type. The final line tells the display to show what we've just written to the display buffer.
language:c
flexibleOLED.clearDisplay(); //Clear display and buffer

flexibleOLED.setFontType(1); //Large font
flexibleOLED.setCursor(28, 12);
flexibleOLED.print("Hello World!");

flexibleOLED.setFontType(0); //Small font
flexibleOLED.setCursor(52, 0);
flexibleOLED.print("8:45:03 AM");

flexibleOLED.display();
This will write the text to the display when our microcontroller runs the setup loop and leave it there, the output should look something like the below image.

Example 2 - Graphics
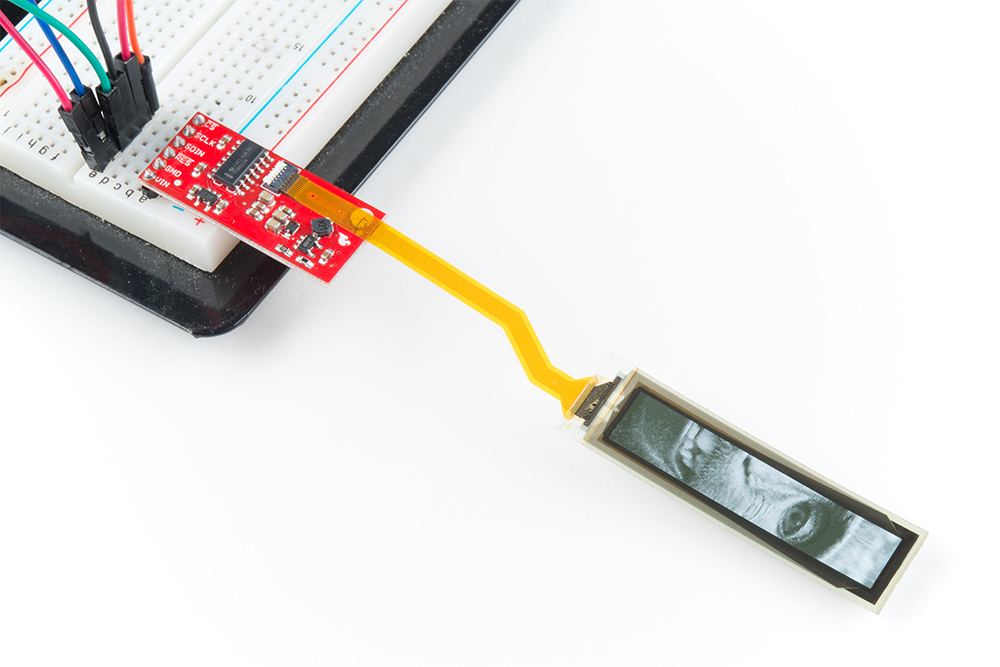
To get started, open up Example2_Graphics under File > Examples > SparkFun Flexible Grayscale OLED Breakout > Example2_Graphics. This example will draw a grayscale image from pre-converted image data, in this case, an image of a macaque. In order to convert your own images to a format readable by the OLED, check out this neat Python script for converting Bitmaps to arrays for the grayscale OLED. First you'll need a *.bmp file that is 160 pixels wide and 32 pixels tall. Once you have your *.bmp, generating an image array is as simple as running the python script from the command line like below. (Make sure you put in the proper file paths)
language:bash
python <path to bmptoarray.py> <pathway to image.bmp>
The output will be placed in the output.txt file in the same directory as bmptoarray.py, and will look something like the below image.
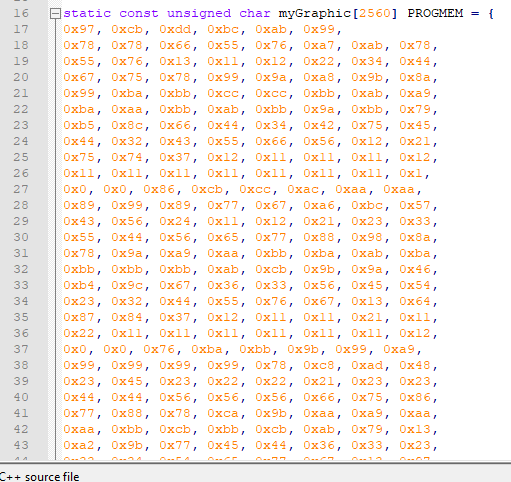
This large array must then be copied into a *.h file in the same folder as your sketch. Go ahead and name it something memorable, my sketch folder looks like this, with my array sitting in the TestImage.h file

Then, in our sketch, we'll need to make sure we include the file containing this array, so make sure to put an #include "TestImage.h" at the top of your sketch. Also make sure you comment out any other image files that may be included. If you haven't gone ahead and replaced the macaque with your own image, the output should look like the below image, otherwise, it should obviously look like whatever image you've chosen to display on your OLED.
Example 3 - Lines
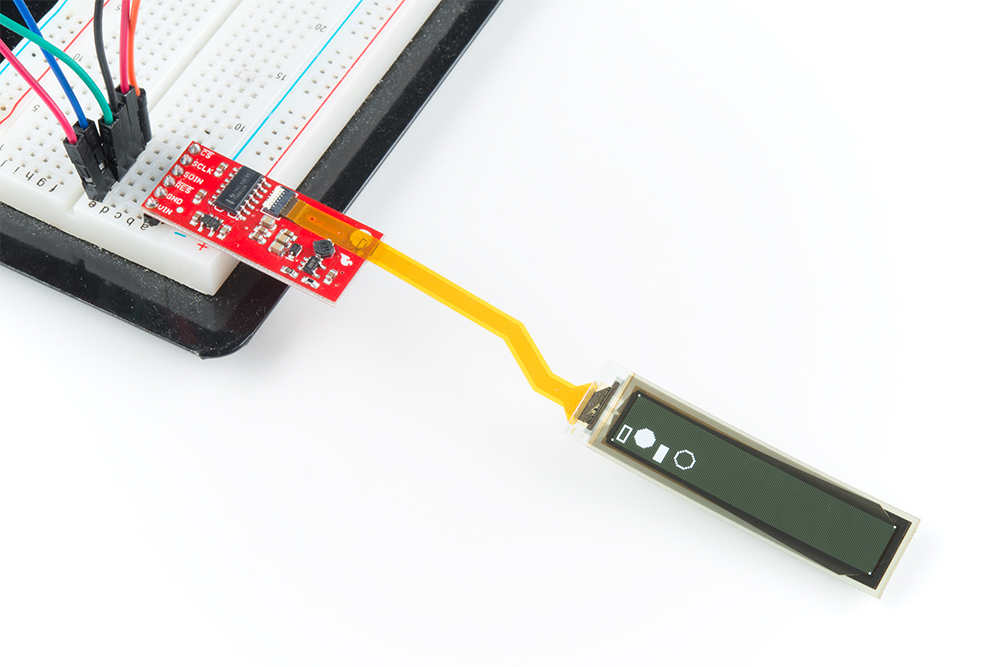
To get started, open up Example3_Lines under File > Examples > SparkFun Flexible Grayscale OLED Breakout > Example3_Lines. This example draws a few shapes on the display. Once again, it simply writes the image to the display and leaves it there. Play around with the parameters that draw each rectangle and circle to determine how this affects their positioning and size. The stock example code should look something like the below image.
Example 4 - BMP Eater
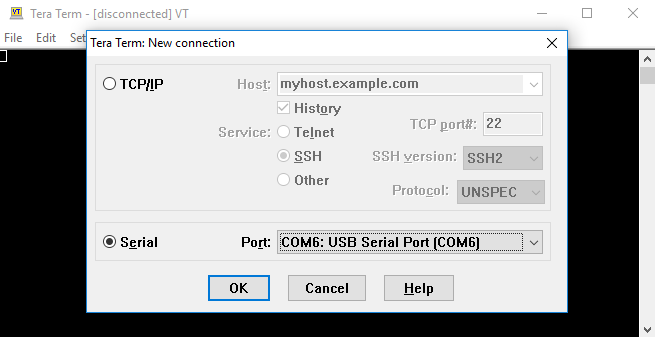
In this example, we'll feed bitmaps directly into the screen using a serial terminal like Tera Term. If you're not too familiar with using a terminal, check out our overview of serial terminal basics and download Tera Term. This is useful because we don't have to convert our bitmaps into a prog_mem or anything. To get started we'll first have to make sure our microcontroller can properly parse the serial input into pixel data. Go ahead and open up Example4_BMP_Eater under File > Examples > SparkFun Flexible Grayscale OLED Breakout > Example4_BMP_Eater. Once you have this open and uploaded, check out the getBitmap() function, which checks the structure of what we're sending over serial and then writes it to the screen. Now that our microcontroller is ready for data, it's time to open up Tera Term and start sending data. A new instance of Tera Term should prompt you to enter the COM port. Be sure to enter the port that your microcontroller is on.
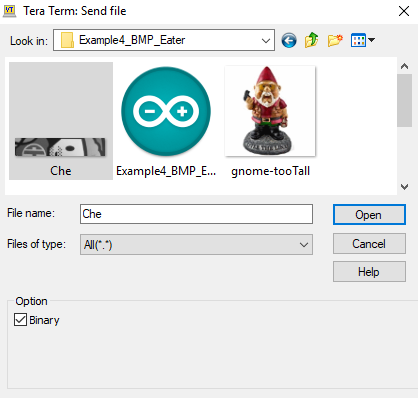
Once we've done this, we'll need to change the baud rate of our terminal to match the microcontroller's baud of 57600. Do this by going to Setup > Serial Port... and select 57600 from the drop-down menu. Now that we've opened a connection to the OLED we can start sending images to it. To do this, all we need to do is go to File > Send File... and select the bitmap we want to send to our screen. Go to Documents > Arduino > Libraries > SparkFun_Flexible_Grayscale_OLED_Breakout > Examples > Example4_BMP_Eater. This folder should contain a few bitmaps. If you got fancy and created your own bitmap in the second example, you can load that up as well. Select your file, make sure you're sending it in a binary format (the image below shows the binary box checked).
Uploading the image should show the display refresh line by line as it gets new data to chew on. The process looks something like the below GIF.
Example 5 - All The Text
To get started, open up Example5_AllTheText under File > Examples > SparkFun Flexible Grayscale OLED Breakout > Example5_AllTheText. This example displays all of the text capabilities of the OLED. Take a look at the text example functions below to see how each one writes the corresponding text.
language:c
void smallTextExample()
{
  printTitle("Small text", 0);

  flexibleOLED.setFontType(0); //Small text

  byte thisFontHeight = flexibleOLED.getFontHeight();

  flexibleOLED.clearDisplay(); //Clear display RAM and local display buffer
  flexibleOLED.setCursor(0, thisFontHeight * 3);
  flexibleOLED.print("ABCDEFGHIJKLMNOPQRSTUVWXYZ");
  flexibleOLED.setCursor(0, thisFontHeight * 2);
  flexibleOLED.print("abcdefghijklmnopqrstuvwxyz");
  flexibleOLED.setCursor(0, thisFontHeight * 1);
  flexibleOLED.print("1234567890!@#$%^&*(),.<>/?");
  flexibleOLED.setCursor(0, thisFontHeight * 0);
  flexibleOLED.print(";:'\"[]{}-=_+|\\~`");

  flexibleOLED.display();

  delay(2000);
}
Changing the type of text is simply a matter of using the setFontType() and changing the font used by the screen. Also notice how we must use different cursor positions for our lines of text to prevent them from overlapping each other.
language:c
void largeTextExample()
{
  printTitle("Large text", 0);

  flexibleOLED.setFontType(1); //Larger text
  byte theDisplayHeight = flexibleOLED.getDisplayHeight();
  byte thisFontHeight = flexibleOLED.getFontHeight();

  flexibleOLED.clearDisplay(); //Clear display RAM and local display buffer

  flexibleOLED.setCursor(0, theDisplayHeight - (thisFontHeight * 1));
  flexibleOLED.print("ABCDEFGHIJKLMNOPQ");
  flexibleOLED.setCursor(0, theDisplayHeight - (thisFontHeight * 2));
  flexibleOLED.print("abcdefghij1234567");

  flexibleOLED.display();

  delay(2000);
}
Uploading this example should yield an output on your screen similar to the one shown in the image below.
Example 6 - Pong
This next example will play us a nice little game of fake pong. To get started, open up Example6_Pong under File > Examples > SparkFun Flexible Grayscale OLED Breakout > Example6_Pong. The meat and potatoes of this pong example is contained in the shapeExample() function, shown below.
language:c
void shapeExample()
{
  printTitle("Shapes!", 0);

  // Silly pong demo. It takes a lot of work to fake pong...
  int paddleW = 3;  // Paddle width
  int paddleH = 15;  // Paddle height
  // Paddle 0 (left) position coordinates
  int paddle0_Y = (flexibleOLED.getDisplayHeight() / 2) - (paddleH / 2);
  int paddle0_X = 2;
  // Paddle 1 (right) position coordinates
  int paddle1_Y = (flexibleOLED.getDisplayHeight() / 2) - (paddleH / 2);
  int paddle1_X = flexibleOLED.getDisplayWidth() - 3 - paddleW;
  int ball_rad = 2;  // Ball radius
  // Ball position coordinates
  int ball_X = paddle0_X + paddleW + ball_rad;
  int ball_Y = random(1 + ball_rad, flexibleOLED.getDisplayHeight() - ball_rad);//paddle0_Y + ball_rad;
  int ballVelocityX = 1;  // Ball left/right velocity
  int ballVelocityY = 1;  // Ball up/down velocity
  int paddle0Velocity = -1;  // Paddle 0 velocity
  int paddle1Velocity = 1;  // Paddle 1 velocity

  //while(ball_X >= paddle0_X + paddleW - 1)
  while ((ball_X - ball_rad > 1) &&
         (ball_X + ball_rad < flexibleOLED.getDisplayWidth() - 2))
  {
    // Increment ball's position
    ball_X += ballVelocityX;
    ball_Y += ballVelocityY;
    // Check if the ball is colliding with the left paddle
    if (ball_X - ball_rad < paddle0_X + paddleW)
    {
      // Check if ball is within paddle's height
      if ((ball_Y > paddle0_Y) && (ball_Y < paddle0_Y + paddleH))
      {
        ball_X++;  // Move ball over one to the right
        ballVelocityX = -ballVelocityX; // Change velocity
      }
    }
    // Check if the ball hit the right paddle
    if (ball_X + ball_rad > paddle1_X)
    {
      // Check if ball is within paddle's height
      if ((ball_Y > paddle1_Y) && (ball_Y < paddle1_Y + paddleH))
      {
        ball_X--;  // Move ball over one to the left
        ballVelocityX = -ballVelocityX; // change velocity
      }
    }
    // Check if the ball hit the top or bottom
    if ((ball_Y <= ball_rad) || (ball_Y >= (flexibleOLED.getDisplayHeight() - ball_rad - 1)))
    {
      // Change up/down velocity direction
      ballVelocityY = -ballVelocityY;
    }
    // Move the paddles up and down
    paddle0_Y += paddle0Velocity;
    paddle1_Y += paddle1Velocity;
    // Change paddle 0's direction if it hit top/bottom
    if ((paddle0_Y <= 1) || (paddle0_Y > flexibleOLED.getDisplayHeight() - 2 - paddleH))
    {
      paddle0Velocity = -paddle0Velocity;
    }
    // Change paddle 1's direction if it hit top/bottom
    if ((paddle1_Y <= 1) || (paddle1_Y > flexibleOLED.getDisplayHeight() - 2 - paddleH))
    {
      paddle1Velocity = -paddle1Velocity;
    }

    // Draw the Pong Field
    flexibleOLED.clearDisplay(CLEAR_BUFFER); //Save time. Only clear the local buffer.
    // Draw an outline of the screen:
    flexibleOLED.rect(0, 0, flexibleOLED.getDisplayWidth() - 1, flexibleOLED.getDisplayHeight());
    // Draw the center line
    flexibleOLED.rectFill(flexibleOLED.getDisplayWidth() / 2 - 1, 0, 2, flexibleOLED.getDisplayHeight());
    // Draw the Paddles:
    flexibleOLED.rectFill(paddle0_X, paddle0_Y, paddleW, paddleH);
    flexibleOLED.rectFill(paddle1_X, paddle1_Y, paddleW, paddleH);
    // Draw the ball:
    flexibleOLED.circle(ball_X, ball_Y, ball_rad);
    // Actually draw everything on the screen:
    flexibleOLED.display();

    //delay(25);  // Delay for visibility
  }

  delay(1000);
}
Most of this function is simply math to move the paddles and ball around the screen and check for collisions. The actual drawing of the objects is executed in the last few lines of the function, right before the flexibleOLED.display(): function. The shapeExample() function is called repeatedly in our void loop() to progress the positions of the Pong pieces. The OLED should look something like the below GIF with this code uploaded.
Example 7 - Logo
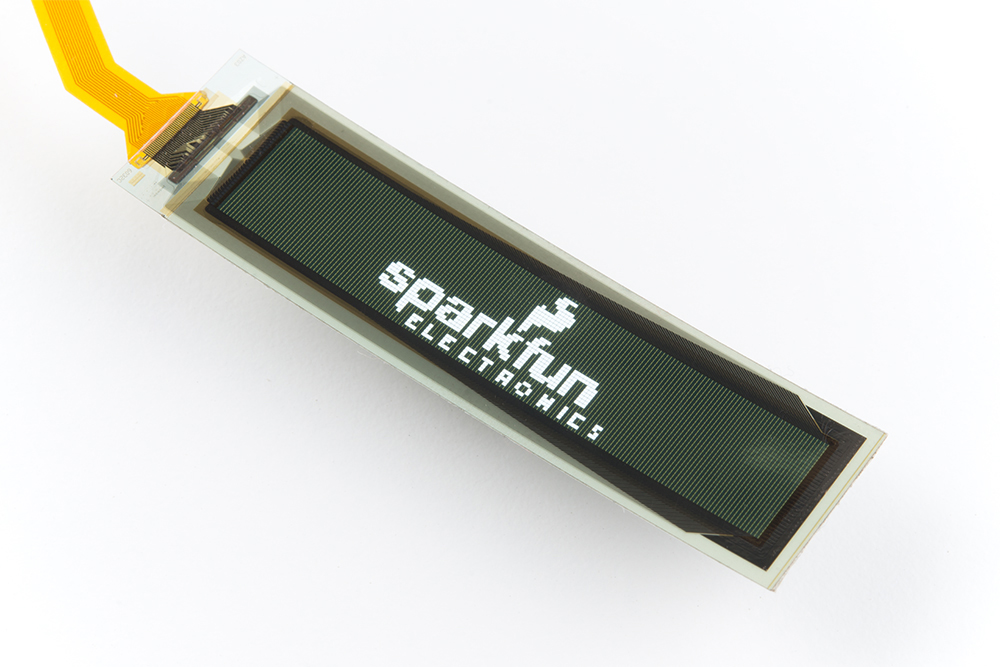
To get started, open up Example7_Logo under File > Examples > SparkFun Flexible Grayscale OLED Breakout > Example7_Logo. This example simply shows us how to display what was already in the OLED's buffer. All we have to do is initialize the screen without clearing the buffer, give the flexibleOLED.display() command, and the OLED will show the SparkFun logo. It'll look similar to the image below.
Example 8 - Noise Drawing
To get started, open up Example8_NoiseDrawing under File > Examples > SparkFun Flexible Grayscale OLED Breakout > Example8_NoiseDrawing. This example writes noise directly to the display and also to the buffer. However, the buffer is incapable of grayscale so we will only get black and white noise when calling the writeToBuffer() function. We can see upon closer inspection that each of these functions writes noise from the A0 and A1 pins, so make sure these aren't connected to anything. The output will look something like the below image. Notice how the noise from the buffer is only in black and white.
Resources and Going Further
Now that you've successfully got your flexible grayscale OLED display up and running, it's time to incorporate it into your own project!
For more information, check out the resources below:
- Schematic (PDF)
- Eagle Files (ZIP)
- Flexible Grayscale OLED Display Datasheet
- SSD1320 Command Set
- SSD1320 Protocol Datasheet
- GitHub
- Product Repo - Hardware design files
- Arduino Library - Library and example code.
- BMP to Array - Python script to convert bitmaps to an Arduino prog_mem array when outputting grayscale images to OLEDs.
- SFE Product Showcase: SparkFun Flexible Grayscale OLED Breakout
Need some inspiration for your next project? Check out some of these related tutorials: