Fingerprint Scanner Hookup Guide
This Tutorial is Retired!
Note: This tutorial is for the GT-511CXX models. If you are using any of the newer models (i.e. GT-521F32 and GT-521F52), please refer to the new Fingerprint Scanner (GT-521Fxx) Hookup Guide.
View the updated tutorial: Fingerprint Scanner (GT-521Fxx) Hookup Guide
 bboyho
Using Demo Software w/ a FTDI
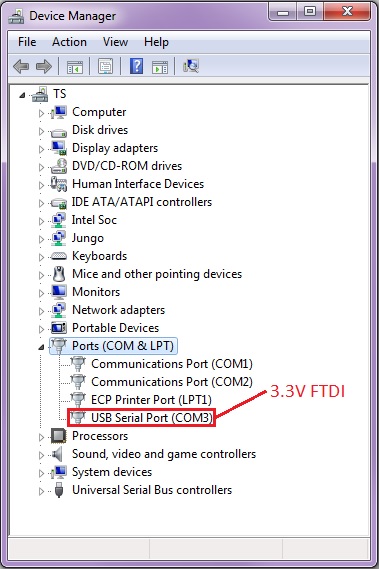
After making your connection with the 3.3V FTDI, connect the USB cable to your computer. Assuming that the FTDI drivers have been installed, make note of what COM port on which the FTDI enumerated. On a Windows computer, I was able to view it in the device manager as shown below:
Opening and Connecting to the SDK_Demo.exe
For basic operation with the demo software, it is recommended to download the demo software development kit (SDK) that is linked in product page's documents section. Each demo software is unique to that version of the scanner and it might not work with the other models.
To use the demo SDK on a computer:
- Download the SDK_DEMO.exe from the product page under the "Documents" section.
- Unzip the folder.
- Go to the directory that it was unzipped, which should look similar to this: ...\Fingerprint Scanner GT-511C1R_SDK_20140312\GT-511C1R_SDK_20140312\Program .
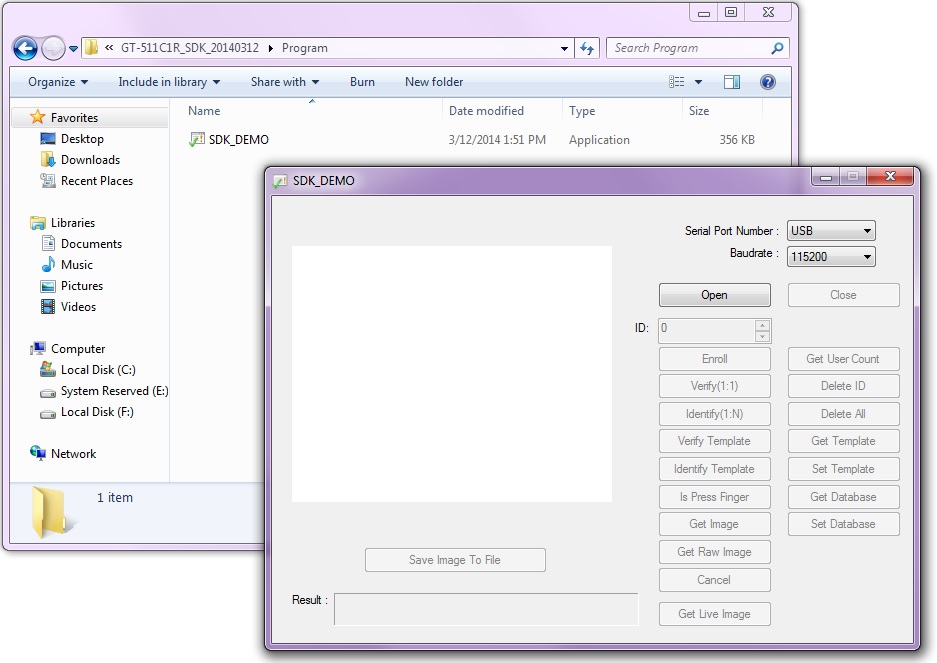
- Open the SDK_DEMO.exe executable.
- Select the COM port that the FTDI enumerated toin the Serial Port Number's drop down menu.*
- Click on the Open button.
Note: The available COM ports range from "COM3" to "COM10". If your USB-to-serial converter enumerates to a number higher than that, you would need to go to your computer's device manager to force it to a lower COM port number.
The image below shows how the SDK_DEMO.exe looks like before connecting:
Once the demo SDK has been opened it will look like this:

The FirmwareVersion and DeviceSN might be different depending the serial number that the manufacturer assigned. After connecting the fingerprint scanner to the FTDI, I was able to utilize all of the features as stated in the datasheet. The features in the demo software are based on the protocol commands. We will go over two features that are frequently used in this section. If you are interested, feel free to experiment and test the other features.
Enrolling
To enroll a fingerprint to the module, you would need to enroll your finger three times for each ID before the scanner can save it as a template. The blue LED will light up to begin reading your fingerprint:

To enroll a fingerprint:
- Select an ID that has no fingerprint template stored by adjusting the number in the ID: field. For this example, we will assume that there is nothing in template "0" .
- Press the Enroll button. The SDK_Demo.exe will respond in the Result: output by requesting "to input finger1!"
- Place a finger on the FPS. The output will state that it is "Processing Fingerprint..."
- Remove your finger when it asks for "to input finger2!"
- Place and remove your finger until the FPS has successfully read your fingerprint 3x.
- A notification will be provided when you have enrolled your fingerprint successfully. For template 0, it will respond by saying: "Enroll Ok (ID=0)!" At this point, the fingerprint scanner's blue LED will turn off.
If the scanner is not able to recognize a unique fingerprint or detect the finger that was placed on the scanner, it will stop the enrollment and respond with a "timeout!" . If the scanner is not able to recognize the fingerprint at anytime during the enrollment, you will receive a response: "The enrollment is failed!" Make sure that there is sufficient contact with the scanner and that the finger is placed in the same position during enrollment.
The template will have a number associated with the fingerprint scanner and it will be saved in its local database.
Identifying
After enrolling, you will want to test to see if the fingerprint can be identified. To test and verify, press on the Identify(1:N). The blue LED will being to light up and a request to "Input finger!" The SDK_DEMO.exe will check through the local database to see if it can recognize fingerprint against the saved fingerprint templates. If successful, it will respond with an ID that matches and the time it took to identify: "ID=0: 546ms;" .