ESP8266 Powered Propane Poofer
Building the Poofer
Between Amazon and the hardware store, I was able to put together the following parts list:
From the hardware store plumbing section
- 2"x12" Threaded Pipe Nipple
- 2" Coupler (x2)
- 2"x1" Bushing (x2)
- 1" Threaded Pipe Nipple (x2)
- 1"x1/2" Reducer
- 1/2" Threaded Pipe Nipple
- 1/2"x1/4" Reducer
- 1/4" Threaded Pipe Nipple
- 1 1/4" Reducer
- 1/4" Threaded Plug
From various Amazon sellers
- 1/4" FFF Brass Tee
- 1/4" MMM Brass Tee
- 1/4" Solenoid Valve (x2)
- 1/4" Brass Gas Bottle Adapter
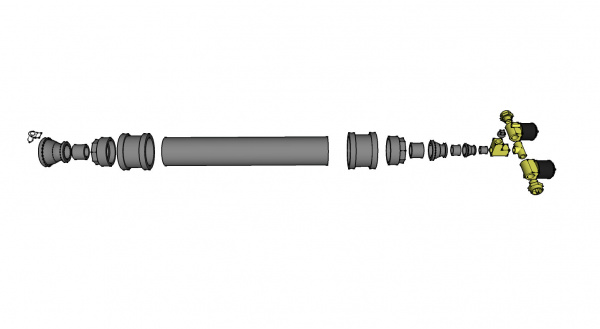
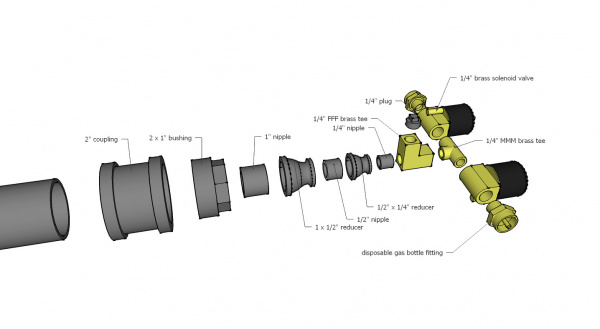
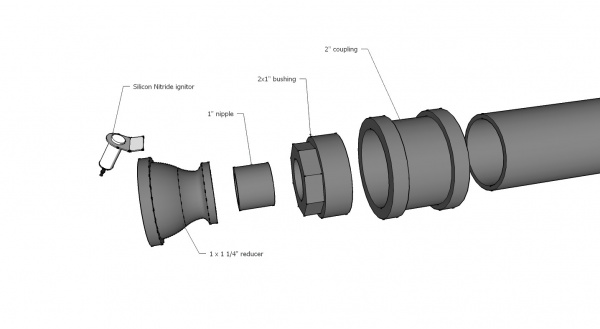
With all of the parts collected, it's time to assemble the cannon! Here are a few exploded diagrams (no pun intended) to detail how everything fits:
As you can see, I built the expansion chamber by using a series of reducer fittings to connect a foot-long section of 2" pipe to the outlet of the gas bottles. I replaced the pilot with an electrical ignitor, eliminating the need for a low pressure regulator and a separate fuel line. I also decided to move the solenoid valves to the section before the tee junction allowing me to individually open each bottle to the expansion chamber. Let's have a closer look at this tee junction:
You may wonder why I included a female tee between the expander and the male tee only to plug the unused port. Originally, there was a large solenoid valve on the output end of the cannon, allowing the expander to be used as an accumulator. I had a 1/4" pressure transducer threaded into that port to monitor the interior pressure of the expansion chamber. It turned out that bringing the expander up to tank pressure and purging it through a 1" solenoid was not only deafeningly loud but generated a stream of uncarborated gas that was nearly impossible to light reliably. When I removed the big solenoid valve, I also removed the pressure transducer (as that section of the cannon became open to atmosphere).
The nozzle end of the cannon is designed to encourage the escaping gas to spread and mix with the surrounding air. I drilled a hole in the side of the reducer fitting in order to secure the Silicon Nitride Ignitor. The leads for the ignitor run down the side of the expansion chamber where they're wrapped in heat tape to protect them from the fire.
Because this cannon doesn't have a pilot, it's necessary to give a short burst from one tank into the expansion chamber in order to start an open flame at the end of the barrel. As gas slowly leaks from the expander through the nozzle and carborates near the ignitor, it will maintain a low flame. When it's time to fire a big poof, you simply open both bottles to the chamber for about half a second and whoosh!


