Environmental Monitoring with the Tessel 2
 rwaldron
Program It
Create A Cloud Data Stream
The application that we're going to create will post data reported by the BME280 and Non-Invasive Current Sensor circuit from the Tessel to data.sparkfun.com (that's why this application does require a connection to the internet).
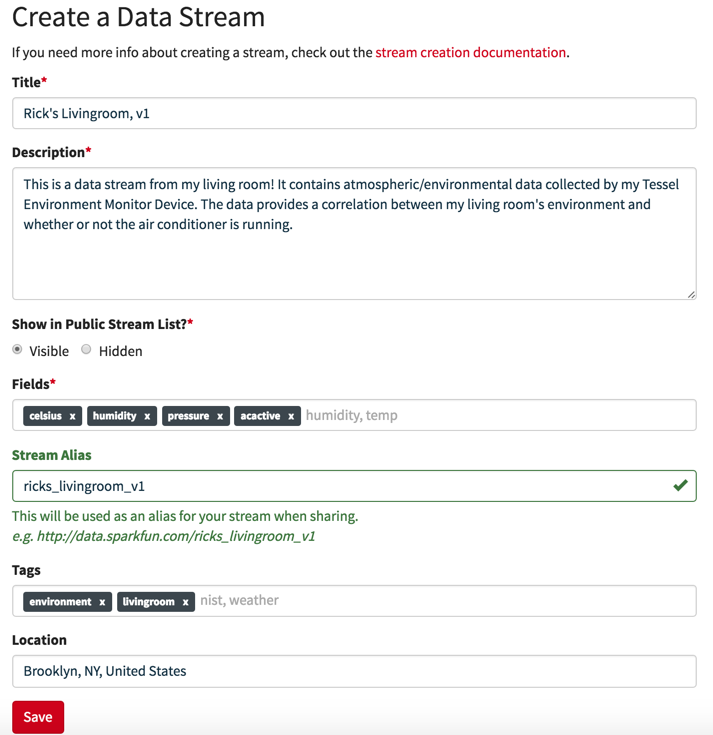
Before we get started with our own program, you'll need to create a new data stream on data.sparkfun.com so that you can send data to it from the monitoring device. You'll need to obtain the public and private keys for this data stream for use in the configuration of the air-conditioning monitor's code later.
Create a new "data stream". You'll want to fill the form in with something similar to this:
When you've completed the form, click "Save" and you'll be brought to a screen that looks like this:
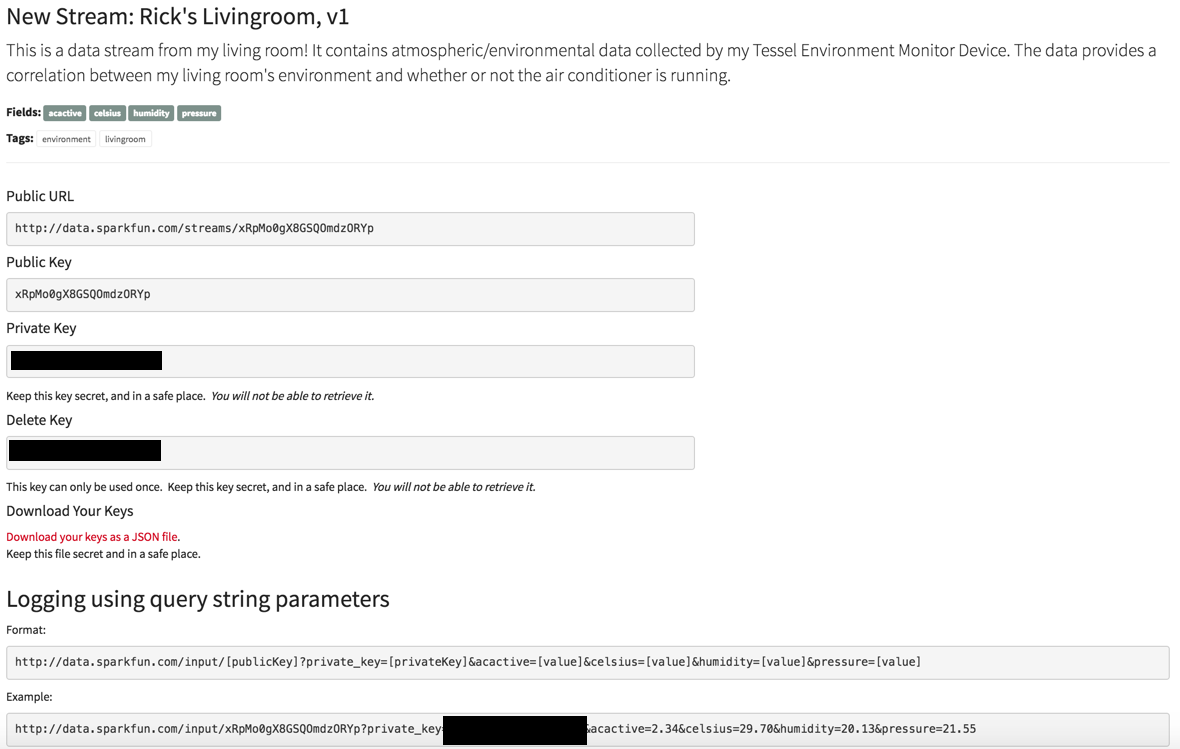
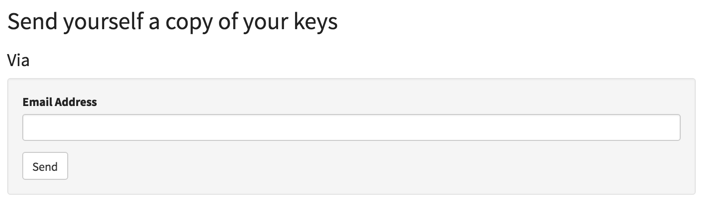
Below that section and at the bottom of that page, you will see an option to send the keys to an email address—I recommend doing this before you proceed.
Create A New Project And Install Dependencies
You should already have a j5ik directory—creating it is part of the Tessel software setup process. Use a terminal application to go to that directory, and then:
cd ../;
mkdir environment-monitor;
cd environment-monitor;
npm init -y;
npm install johnny-five tessel-io got;
This is going to change (cd) to the parent directory of j5ik/ and create an all new directory called environment-monitor. Once created, it will then change into environment-monitor/ and initialize a new project workspace with npm init -y. The last line will install the modules johnny-five, tessel-io and got into this project. The got module provides "Simplified HTTP requests" and describes itself as:
A nicer interface to the built-in http module.
It supports following redirects, promises, streams, retries, automagically handling gzip/deflate and some convenience options
which is perfect for our project's needs!
Application Overview
There are four main files for our application, and they will be created in the root of the project (i.e. the environment-monitor/ directory):
current.js: a module that exports a class calledCurrent.Currentrepresents a Non-Invasive Current Sensor and inherits from Johnny-Five'sSensorclass.ac.js: a module that exports a class calledACwhich represents an Air Conditioner.ACinherits fromCurrent.config.js: your application-specific configurationindex.js: the application itself
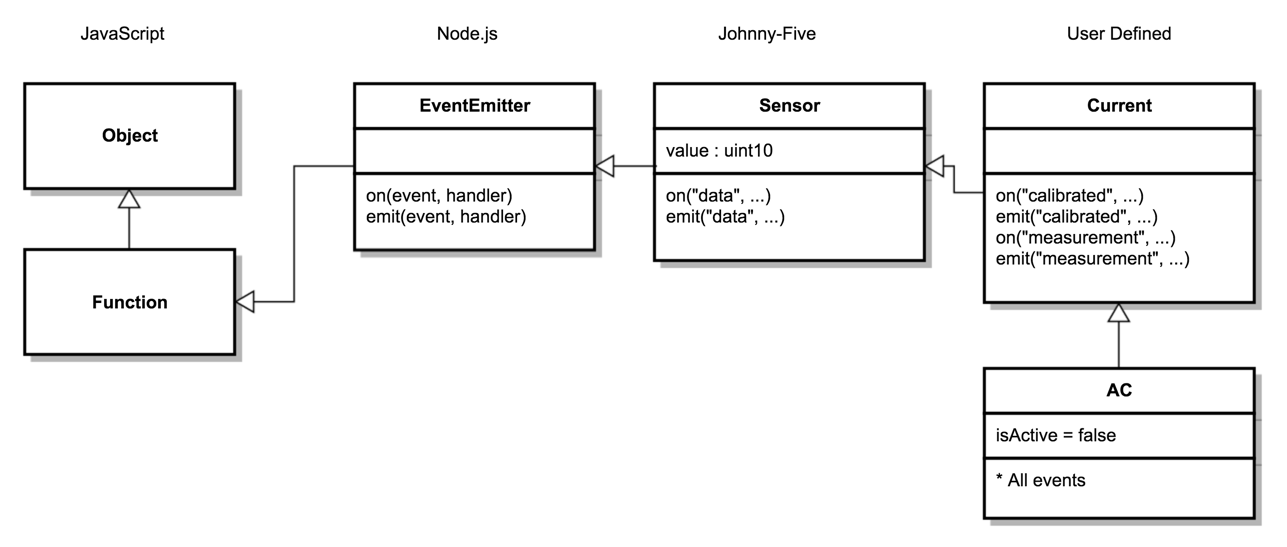
Class Heirarchy Overview
The next portion of this tutorial is dedicated to writing the software that will run our environment monitor. The bulk of this work will be spent creating cleanly separable classes that will be layered together in our application:
Writing the Current Sensor Class
Current is a class that will extend Johnny-Five's Sensor class. Open your favorite code editor, create a file called current.js and save it in the environment-monitor/ directory. Type—or copy and paste—the following JavaScript code into your current.js file:
language:javascript
"use strict";
const five = require("johnny-five");

class Current extends five.Sensor {
  constructor(pin) {
    super(pin);

    let aref = this.io.aref || 4.4;
    let cCount = 0;
    let sCount = 0;
    let lastSampleI = 0;
    let sampleI = 0;
    let lastFilteredI = 0;
    let filteredI = 0;
    let offsetI = 0;
    let sumSqI = 0;
    let rmsI = 0;
    // Turn Ratio: 100A:0.05mA
    //             2000:1
    // Burden: 100Ω
    // Calibration: 2000 / 100 = 20
    let calibration = 20;
    let ratioI = calibration * (aref / 1023);
    let last = Date.now();
    let isCalibrated = false;

    this.on("data", () => {
      let now = Date.now();

      if (now > last + 1000) {
        // Calculate Root Mean Squared Current (Amps = I)
        rmsI = ratioI * Math.sqrt(sumSqI / sCount);
        sumSqI = 0;
        sCount = 0;
        last = now;

        if (isCalibrated) {
          this.emit("measurement", rmsI);
        } else {
          if (cCount === 5) {
            this.emit("calibrated");
            isCalibrated = true;
          } else {
            cCount++;
          }
        }
      } else {
        lastSampleI = sampleI;
        sampleI = this.value;
        offsetI = offsetI + ((sampleI - offsetI) / 1023);
        filteredI = sampleI - offsetI;
        sumSqI += filteredI * filteredI;
        sCount++;
      }
    });
  }
}
module.exports = Current;
Exploring the Current Class
To provide a measurement of current in Amps, Current's data handler function needs to consider a number of individual data samples taken during a 1-second sampling cycle. Computations need to be performed on individual samples, and, at the end of each sampling cycle, a root mean squared current (rmsI) is calculated. Current objects then emit a measurement event and pass the rmsI along to anything that might be listening. rmsI is what we're after here—it represents the current going through the wire.
The first line of the Current module contains a Use Strict Directive to inform the JavaScript engine that this code conforms to a safe subset of JavaScript. "use strict"; appears at the top of every code file for the air conditioning monitor, so I won't dive into it again:
language:javascript
"use strict";
Next, the module requires its only dependency: the johnny-five module:
language:javascript
const five = require("johnny-five");
Immediately following that, a new class, Current, is declared. Current extends the Sensor class provided by Johnny-Five. Sensor provides all of the base mechanics needed to implement a specific analog input sensor. Current will extend Sensor and provide some things to support our current sensor.
Current's constructor (the method that is invoked when a new Current object is created) defines a single formal parameter, pin. pin gets passed as an argument to the parent class' constructor (that is, the constructor on Sensor) when super(...) is invoked. Sensor takes care of setting up an analog input on the pin indicated:
language:javascript
class Current extends five.Sensor {
  constructor(pin) {
    super(pin);
    // ...
  }
}
After the call to super(...), a long list of let variable declarations follows. Don't worry if these don't make a lot of sense yet:
language:javascript
let aref = this.io.aref || 4.4;
let cCount = 0;
let sCount = 0;
let lastSampleI = 0;
let sampleI = 0;
let lastFilteredI = 0;
let filteredI = 0;
let offsetI = 0;
let sumSqI = 0;
let rmsI = 0;
// Turn Ratio: 100A:0.05mA
//             2000:1
// Burden: 100Ω
// Calibration: 2000 / 100 = 20
let calibration = 20;
let ratioI = calibration * (aref / 1023);
let last = Date.now();
let isCalibrated = false;
All right, let's look at what some of these mean:
aref: the value of the particular board's analog reference, which is the top end of the voltage that the board expects in the analog input range. For the Tessel, we know this is +3.3V, but other boards have differentarefvalues (e.g. Arduino Uno is +5V).this.io.arefshould contain the analog reference for whatever board Johnny-Five is running on currently.cCount: track the number of "calibration" cycles that have passed. Calibration is set to occur over 5 1000-ms cycles—that is, the first 5 seconds of the instance's lifetime will be used for calibration.sCount: track the number of samples collected in each 1000ms sampling cycle.lastSampleI/sampleI: the value of the previous and present Amps (current, or I) value.lastFilteredI,filteredI,offsetI,sumSqI: Used within individual sampling computations.rmsI: the calculated root mean squared (RMS) Amps value for the sampling cycle.calibration/ratioI: calculated calibration and Amps ratio based on turn ratio—a characteristic of the current sensor's hardware—and burden resistor—100Ω in our circuit. More technical details).last: tracks the last time a sampling cycle completed.isCalibrated: initiallyfalse; will becometrueonce the calibration cycles are complete.
Next, we define a handler function for "data" events. These "data" events are defined within the super class five.Sensor. The only operation that occurs at the "top level" of this function execution context is to take note of the exact date and time (let now = Date.now()). data events fire frequently, about once every 25 milliseconds (this is the default sampling frequency of Johnny-Five's Sensor class).
language:javascript
this.on("data", () => {
  let now = Date.now();
  // ...
});
From there, the operations choose a fork in the road. There are two primary conditional paths:
language:javascript
if (now > last + 1000) {
  // This code is executed if 1 second (1000 ms) has passed since
  // the last time this path was taken.
  // It represents the end of a sample cycle.
} else {
  // This code is executed every time the handler
  // function is invoked unless it's the end of a cycle.
  // It performs computations on the data sample
}
The first path handles execution when a full sampling cycle—1000ms or 1 second—is complete.
First the rmsI is calculated for this sampling cycle, then resets some variables (sumSqI and sCount). The value of last is assigned to the value of now; this will result in starting a new sampling cycle when the data handler is next invoked.
language:javascript
// Calculate (Amps = I)
rmsI = ratioI * Math.sqrt(sumSqI / sCount);
sumSqI = 0;
sCount = 0;
last = now;
If the instance is done calibrating (isCalibrated), then it can emit a "measurement" event with the value of the rmsI for the sampling cycle. Otherwise it continues calibration.
language:javascript
if (isCalibrated) {
  this.emit("measurement", rmsI);
} else {
  if (cCount === 5) {
    this.emit("calibrated");
    isCalibrated = true;
  } else {
    cCount++;
  }
}
That's the end of the fork that handles the end of a sampling cycle. The other fork—the second primary condition—occurs almost every time the data handler is invoked, every time it's invoked and it's not the end of a sampling cycle.
This fork performs several computations on the most recent current value read from the sensor. The calculations here are ported from OpenEnergyMonitor.org's "EmonLib".
This second fork evaluates a single sensor reading. It increments the sCount (sample count) by 1 in order to track the total number of samples collected within a single sampling cycle. It then performs some calcuations on the current value, with an eye toward ultimately being able to produce a rmsI value for the entire sampling cycle.
language:javascript
lastSampleI = sampleI;
sampleI = this.value;
offsetI = offsetI + ((sampleI - offsetI) / 1023);
filteredI = sampleI - offsetI;
sumSqI += filteredI * filteredI;
sCount++;
Back out in the top-level scope, the very last line exports the Current class object so that it can be used by other code modules. I'll skip mentioning this when looking at the code in other modules for the air conditioning monitor.
language:javascript
module.exports = Current;
Writing the AC Class
Open your favorite code editor, create a file called ac.js and save it in the environment-monitor/ directory. Type—or copy and paste—the following JavaScript code into your ac.js file:
language:javascript
"use strict";
const Current = require("./current");

class AC extends Current {
  constructor(setup) {
    super(setup.pin);

    let isActive = false;

    this.on("measurement", rmsI => {
      if (Math.round(rmsI) < setup.minimumI) {
        isActive = false;
        return;
      }

      isActive = true;
    });

    Object.defineProperty(this, "isActive", {
      get() {
        return isActive;
      },
    });
  }
}
module.exports = AC;
Exploring the AC Class
The AC class has only one dependency—the Current class we just created.
language:javascript
"use strict";
const Current = require("./current");
Just like with the Current class, the next step is to declare a new class called AC, which extends the Current class. Instances of the AC class will forward the value of setup.pin along to super(...) during instantiation.
language:javascript
class AC extends Current {
  constructor(setup) {
    super(setup.pin);
    // ...
  }
}
After the call to super(...), a let variable named isActive is declared and assigned an initial value of false. This will be used to track whether or not the air conditioner is active or not. (The air conditioner might be switched on all the time, but we only want to know when it's actually actively cooling).
language:javascript
let isActive = false;
Next, we register a "measurement" event handler, which receives the rmsI value as an argument. To determine if the air conditioner is active or not...
the handler first checks if the rounded rmsI is less than the value of setup.minimumI, which the application specifies as the "minimum amps flowing when the air conditioner is active". If it that condition evaluates to true, then that means that the air conditioner is inactive, so set isActive to false and return immediately. If that condition does not evaluate to true, that is: the value of the rounded rmsI is greater than or equal to the "minimum amps flowing when the air conditioner is active", then set isActive to true. Note that isActive is still the let variable declared outside of the event handler.
The "measurement" event handler's job is to determine whether the air conditioner is active. It determines this by looking at the value of rmsI (the root mean squared Amps of the sample), which it receives as an argument. The setup object passed to the AC constructor includes a minimumI property. setup.minimumI defines the minimum Amps flowing when the air conditioner is active. If rmsI is less than that value, then the air conditioner is not presently active (isActive = false). Otherwise, we can deduce that it is (isActive = true).
language:javascript
this.on("measurement", rmsI => {
  var roundRmsI = Math.round(rmsI);

  if (roundRmsI < setup.minimumI) {
    isActive = false;
    return;
  }

  isActive = true;
});
A bit about scope. isActive is declared within the function execution context of the AC class' constructor. So is the "measurement" handler function, so code within it can access isActive. However, isActive isn't accessible directly on AC instances yet—for example, if you had an AC instance called ac, there is no ac.isActive property—yet.
What we can do is define an accessor property, also called a "getter", to expose the value of isActive on AC instance objects.
language:javascript
Object.defineProperty(this, "isActive", {
  get() {
    return isActive;
  },
});
Note that we're only defining a "getter", not a "setter". You can check the value of ac.isActive, but if you tried to set the value (ac.isActive = true), you wouldn't be able to (it'd throw TypeError: Cannot set property isActive of #<AC> which has only a getter). While this kind of protection isn't strictly necessary, it's important to me that I impart my preference for tamper-proof hardware state representations in my software.
Creating the Configuration Module
Before move onto discussing the actual application code, we have one last supporting module file to create: config.js.
This module contains a single export, an object containing properties whose values are relevant configuration for our application.
The interval property defines how frequently, in milliseconds, new data is sent to data.sparkfun.com. I've specified 10 seconds, but you may change this to whatever best suits your version of the application. Take care to replace [Phant Public Key] and [Phant Private Key] with the values generated when you created your data stream. If you followed my advice earlier, you will already have an email containing those values.
language:javascript
module.exports = {
  interval: 10000,
  phant: {
    public: "[Phant Public Key]",
    private: "[Phant Private Key]",
  },
};
Writing the Environment Monitor Application
Open your favorite code editor, create a file called index.js and save it in the environment-monitor/ directory. Type—or copy and paste—the following JavaScript code into your index.js file:
language:javascript
"use strict";
const AC = require("./ac");
const config = require("./config");
const five = require("johnny-five");
const got = require("got");
const Tessel = require("tessel-io");

const board = new five.Board({
  io: new Tessel()
});

board.on("ready", () => {
  const url = `http://data.sparkfun.com/input/${config.phant.public}.json`;
  const payload = {
    body: null,
    headers: {
      "Phant-Private-Key": config.phant.private, // <-- don't publish this!
    }
  };
  const ac = new AC({
    pin: "A7",
    minimumI: 1
  });
  // Once the AC instance is calibrated,
  // setup the BME280 and report status to phant
  // according to the specified interval.
  ac.on("calibrated", () => {
    let env = new five.Multi({
      controller: "BME280",
    });
    board.loop(config.interval, () => {
      if (env.isReady) {
        payload.body = {
          celsius: env.thermometer.celsius,
          humidity: env.hygrometer.relativeHumidity,
          pressure: env.barometer.pressure,
          acactive: Number(ac.isActive),
        };
        got.post(url, payload);
      }
    });
  });
});
Exploring the Application Code
As you've seen twice already in this tutorial, the first thing we do is require the modules that our application depends on. This time, we're requiring got, johnny-five, tessel-io, as well as our own ac.js and config.js module files.
language:javascript
"use strict";
const AC = require("./ac");
const config = require("./config");
const five = require("johnny-five");
const got = require("got");
const Tessel = require("tessel-io");
If you've previously read any or all of the Experiment Guide for the Johnny-Five Inventor's Kit, then the next part will look familiar. To quote from the guide itself:
Johnny-Five supports many kinds of development boards. The support for some boards is built right in to Johnny-Five, but others — including Tessels — rely on external plugins encapsulated in modules. That’s why the code requires the
tessel-ionpmmodule. Here, we tell Johnny-Five to use aTesselobject for IO when communicating with the board.
language:javascript
const board = new five.Board({
  io: new Tessel()
});
Next, a "ready" event handler is registered for the board instance (which represents the Tessel 2 itself). The "ready" event will be emitted when Johnny-Five and Tessel-IO have completed their respective initialization phases and the board is ready to interact with.
Before we start interacting with the hardware, there are two const declarations that get created. The value of url will be passed directly to got.post(...) and represents the API endpoint for posting data to your data stream, while the value of the payload.body property will be updated with the present environment values to send to data.sparkfun.com.
language:javascript
const url = `http://data.sparkfun.com/input/${config.phant.public}.json`;
const payload = {
  body: null,
  headers: {
    "Phant-Private-Key": config.phant.private, // <-- don't publish this!
  }
};
Now we get to see our AC class in action! The program instantiates a new AC instance object and assigns it to ac. If you look back at the AC class constructor definition, you'll see that it accepts a setup argument, an object. The pin property of the setup object will get forwarded on to Current and then on to Sensor to tell Johnny-Five which pin the component is connected to. The minimumI value represents the minimum amount of current, in Amps, that the air conditioner uses when active.
language:javascript
const ac = new AC({
  pin: "A7",
  minimumI: 1
});
Immediately following the instantiation, the program registers a "calibrated" event with ac. Remember that AC inherits from Current? That means that the ac instance object will emit all of the events that come from its super class object as well. Very useful!
language:javascript
ac.on("calibrated", () => {
  // ...
});
The "calibrated" event will fire once near the beginning of the ac instance's lifetime, and when it does, the program will treat that as an indication that all systems are "go".
The next step is instantiate a new five.Multi object, specifying "BME280" as controller. The Multi class is used to represent components that provide data from multiple sensors, each of which is represented by a Johnny-Five component class. In this case, an instance of Multi for a BME280 will itself contain instances of:
AltimeterBarometerHygrometerThermometer
...all four of these sensors are packaged on the BME280. By making use of the Multi class, you can wrangle all four sensors with one component object.
language:javascript
const env = new five.Multi({
  controller: "BME280",
});
In the Johnny-Five Inventors Kit Guide Experiment 10: Using the BME280, you learned how to respond to "data" events from the BME280 Multi instance by creating a handler that forwarded values on to the browser via a WebSocket provided by socket.io.
In this example, I'd like to show you how to interact with sensors by simply waiting for them to be "ready" and then accessing data directly from the instance object's properties. The program will use the board.loop(...) method, check if the Multi instance (env, which is short for "environment") is "ready"; if it is, then it will post data to our data stream:
language:javascript
const env = new five.Multi({
  controller: "BME280",
});
board.loop(config.interval, () => {
  if (env.isReady) {
    payload.body = {
      celsius: env.thermometer.celsius,
      humidity: env.hygrometer.relativeHumidity,
      pressure: env.barometer.pressure,
      acactive: Number(ac.isActive),
    };
    got.post(url, payload);
  }
});
And that's it!