Das Blinken Top Hat
 Nate
Nate 
Background
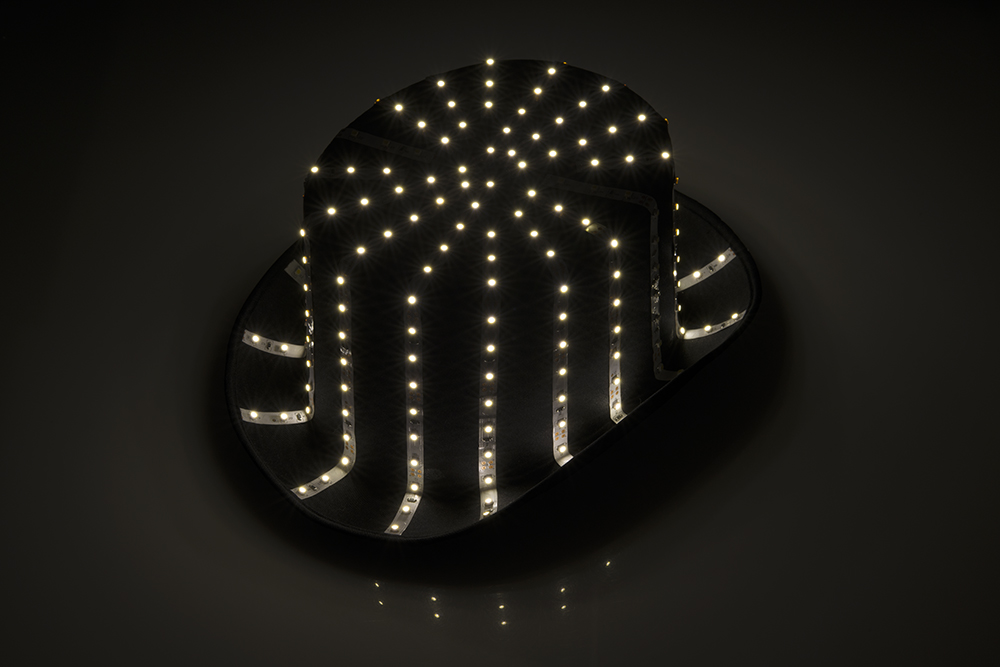
The Das Blinken Top Hat was an awesome gift built by Diana Eng and David Clausen and given to Nathan and Alicia at their engagement party. As the hat is tilted it lights up with rotating effects. Das blinken top hat combines white LED strips, a small Arduino Pro Mini, and an accelerometer to get a pretty nifty effect.
Suggested Reading
Things you may want to know:
Hardware
Parts used:
- Arduino Pro Mini
- Mini FET Shield
- ADXL335 Triple Axis Accelerometer
- Rectangle AA battery holder
- Power switch
- Wire wrap wire
- 12V Strip LEDs
LEDs
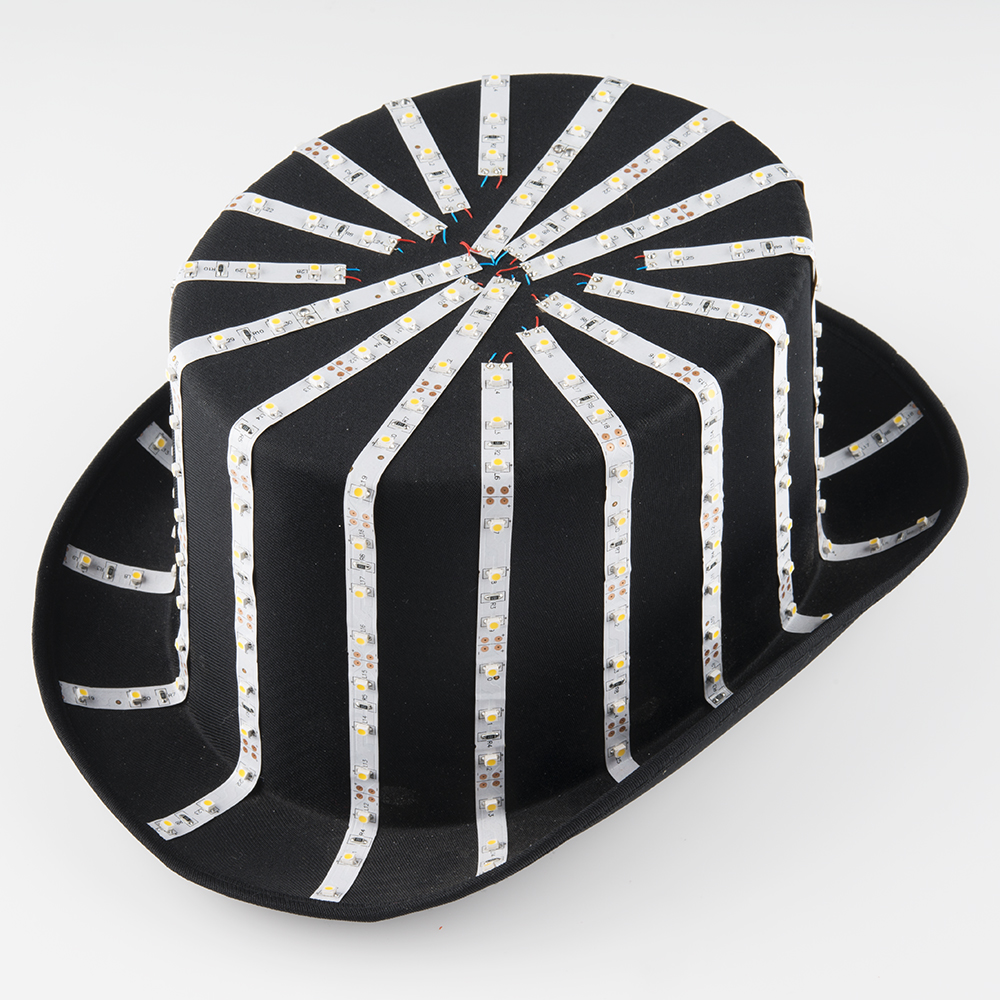
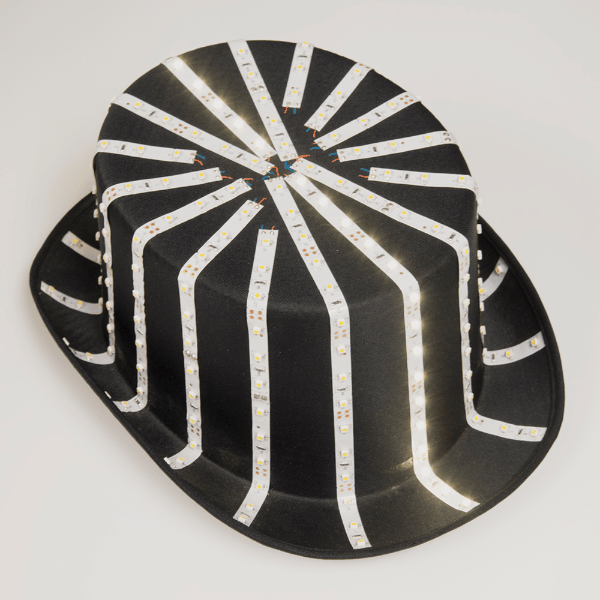
The lighting comes from common white LED strips. They are driven by 12V, and are extremely bright!
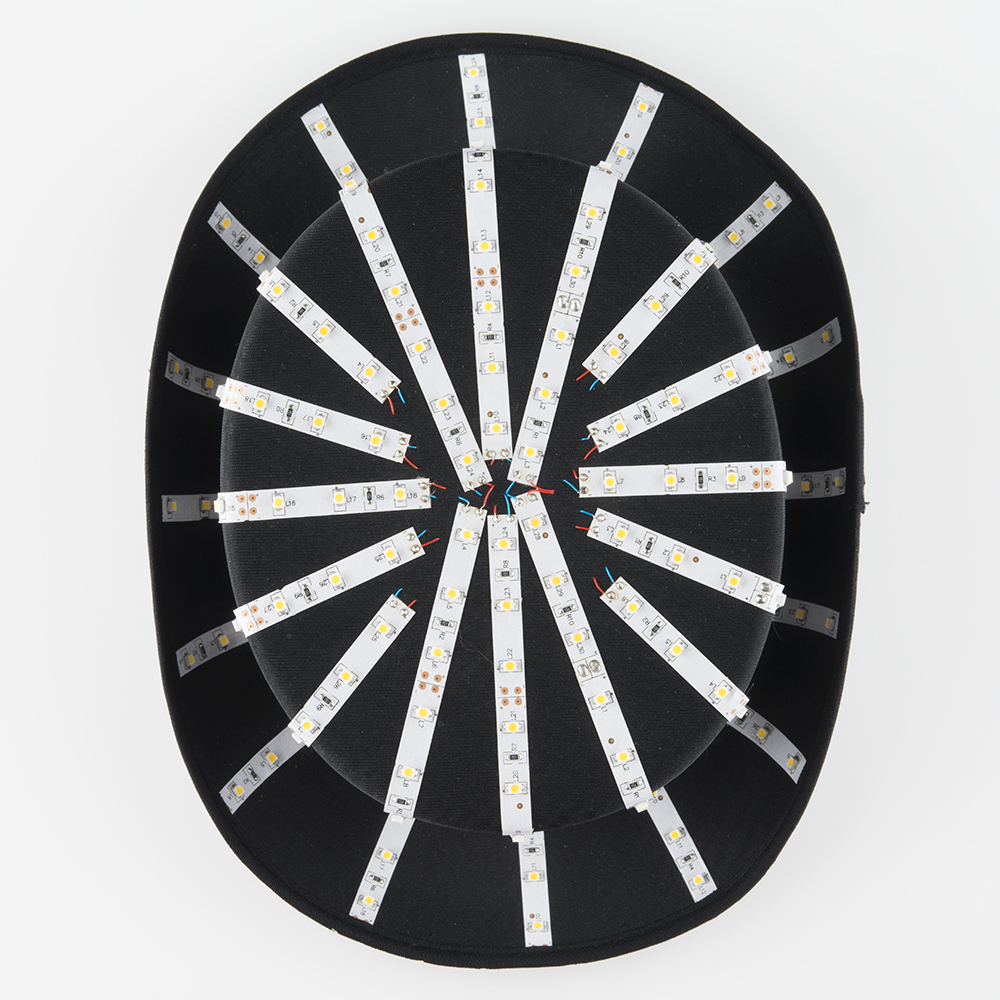
There's 16 strips in all, wired very ingeniously in parallel so that the Arduino Pro Mini shield only has to deal with 8 channels.
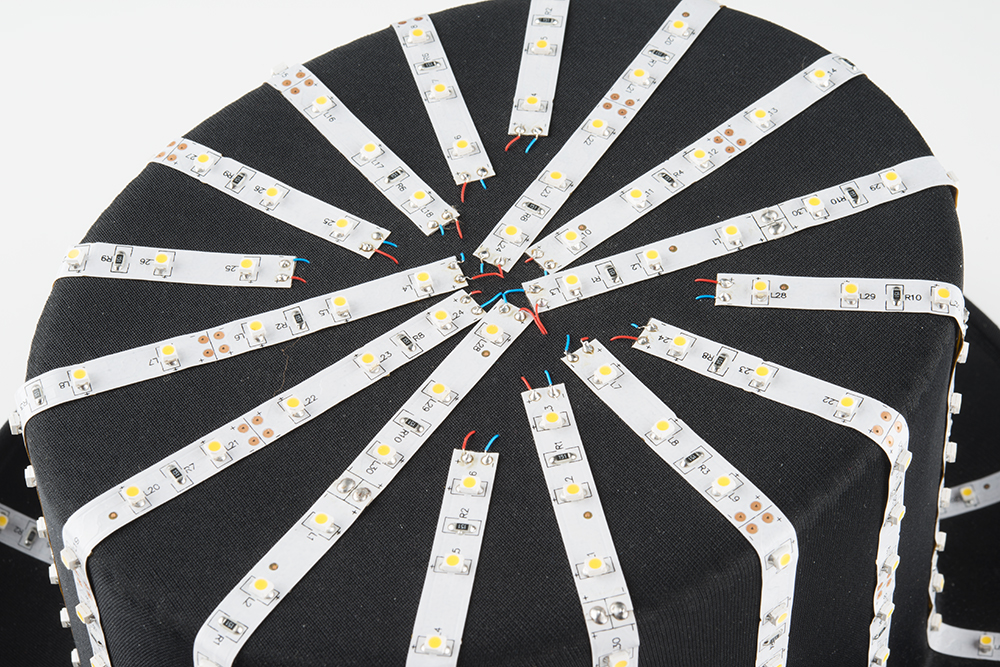
Each strip has a self adhesive backing that holds the strip solidly (during extreme head maneuvers) to the top hat. The + and - connections are created with thin 30AWG wire wrap wire and poked through the fabric.
Arduino Pro Mini + Driver
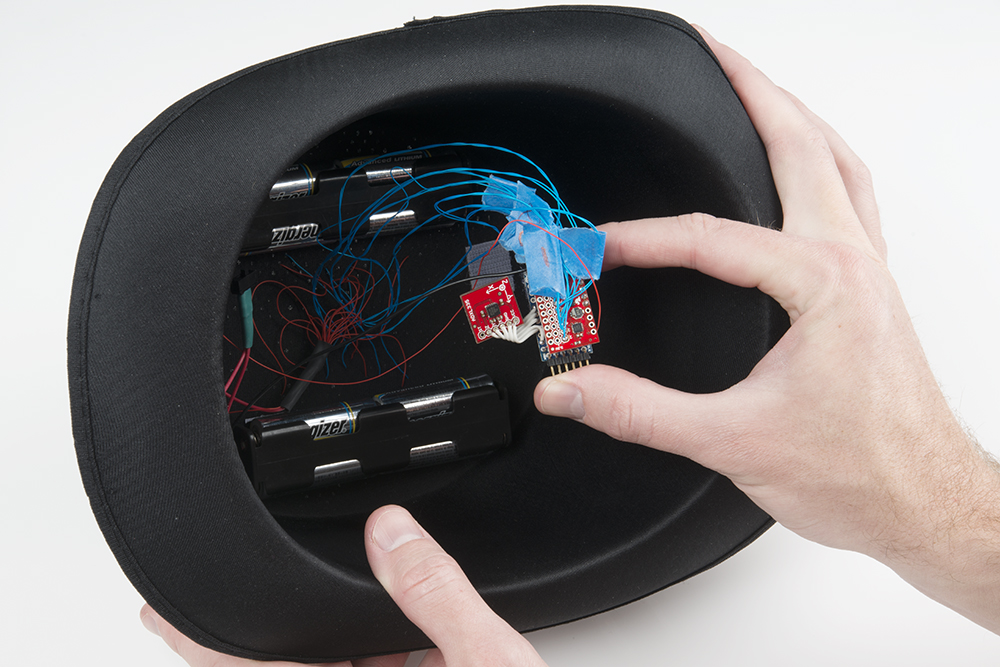
The Arduino Pro Mini 3.3V/8MHz is the perfect size and has plenty of computing power to read the accelerometer and control 8 channels of LEDs. It uses a fraction of the power that the LEDs use and can be reprogrammed with an FTDI Basic for other nifty lighting effects.
Each strip has 15 LEDs, which means it will use about (15 * 20) 300mA per strip when illuminated. This is way more than the ATmega328 can handle (about 20mA max) so the Mini FET Shield came in super handy. This shield allows a low voltage Arduino (3.3Vs in the case of the top hat) to control much larger loads (12V and 300mA in the case of the LED strips). Each of the 8 channels on the Mini FET shield can handle 2 amps, so the MOSFETs shouldn't even get warm. As previously mentioned, there are 16 LED strips, but they are wired in parallel so that we only need to control 8 channels to get a really cool effect.
Accelerometer
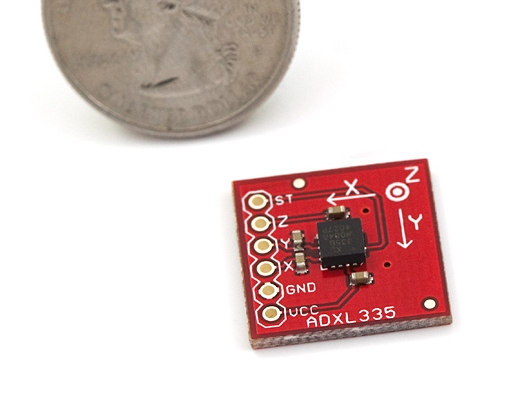
The hat uses the ADXL335, a classic workhorse with easy to read analog outputs for the three axes. But any solid state accelerometer, such as the ADXL345, the MMA7361, or the MMA8452Q, should work just fine.
The ADXL335 is old (3 years is archaic in the electronics world), but it's super easy to read the analog voltages and convert them into 10-bit integers using Arduino. The real trick is doing the basic math to figure out how the top hat is moving. In general we take the three vectors (X, Y, and Z) and combine them into one vector.
Battery Power

Because the LED strips run at 12V, the hat uses 8 AAs in two battery holders, to distribute the weight. When the batteries are fresh, we have a nominal voltage of 1.5V * 8 = 12V. The LEDs use a fair amount of juice, so lithium batteries were used to maximize the run time. In practice, the hat runs for tens of hours on a set of batteries, so alkalines could also be used. An in-line slide switch makes it easy to kill the power to the hat at the end of the night.
Wiring Diagram
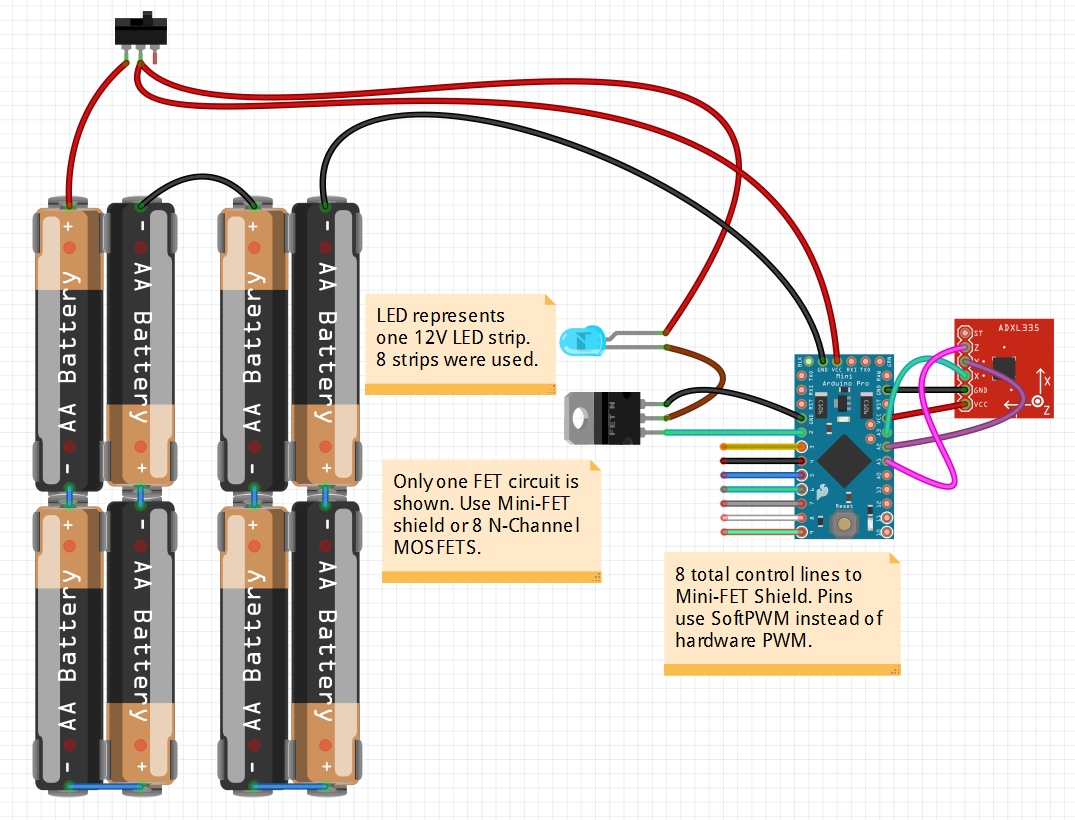
This shows how the hat is wired. The on/off switch provides power to the Arduino Pro Mini as well as power to the LED strips. There are 8 MOSFETs on the MiniFET that are individually controlled. You can use the shield or use 8 discrete MOSFETs (for powering really big stuff). The accelerometer is wired into the analog inputs.
Vector Math
If you've been out of school and away from Newtonian physics as long as I have, it takes a second to remember how to combine the three acceleration vectors into one. For our purposes we care only about the movement of the hat (magnitude of movement), not direction:
A2 + B2 + C2 = Z2
or in code:
float magnitude = sqrt((aX * aX) + (aY * aY) + (aZ * aZ)); //Combine all vectors
Here's what the actual code looks like:
language:c
float avgMag = 0;
for(int x = 0 ; x < 8 ; x++)
{
    aX = analogRead(accelX);
    aY = analogRead(accelY);
    aZ = analogRead(accelZ);

    float magnitude = sqrt((aX * aX) + (aY * aY) + (aZ * aZ)); //Combine all vectors
    avgMag += magnitude;
}
avgMag /= 8;
We take 8 readings and average them together to reduce the noise. This works pretty well. Now we just have to decide what to do with this magnitude reading.
For the purposes of das blinken top hat we needed to have the LEDs spin fast when acceleration or movement was detected and then begin to slow the rotation as movement subsided. To do this, we use an exponential growth equation to organically increase the time between channel changes (tBCC in the code).
Time delay between LED changes = A * xt
This is a basic exponential growth equation. The time between LED changes will increase exponentially with time based on a constant A and a growth rate x. I knew I wanted the LED strips to slow down across 3 or 4 seconds when the accelerometer stopped detecting movement, I just had to determine A and x.
I determined the constant A by programming the hat to rotate in a circle and seeing how small a delay the rotation could use before my eyes couldn't discern the difference. 10-20ms between a step to the next LED strip looked pretty awesome. Anything less than 10ms just turned into a blur.
To determine the growth rate x, I used a spreadsheet and found that a growth rate of 1.00086 would cause the delay to increase to over 500ms within 3.5 seconds. Checkout the google spreadsheet here to see the calculations.
language:c
long currentTime = millis() - startTime;
timeBetweenChannelChange = shortestDelay * pow(growthRate, currentTime); //Exponentially grow the delay between changes
In the equations above we calculate the current time and then calculate the new tBCC using the two constants. This value (timeBetweenChannelChange) in milliseconds will increase exponentially over time until it becomes greater than our maxTimeBetween (3.5 seconds). Once tBCC becomes larger than the max time the hat will stop spinning altogether.
After a bit of testing and a few small tweaks the rotational light effect looked pretty good.
Soft PWM
I have had a few costumes and LED pieces where the LEDs were so bright they were blinding. This also happened with the top hat -- the light was so intensely awesome it bordered on epileptic dance party. To counter this, I wanted to reduce the brightness by pulse-width-modulating the 8 channels. If we reduce the PWM ratio, then the LED strips should be less bright, we extend our battery life, and we blind less harmless bystanders. The problem is that the Arduino Pro Mini only has 6 PWM channels, not enough to run all 8. Luckily, there is a software solution to the rescue!
SoftPWM is a library written by Brett Hagman of Rogue Robotics. This really slick library allows us to turn any pin into a PWM pin. It's not perfect (looks like servo support may be limited), but it works great for controlling LEDs!
language:c
SoftPWMSetPercent(chan0, brightLevel);
This simple function allows us to set a given LED strip to a brightness level between 0 (off) and 99 (full brightness). Through testing, I found that a brightness level of 9% (yep, that's all) was still plenty bright without being overbearing.
The original plan was to solder a trimpot onto the Pro Mini so that the brightness could be adjusted on the fly. This became a bit of a problem (trying to detect changes to the trimpot during run-time got tricky), so, instead, I tested a few brightness levels and then set it permanently. I've had the hat set on 9% ever since.
Das Bliken Firmware
There are two example sketches to give you an idea of how to create different lighting effects. Dave wrote the original code which provides tons of great lighting effects with physics engines coupled with energy systems. I wrote a much less interesting sketch that uses a simple exponential growth formula to control the light spin.
- Basic spinning example
- Dave's code with lots of example effects
- You can also checkout the TopHat repo here
Success!

The Das Blinken Top Hat was a fantastic gift that has wowed crowds and lit up parties. It's amazingly robust and a ton of fun to show off.
Thank you Diana and Dave!
Resources and Going Further
Thanks for reading this project tutorial. If you'd like read more about LED related projects and products, check out these other great SparkFun tutorials: