Boss Alarm
 AGlass0fMilk
Making the Computer Receiver
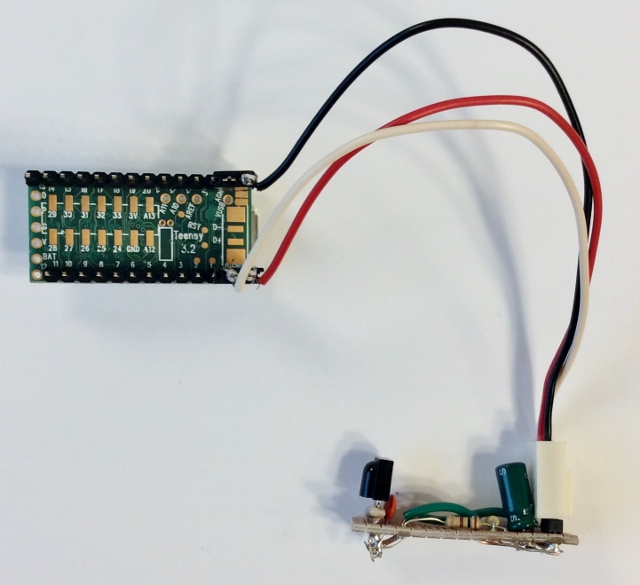
The computer receiver is just a copy of the IR filtering circuit used in the owl hooked up to a Teensy 3.2.
Build the Circuit
The parts you need for this component of the project are:
- Teensy 3.2 and USB Cable
- Male headers
- 100Ω and 10kΩ Resistors
- 0.1μF, and 10μF capacitors
- Infrared Receiver
- Snapable Protoboard
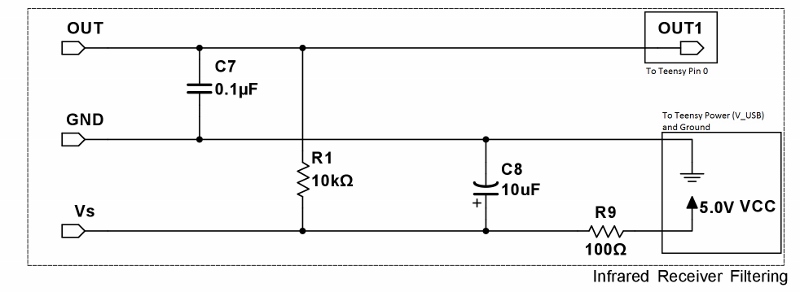
Here's the schematic again:
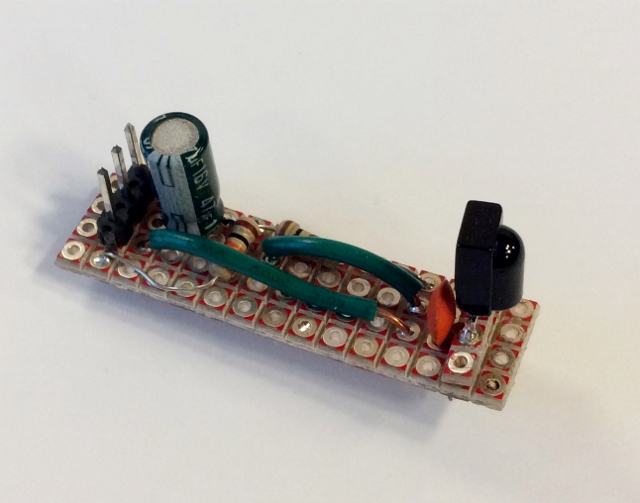
First, solder headers on your Teensy board, if you haven't already.
Solder together the IR filtering circuit, and use a connector to tie the Teensy's power and ground pins to the appropriate pins on the infrared receiver. Make sure to use the V_USB pin to get a 5V source rather than the 3.3V source on the Teensy. Connect the output of the receiver to pin 0 on the Teensy.
Programming the Teensy
Plug the Teensy into your computer, and get ready to program it! If you haven't used the Teensy before, read this guide to get started.
The Teensy is like an Arduino, but it has a unique feature -- it can be configured as a USB device. This lets your computer "see" the Teensy as another device and automatically load the drivers for it. For example, you can configure the Teensy as a USB keyboard (as in this project), and, when you plug it in, your computer will see it as a keyboard -- no special software required!
The code used in this project is almost identical to the Teensy's USB keyboard example sketch. We simply treat the output of the IR receiver as a switch and send key presses/releases on the falling/rising edge of the receiver's output.
language:c
/* Title: Boss Alarm
 * Date: 3/14/2016
 * Author: Don Beckstein

   Note: You must select Keyboard from the "Tools > USB Type" menu

*/

#include <Bounce.h>

// Helps us debounce the output from the IR receiver (helps suppress false-alarms)
Bounce button0 = Bounce(0, 100);

//Change these to set the key combination used
unsigned const int modifierKey = MODIFIERKEY_ALT;
unsigned const int combinationKey = KEY_TAB;

//If you're on Mac you can try this code (I haven't tested it)
//unsigned const int modifierKey = MODIFIERKEY_GUI;
//unsigned const int combinationKey = KEY_TAB;

//If you want it to show your desktop on Windows instead of switch windows, use this code:
//Sends Windows Key + D
//unsigned const int modifierKey = MODIFIERKEY_GUI;
//unsigned const int combinationKey = KEY_D;

void setup() {
  // Configure the pins for input mode with internal pullup resistors.
  pinMode(0, INPUT_PULLUP);

}

void loop() {

  //Update the buttons
  button0.update();

  //Press keyboard keys when the IR Receiver is triggered
  if (button0.fallingEdge()) {

    //Send the key commands
    Keyboard.set_modifier(modifierKey);
    Keyboard.send_now();
    Keyboard.set_key1(combinationKey);
    Keyboard.send_now();
  }

  //Release the keyboard keys when the trigger returns to normal
  if (button0.risingEdge()) {

    //Release keys
    Keyboard.set_modifier(0);
    Keyboard.set_key1(0);
    Keyboard.send_now();
  }
}
The default key combination is ALT+Tab to switch between programs on Windows. If you have multiple monitors you might want all programs to be minimized. I included a few different key combinations in the code, you can uncomment/comment lines of code to suit your needs. I also included a key combination that should work on Mac. If you want to make your own key command, this page provides a reference to the Teensy's defined keys.
Make sure to click Tools->Board->Teensy 3.2 and Tools->USB Type->Keyboard+Mouse+Joystick to set up your Teensy correctly. Load the Boss Alarm code onto your Teensy, and it should be all set!