2D Barcode Scanner Breakout Hookup Guide
 El Duderino, MAKIN-STUFF
Arduino Examples
The DE2120 Library includes three examples to demonstrate how to do simple scans, read the barcode data, configure the various settings available and sending specific commands. In this section we'll go over these examples in some detail and highlight important bits of code.
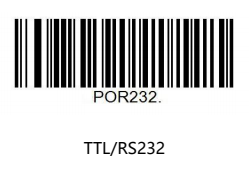
Important: Make sure to scan the barcode below to put the DE2120 into TTL mode or the barcode scanner will not communicate properly with the Arduino and the examples will freeze until the board is reset.
The 2D Barcode Scanner saves all settings during power cycles so you can configure the DE2120 however you would like (e.g. scanning mode, image flipping, LED settings, etc.) prior to assembling your Arduino circuit and using the examples.
Example 1 - Serial Scan
This basic example demonstrates how to connect the scanner to an Arduino via Software Serial and output any barcodes it sees over serial. Open the example in Arduino by navigating to "File > Examples > SparkFun DE2120 Arduino Library > Example1-SerialScan". Select the correct Board and Port from the "Tools" menu and click upload. After the upload finishes, open the serial monitor with the baud set to 115200.
Since this example uses the Software Serial library, make sure to refer to this page for pin compatibility limitations for common Arduino boards. The example assumes an ATMel328-based Arduino like the SparkFun RedBoard is used so if you prefer a different board, adjust this line if necessary:
language:c
SoftwareSerial softSerial(2, 3);
After declaring the pins to use for RX/TX in Software Serial, the code creates the scanner object as well as the scanner buffer and buffer size:
language:c
DE2120 scanner;

#define BUFFER_LEN 40
char scanBuffer[BUFFER_LEN];
The setup attempts to initialize the barcode scanner and, if successful, the main loop will start polling the buffer for any data every 200ms. If there is data in the buffer, the code prints it. With a serial monitor open, try scanning barcodes with the breakout and watch the code data print out.
Example 2 - Serial Settings
The second example shows how to adjust a selection of seven scanner settings using a "menu" in the serial monitor. Select and upload the example and open a serial monitor with the baud set to 115200. After initializing the DE2120, the code prints out the selection options for the user.
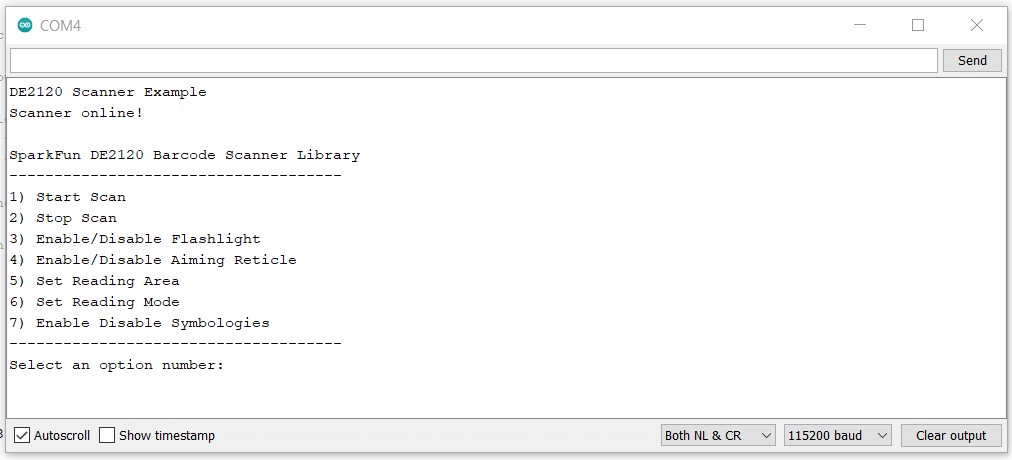
Select an option number by sending the corresponding number and hit ENTER. The code then prints out the available options for the selected setting. Enter the number corresponding to the preferred behavior and hit ENTER again to change the setting. After the setting is adjusted, the code prints if the adjustment was successful and returns to the "main menu".
Example 3 - Send Command
The third example demonstrates how to use the sendCommand(); function to send serial commands to the barcode scanner either through scanning barcodes or a serial monitor. As we mentioned in the previous section, sendCommand(); takes two strings, links them together, adds the command prefix ("^_^") and suffix (".") and sends the command to the DE2120.
Upload the example and open the serial monitor with the baud set to 115200. Once the terminal window is open, type in the command you want to use and press ENTER. Refer to the Scan Settings Manual for the Command Table (found starting on page 78). If the command is not recognized, the code prints out the code is invalid.