XBee Shield Hookup Guide
 jimblom
Example: Remote Control Arduino
Setting up a chat system is fun, but where XBees and the XBee Shield really shine is in passing data to and from an Arduino, so you can remotely control it or receive data from it. In this example, we'll create a simple serial interface, which can be used to set and read analog and digital pins.
Example Sketch
Here's the sketch. Copy and paste from below, or click here to download it.
language:c
/*****************************************************************
XBee_Remote_Control.ino
Write your Arduino's pins (analog or digital) or read from those
pins (analog or digital) using a remote XBee.
Jim Lindblom @ SparkFun Electronics
Original Creation Date: May 7, 2014

This sketch requires an XBee, XBee Shield and another XBee tied to
your computer (via a USB Explorer). You can use XCTU's console, or
another serial terminal program (even the serial monitor!), to send
commands to the Arduino.

Example usage (send these commands from your computer terminal):
    w#nnn - analog WRITE pin # to nnn
      e.g. w6088 - write pin 6 to 88
    d#v   - digital WRITE pin # to v
      e.g. ddh - Write pin 13 High
    r#    - digital READ digital pin #
      e.g. r3 - Digital read pin 3
    a#    - analog READ analog pin #
      e.g. a0 - Read analog pin 0

    - Use hex values for pins 10-13
    - Upper or lowercase works
    - Use 0, l, or L to write LOW
    - Use 1, h, or H to write HIGH

Hardware Hookup:
  The Arduino shield makes all of the connections you'll need
  between Arduino and XBee. Make sure the SWITCH IS IN THE
  "DLINE" POSITION.

Development environment specifics:
    IDE: Arduino 1.0.5
    Hardware Platform: SparkFun RedBoard
    XBee Shield & XBee Series 1 1mW (w/ whip antenna)
        XBee USB Explorer connected to computer with another
          XBee Series 1 1mW connected to that.

This code is beerware; if you see me (or any other SparkFun
employee) at the local, and you've found our code helpful, please
buy us a round!

Distributed as-is; no warranty is given.
*****************************************************************/
// SoftwareSerial is used to communicate with the XBee
#include <SoftwareSerial.h>

SoftwareSerial XBee(2, 3); // Arduino RX, TX (XBee Dout, Din)

void setup()
{
  // Initialize XBee Software Serial port. Make sure the baud
  // rate matches your XBee setting (9600 is default).
  XBee.begin(9600);
  printMenu(); // Print a helpful menu:

}

void loop()
{
  // In loop() we continously check to see if a command has been
  //  received.
  if (XBee.available())
  {
    char c = XBee.read();
    switch (c)
    {
    case 'w':      // If received 'w'
    case 'W':      // or 'W'
      writeAPin(); // Write analog pin
      break;
    case 'd':      // If received 'd'
    case 'D':      // or 'D'
      writeDPin(); // Write digital pin
      break;
    case 'r':      // If received 'r'
    case 'R':      // or 'R'
      readDPin();  // Read digital pin
      break;
    case 'a':      // If received 'a'
    case 'A':      // or 'A'
      readAPin();  // Read analog pin
      break;
    }
  }
}

// Write Digital Pin
// Send a 'd' or 'D' to enter.
// Then send a pin #
//   Use numbers for 0-9, and hex (a, b, c, or d) for 10-13
// Then send a value for high or low
//   Use h, H, or 1 for HIGH. Use l, L, or 0 for LOW
void writeDPin()
{
  while (XBee.available() < 2)
    ; // Wait for pin and value to become available
  char pin = XBee.read();
  char hl = ASCIItoHL(XBee.read());

  // Print a message to let the control know of our intentions:
  XBee.print("Setting pin ");
  XBee.print(pin);
  XBee.print(" to ");
  XBee.println(hl ? "HIGH" : "LOW");

  pin = ASCIItoInt(pin); // Convert ASCCI to a 0-13 value
  pinMode(pin, OUTPUT); // Set pin as an OUTPUT
  digitalWrite(pin, hl); // Write pin accordingly
}

// Write Analog Pin
// Send 'w' or 'W' to enter
// Then send a pin #
//   Use numbers for 0-9, and hex (a, b, c, or d) for 10-13
//   (it's not smart enough (but it could be) to error on
//    a non-analog output pin)
// Then send a 3-digit analog value.
//   Must send all 3 digits, so use leading zeros if necessary.
void writeAPin()
{
  while (XBee.available() < 4)
    ; // Wait for pin and three value numbers to be received
  char pin = XBee.read(); // Read in the pin number
  int value = ASCIItoInt(XBee.read()) * 100; // Convert next three
  value += ASCIItoInt(XBee.read()) * 10;     // chars to a 3-digit
  value += ASCIItoInt(XBee.read());          // number.
  value = constrain(value, 0, 255); // Constrain that number.

  // Print a message to let the control know of our intentions:
  XBee.print("Setting pin ");
  XBee.print(pin);
  XBee.print(" to ");
  XBee.println(value);

  pin = ASCIItoInt(pin); // Convert ASCCI to a 0-13 value
  pinMode(pin, OUTPUT); // Set pin as an OUTPUT
  analogWrite(pin, value); // Write pin accordingly
}

// Read Digital Pin
// Send 'r' or 'R' to enter
// Then send a digital pin # to be read
// The Arduino will print the digital reading of the pin to XBee.
void readDPin()
{
  while (XBee.available() < 1)
    ; // Wait for pin # to be available.
  char pin = XBee.read(); // Read in the pin value

  // Print beggining of message
  XBee.print("Pin ");
  XBee.print(pin);

  pin = ASCIItoInt(pin); // Convert pin to 0-13 value
  pinMode(pin, INPUT); // Set as input
  // Print the rest of the message:
  XBee.print(" = ");
  XBee.println(digitalRead(pin));
}

// Read Analog Pin
// Send 'a' or 'A' to enter
// Then send an analog pin # to be read.
// The Arduino will print the analog reading of the pin to XBee.
void readAPin()
{
  while (XBee.available() < 1)
    ; // Wait for pin # to be available
  char pin = XBee.read(); // read in the pin value

  // Print beginning of message
  XBee.print("Pin A");
  XBee.print(pin);

  pin = ASCIItoInt(pin); // Convert pin to 0-6 value
  // Printthe rest of the message:
  XBee.print(" = ");
  XBee.println(analogRead(pin));
}

// ASCIItoHL
// Helper function to turn an ASCII value into either HIGH or LOW
int ASCIItoHL(char c)
{
  // If received 0, byte value 0, L, or l: return LOW
  // If received 1, byte value 1, H, or h: return HIGH
  if ((c == '0') || (c == 0) || (c == 'L') || (c == 'l'))
    return LOW;
  else if ((c == '1') || (c == 1) || (c == 'H') || (c == 'h'))
    return HIGH;
  else
    return -1;
}

// ASCIItoInt
// Helper function to turn an ASCII hex value into a 0-15 byte val
int ASCIItoInt(char c)
{
  if ((c >= '0') && (c <= '9'))
    return c - 0x30; // Minus 0x30
  else if ((c >= 'A') && (c <= 'F'))
    return c - 0x37; // Minus 0x41 plus 0x0A
  else if ((c >= 'a') && (c <= 'f'))
    return c - 0x57; // Minus 0x61 plus 0x0A
  else
    return -1;
}

// printMenu
// A big ol' string of Serial prints that print a usage menu over
// to the other XBee.
void printMenu()
{
  // Everything is "F()"'d -- which stores the strings in flash.
  // That'll free up SRAM for more importanat stuff.
  XBee.println();
  XBee.println(F("Arduino XBee Remote Control!"));
  XBee.println(F("============================"));
  XBee.println(F("Usage: "));
  XBee.println(F("w#nnn - analog WRITE pin # to nnn"));
  XBee.println(F("  e.g. w6088 - write pin 6 to 88"));
  XBee.println(F("d#v   - digital WRITE pin # to v"));
  XBee.println(F("  e.g. ddh - Write pin 13 High"));
  XBee.println(F("r#    - digital READ digital pin #"));
  XBee.println(F("  e.g. r3 - Digital read pin 3"));
  XBee.println(F("a#    - analog READ analog pin #"));
  XBee.println(F("  e.g. a0 - Read analog pin 0"));
  XBee.println();
  XBee.println(F("- Use hex values for pins 10-13"));
  XBee.println(F("- Upper or lowercase works"));
  XBee.println(F("- Use 0, l, or L to write LOW"));
  XBee.println(F("- Use 1, h, or H to write HIGH"));
  XBee.println(F("============================"));
  XBee.println();
}
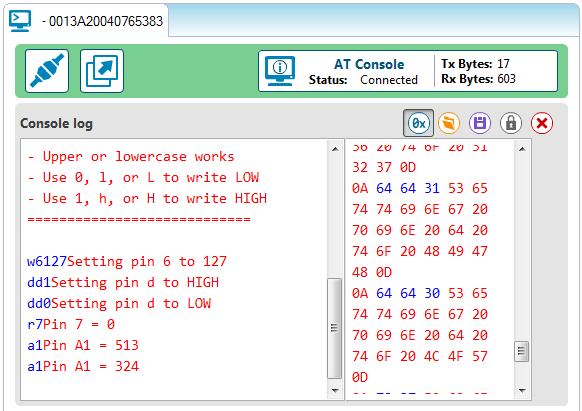
Upload that, then switch over to your XCTU console window. You'll use the XBee connected to your computer to control and read data from your Arduino.
All of the XBee magic occurs in serial prints and reads. To send data from the Arduino XBee, XBee.print() and XBee.println()'s are used to write strings and other data. To read data from the computer XBee, we can use XBee.read(), adding XBee.available() tests to check if data has come in. That's all there is to it!
Check out the comments in the code for a line-by-line dissection.
Remote Controlling/Receiving
When the Arduino sketch first starts up, it will print a helpful usage menu. After that's printed, follow the directions to send commands to your Arduino. To control pins 10, 11, 12, and 13, send the hexadecimal equivalent characters (A, B, C, and D).
w#nnn-- analog write pin#tonnn. Use leading zeros for single- and double-digit values.- Example:
w6088will write pin 6 to 88
- Example:
d#v-- digital write pin#tov.vcan be 1, h, or H for HIGH, and 0, l, or L for LOW.- Example:
ddhwill write pin 13 High
- Example:
r#- digital read digital pin#- Example:
r3will digtally read from pin 3.
- Example:
a#-- analog read analog pin#- Example:
a0will read analog pin 0
- Example:
In each case, the Arduino will respond with the action it's taken after you've sent a viable string.
As an initial test, try turning the D13 LED on and off, by sending dd1 and dd0.
Then try setting analog values, or reading from pins. Maybe try making it more advanced -- have a button press trigger an XBee communication. Or send an alert when an analog input rises past a certain threshold.
This example barely scrapes the surface of what the Arduino-XBee combination is capable of. XBee's allow you to remotely control your robot from the comfy confines of your computer. Or you can set up a network of XBees to monitor carbon-monoxide conditions in every room, while logging to a single computer.
The power of XBees comes from their simplicity -- they make your projects wireless by simply "serial printing".