Tinker Kit Circuit Guide
Circuit 2: Potentiometer
Potentiometers (also known as “pots” or “knobs”) are one of the more basic inputs for electronics devices. By tracking the position of the knob with your RedBoard, you can make volume controls, speed controls, angle sensors and a ton of other useful inputs for your projects. In this circuit, you'll use a potentiometer as an input device to control the speed at which your LED blinks.
Parts Needed
You will need the following parts:
- 1x Breadboard
- 1x SparkFun RedBoard
- 1x Red LED
- 1x 330Ω Resistor
- 7x Jumper Wires
- 1x Potentiometer
Didn't Get the Tinker Kit?
If you are conducting this experiment and didn't get the Tinker Kit, we suggest using these parts:
New Components
Potentiometer
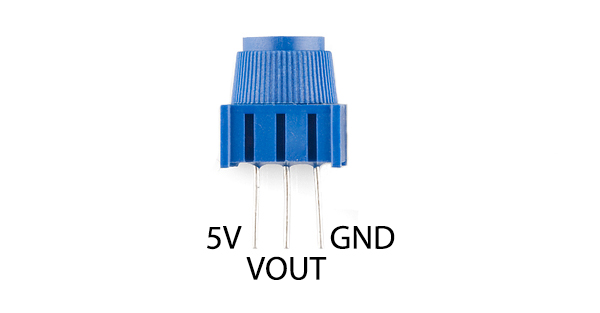
A potentiometer (trimpot for short) is a variable resistor. When powered with 5V, the middle pin outputs a voltage between 0V and 5V, depending on the position of the knob on the potentiometer. Internal to the trimpot is a single resistor and a wiper, which cuts the resistor in two and moves to adjust the ratio between both halves. Externally, there are usually three pins: two pins connect to each end of the resistor, while the third connects to the pot's wiper.
New Concepts
Analog vs. Digital
Understanding the difference between analog and digital is a fundamental concept in electronics.
We live in an analog world. There is an infinite number of colors to paint an object (even if the difference is indiscernible to our eye), an infinite number of tones we can hear, and an infinite number of smells we can smell. The common theme among all of these analog signals is their infinite possibilities.
Digital signals deal in the realm of the discrete or finite, meaning there is a limited set of values they can be. The LED from the previous circuit had only two states it could exist in, ON or OFF, when connected to a Digital Output.
Analog Inputs
So far, we've only dealt with outputs. The RedBoard also has inputs. Both inputs and outputs can be analog or digital. Based on our definition of analog and digital above, that means an analog input can sense a wide range of values versus a digital input, which can only sense two states.
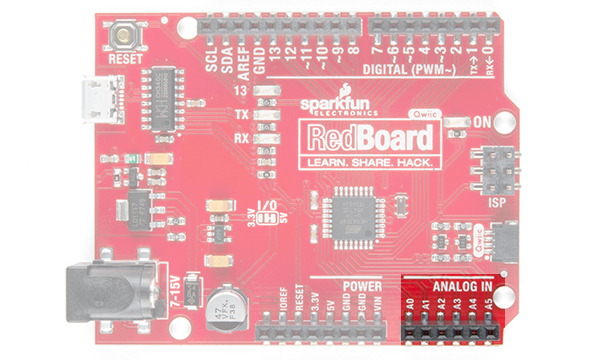
You may have noticed some pins labeled Digital and some labeled Analog In on your RedBoard. There are only six pins that function as analog inputs labeled A0--A5.
Voltage Divider
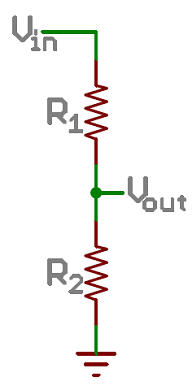
A voltage divider is a simple circuit that turns some voltage into a smaller voltage using two resistors. The following is a schematic of the voltage divider circuit. Schematics are a universally agreed upon set of symbols that engineers use to represent electric circuits.
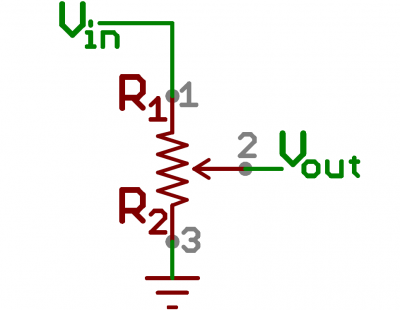
A potentiometer is a variable resistor that can be used to create an adjustable voltage divider.
If the outside pins connect to a voltage source (one to ground, the other to Vin), the output (Vout) at the middle pin will mimic a voltage divider. Turn the trimpot all the way in one direction, and the voltage may be zero; turned to the other side, the output voltage approaches the input. A wiper in the middle position means the output voltage will be half of the input.
Voltage dividers will be covered in more detail in the next circuit.
Hardware Hookup
The potentiometer has three legs. Pay close attention into which pins you're inserting it on the breadboard, as they will be hard to see once inserted.
Potentiometers are not polarized. You can attach either of the outside pins to 5V and the opposite to GND. However, the values you get out of the trimpot will change based on which pin is 5V and which is GND.
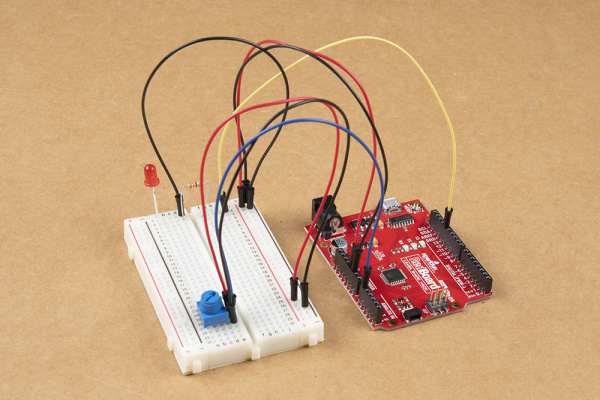
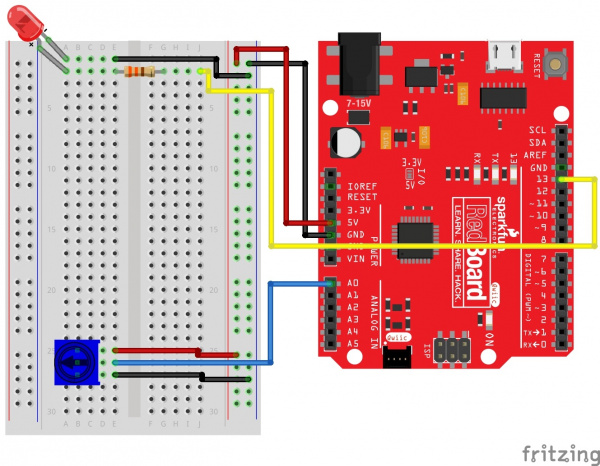
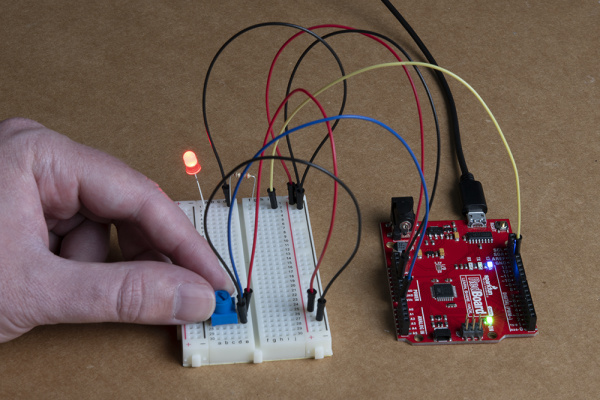
Ready to start hooking everything up? Check out the circuit diagram and hookup table below to see how everything is connected.
Circuit Diagram
Hookup Table
| Component | RedBoard | Breadboard | Breadboard | Breadboard |
|---|---|---|---|---|
| Jumper Wire | 5V | 5V Rail ( + ) | ||
| Jumper Wire | GND | GND Rail ( - ) | ||
| LED | A1 LED ( - ) | A2 LED ( + ) | ||
| 330Ω Resistor (orange, orange, brown) |
E2 | F2 | ||
| Jumper Wire | E1 | GND Rail ( - ) | ||
| Jumper Wire | Digital Pin 13 | J2 | ||
| Potentiometer | B25 | B26 | B27 | |
| Jumper Wire | Analog Pin 0 (A0) | E26 | ||
| Jumper Wire | E25 | 5V Rail ( + ) | ||
| Jumper Wire | E27 | GND Rail ( - ) |
Open the Sketch
Open the sketch from your Arduino sketchbook or copy and paste the following code into the Arduino IDE. Hit upload, and see what happens!
language:c
/*
SparkFun Tinker Kit
Circuit 2: Potentiometer

Changes how fast an LED connected to pin 13 blinks, based on a potentiometer connected to pin A0

This sketch was written by SparkFun Electronics, with lots of help from the Arduino community.
This code is completely free for any use.

View circuit diagram and instructions at: https://learn.sparkfun.com/tutorials/activity-guide-for-sparkfun-tinker-kit/
Download code at: https://github.com/sparkfun/SparkFun_Tinker_Kit_Code
*/

int potPosition;       //this variable will hold a value based on the position of the potentiometer

void setup()
{
  Serial.begin(9600);       //start a serial connection with the computer

  pinMode(13, OUTPUT);      //set pin 13 as an output that can be set to HIGH or LOW
}

void loop()
{
  //read the position of the pot
  potPosition = analogRead(A0);    //set potPosition to a number between 0 and 1023 based on how far the knob is turned
  Serial.println(potPosition);     //print the value of potPosition in the serial monitor on the computer

  //change the LED blink speed based on the trimpot value
  digitalWrite(13, HIGH);           // Turn on the LED
  delay(potPosition);              // delay for as many miliseconds as potPosition (0-1023)

  digitalWrite(13, LOW);            // Turn off the LED
  delay(potPosition);              // delay for as many miliseconds as potPosition (0-1023)
}
What You Should See
Try adjusting the potentiometer's position and you should see the LED blink faster or slower in accordance with it. The delay between each flash will change based on the position of the knob. If it isn't working, make sure you have assembled the circuit correctly and verified and uploaded the code to your board, or see the Troubleshooting section.
Program Overview
- Read the position of the potentiometer (from 0 to 1023) and store it in the variable
potPosition. - Turn the LED on.
- Wait from 0 to 1023 milliseconds, based on the position of the knob and the value of
potPosition. - Turn the LED off.
- Wait from 0 to 1023 milliseconds, based on the position of the knob and the value of
potPosition. - Repeat.
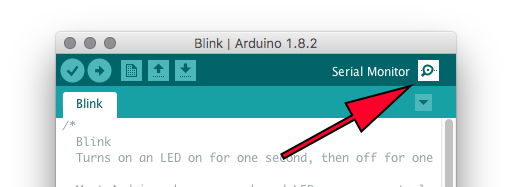
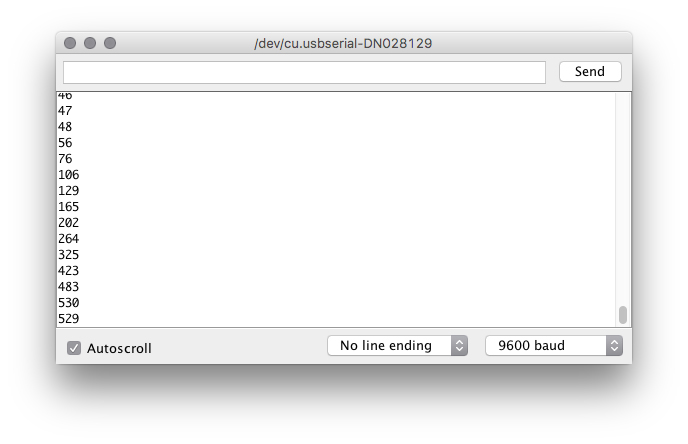
You should then see numeric values print out on the monitor. Turn the potentiometer, and you should see the values change as well as the delay between each print.
If you are having trouble seeing the values, ensure that you have selected 9600 baud in the dropdown menu and have auto scroll checked.
Code to Note
| Code | Description |
|---|---|
Integer Variables:int potPosition; | A variable is a placeholder for values that may change in your code. You must introduce, or "declare" variables before you use them. Here we're declaring a variable called potPosition of type int (integer). We will cover more types of variables in later circuits. Don't forget that variable names are case-sensitive! |
Serial Begin:Serial.begin(9600); | Serial commands can be used to send and receive data from your computer. This line of code tells the RedBoard that we want to "begin" that communication with the computer, the same way we would say "Hi" to initiate a conversation. Notice that the baud rate, 9600, is the same as the one we selected in the monitor. This is the speed at which the two devices communicate, and it must match on both sides. |
Analog Input:potPosition = analogRead(A0); | We use the analogRead() function to read the value on an analog pin. analogRead() takes one parameter, the analog pin you want to use, A0 in this case, and returns a number between 0 (0 volts) and 1023 (5 volts), which is then assigned to the variable potPosition |
Serial Print:Serial.println(potPosition); | This is the line that actually prints the trimpot value to the monitor. It takes the variable potPosition and prints whatever value it equals at that moment in the loop(). The ln at the end of print tells the monitor to print a new line at the end of each value; otherwise the values would all run together on one line. Try removing the ln to see what happens. |
Coding Challenges
| Challenge | Description |
|---|---|
| Changing the Range | Try multiplying, dividing or adding to your sensor reading so that you can change the range of the delay in your code. For example, can you multiply the sensor reading so that the delay goes from 0–2046 instead of 0–1023? |
| Adding More LEDs | Add more LEDs to your circuit. Don't forget the current limiting resistor for each one. Try making multiple LEDs blink at different rates by changing the range of each using multiplication or division. |
Troubleshooting
| Problem | Solution |
|---|---|
| The potentiometer always reads as 0 or 1023 | Make sure that your 5V, A0 and GND pins are properly connected to the three pins on your potentiometer. It is easy to misalign a wire with the actual trimpot pin. |
| No values in Serial Monitor | Make sure that you have selected the correct baud rate, 9600. Also ensure that you are on the correct Serial Port. The same Serial Port you use when uploading code to your board is the same Serial Port you use to print values to the Serial Monitor. |
