SX1509 I/O Expander Breakout Hookup Guide
 jimblom
Example: Button Matrices
Blinking and breathing LEDs can be fun, but the SX1509's real power lies in its keypad engine. By wiring up buttons in a row/column matrix, you can connect up to 64 buttons to the SX1509.
Keypad matrices are very common -- they allow you to save immensely on GPIO. You could monitor a 16-button, 4x4 keypad pad with 8 I/O, or four of those keypads (a 64-button/8x8 matrix) with just 16 I/O.
In this example, we'll use seven SX1509 I/O to monitor a 12-button Keypad -- which is a matrix of four rows and three columns. We'll also use the SX1509's interrupt output, so we don't constantly have to poll the I/O expander. Here's the circuit:
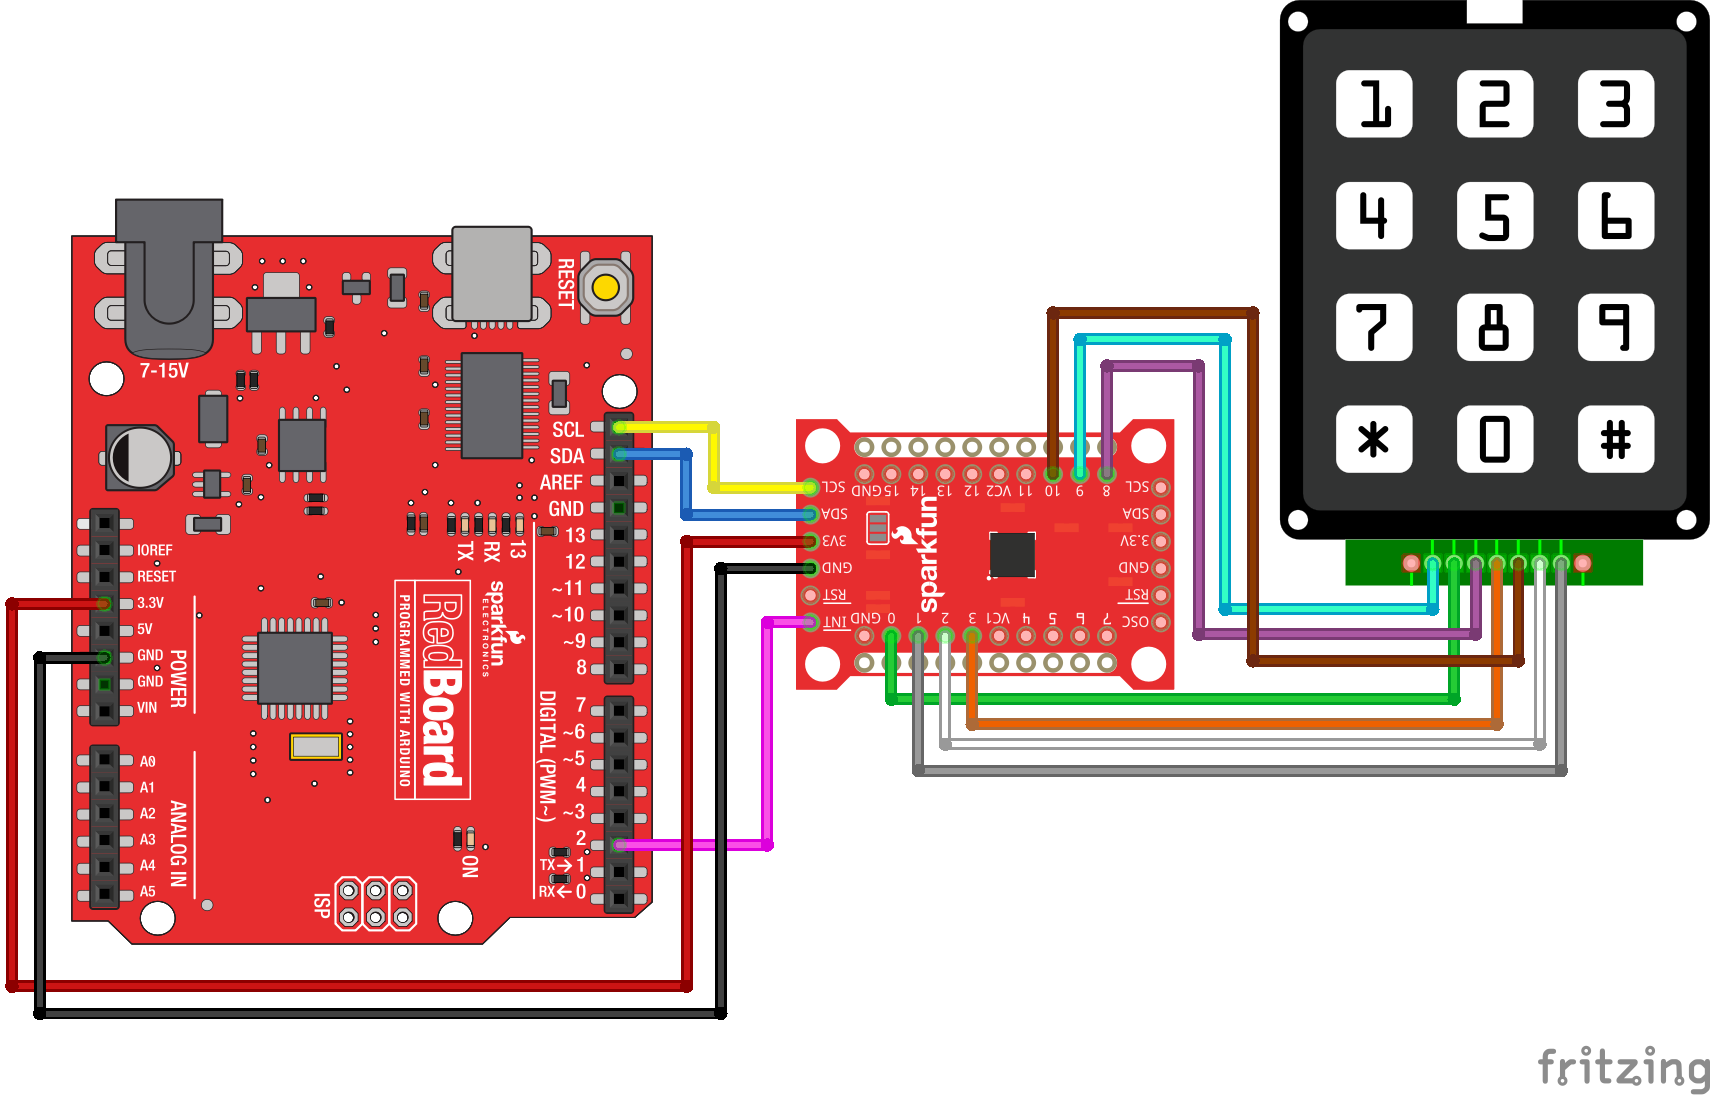
There isn't a lot of flexibility in the SX1509's keypad engine. The rows of you matrix have to be connected, sequentially, to pins 0-7, and the columns wire up to pins 8-15. Our four row buses must route to pins 0-3, and the three columns are connected to 8-10. That still leaves plenty of pins for LED driving!
Here's the example code:
language:c
/*************************************************************
keypadInterrupt.ino
SparkFun SX1509 I/O Expander Example: keypad matrix with int
Jim Lindblom @ SparkFun Electronics
Original Creation Date: September 21, 2015
https://github.com/sparkfun/SparkFun_SX1509_Arduino_Library

This example demonstrates how to use the SX1509's keypad
engine to monitor a matrix of button inputs. The SX1509's
interrupt output is monitored to check for button presses.

For this example, we use the 12-button keypad
  (https://www.sparkfun.com/products/8653).

After uploading the sketch, open your serial monitor and
set it to 115200 baud.

Hardware Hookup:
    SX1509 Breakout ------ Arduino -------- Keypad Pin
          INT --------------- D2
          GND -------------- GND
          3V3 -------------- 3.3V
          SDA ------------ SDA (A4)
          SCL ------------ SCL (A5)
          0 ---------------------------------- 2 (row 1)
          1 ---------------------------------- 7 (row 2)
          2 ---------------------------------- 6 (row 3)
          3 ---------------------------------- 4 (row 4)
          8 ---------------------------------- 3 (col 1)
          9 ---------------------------------- 1 (col 2)
          10 --------------------------------- 5 (col 3)

Development environment specifics:
    IDE: Arduino 1.6.5
    Hardware Platform: Arduino Uno
    SX1509 Breakout Version: v2.0

This code is beerware; if you see me (or any other SparkFun
employee) at the local, and you've found our code helpful,
please buy us a round!

Distributed as-is; no warranty is given.
*************************************************************/

#include <Wire.h>           // Include the I2C library (required)
#include <SparkFunSX1509.h> //Click here for the library: http://librarymanager/All#SparkFun_SX1509

// SX1509 I2C address (set by ADDR1 and ADDR0 (00 by default):
const byte SX1509_ADDRESS = 0x3E; // SX1509 I2C address
SX1509 io;                        // Create an SX1509 object to be used throughout

#define KEY_ROWS 4 // Number of rows in the keypad matrix
#define KEY_COLS 3 // Number of columns in the keypad matrix

// keyMap maps row/column combinations to characters:
char keyMap[KEY_ROWS][KEY_COLS] = {
    {'1', '2', '3'},
    {'4', '5', '6'},
    {'7', '8', '9'},
    {'*', '0', '#'}};

const byte ARDUINO_INTERRUPT_PIN = 2;

void setup()
{
  Serial.begin(115200);
  Serial.println("SX1509 Example");

  Wire.begin();

  // Call io.begin(<address>) to initialize the SX1509. If it
  // successfully communicates, it'll return 1.
  if (io.begin(SX1509_ADDRESS) == false)
  {
    Serial.println("Failed to communicate. Check wiring and address of SX1509.");
    while (1)
      ; // If we fail to communicate, loop forever.
  }

  // Scan time range: 1-128 ms, powers of 2
  byte scanTime = 8; // Scan time per row, in ms
  // Debounce time range: 0.5 - 64 ms (powers of 2)
  byte debounceTime = 1; // Debounce time
  // Sleep time range: 128 ms - 8192 ms (powers of 2) 0=OFF
  byte sleepTime = 0;
  // Scan time must be greater than debounce time!
  io.keypad(KEY_ROWS, KEY_COLS,
            sleepTime, scanTime, debounceTime);

  // Set up the Arduino interrupt pin as an input w/
  // internal pull-up. (The SX1509 interrupt is active-low.)
  pinMode(ARDUINO_INTERRUPT_PIN, INPUT_PULLUP);
}

// Compared to the keypad in keypad.ino, this keypad example
// is a bit more advanced. We'll use these varaibles to check
// if a key is being held down, or has been released. Then we
// can kind of emulate the operation of a computer keyboard.
unsigned int previousKeyData = 0;         // Stores last key pressed
unsigned int holdCount, releaseCount = 0; // Count durations
const unsigned int holdCountMax = 15;     // Key hold limit
const unsigned int releaseCountMax = 100; // Release limit

void loop()
{
  // If the SX1509 INT pin goes low, a keypad button has
  // been pressed:
  if (digitalRead(ARDUINO_INTERRUPT_PIN) == LOW)
  {
    // Use io.readKeypad() to get the raw keypad row/column
    unsigned int keyData = io.readKeypad();
    // Then use io.getRow() and io.getCol() to parse that
    // data into row and column values.
    byte row = io.getRow(keyData);
    byte col = io.getCol(keyData);
    // Then plug row and column into keyMap to get which
    // key was pressed.
    char key = keyMap[row][col];

    // If it's a new key pressed
    if (keyData != previousKeyData)
    {
      holdCount = 0;               // Reset hold-down count
      Serial.println(String(key)); // Print the key
    }
    else // If the button's beging held down:
    {
      holdCount++;                  // Increment holdCount
      if (holdCount > holdCountMax) // If it exceeds threshold
        Serial.println(key);        // Print the key
    }
    releaseCount = 0;          // Clear the releaseCount variable
    previousKeyData = keyData; // Update previousKeyData
  }

  // If no keys have been pressed we'll continuously increment
  //  releaseCount. Eventually creating a release, once the
  // count hits the max.
  releaseCount++;
  if (releaseCount >= releaseCountMax)
  {
    releaseCount = 0;
    previousKeyData = 0;
  }
  delay(1); // Gives releaseCountMax a more intuitive unit
}
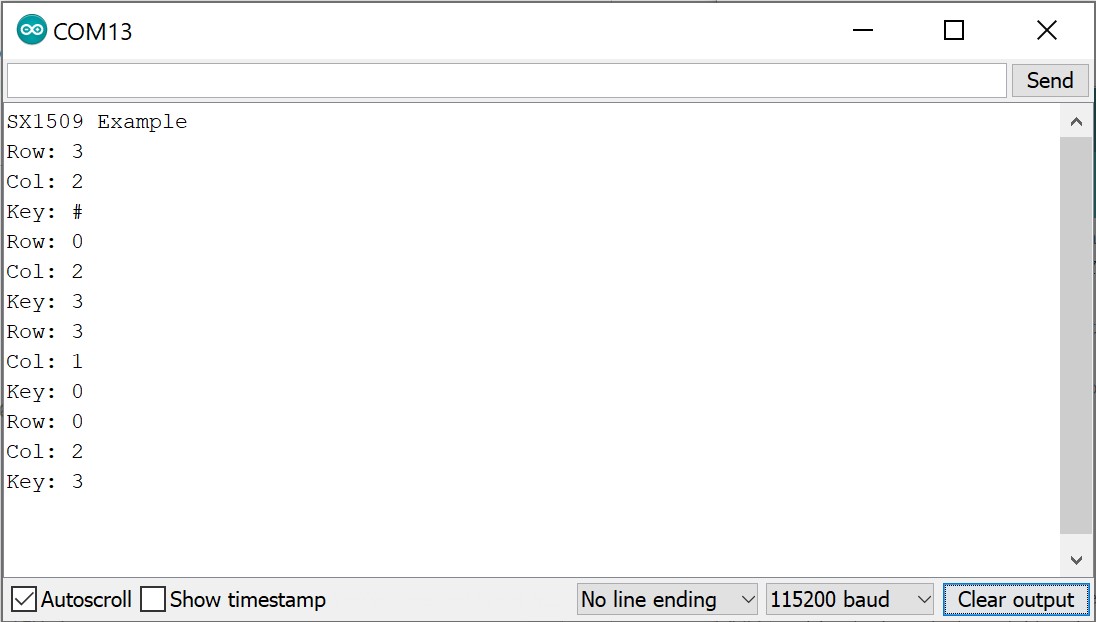
After uploading the code, open the serial monitor and press some keys!
Now just hook up a cellular shield and go make some prank calls!
Keep in mind any of these SX1509 features can be combined, as long as you don't run out of I/O (then just cascade another expander!). Check out the library's examples for demonstrations of other features -- like the clock output, or input debouncing.