SparkFun Thing Plus - NINA-B306 Hookup Guide
 El Duderino
 Introduction
The SparkFun Thing Plus - NINA-B306 offers a unique combination development platform in the Thing Plus form factor featuring the NINA-B306 from u-blox™, the ISM330DHCX 6 DoF IMU from STMicroelectronics™ and the BME280 atmospheric sensor from Bosch Sensortec™.
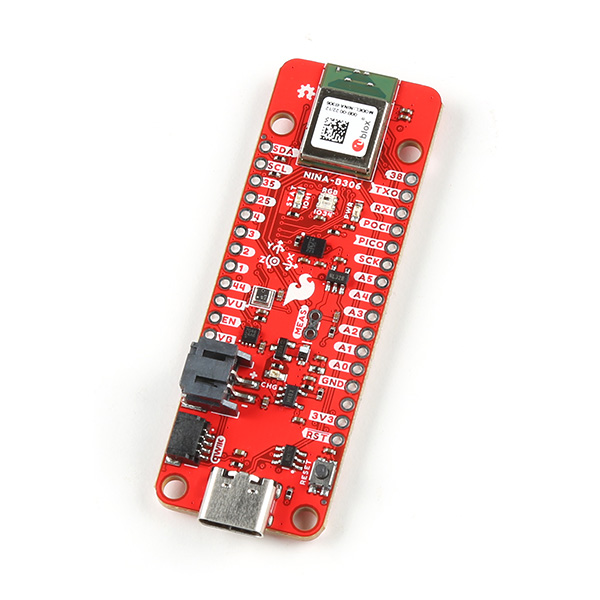
The combination of Bluetooth® 5 low energy module with an integrated Arm Cortex-M4 processor in the NINA-B306 with motion and environmental sensing provides a powerful and versatile wireless development platform.
In this guide we'll go over the hardware present on this Thing Plus development board, how to assemble it as well as integrate and use it with the Arduino IDE.
Required Materials
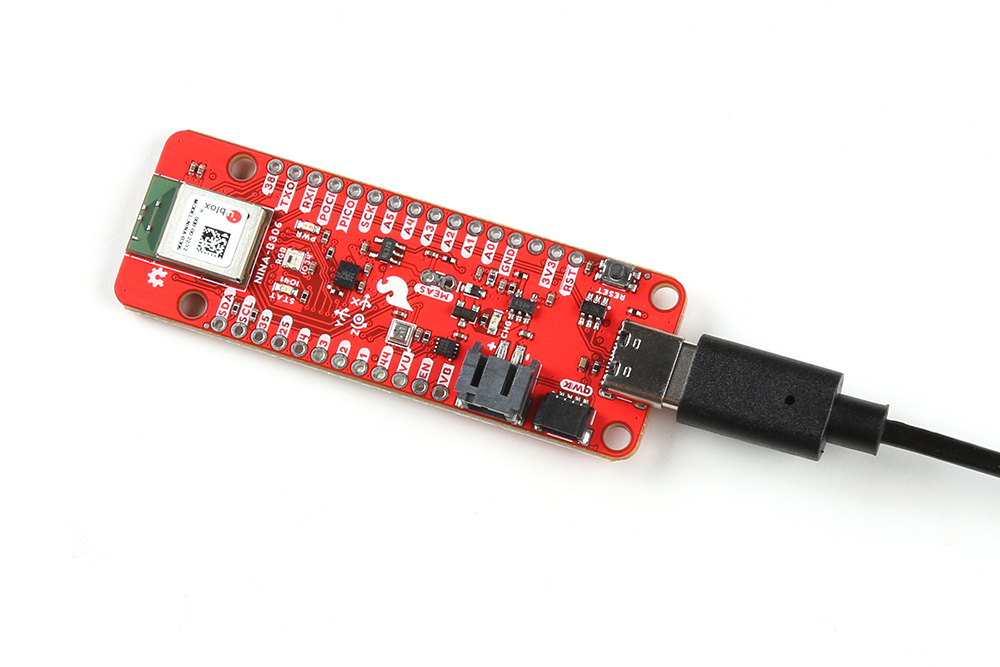
All you need to get started with the Thing Plus - NINA-B306 is a USB-C cable.

Optional Materials
Suggested Reading
If you aren't familiar with the Qwiic system, we recommend reading here for an overview.
We also recommend checking out these tutorials if you're not familiar with the concepts covered in them or would like a refresher:
Serial Communication
Logic Levels
Bluetooth Basics
Hardware Overview
In this section we'll take a closer look at the hardware on the SparkFun Thing Plus - NINA-B306.
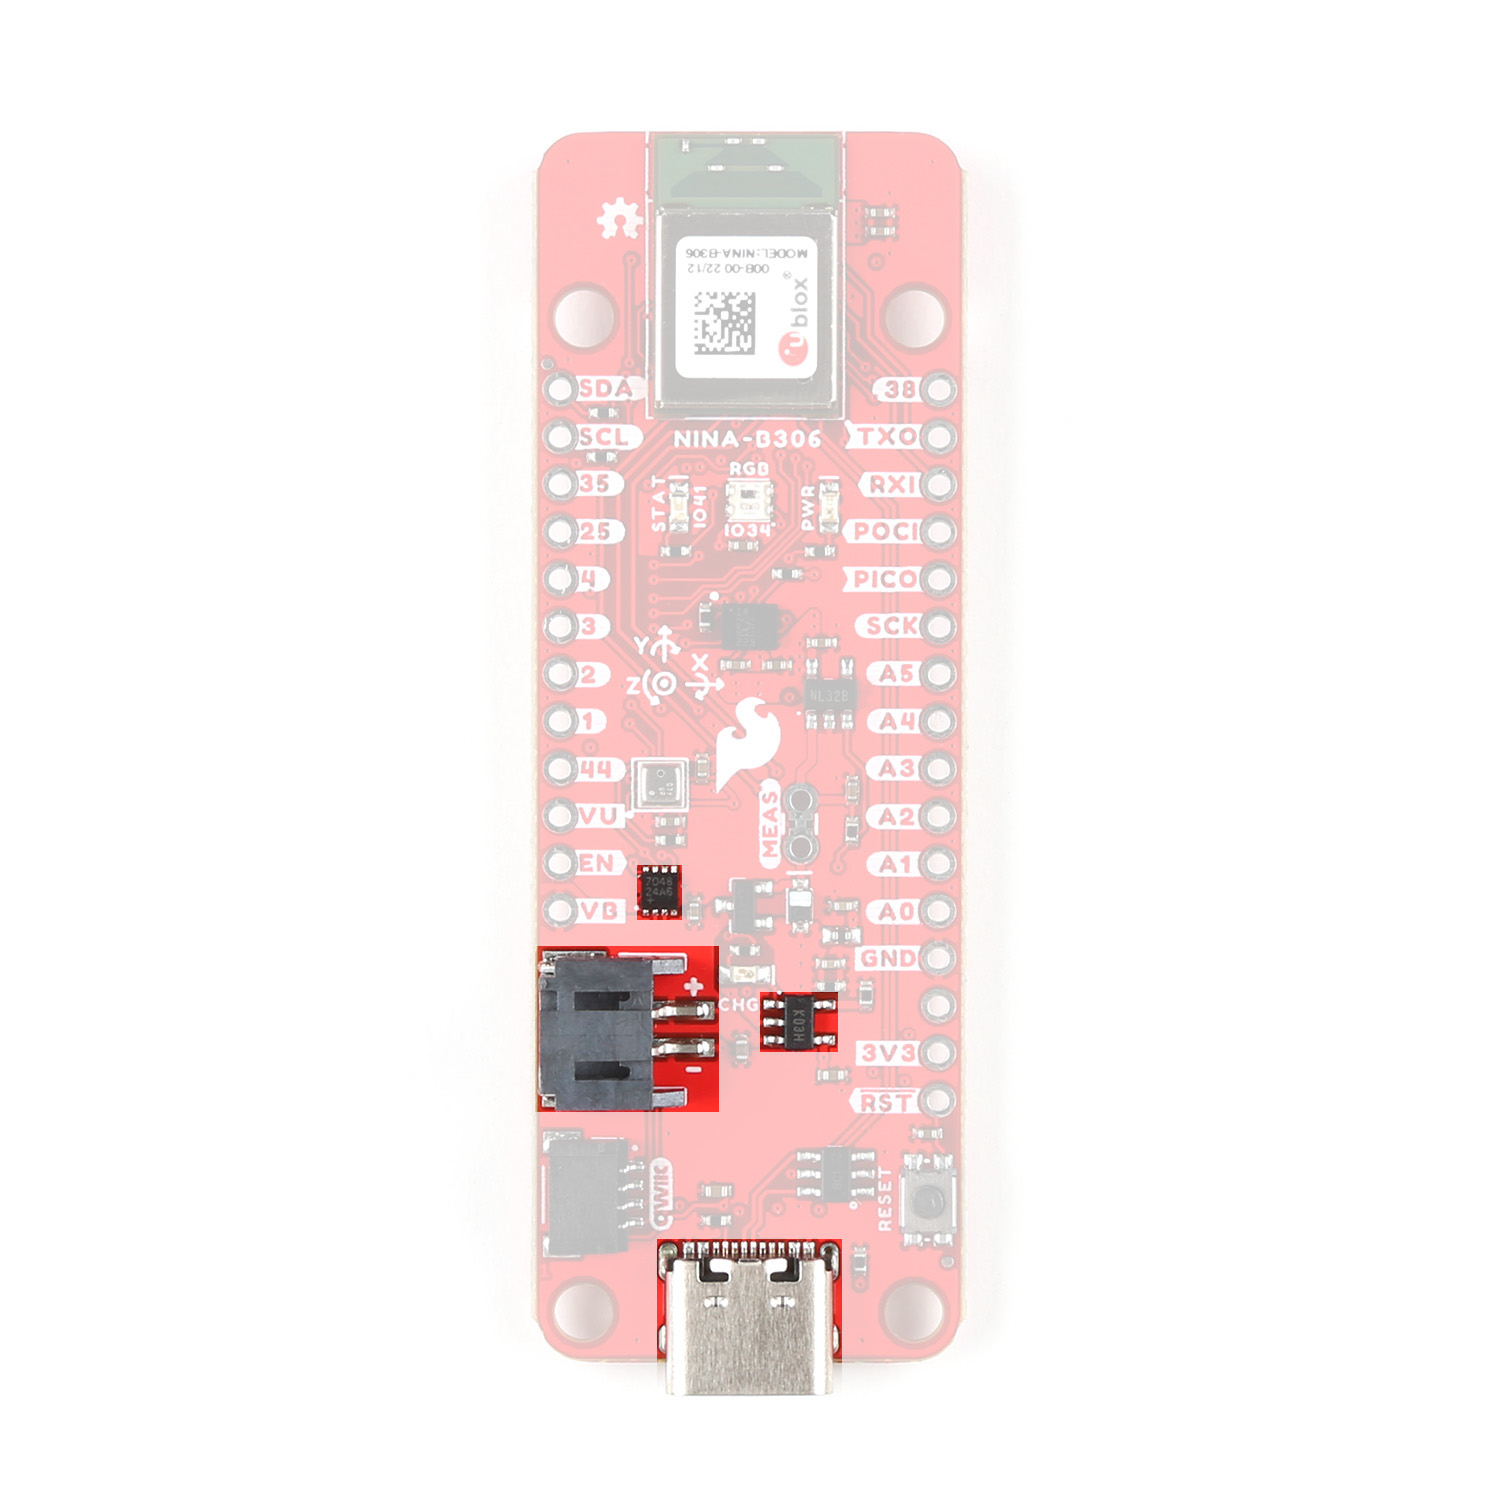
NINA-B306
The NINA-B306 is a Bluetooth 5 low energy module with an integrated Arm Cortex-M4 processor allowing for powerful computing power on top of Bluetooth connectivity.
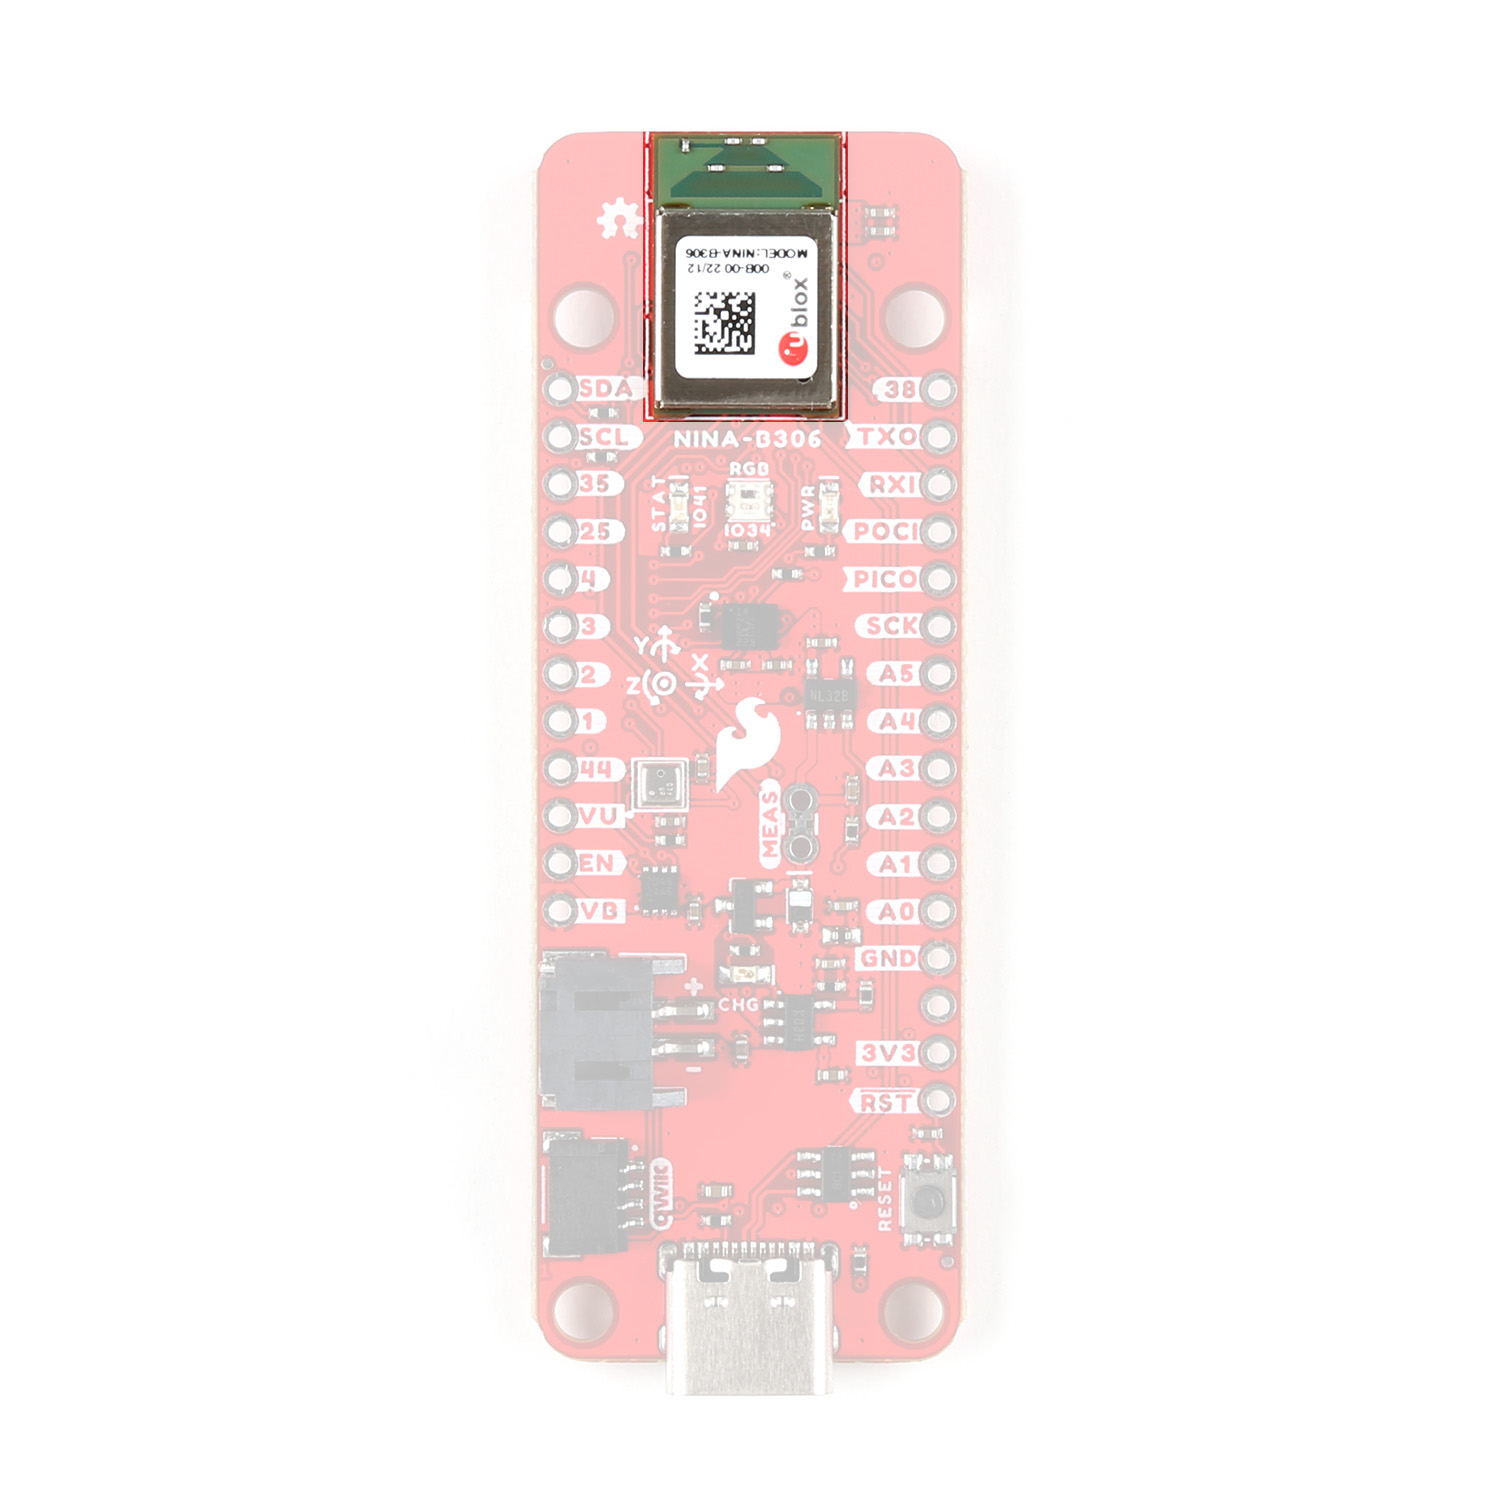
The module uses the nRF52840 chip at 64 MHz clock speed with 1 MB of Flash and 256 KB of RAM for program and data storage. The NINA-B306 has an integrated PCB antenna for the 2.4 GHz radio. The NINA-B30 series features the open CPU architecture and the modules on this board comes with a bootloader to work with the Arduino IDE.
For a complete overview of the NINA-B306, refer to the datasheet.
On Board Sensors
This Thing Plus has two on board sensors; the BME280 for environmental and ISM330DHCX 6 DoF IMU for motion sensing. Both sensors communicate over the NINA-B306's I2C interface and operate at 3.3V.
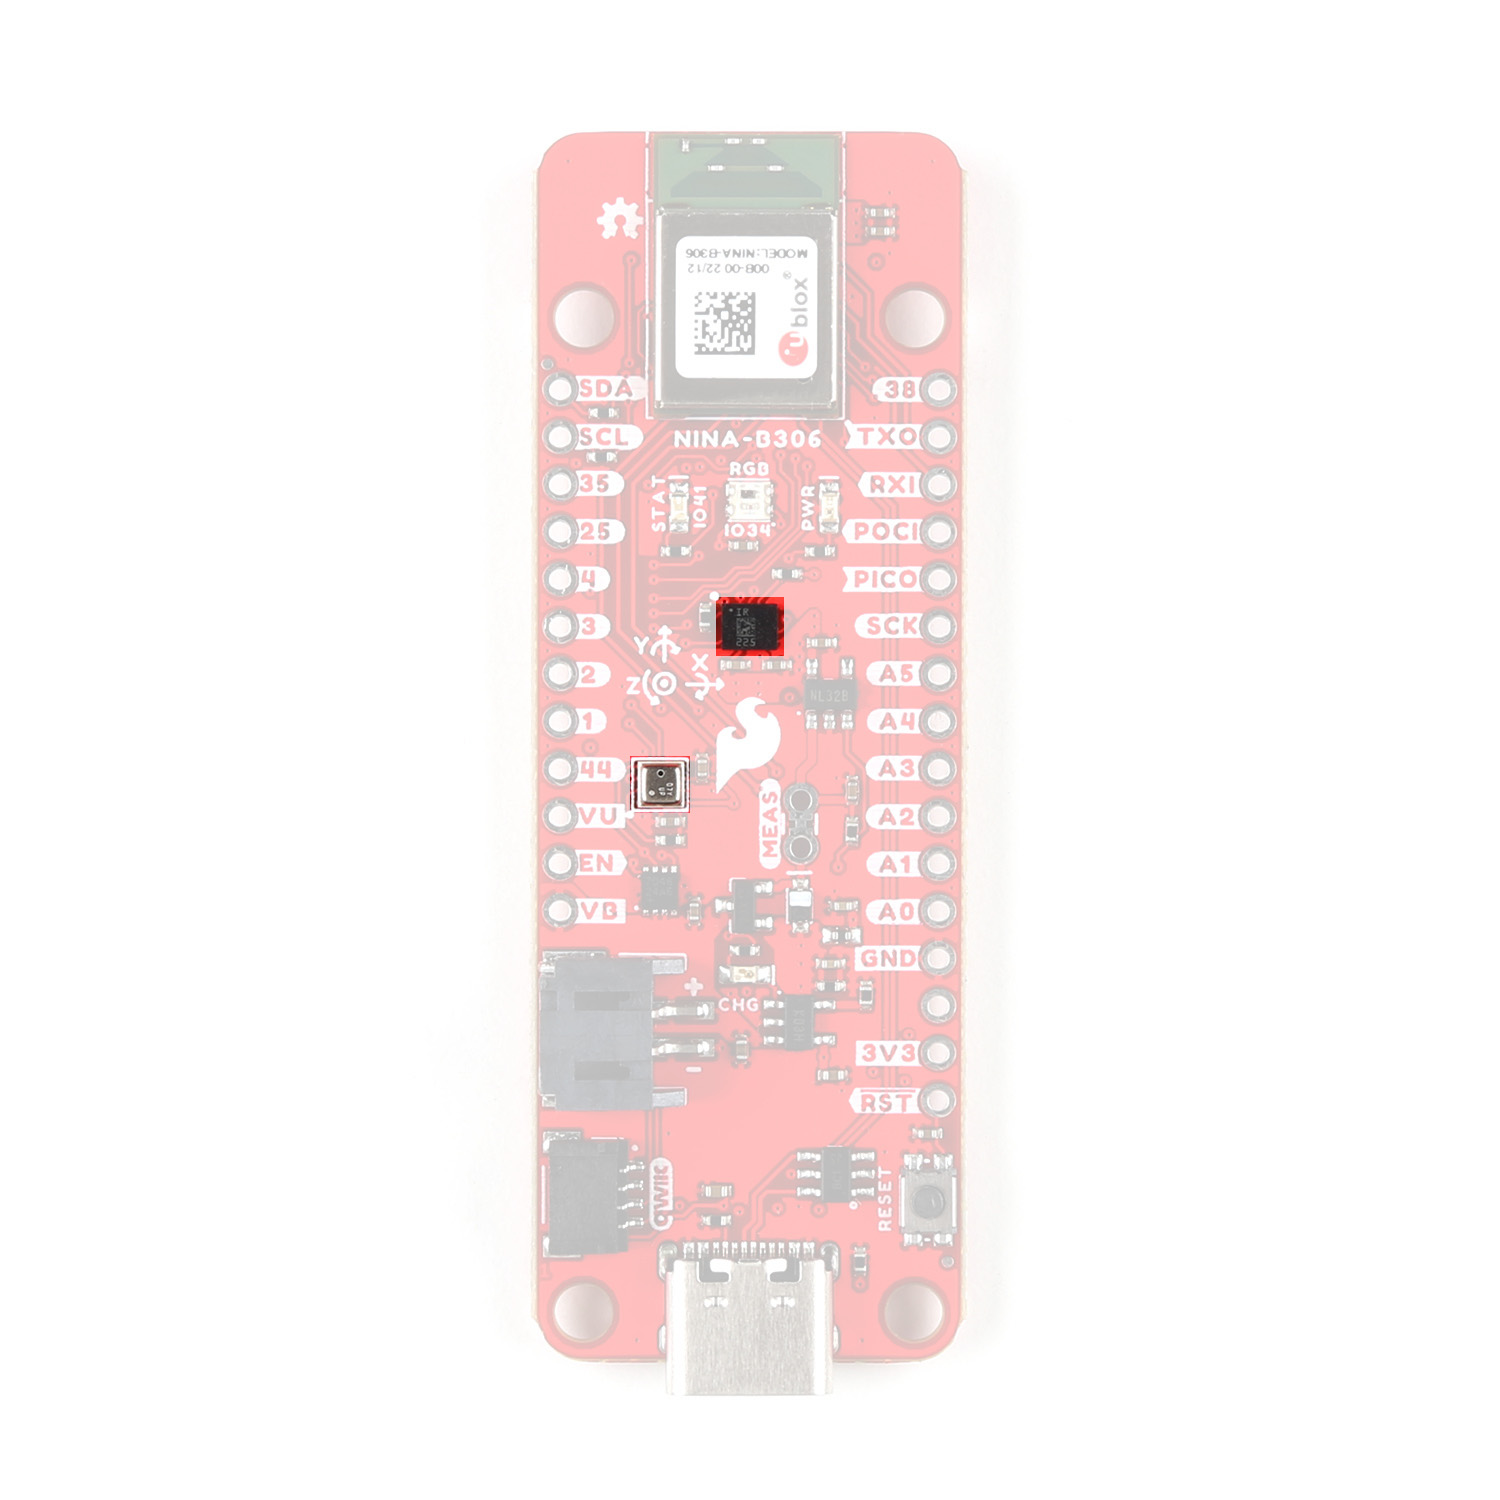
BME280
The BME280 environmental sensor is a combined humidity and pressure sensor capable of measuring relative humidity, ambient temperature and atmospheric pressure.
The sensor has operational ranges of 0 to 100%RH, -40 to +85°C (full accuracy from 0 to 65°C), and 300 to 1100hPa. The table below outlines several of the sensor's operational characteristics. For a complete overview of the sensor, refer to the datasheet.
| Characteristic | Description |
|---|---|
| Operational Modes | Sleep (Default), Normal, and Forced (low power; single measurement) |
| Current Consumption (Typical) |
Sleep: 0.3 µA Standby: 0.5 µA (inactive period of normal mode) Humidity Measurements: 340 µA (peaks at 85°C) Pressure Measurements: 714 µA (peaks at -40°C) Temperature Measurements: 350 µA (peaks at 85°C) |
| Data Output |
16-bit output from ADC (*IIR filter and oversampling can increase this to 20-bit; excludes humidity data.) |
| Humidity Parameters |
Range: 0 to 100 %RH Absolute Accuracy: ±3 %RH (from 20 - 80 %RH) Resolution: 0.008 %RH |
| Pressure Parameters |
Range: 300 to 1100 hPa (30,000 - 110,000 Pa or approx. 4.35 - 15.95 PSI) Absolute Accuracy: ±(1 - 1.7) hPa Resolution: 0.18 Pa |
| Temperature Parameters |
Range: 0°C to 65°C (32°F to 149°F) Absolute Accuracy: ±(0.5 - 1.5)°C Resolution: 0.01°C |
| I2C Address | 0x76 |
ISM330DHCX
The ISM330DHCX six degrees of freedom IMU is a high-performance 3D digital accelerometer and 3D digital gyroscope tailored for Industry 4.0. The IMU has user selectable full-scale acceleration ranges of ±2/±4±/±8/±16 g and wide angular rate ranges of ±125/±250/±500/±1000/±2000/±4000 dps.
The ISM330DHCX includes a robust feature set including Machine Learning Core1, programmable FSM, FIFO, event decoding and interrupts. The Thing Plus connects both of the sensor's interrupt pins to two of the NINA-B306's GPIO pins (INT1 to IO21 and INT2 to IO22) for configuring and monitoring interrupt events from the ISM330DHCX. The table below outlines a few of the characteristics of this IMU. For a complete overview of the ISM330DHCX, refer to the datasheet.
| Characteristic | Description |
|---|---|
| Operating Modes | |
| Acceleration Ranges | ±2/±4±/±8/±16 g |
| Angular Rate Ranges | ±125/±250/±500/±1000/±2000/±4000 dps |
Power and Battery Components
The Thing Plus - NINA-B306 offers several ways to power the board. Primary power options are over USB-C or through a single-cell LiPo battery. The board includes both battery charging and monitoring circuits using the MCP78381 single cell battery charge IC and MAX17048 fuel gauge.
Both the USB-C and battery power inputs are regulated down to 3.3V to power the rest of the system through a 3.3V/700mA voltage regulator. Let's take a closer look at the power components on the Thing Plus - NINA-B306.
USB-C Connector
The USB-C connector acts as the primary serial interface for programming and interfacing with the NINA-B306 and also provides input voltage for charging a connected LiPo battery.
2-Pin JST LiPo Connector
The 2-pin JST LiPo connector provides a standard connection for a single-cell lithium-ion battery. The battery is charged and monitored by the following components.
MCP73831 Battery Charger
The MCP73931 single-cell battery charger provides an on-board LiPo charging option at 500mA@5V. The USB-C connector acts as the primary input voltage for the charge circuit. The V_USB pin can act as a 5V input for the charge circuit but is not recommended for most users.
MAX17048 Fuel Gauge
The MAX17048 fuel gauge monitors a connected LiPo battery's voltage level over I2C. The MAX17048's I2C address is 0x36. The fuel gauge's battery alert pin connects to IO39 on the NINA-B306.
Pinout
The board routes one UART, I2C, and SPI bus to the pair of 0.1"-spaced headers on the board as well as six analog pins labeled A0-A5, eight GPIO configured as digital pins (with D38/IO38 to the Freebie pin).

The headers also include the Reset and Enable pins as well as the voltage pins for VUSB, VBATT, and 3.3V. The NINA-B306 offers full multiplexing for many of the module's pins so the labeled pins are mostly software defined through the Arduino Board definition allowing for users to customize them if they prefer.
LEDs
The Thing Plus - NINA-B306 has four LEDs labeled PWR, CHG, STAT, and RGB.

The red Power LED indicates if the board is powered or not. The yellow Charge LED illuminates when a connected battery is actively being charged. The blue Status LED is tied to IO41 on the NINA-B306 and can be toggled through software. The WS2812 data in pin connects to IO34 on the NINA-B306.
Solder Jumpers
The board has five solder jumpers labeled: SHLD, MEAS, CHG, PWR, and I2C. The table below outlines their functionality, default state and any notes regarding their use.
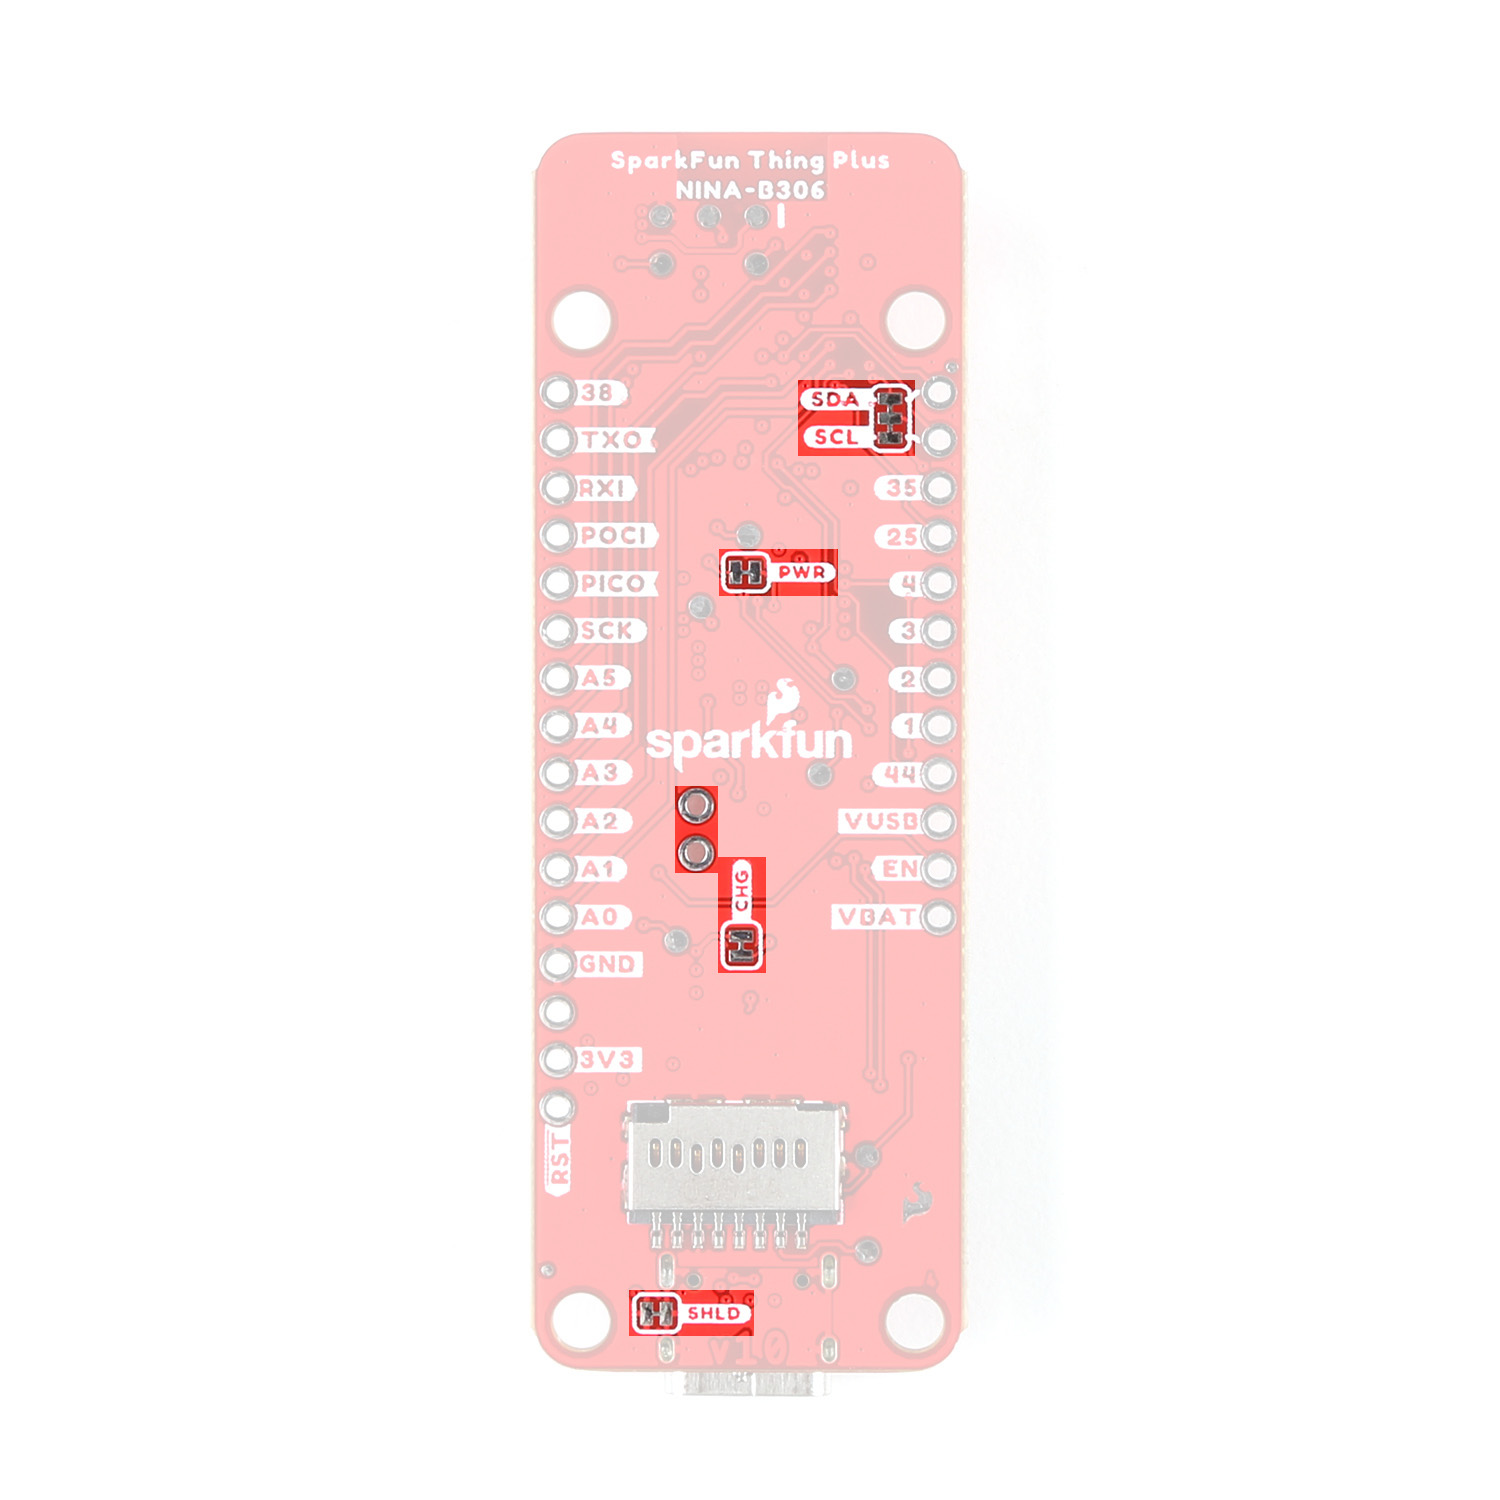
| Label | Default State | Function | Notes |
|---|---|---|---|
| SHLD | CLOSED | Connects USB-C shield pin to ground plane. | Open to isolate this pin from the board's ground plane. |
| MEAS | CLOSED | ||
| CHG | CLOSED | Completes the Charge LED circuit | Open to disable the Charge LED |
| PWR | CLOSED | Completes the Power LED circuit | Open to disable the Power LED |
| I2C | CLOSED | Pulls SDA/SCL to 3.3V through a pair of 2.2kΩ resistors. | Open completely to disable I2C pull-up resistors |
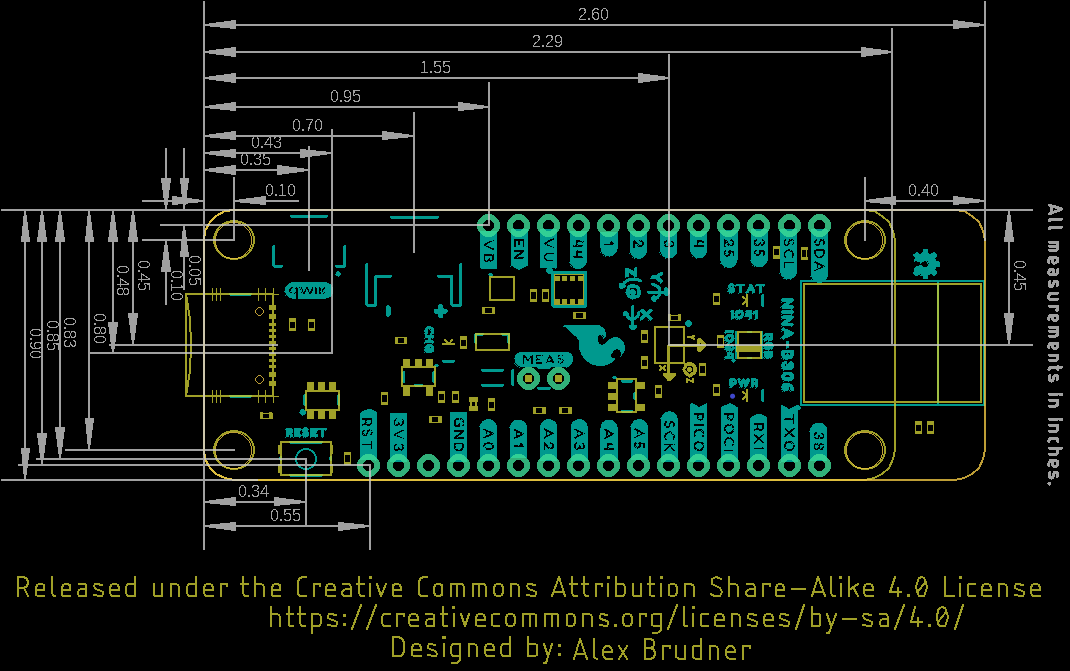
Board Dimensions
The Thing Plus - NINA-B306 packs in a few more components than most Thing Plus boards so it is a bit longer the standard Thing Plus footprint and measures 2.60" x 0.90" (66.04mm x 22.86mm).
Hardware Assembly
Now that we're familiar with the hardware on this Thing Plus it's time to assemble the board into a prototyping circuit or simply plug it into our computer with a USB-C cable and get right to programming.
Basic Assembly
For those who want to jump right in to using the Thing Plus NINA-B306 on its own or just with the wireless capabilities, all you need to do is plug the board into your computer using a USB-C cable.
Soldering Headers
Users who want to assemble a prototyping circuit with the Thing Plus should solder headers of their choice to the board to plug it into a breadboard. We recommend something like this Feather Stackable Header Kit.
If you have never soldered before or would like some tips, check out our Through Hole Soldering tutorial:
How to Solder: Through-Hole Soldering
Software Setup
If this is your first time using Arduino or installing an Arduino boards package, please review our tutorial on installing the Arduino IDE. If you have never installed an Arduino library before, please check out our installation guide.
SparkFun Arduino Boards Package
The Thing Plus - NINA-B306 is included with the SparkFun Arduino Boards package. First, we need to add the SparkFun Arduino Boards JSON link to the "Arduino Additional Board Manager URLs" list in the "Preferences" menu. Open the Preferences menu by clicking File > Preferences, and towards the bottom of the window paste the URL below into the "Additional Board Manager URLs" box:
https://raw.githubusercontent.com/sparkfun/Arduino_Boards/main/IDE_Board_Manager/package_sparkfun_index.json
With that done, install the core by navigating to the Boards Manager in the Tools < Boards drop-down menu. With the Boards Manager open, search for "SparkFun nRF" and install the latest version. This install may take a while as it installs the board files and all software packages required for use. The boards package also includes libraries specific to the package, the SparkFun BLE Service for Thing Plus NINA-B306 and the Adafruit Bluefruit nRF52 libraries. These are necessary for the BLE example in the next section.
Arduino Libraries
We've written Arduino libraries for both sensors on the board as well as the LiPo fuel gauge to get started reading data from the BME280, ISM330DHCX, and MAX17048. Install the libraries through the Arduino Library Manager tool by searching for "SparkFun BME280 Arduino Library" and "SparkFun Qwiic 6DoF - ISM330DHCX". Users who prefer to manually install them can get the library from the GitHub Repositories: BME280 and ISM330DHCX or download the ZIP by clicking the buttons below:
Extra Libraries
In order to use the example in the next section you'll need to install two other libraries along with the sensor libraries linked above. These extra libraries the Adafruit TinyUSB library and Adafruit's Unified Sensor Driver. Install the TinyUSB library using the Ardiuno Library Manager tool by searching for "Adafruit TinyUSB". Users who prefer to manually install the TinyUSB library can get it from the GitHub Repository or download the ZIP by clicking the button below:
The Adafruit Unified Sensor Driver must be manually installed so download it from the GitHub repository or click the button below:
After downloading, extract the contents from the compressed ZIP folder. Next you need to open the Arduino Sketchbook folder. If you're not sure where this is, open the "Preferences" menu in Arduino and take note of the filepath for the "Sketchbook location". Open this folder and then drag (or copy) the "Adafruit_Sensor" folder into the "Libraries" folder in your sketchbook.
BLE Data Pipe Arduino Example
With everything installed in Arduino we can move on to an example sketch that sets up the Thing Plus - NINA-B306 as a BLE device to package and send data recorded by the sensors to a paired device.
Example Code
You can find the example in the Examples folder in the GitHub repository or you can copy the code below into a blank sketch in Arduino. Select your Board (SparkFun Thing Plus - NINA-B306) and Port and click the Upload button.
language:c
/*
  BLE Data Pipe

  This example creates a BLE peripheral with a sensor service using the
  SparkFun NINA-B306 Thing Plus. The sensor service notifies (push data to) the
  central.

  The sensor service contains the following characteristics:
  Acceleration X,Y,Z
  Gyro X,Y,Z
  Temperature (degC), Humidity, Pressure
  MIT License
  Permission is hereby granted, free of charge, to any person obtaining a copy
  of this software and associated documentation files (the "Software"), to deal
  in the Software without restriction, including without limitation the rights
  to use, copy, modify, merge, publish, distribute, sublicense, and/or sell
  copies of the Software, and to permit persons to whom the Software is
  furnished to do so, subject to the following conditions:
  The above copyright notice and this permission notice shall be included in all
  copies or substantial portions of the Software.
  THE SOFTWARE IS PROVIDED "AS IS", WITHOUT WARRANTY OF ANY KIND, EXPRESS OR
  IMPLIED, INCLUDING BUT NOT LIMITED TO THE WARRANTIES OF MERCHANTABILITY,
  FITNESS FOR A PARTICULAR PURPOSE AND NONINFRINGEMENT. IN NO EVENT SHALL THE
  AUTHORS OR COPYRIGHT HOLDERS BE LIABLE FOR ANY CLAIM, DAMAGES OR OTHER
  LIABILITY, WHETHER IN AN ACTION OF CONTRACT, TORT OR OTHERWISE, ARISING FROM,
  OUT OF OR IN CONNECTION WITH THE SOFTWARE OR THE USE OR OTHER DEALINGS IN THE
  SOFTWARE.

*/

#include <Wire.h>
#include <Adafruit_TinyUSB.h>

#include <SparkFunBME280.h>
#include <SparkFun_ISM330DHCX.h>
#include <SparkFun_MAX1704x_Fuel_Gauge_Arduino_Library.h>

#include "bluefruit.h"
#include "SparkFunBLEService.h"
#include "services/SparkFunBLE_ISM330DHCX.h"
#include "services/SparkFunBLE_BME280.h"


/* Battery Monitor */
SFE_MAX1704X              lipo(MAX1704X_MAX17048);

long curr_millis    = 0;
long prev_millis    = 0;
long batt_interval  = 5000; // 5s in ms

/* BME280 Environmental Sensor */
BME280                    envSensor;

/* ISM330DHCX 6-DoF IMU Sensor */
SparkFun_ISM330DHCX       imuSensor;

sfe_ism_data_t _accelData;
sfe_ism_data_t _gyroData;

/* IMU BLE Service */
SparkFunBLE_ISM330DHCX    bleIMU;

/* ENV BLE Service */
SparkFunBLE_BME280        bleENV;

/* BLE Device Information
 * Name - Thing Plus NINA-B306 Data Pipe
 * Manufacturer - SparkFun Electronics
 * Model - SparkFun Thing Plus NINA-B306
 */
BLEDis                    bledis;

/* BLE Battery Service helper class */
BLEBas                    blebas;

void setup() {
  Serial.begin(115200);
  //while(!Serial) delay(10);

  Serial.println(F("SparkFun BLE Data Pipe Example"));
  Serial.println(F("------------------------------\n"));

  Wire.begin();

  // Initialize Sensors
  initFuelGauge();

  initBME280();

  initISM330DHCX();

  //Initialize BLE things
  Bluefruit.begin();
  Bluefruit.setTxPower(8); // +8 dBm, max power.
  Bluefruit.setName("Data Pipe Example");

  // Configure and start Device Information Service
  Serial.println(F("Configuring the Device Information Service..."));
  bledis.setManufacturer("SparkFun Electronics");
  bledis.setModel("Thing Plus NINA-B306");
  bledis.setHardwareRev("v10");
  bledis.setSoftwareRev("0.1.0");
  bledis.begin();

  // Configure and start BLE Battery Service and initialize to 100%
  Serial.println(F("Configuring the Battery Service..."));
  blebas.begin();
  blebas.write(100);

  // Configure and start BLE Environmental Sensor Service
  // Make sure to give enough room between sensor IDs, the BME280 uses 3 IDs.
  Serial.println(F("Configuring the Environmental Sensor Service..."));
  bleENV.begin(&envSensor, 100); // Sensor, ID.


  // Configure and start the IMU Sensor Service
  // Make sure to give enough room between sensor IDs, the IMU uses 2 IDs.
  Serial.println(F("Configuring the IMU Data Service..."));
  bleIMU.begin(&imuSensor, 200); // Sensor, ID.


  Serial.println(F("Setup complete."));

  /*  Start advertising BLE. It will start continuously transmitting BLE
      advertising packets and will be visible to remote BLE central devices
      until it receives a connection.
  */
  startAdv();

  Serial.println(F("BLE device active, waiting for connections..."));

}

void loop() {

  // Battery service handler
  curr_millis = millis();
  if ((curr_millis - prev_millis) > batt_interval) { // check every batt_interval ms
    prev_millis = curr_millis;
    if ( lipo.isChange(true) ) {  // only update if battery SOC is > +/- 1%
      blebas.write(lipo.getSOC());
    }
  }

}

void startAdv() {
  Serial.println(F("Begin advertising."));
  Bluefruit.Advertising.addFlags(BLE_GAP_ADV_FLAGS_LE_ONLY_GENERAL_DISC_MODE);
  Bluefruit.Advertising.addTxPower();

  // Add services
  Bluefruit.Advertising.addService(bleENV, bleIMU);

  Bluefruit.ScanResponse.addName();

  /* Start Advertising
   * - Enable auto advertising if disconnected
   * - Interval: fast mode = 20 ms, slow mode = 152.5 ms
   * - Timeout for fast mode is 30 seconds
   * - Start(timeout) with timeout = 0 will advertise forever (until connected)
   *
   * For recommended advertising interval
   * https://developer.apple.com/library/content/qa/qa1931/_index.html
   */
  Bluefruit.Advertising.restartOnDisconnect(true);
  Bluefruit.Advertising.setInterval(32, 244);       // units of 0.625 ms
  Bluefruit.Advertising.setFastTimeout(30);         // number of seconds in fast mode
  Bluefruit.Advertising.start(0);                   // 0 = Don't stop advertising unless connected

}

void initFuelGauge() {
  Serial.println(F("Initializing MAX17048 Battery Fuel Gauge..."));

  if (!lipo.begin()) {
    Serial.println(F("MAX17048 not detected. Please check wiring. Freezing."));
    while(1);
  }

  // Read and print the battery threshold
  Serial.print(F("Battery empty threshold is currently: "));
  Serial.print(lipo.getThreshold());
  Serial.println(F("%"));

    // We can set an interrupt to alert when the battery SoC gets too low.
    // We can alert at anywhere between 1% and 32%:
    lipo.setThreshold(20); // Set alert threshold to 20%.

  // Read and print the battery empty threshold
  Serial.print(F("Battery empty threshold is now: "));
  Serial.print(lipo.getThreshold());
  Serial.println(F("%"));

  // Clear any alert that might already be generated.
  lipo.clearAlert();

}

void initBME280() {
  Serial.println("Initializing BME280 Environmental Sensor...");
  envSensor.setI2CAddress(0x76); // Default address on NINA-B306

  if (!envSensor.beginI2C()) {
    Serial.println("The BME280 did not respond. Please check address and wiring.");
    while(1);
  }
  Serial.println("BME280 initialization successful.");
}

void initISM330DHCX() {
  Serial.println("Initializing ISM330DHCX...");

  if (!imuSensor.begin()) {
    Serial.println("The ISM330DHCX did not respond. Please check address and wiring.");
    while(1);
  }

  Serial.println("ISM330DHCX Initialization successful. Resetting device settings...");

  imuSensor.deviceReset();

  while(!imuSensor.getDeviceReset()){
    delay(1);
  }

  Serial.println("Device reset complete. Configuring ISM330DHCX...");
  delay(100);

  imuSensor.setDeviceConfig();
  imuSensor.setBlockDataUpdate();

  // Set accelerometer output data rate and data precision
  imuSensor.setAccelDataRate(ISM_XL_ODR_104Hz);
  imuSensor.setAccelFullScale(ISM_4g);

  // Set gyro output data rate and data precision
  imuSensor.setGyroDataRate(ISM_GY_ODR_104Hz);
  imuSensor.setGyroFullScale(ISM_500dps);

  // Turn on accelerometer's filter and apply settings.
  imuSensor.setAccelFilterLP2();
  imuSensor.setAccelSlopeFilter(ISM_LP_ODR_DIV_100);

  // Turn on gyro's filter and apply settings.
  imuSensor.setGyroFilterLP1();
  imuSensor.setGyroLP1Bandwidth(ISM_MEDIUM);

  Serial.println("ISM330DHCX successfully configured.");
}

uint16_t measureCallBack(uint8_t* buf, uint16_t bufsize) {
  float imu_data[6];
  imuSensor.getAccel(&_accelData);
  imuSensor.getGyro(&_gyroData);

  imu_data[0] = _accelData.xData * 0.0098067;
  imu_data[1] = _accelData.yData * 0.0098067;
  imu_data[2] = _accelData.zData * 0.0098067;
  imu_data[3] = _gyroData.xData * 0.017453;
  imu_data[4] = _gyroData.yData * 0.017453;
  imu_data[5] = _gyroData.zData * 0.017453;

  memcpy(buf, &imu_data, 24);

  return 24;
}
Device Pairing & Data Reading
Once the code finishes uploading, open the Serial Monitor in Arduino to watch the printout to check if everything initializes and configures properly. After configuring the device information and BLE services for the sensors, the code will wait for a connection. You'll need a device to pair with the Thing Plus NINA-B306 like your phone or computer. We recommend using a phone with a BLE application like nRF Connect for Mobile from Nordic Semiconductor®. Other apps should work as well so feel free to use whichever you prefer.
The example sets the SparkFun service/characteristic UUID128 to the base UUID of 5FE0xxxx-005E-4761-9A7E-947AA3C505FE. The sensor services have UUIDs unique to the 3-4ths octets. The BME280 service ID is 0100 and its sensor output characteristic is 0101. The ISM330DHCX sensor service ID is 0200 and its sensor output characteristic is 0201.
Open your BLE app and scan for devices in range and look for the Thing Plus UUID or name. Pair with this device and then enable notify for the sensor service(s) you wish to view. After selecting the service, you should start seeing hex values for data from the sensor. Unfortunately, this is not very human readable but you should be able to see the values change as you move the board or breathe on the BME280.
Extra Examples
The GitHub repository also includes several other examples for the Thing Plus NINA-B306 in the examples folder to use other components on the board like the RGB LED and µSD card.
Troubleshooting
NINA-B306 Range Limitations and Optimization
Due to the design limitations of this board along with the PCB antenna on the NINA-B306, the range of the radio is quite limited with a max range of 20-25 feet.
Users struggling with getting this range should increase the power of the antenna with the Bluefruit.setTxPower(8) command. The 8 value in this command references the power in dBm. Refer to the Bluefruit52 library for valid values for this command.
General Troubleshooting
If you need technical assistance and more information on a product that is not working as you expected, we recommend heading on over to the SparkFun Technical Assistance page for some initial troubleshooting.
If you don't find what you need there, the SparkFun Forums are a great place to find and ask for help. If this is your first visit, you'll need to create a Forum Account to search product forums and post questions.
Resources and Going Further
That's all for this guide. For more information on the Thing Plus - NINA-B306, take a look at the resources below:
- Schematic
- Eagle Files
- Board Dimensions
- GitHub Hardware Repository
- Datasheets:
- Arduino Libraries: