SparkFun Qwiic Alphanumeric Display Hookup Guide
Arduino Examples - The Basics
Now that we have our library installed, we're ready to run some examples. The library currently comes with a set of 10 examples to get you started on your way. Let's look at the first few examples!
Example_01_PrintString
Once the library is installed, go ahead and open up File->Examples->SparkFun Qwiic Alphanumeric Display Library->Example_01_PrintString.
Alternatively, you can copy and paste the code below to a shiny new Arduino file:
    language:c
/*****************************************************************************************
 * This example tests illuminating whole 4 letter strings on the 14-segment display.
 *
 * Priyanka Makin @ SparkFun Electronics
 * Original Creation Date: February 3, 2020
 *
 * SparkFun labored with love to create this code. Feel like supporting open source hardware?
 * Buy a board from SparkFun! https://www.sparkfun.com/products/16391
 *
 * This code is Lemonadeware; if you see me (or any other SparkFun employee) at the
 * local, and you've found our code helpful, please buy us a round!
 *
 * Hardware Connections:
 * Attach Red Board to computer using micro-B USB cable.
 * Attach Qwiic Alphanumeric board to Red Board using Qwiic cable.
 *
 * Distributed as-is; no warranty is given.
 ****************************************************************************************/
#include <Wire.h>

#include <SparkFun_Alphanumeric_Display.h> //Click here to get the library: http://librarymanager/All#SparkFun_Qwiic_Alphanumeric_Display by SparkFun
HT16K33 display;

void setup()
{
  Serial.begin(115200);
  Serial.println("SparkFun Qwiic Alphanumeric - Example 1: Print String");

  Wire.begin(); //Join I2C bus

  if (display.begin() == false)
  {
    Serial.println("Device did not acknowledge! Freezing.");
    while (1);
  }
  Serial.println("Display acknowledged.");

  display.print("Milk");
}

void loop()
{
}
Once you have the code, make sure you've got the correct port selected, and then go ahead and click on the upload button. If all goes well, you'll see your Display light up with "Milk"!

Example_02_TurnOnOneSegment
This example lights up a single segment on the display. Head on back to your File Menu and open up File->Examples->SparkFun Qwiic Alphanumeric Display Library->Example_02_TurnOnOneSegment.
Alternatively, you can copy and paste the code below to a shiny new Arduino file:
language:c
/*******************************************************************************************
 * This example tests illuminating individual segments of the display. Pass in the segment
 * and digit you wish to illuminate to illuminateSegement().
 *
 * Priyanka Makin @ SparkFun Electronics
 * Original Creation Date: January 31, 2020
 *
 * SparkFun labored with love to create this code. Feel like supporting open source hardware?
 * Buy a board from SparkFun! https://www.sparkfun.com/products/16391
 *
 * This code is Lemonadeware; if you see me (or any other SparkFun employee) at the
 * local, and you've found our code helpful, please buy us a round!
 *
 * Hardware Connections:
 * Attach Red Board to computer using micro-B USB cable.
 * Attach Qwiic Alphanumeric board to Red Board using Qwiic cable.
 *
 * Distributed as-is; no warranty is given.
 *****************************************************************************************/
#include <Wire.h>

#include <SparkFun_Alphanumeric_Display.h>  //Click here to get the library: http://librarymanager/All#SparkFun_Qwiic_Alphanumeric_Display by SparkFun
HT16K33 display;

void setup()
{
  Serial.begin(115200);
  Serial.println("SparkFun Qwiic Alphanumeric - Example 2: Turn On One Segment");
  Wire.begin(); //Join I2C bus

  //check if display will acknowledge
  if (display.begin() == false)
  {
    Serial.println("Device did not acknowledge! Freezing.");
    while(1);
  }
  Serial.println("Display acknowledged.");

  display.illuminateSegment('A', 0);
  display.illuminateSegment('L', 1);
  display.illuminateSegment('I', 2);
  display.illuminateSegment('G', 3);
  display.updateDisplay();
}

void loop()
{
}
As before, once you have the code, make sure you've got the correct port selected, and then go ahead and click on the upload button. You won't need your serial monitor for this one though, unless you want it. If all goes well, you should see your display light up like so:
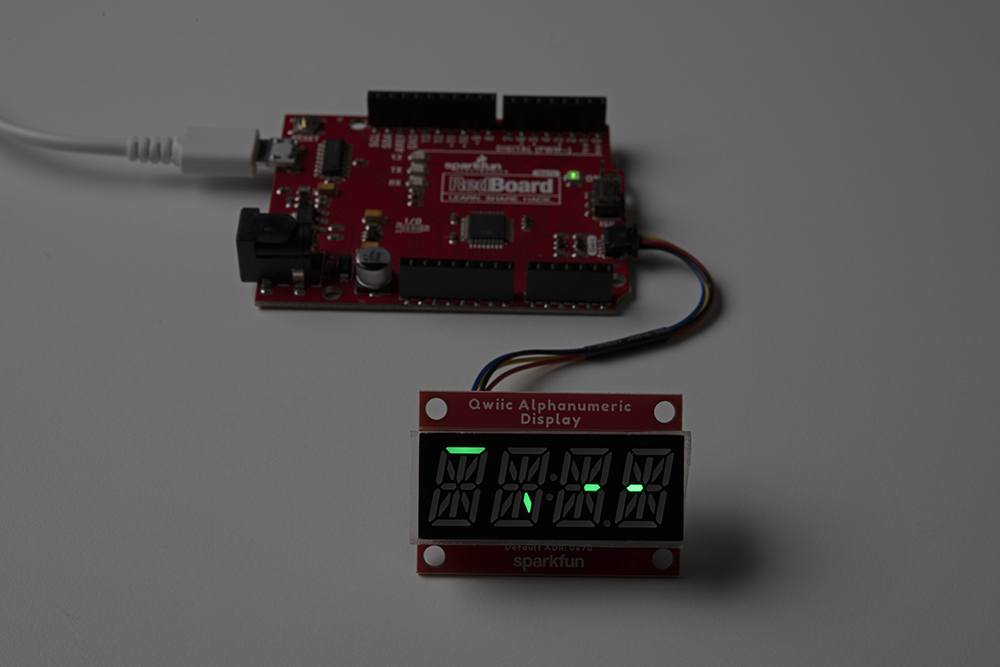
It looks weird, but it's one segment of each letter lit up.
Example_03_PrintChar
Let's print some stuff! Grab Example 3 by going to File->Examples->SparkFun Qwiic Alphanumeric Display Library->Example_03_PrintChar.
Alternatively, you can copy and paste the code below to a shiny new Arduino file:
language:c
/*****************************************************************************************
 * This example tests illuminating whole characters on the 14-segment display.
 *
 * Priyanka Makin @ SparkFun Electronics
 * Original Creation Date: February 3, 2020
 *
 * SparkFun labored with love to create this code. Feel like supporting open source hardware?
 * Buy a board from SparkFun! https://www.sparkfun.com/products/16391
 *
 * This code is Lemonadeware; if you see me (or any other SparkFun employee) at the
 * local, and you've found our code helpful, please buy us a round!
 *
 * Hardware Connections:
 * Attach Red Board to computer using micro-B USB cable.
 * Attach Qwiic Alphanumeric board to Red Board using Qwiic cable.
 *
 * Distributed as-is; no warranty is given.
 *****************************************************************************************/
#include <Wire.h>

#include <SparkFun_Alphanumeric_Display.h>  //Click here to get the library: http://librarymanager/All#SparkFun_Qwiic_Alphanumeric_Display by SparkFun
HT16K33 display;

void setup()
{
  Serial.begin(115200);
  Serial.println("SparkFun Qwiic Alphanumeric - Example 3: Print Character");
  Wire.begin(); //Join I2C bus

  //check if display will acknowledge
  if (display.begin() == false)
  {
    Serial.println("Device did not acknowledge! Freezing.");
    while(1);
  }
  Serial.println("Display acknowledged.");

  display.printChar('W', 0);
  display.printChar('H', 1);
  display.printChar('A', 2);
  display.printChar('T', 3);

  display.updateDisplay();
}

void loop(){
}
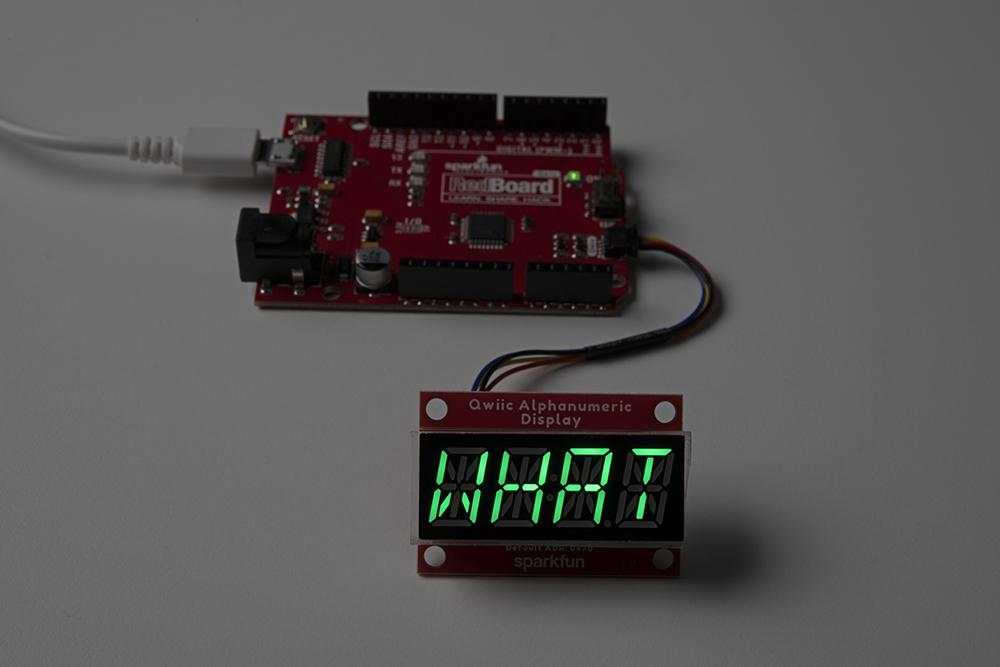
Check your port, and then click on the upload button. Voila! Are you starting to get the picture?
This is just the beginning - there are more examples to get you going with your SparkFun Qwiic Alphanumeric Display. We won't go through them all here, but feel free to tinker with these to see what all you can come up with!
If you haven't downloaded the library yet, get it either here or by clicking on the link below and get hackin!