SparkFun Qwiic Alphanumeric Display Hookup Guide
Introduction
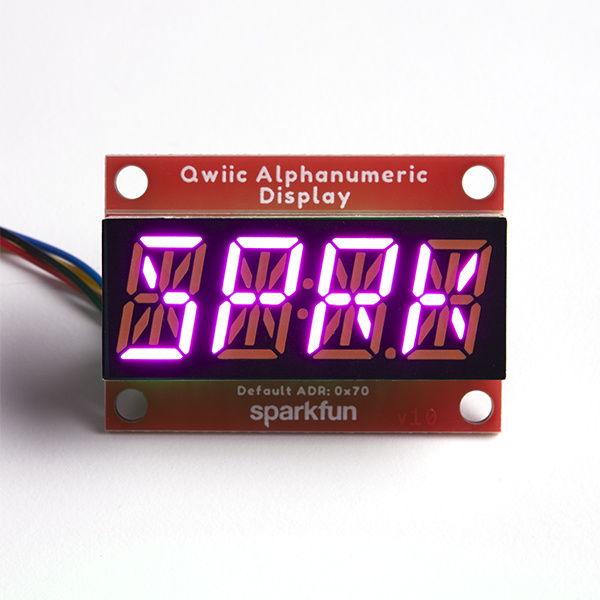
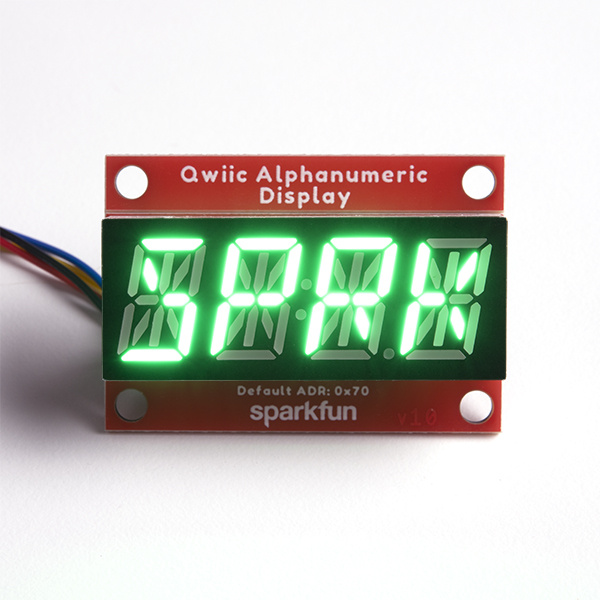
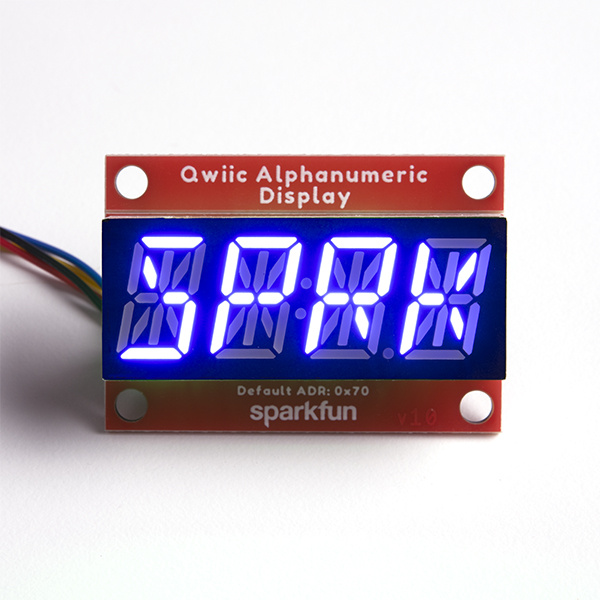
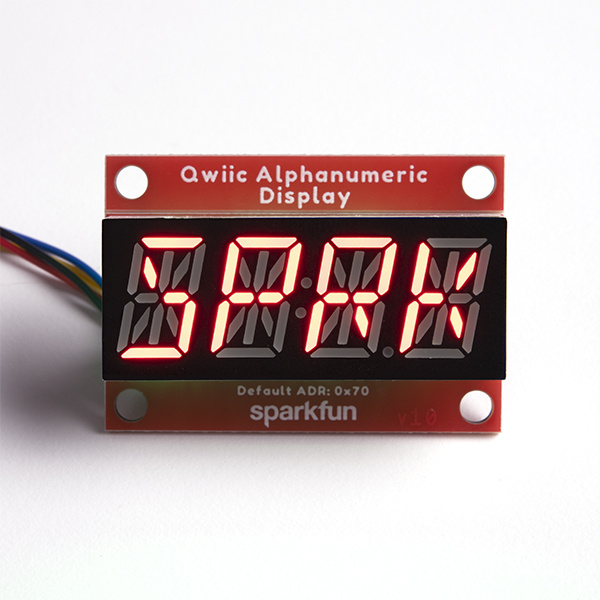
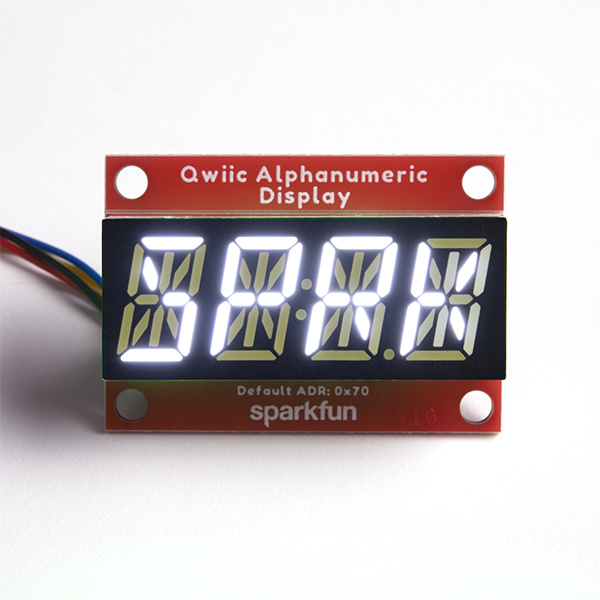
Seven segment displays are SO in right now! I mean, we see them in our clocks, ovens, and microwaves on the daily. But what happens when you add more segments to each digit? You can upgrade your appliances and let everyone know how you REALLY feel. Introducing SparkFun's newest Qwiic-Enabled Alphanumeric Display in Pink, Green, Blue, Red, Purple, and White. Customize that microwave alert - "Your food is done, fool!" Or hack those oven messages - "I pity the fool that doesn't pre-heat!" These fourteen-segment digits allow you display all sorts of numbers, characters, and symbols. Let's jump in and have a look, shall we?

SparkFun Qwiic Alphanumeric Display Kit
KIT-19297Required Materials
You will need a microcontroller to control the Qwiic Alphanumeric Display in order to follow along with this tutorial. Below are a few options that come Qwiic-enabled out of the box:


If your chosen microcontroller is not already Qwiic-enabled, you can add that functionality with one or more of the following items:


You will also need at least one Qwiic cable to connect your Alphanumeric Display to your microcontroller.

Qwiic Cable - 50mm
PRT-14426
Qwiic Cable - 100mm
PRT-14427
Qwiic Cable - 200mm
PRT-14428
Qwiic Cable - 500mm
PRT-14429Suggested Reading
If you aren't familiar with the Qwiic system, we recommend reading here for an overview:
We would also suggest reading through the following tutorials if you are not familiar with the concepts covered in them:
Serial Communication
I2C
Hardware Overview
As mentioned in the introduction, the Qwiic Alphanumeric Displays use the VK16K33 LED driver chip to control the segments. In this section of the guide we'll go into more detail on the LED driver and the display, as well as the other components included on the board.
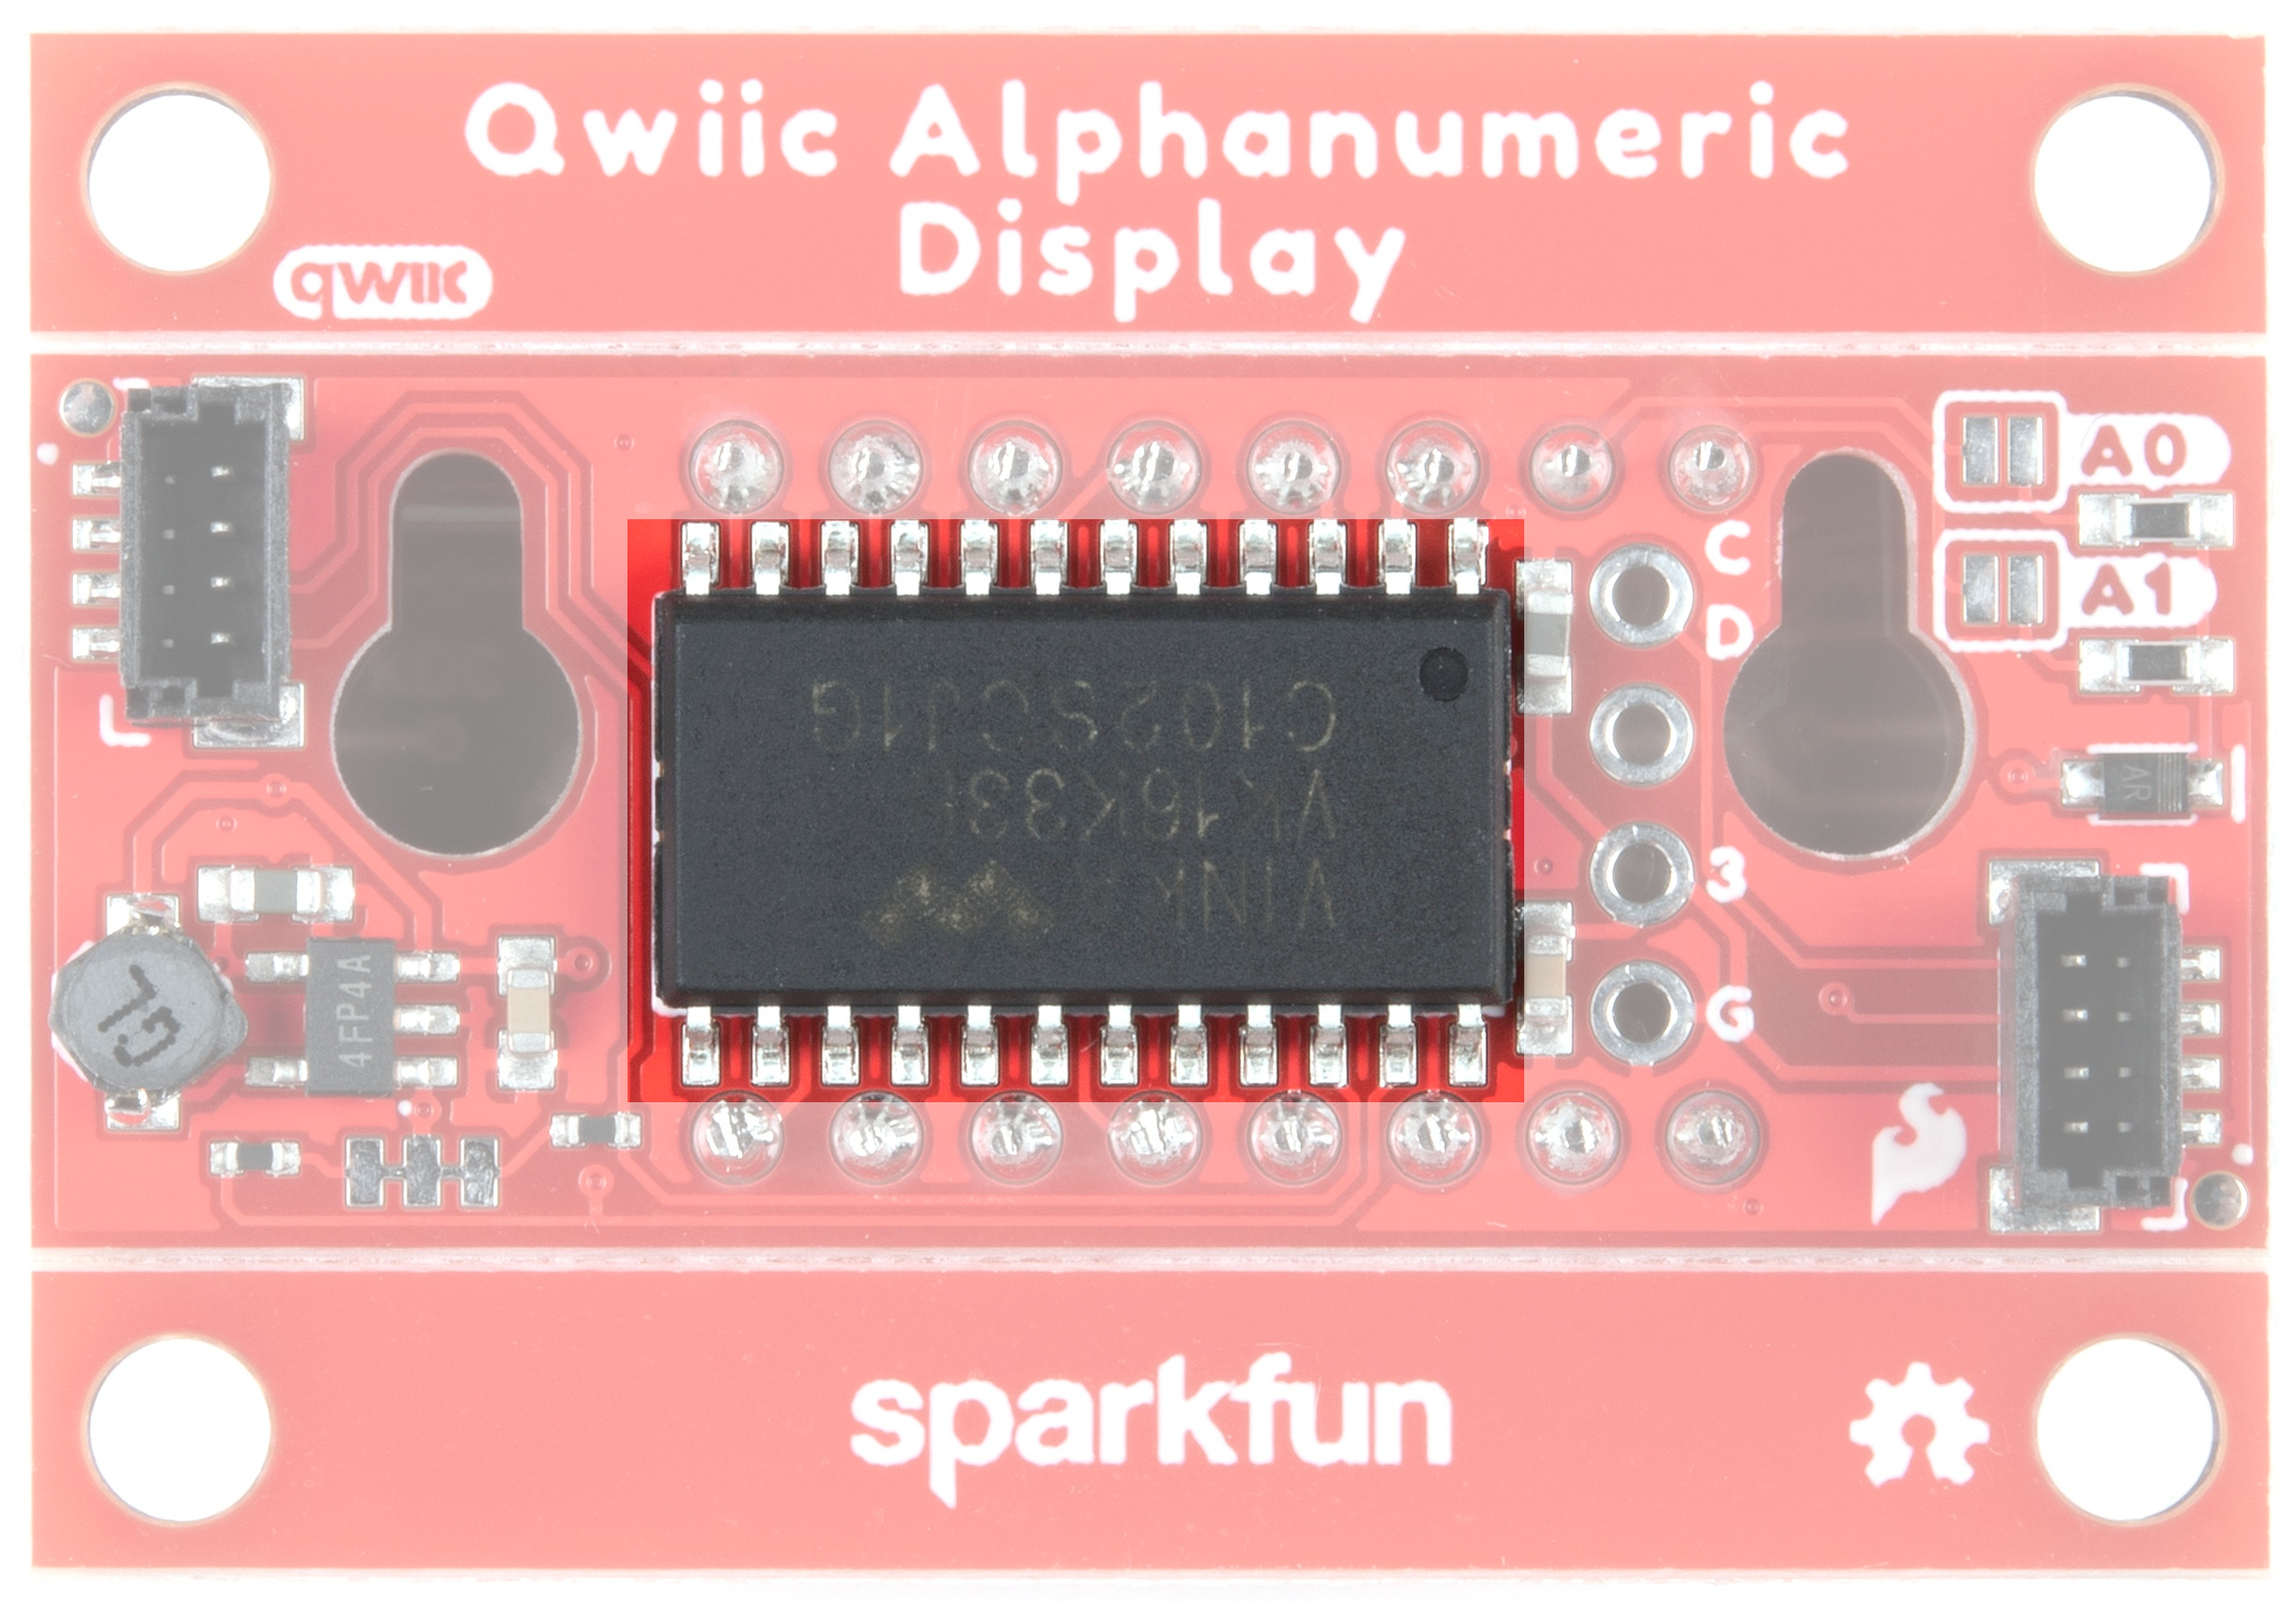
VK16K33 LED Driver
The Qwiic Alphanumeric Display boards use the VK16K33 LED driver chip to control the segments. The VK16K33 is a memory mapping and multifunction LED controller driver with a maximum display segment number of 128 patterns (16 segments and 8 commons) and a 13×3 matrix key scan circuit. There's an integrated RC oscillator and a 16-step dimming circuit as well. More information can be found in the VK16K33 Datasheet.
Alphanumeric Display
Look at all those beautiful segments ready to display (almost) whatever your heart desires!

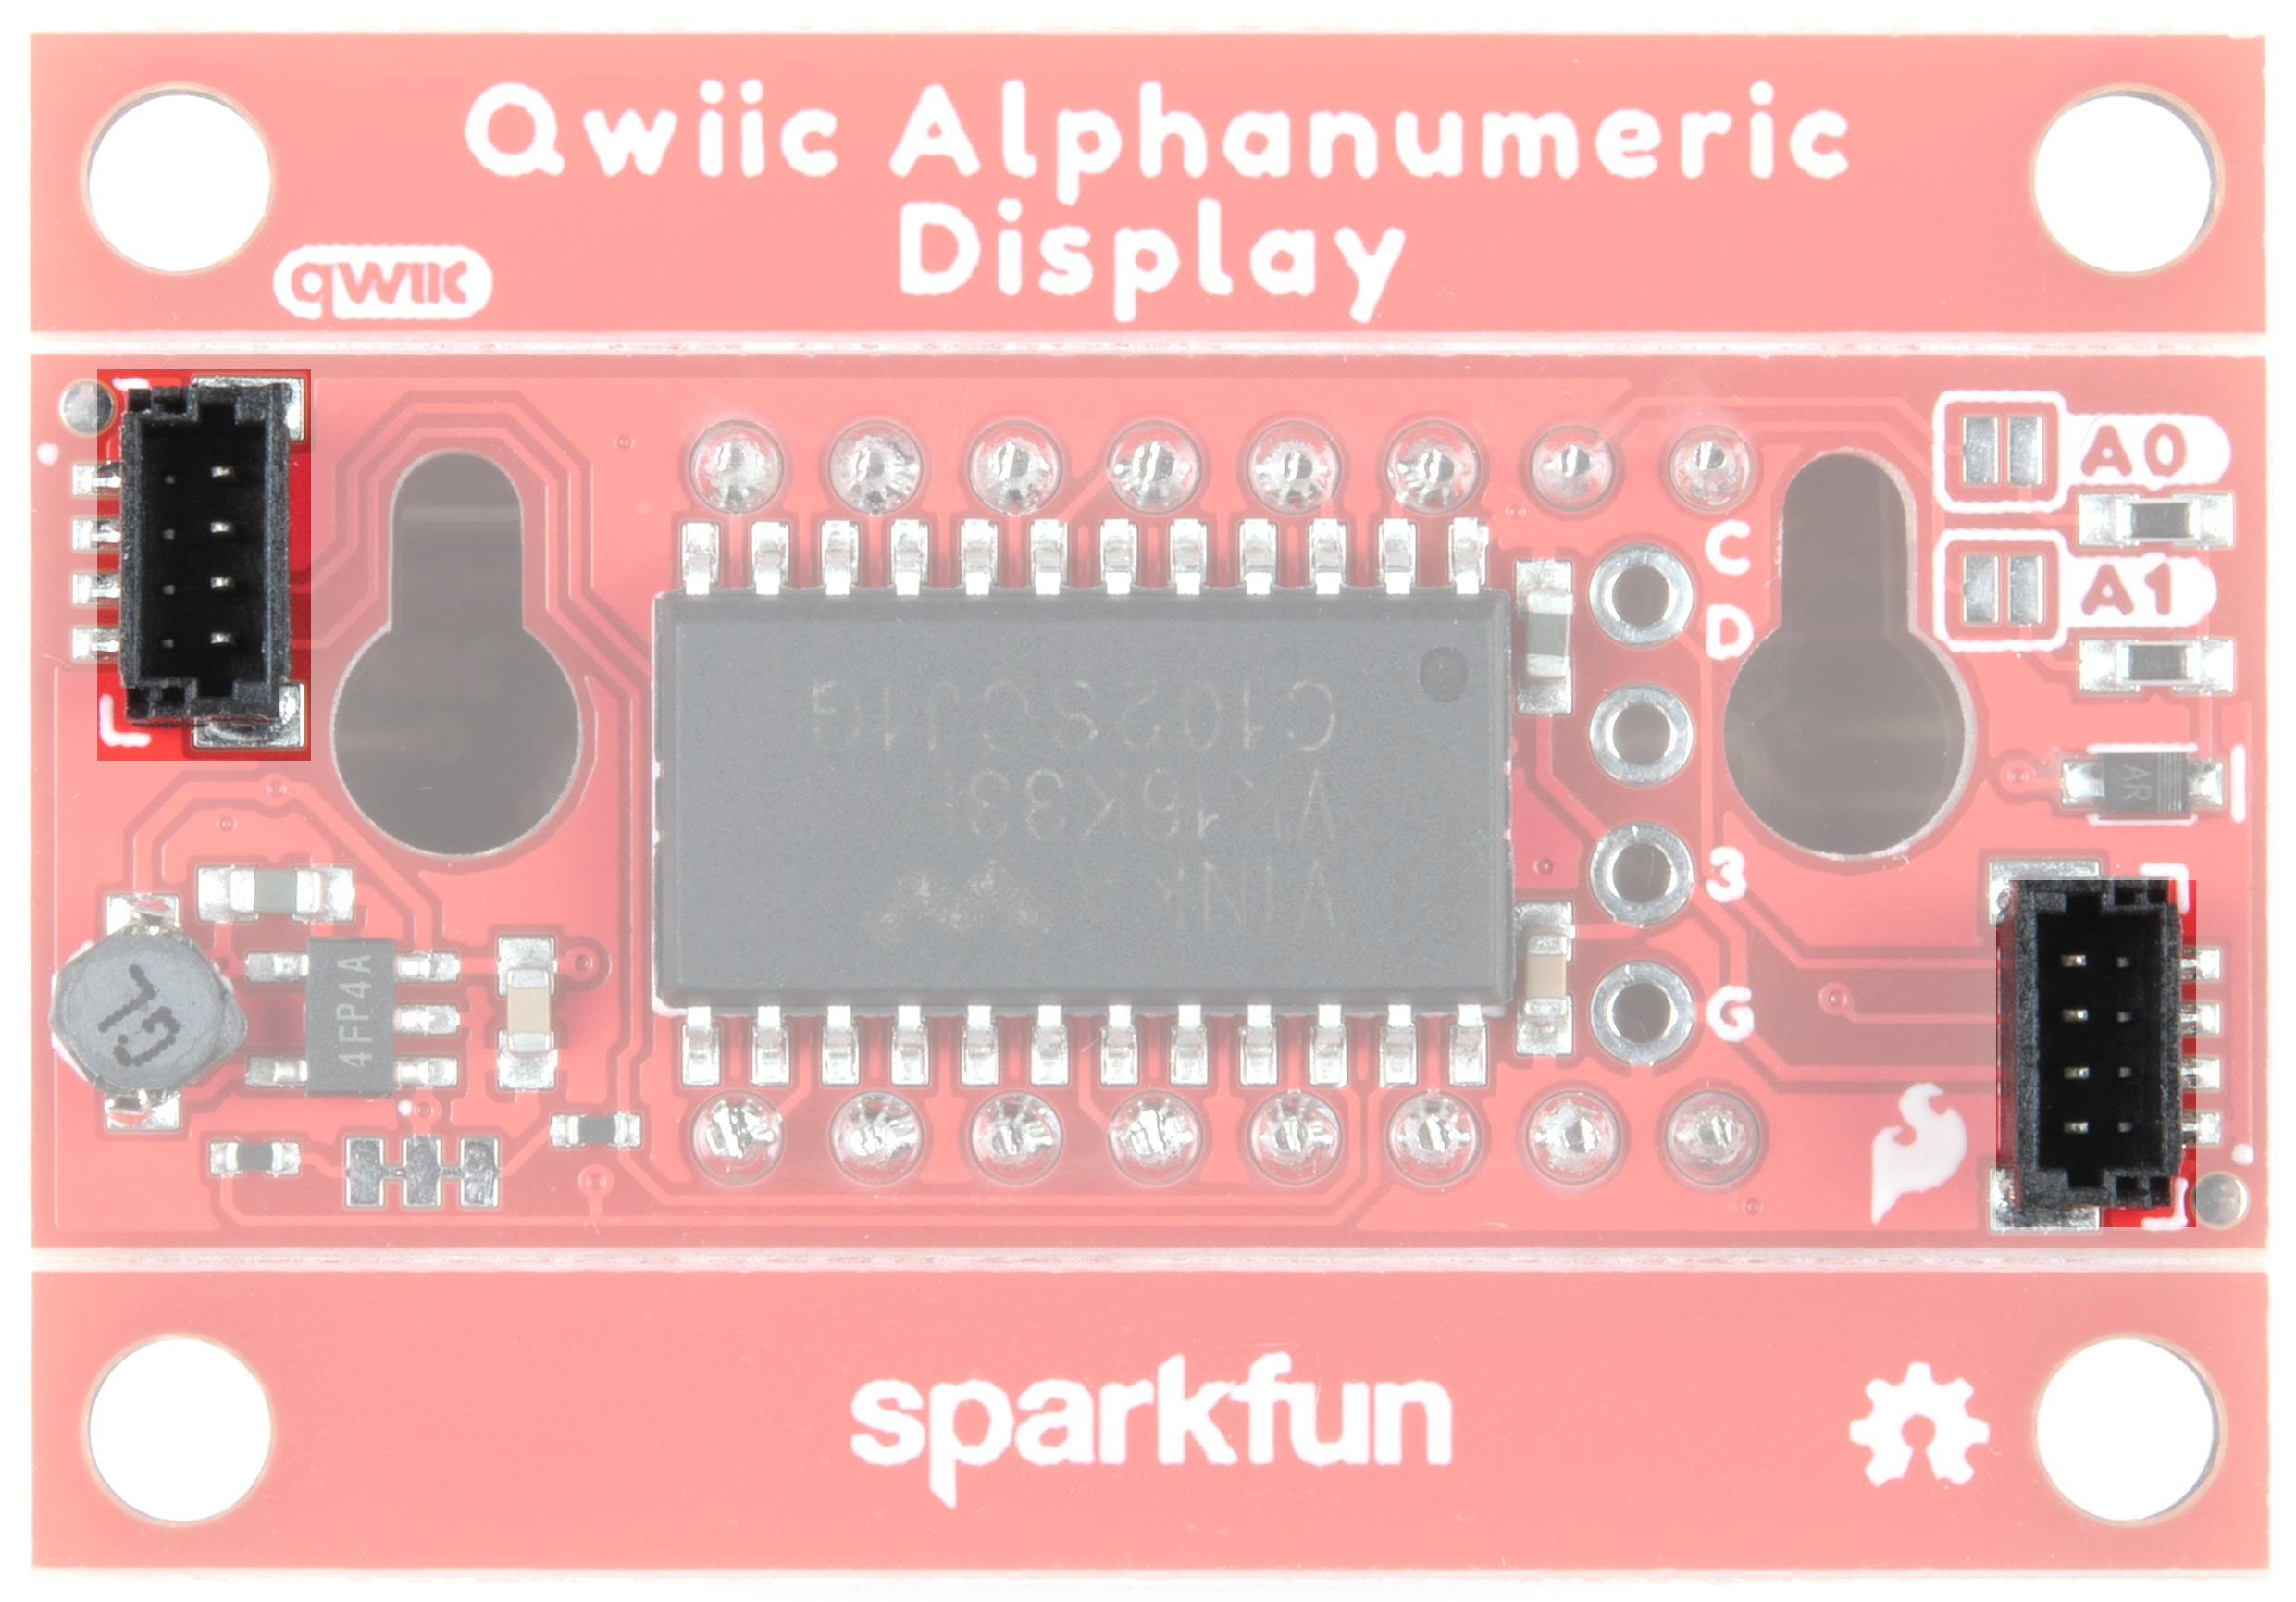
Qwiic
Our Qwiic Ecosystem makes sensors pretty much plug and play. There are two Qwiic connectors on either side of the Alphanumeric Display board to provide power and I2C connectivity simultaneously.
The default I2C address of the board is 0x70. Additional addresses are available - see the Jumpers section below.
I2C Address Jumpers
Two jumpers have been provided to allow you to choose the I2C address of the peripheral. See the table below for configuration details.
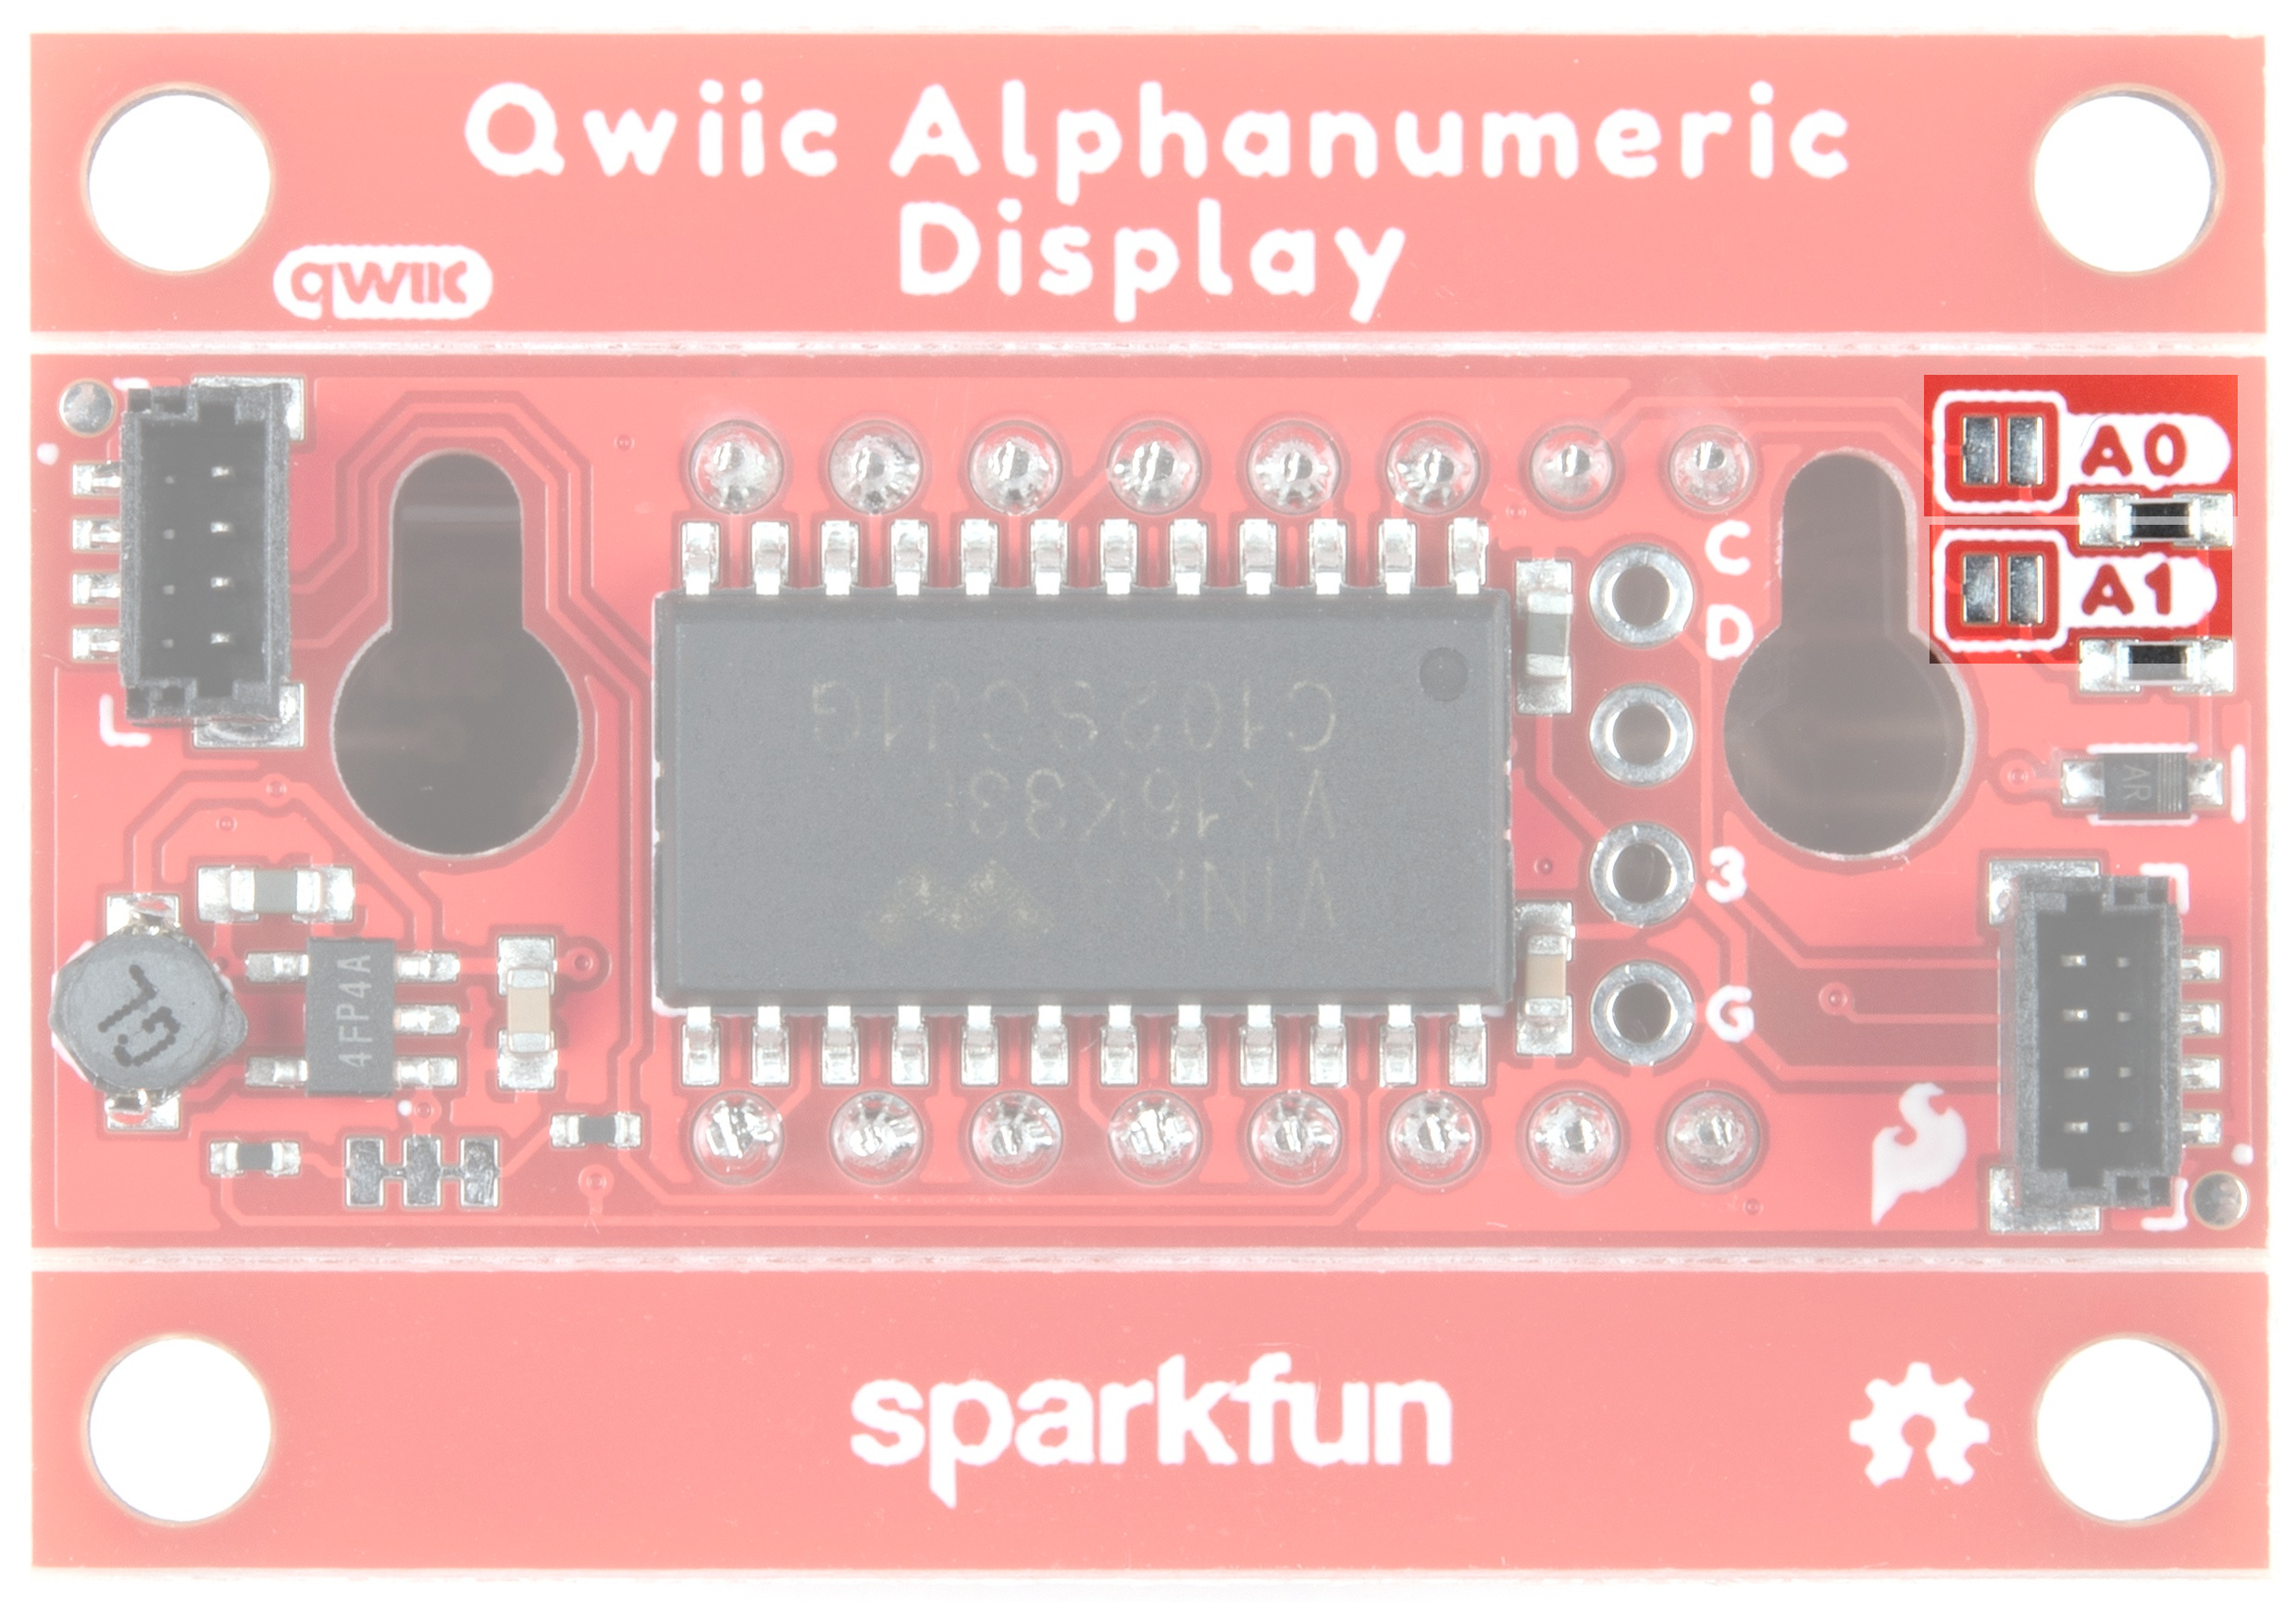
| Address | A0 | A1 |
|---|---|---|
| 0x70 | Open | Open |
| 0x71 | Closed | Open |
| 0x72 | Open | Closed |
| 0x73 | Closed | Closed |
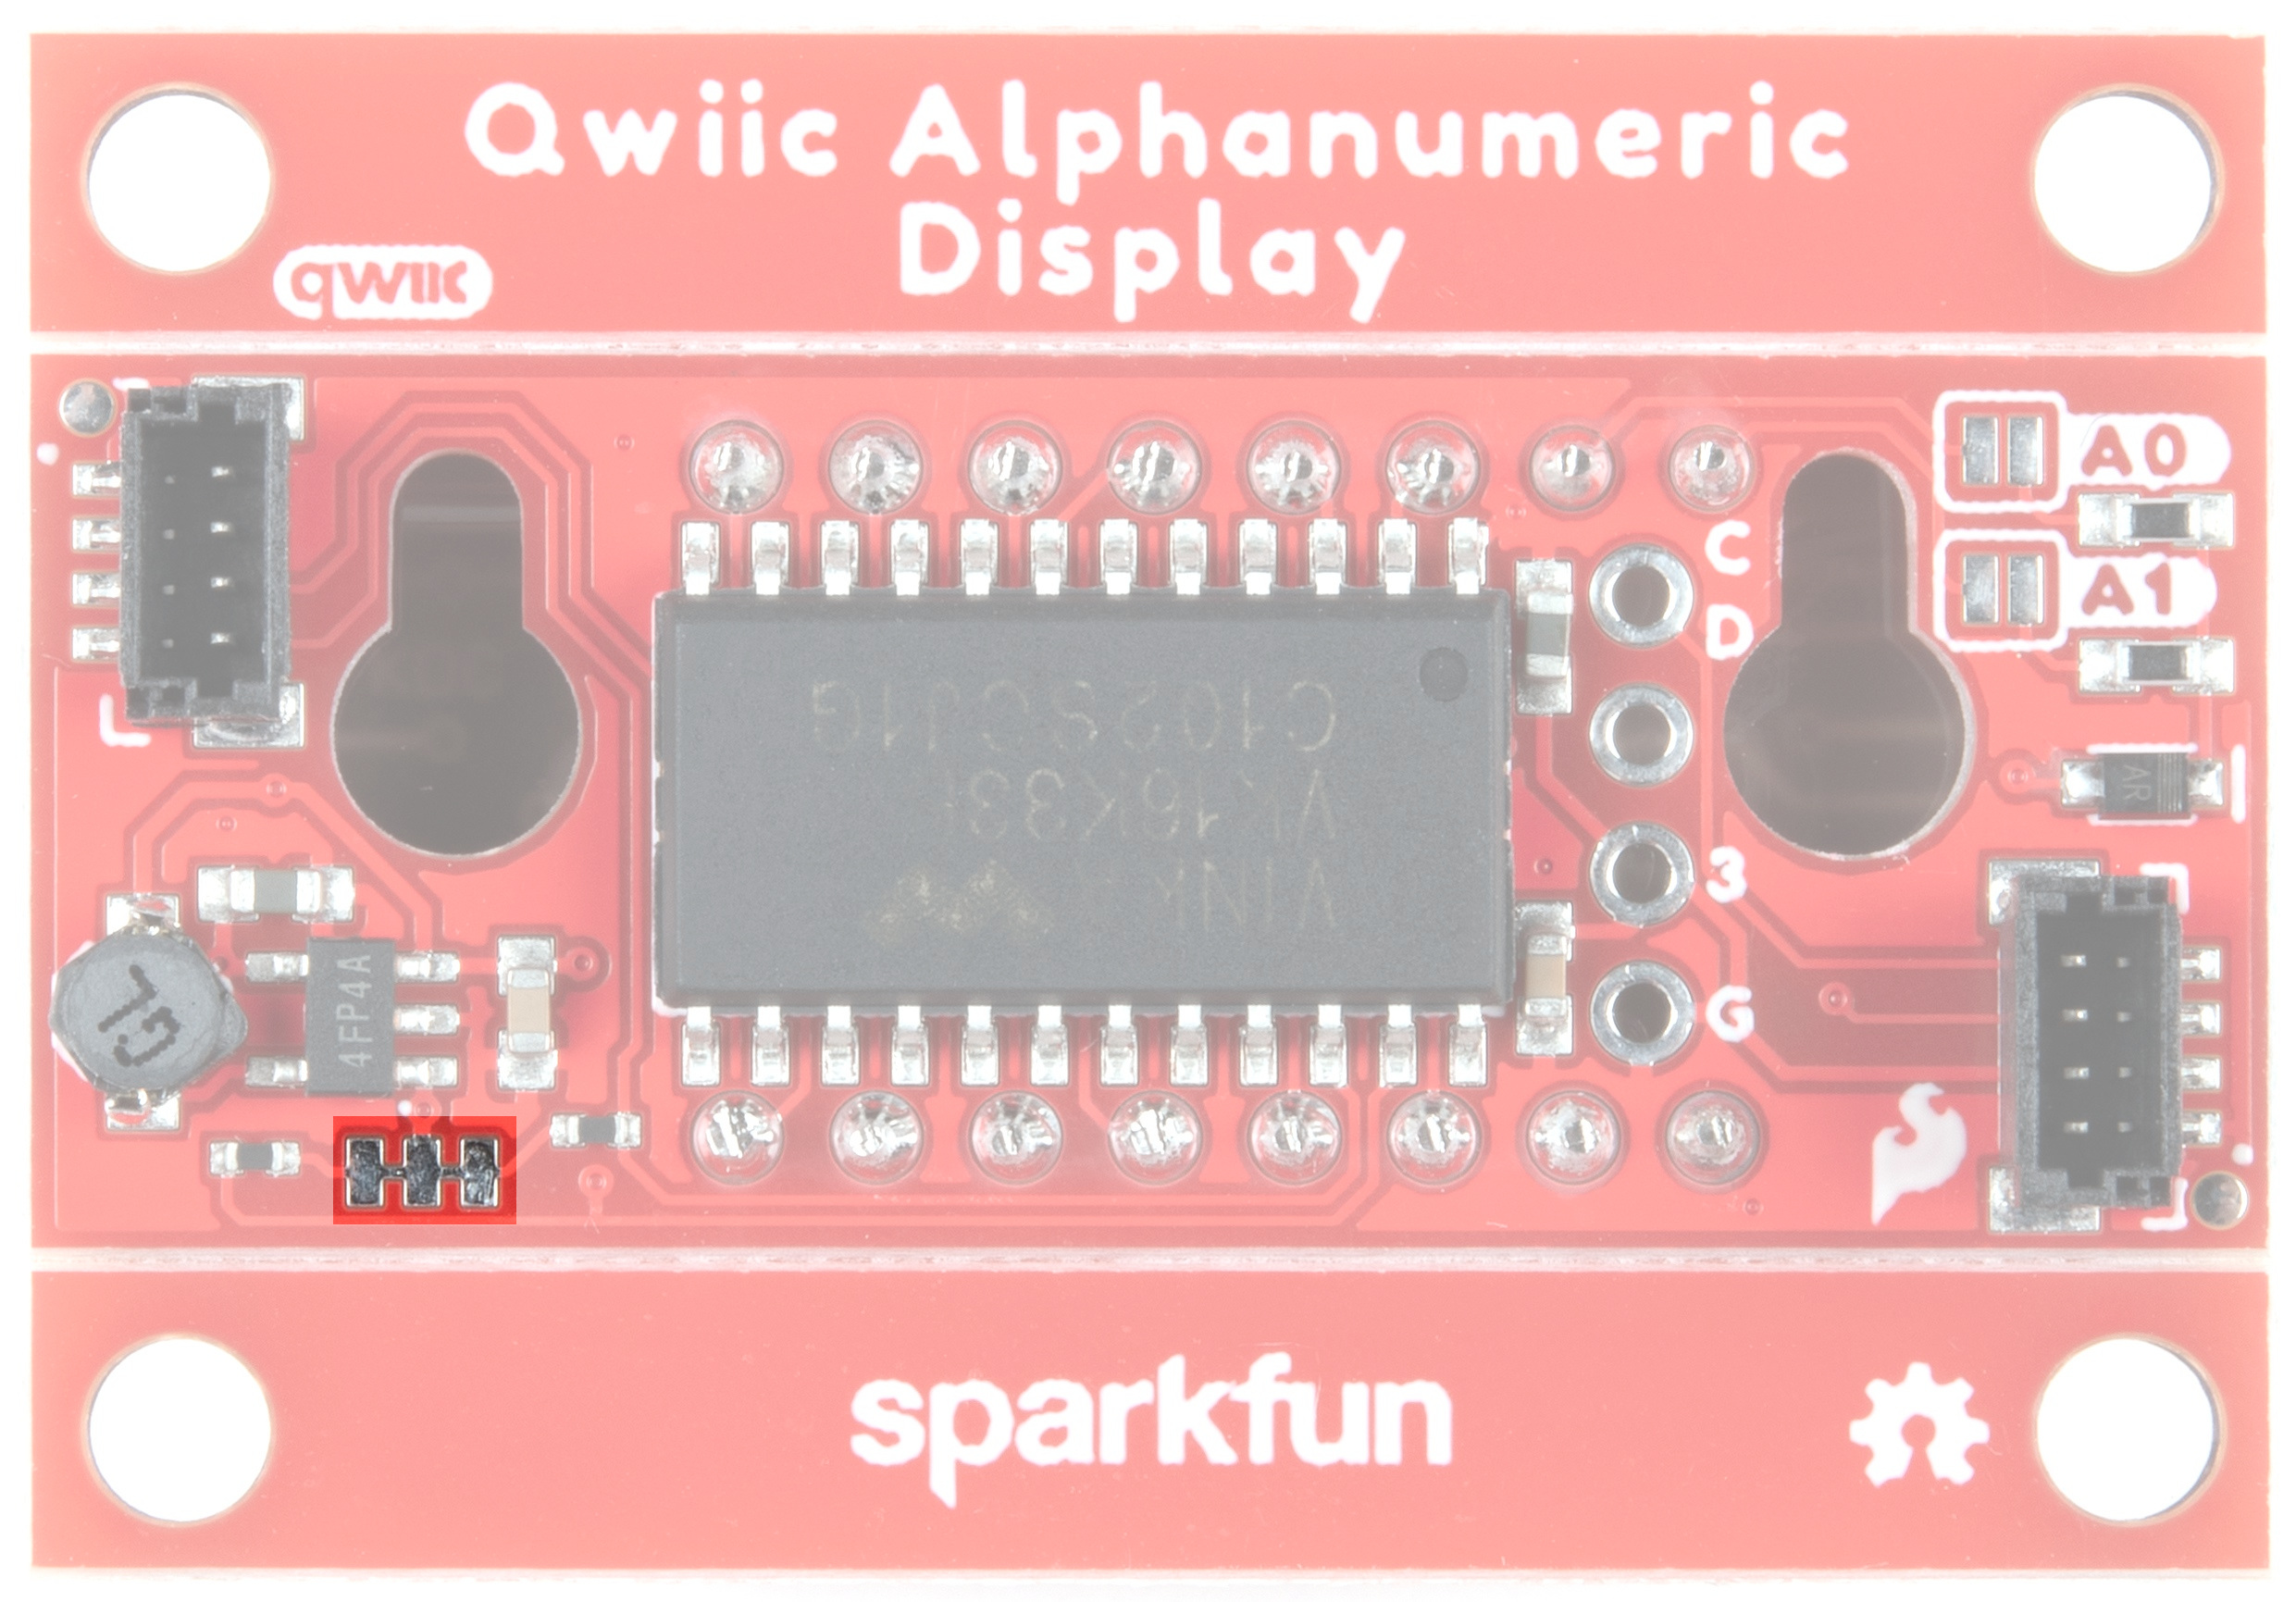
I2C Bus Resistor Jumper
The Qwiic Alphanumeric Display Breakout has onboard I2C pull up resistors; if multiple sensors are connected to the bus with the pull-up resistors enabled, the parallel equivalent resistance will create too strong of a pull-up for the bus to operate correctly. As a general rule of thumb, disable all but one pair of pull-up resistors if multiple devices are connected to the bus. If you need to disconnect the pull up resistors they can be removed by cutting the traces on the corresponding jumpers highlighted below.
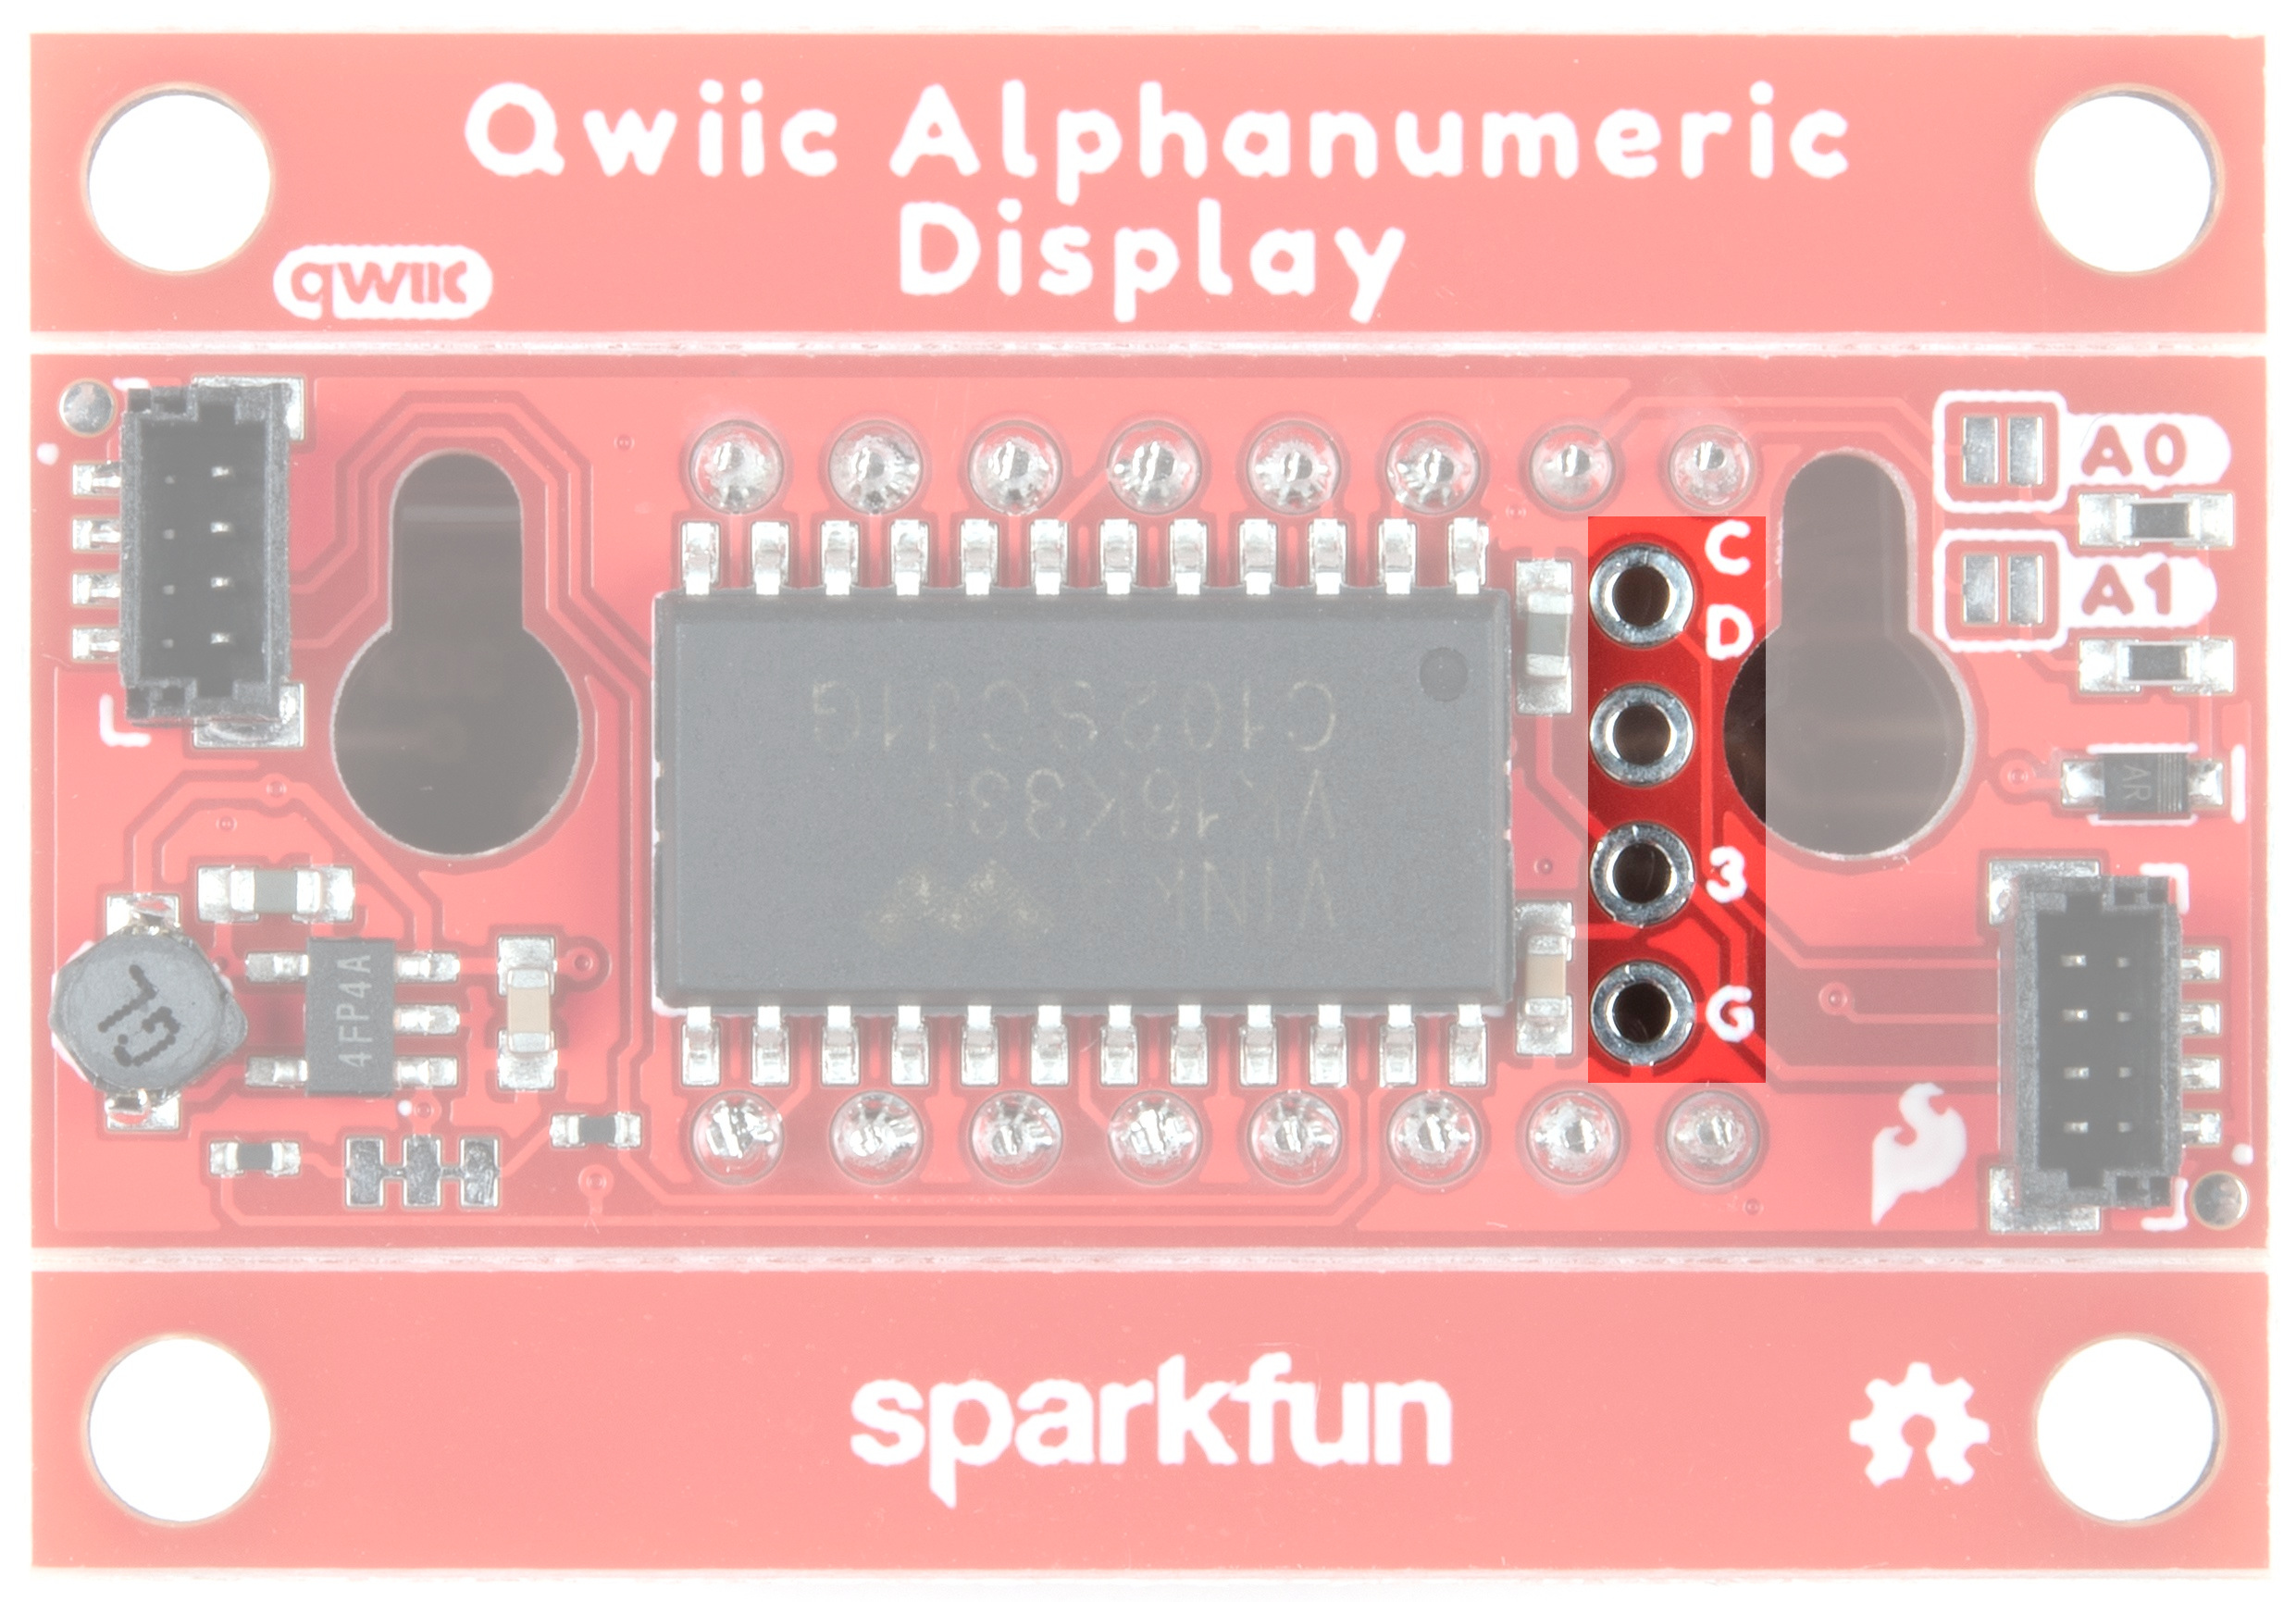
I2C Pins
If you've got mad soldering skillz and really want to access the I2C pins, we've made these bad boys available to you. Check it:
- C - SCL
- D - SDA
- 3 - 3.3V
- G - GND
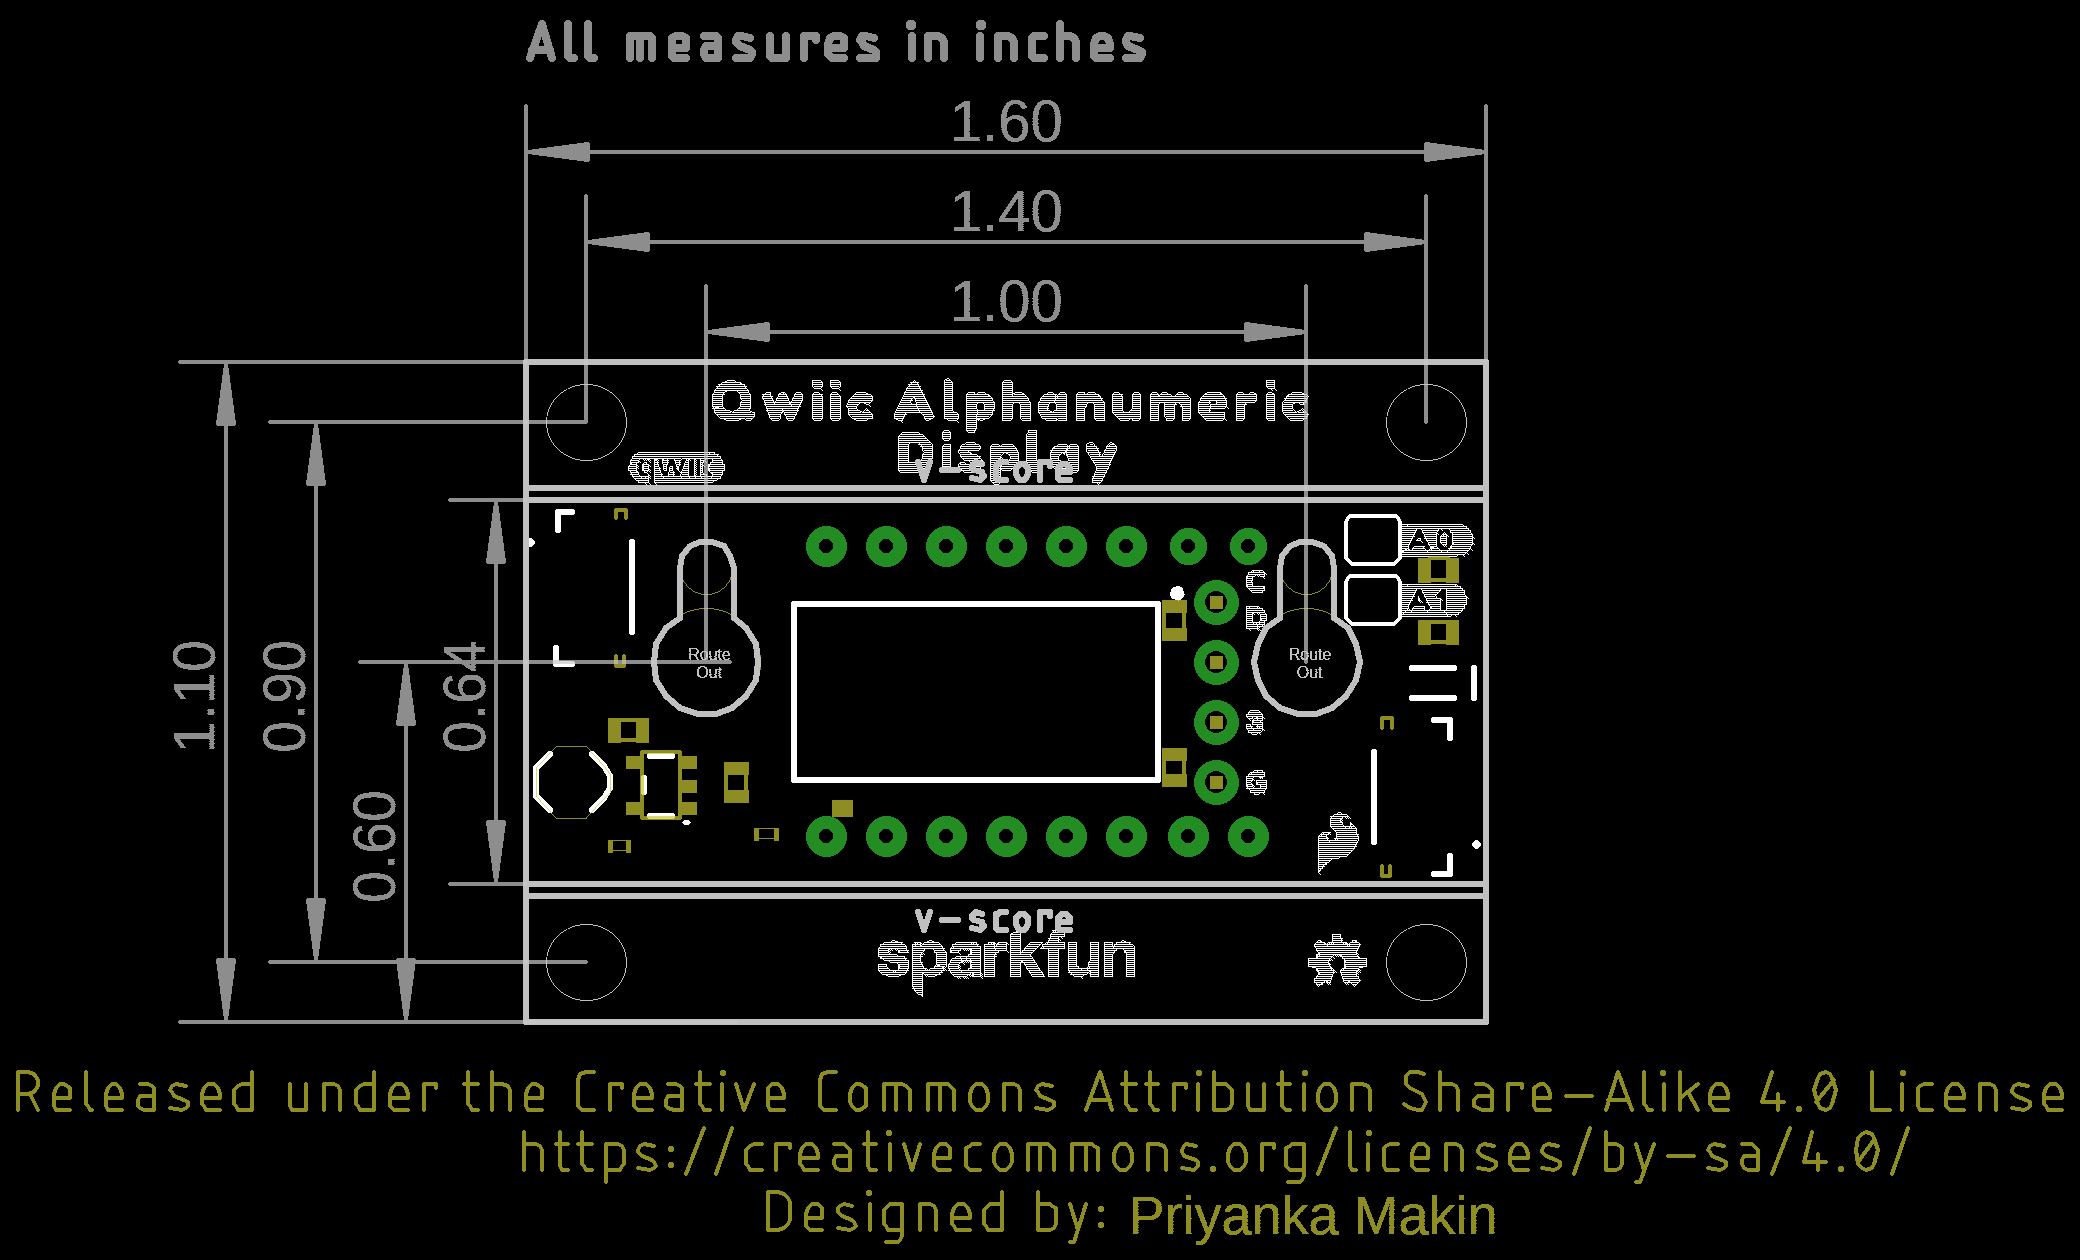
Board Outline
Each Alphanumeric Display Breakout board measures 1.6" x 1.1".
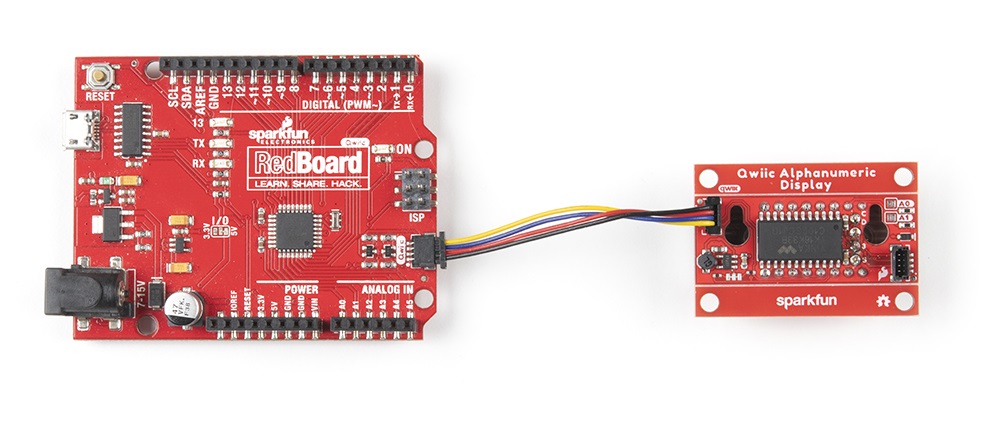
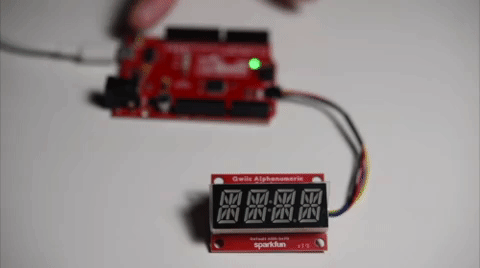
Hardware Hookup
Using the Qwiic system, assembling the hardware is a breeze. All you need to do is connect your SparkFun Qwiic Alphanumeric Display to your chosen development board with a Qwiic cable or adapter cable.
If you decide to use the PTH pins broken out on the display you will need to solder some headers to them. If you are not familiar with through-hole soldering take a look at this tutorial:
How to Solder: Through-Hole Soldering
With the display connected to your microcontroller it's time to get started using the SparkFun Alphanumeric Display Library!
Alphanumeric Display Arduino Library
Before we get started, we'll need to download and install SparkFun's Alphanumeric Display Arduino library. You can use the Arduino Library Manager by searching "SparkFun Alphanumeric Display" to automatically install. Or you can download the library and install it using the button below.
Before we get started developing a sketch, let's look at the available functions of the library.
bool setBrightness(uint8_t duty);--- This sets the brightness for all unitssetBrightnessSingle(uint8_t displayNumber, uint8_t duty);--- This sets the brightness for a single unitsetBlinkRate(float rate);--- Set the refresh rate for all units.setBlinkRateSingle(uint8_t displayNumber, float rate);--- Set the refresh rate for a single unitdisplayOn();--- Turn all display units ondisplayOff();--- Turn all display units offdisplayOnSingle(uint8_t displayNumber);--- Turn a single display unit ondisplayOffSingle(uint8_t displayNumber);--- Turn a single display unit offsetDisplayOnOff(uint8_t displayNumber, bool turnOnDisplay);--- Set or clear the display on/off bitenableSystemClock();--- Turn on the system oscillator for all displays on the I2C busdisableSystemClock();--- Turn off the system oscillator for all displays on the busenableSystemClockSingle(uint8_t displayNumber);--- Turn on the system oscillator for normal operation modedisableSystemClockSingle(uint8_t displayNumber);--- Turn off the system oscillator for standby modeilluminateSegment(uint8_t segment, uint8_t digit);--- Given a segment and a digit, set the matching bit within the RAM of the Holtek RAM setilluminateChar(uint16_t disp, uint8_t digit);--- Given a binary set of segments and a digit, store this data into the RAM arrayprintChar(uint8_t displayChar, uint8_t digit);--- Print a character, for a given digit, on displayupdateDisplay();--- Push the contents of displayRAM out to the various displays in 16 byte chunksdefineChar(uint8_t displayChar, uint16_t segmentsToTurnOn);--- Update the list to define a new segments display for a particular charactergetSegmentsToTurnOn (uint8_t charPos);--- Get the character map from the definition list or default tabledecimalOn();--- Turn the decimal on for all displays on busdecimalOff();--- Turn the decimal off for all displays on busdecimalOnSingle(uint8_t displayNumber);--- Turn the decimal point on for a single displaydecimalOffSingle(uint8_t displayNumber);--- Turn the decimal point off for a single displaysetDecimalOnOff(uint8_t displayNumber, bool turnOnDecimal);--- Set or clear the decimal on/off bitcolonOn();--- Turn the colon on for all displays on the buscolonOff();--- Turn the colon off for all displays on the buscolonOnSingle(uint8_t displayNumber);--- Turn the colon on for a single displaycolonOffSingle(uint8_t displayNumber);--- Turn the colon off for a single displaysetColonOnOff(uint8_t displayNumber, bool turnOnColon);--- Set or clear the colon on/off bitshiftRight(uint8_t shiftAmt = 1);--- Shift the display content to the right one digitshiftLeft(uint8_t shiftAmt = 1);--- Shift the display content to the left one digit
Arduino Examples - The Basics
Now that we have our library installed, we're ready to run some examples. The library currently comes with a set of 10 examples to get you started on your way. Let's look at the first few examples!
Example_01_PrintString
Once the library is installed, go ahead and open up File->Examples->SparkFun Qwiic Alphanumeric Display Library->Example_01_PrintString.
Alternatively, you can copy and paste the code below to a shiny new Arduino file:
    language:c
/*****************************************************************************************
 * This example tests illuminating whole 4 letter strings on the 14-segment display.
 *
 * Priyanka Makin @ SparkFun Electronics
 * Original Creation Date: February 3, 2020
 *
 * SparkFun labored with love to create this code. Feel like supporting open source hardware?
 * Buy a board from SparkFun! https://www.sparkfun.com/products/16391
 *
 * This code is Lemonadeware; if you see me (or any other SparkFun employee) at the
 * local, and you've found our code helpful, please buy us a round!
 *
 * Hardware Connections:
 * Attach Red Board to computer using micro-B USB cable.
 * Attach Qwiic Alphanumeric board to Red Board using Qwiic cable.
 *
 * Distributed as-is; no warranty is given.
 ****************************************************************************************/
#include <Wire.h>

#include <SparkFun_Alphanumeric_Display.h> //Click here to get the library: http://librarymanager/All#SparkFun_Qwiic_Alphanumeric_Display by SparkFun
HT16K33 display;

void setup()
{
  Serial.begin(115200);
  Serial.println("SparkFun Qwiic Alphanumeric - Example 1: Print String");

  Wire.begin(); //Join I2C bus

  if (display.begin() == false)
  {
    Serial.println("Device did not acknowledge! Freezing.");
    while (1);
  }
  Serial.println("Display acknowledged.");

  display.print("Milk");
}

void loop()
{
}
Once you have the code, make sure you've got the correct port selected, and then go ahead and click on the upload button. If all goes well, you'll see your Display light up with "Milk"!

Example_02_TurnOnOneSegment
This example lights up a single segment on the display. Head on back to your File Menu and open up File->Examples->SparkFun Qwiic Alphanumeric Display Library->Example_02_TurnOnOneSegment.
Alternatively, you can copy and paste the code below to a shiny new Arduino file:
language:c
/*******************************************************************************************
 * This example tests illuminating individual segments of the display. Pass in the segment
 * and digit you wish to illuminate to illuminateSegement().
 *
 * Priyanka Makin @ SparkFun Electronics
 * Original Creation Date: January 31, 2020
 *
 * SparkFun labored with love to create this code. Feel like supporting open source hardware?
 * Buy a board from SparkFun! https://www.sparkfun.com/products/16391
 *
 * This code is Lemonadeware; if you see me (or any other SparkFun employee) at the
 * local, and you've found our code helpful, please buy us a round!
 *
 * Hardware Connections:
 * Attach Red Board to computer using micro-B USB cable.
 * Attach Qwiic Alphanumeric board to Red Board using Qwiic cable.
 *
 * Distributed as-is; no warranty is given.
 *****************************************************************************************/
#include <Wire.h>

#include <SparkFun_Alphanumeric_Display.h>  //Click here to get the library: http://librarymanager/All#SparkFun_Qwiic_Alphanumeric_Display by SparkFun
HT16K33 display;

void setup()
{
  Serial.begin(115200);
  Serial.println("SparkFun Qwiic Alphanumeric - Example 2: Turn On One Segment");
  Wire.begin(); //Join I2C bus

  //check if display will acknowledge
  if (display.begin() == false)
  {
    Serial.println("Device did not acknowledge! Freezing.");
    while(1);
  }
  Serial.println("Display acknowledged.");

  display.illuminateSegment('A', 0);
  display.illuminateSegment('L', 1);
  display.illuminateSegment('I', 2);
  display.illuminateSegment('G', 3);
  display.updateDisplay();
}

void loop()
{
}
As before, once you have the code, make sure you've got the correct port selected, and then go ahead and click on the upload button. You won't need your serial monitor for this one though, unless you want it. If all goes well, you should see your display light up like so:
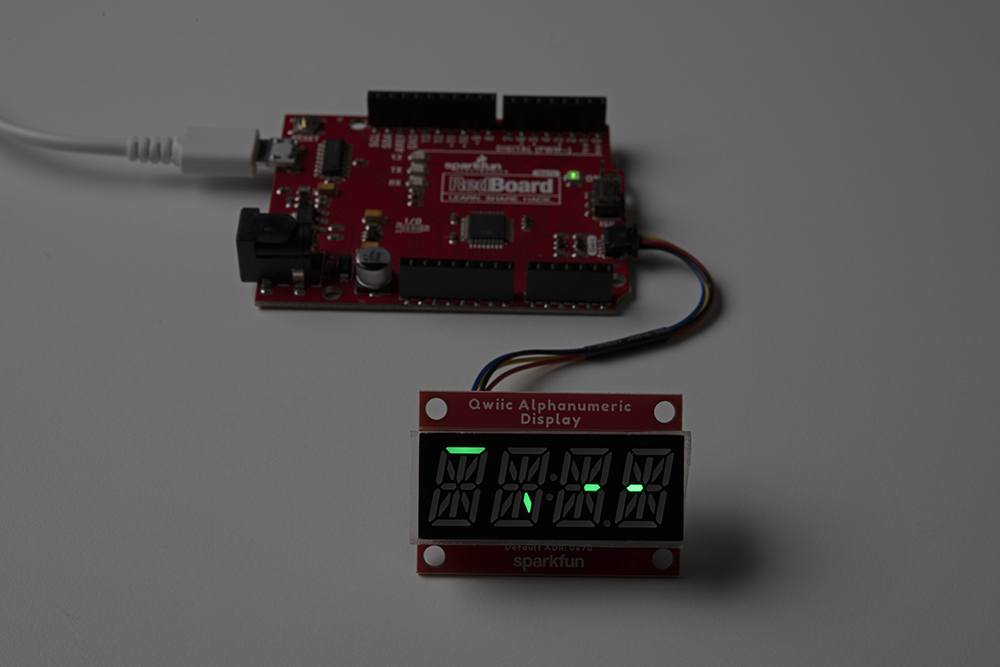
It looks weird, but it's one segment of each letter lit up.
Example_03_PrintChar
Let's print some stuff! Grab Example 3 by going to File->Examples->SparkFun Qwiic Alphanumeric Display Library->Example_03_PrintChar.
Alternatively, you can copy and paste the code below to a shiny new Arduino file:
language:c
/*****************************************************************************************
 * This example tests illuminating whole characters on the 14-segment display.
 *
 * Priyanka Makin @ SparkFun Electronics
 * Original Creation Date: February 3, 2020
 *
 * SparkFun labored with love to create this code. Feel like supporting open source hardware?
 * Buy a board from SparkFun! https://www.sparkfun.com/products/16391
 *
 * This code is Lemonadeware; if you see me (or any other SparkFun employee) at the
 * local, and you've found our code helpful, please buy us a round!
 *
 * Hardware Connections:
 * Attach Red Board to computer using micro-B USB cable.
 * Attach Qwiic Alphanumeric board to Red Board using Qwiic cable.
 *
 * Distributed as-is; no warranty is given.
 *****************************************************************************************/
#include <Wire.h>

#include <SparkFun_Alphanumeric_Display.h>  //Click here to get the library: http://librarymanager/All#SparkFun_Qwiic_Alphanumeric_Display by SparkFun
HT16K33 display;

void setup()
{
  Serial.begin(115200);
  Serial.println("SparkFun Qwiic Alphanumeric - Example 3: Print Character");
  Wire.begin(); //Join I2C bus

  //check if display will acknowledge
  if (display.begin() == false)
  {
    Serial.println("Device did not acknowledge! Freezing.");
    while(1);
  }
  Serial.println("Display acknowledged.");

  display.printChar('W', 0);
  display.printChar('H', 1);
  display.printChar('A', 2);
  display.printChar('T', 3);

  display.updateDisplay();
}

void loop(){
}
Check your port, and then click on the upload button. Voila! Are you starting to get the picture?
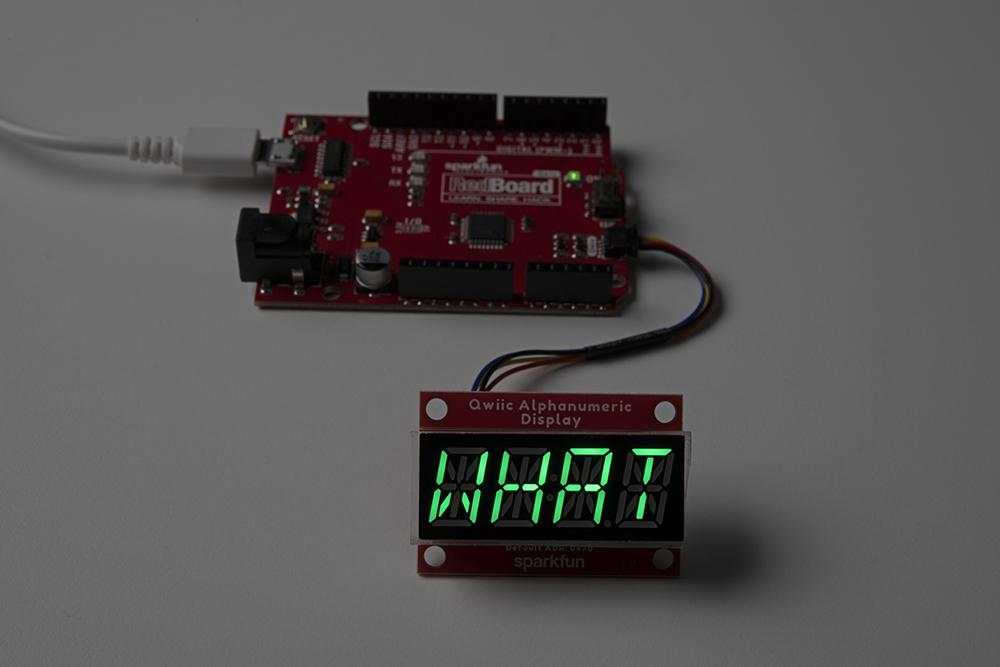
This is just the beginning - there are more examples to get you going with your SparkFun Qwiic Alphanumeric Display. We won't go through them all here, but feel free to tinker with these to see what all you can come up with!
If you haven't downloaded the library yet, get it either here or by clicking on the link below and get hackin!
Arduino Examples - The Fun Stuff
Okay. You got the basics done - you can light up segments, yes? Now lets do a couple of fun things!
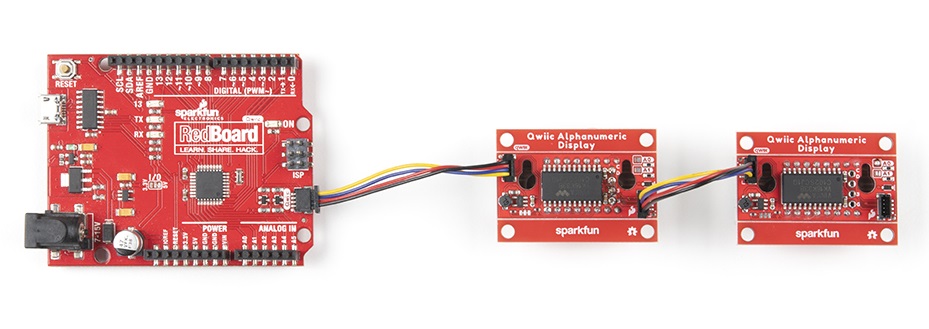
Example_08_MultiDisplay
This example tests printing across multiple displays. In order to make this example work, you'll need to do some soldering on the jumpers on the back of the board. For this example, we'll use 0x70 and 0x71 as the addresses, so the jumpers for the second display should look like this:

Once your jumper is soldered, go ahead and hook your boards together with your Qwiic cables and plug em on into your RedBoard.
Once your hardware is ready to go, head back to your File Menu and open up File->Examples->SparkFun Qwiic Alphanumeric Display Library->Example_08_MultiDisplay.
Alternatively, you can copy and paste the code below to a shiny new Arduino file:
language:c
/**************************************************************************************
 * This example tests printing across multiple alpha displays.
 *
 * Priyanka Makin @ SparkFun Electronics
 * Original Creation Date: February 26, 2020
 *
 * SparkFun labored with love to create this code. Feel like supporting open source hardware?
 * Buy a board from SparkFun! https://www.sparkfun.com/products/16391
 *
 * This code is Lemonadeware; if you see me (or any other SparkFun employee) at the
 * local, and you've found our code helpful, please buy us a round!
 *
 * Hardware Connections:
 * Attach Red Board to computer using micro-B USB cable.
 * Attach Qwiic Alphanumeric board to Red Board using Qwiic cable.
 *  Don't close any of the address jumpers so that it defaults to address 0x70.
 * Attach a second Alphanumeric display using Qwiic cable.
 *  Close address jumper A0 so that this display's address become 0x71.
 *
 * Distributed as-is; no warranty is given.
 *****************************************************************************************/
#include <Wire.h>

#include <SparkFun_Alphanumeric_Display.h>  //Click here to get the library: http://librarymanager/All#SparkFun_Qwiic_Alphanumeric_Display by SparkFun
HT16K33 display;

void setup() {
  Serial.begin(115200);
  Serial.println("SparkFun Qwiic Alphanumeric - Example 8: Multi Display");
  Wire.begin(); //Join I2C bus

  //check if displays will acknowledge
  //The first address in the begin() function should be the left-most display, traveling to the right from there
  //This is how the string will print across displays, reading from left to right.
  if (display.begin(0x70, 0x71) == false)
  {
    Serial.println("Device did not acknowledge! Freezing.");
    while(1);
  }
  Serial.println("Displays acknowledged.");

  display.print("Get Milk");
}

void loop()
{
}
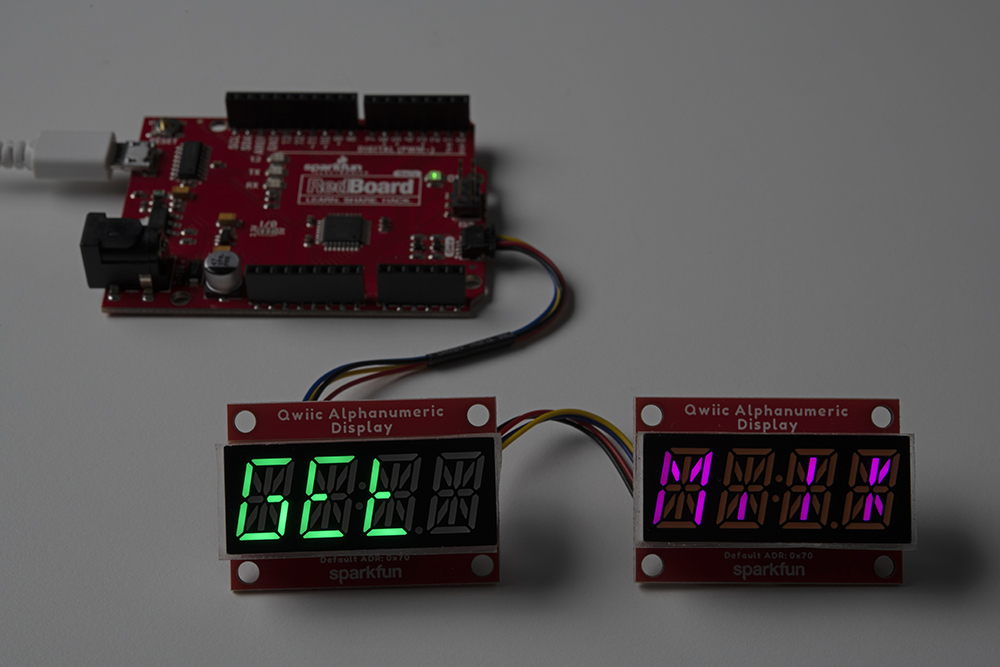
Once you've got your code, make sure you've got the correct port selected, and then go ahead and click on the upload button. You should see the following:
Example_09_ScrollingString
This example SCROLLS! Let's start by plugging your Alphanumeric board into your RedBoard with your handy dandy Qwiic cables.
Once your hardware is ready to go, head back to your File Menu and open up File->Examples->SparkFun Qwiic Alphanumeric Display Library->Example_09_ScrollingString.
Alternatively, you can copy and paste the code below to a shiny new Arduino file:
language:c
/**************************************************************************************
 * This example tests scrolling functionality of alphanumeric displays.
 *
 * Priyanka Makin @ SparkFun Electronics
 * Original Creation Date: February 26, 2020
 *
 * SparkFun labored with love to create this code. Feel like supporting open source hardware?
 * Buy a board from SparkFun! https://www.sparkfun.com/products/16391
 *
 * This code is Lemonadeware; if you see me (or any other SparkFun employee) at the
 * local, and you've found our code helpful, please buy us a round!
 *
 * Hardware Connections:
 * Attach Red Board to computer using micro-B USB cable.
 * Attach Qwiic Alphanumeric board to Red Board using Qwiic cable.
 *  Don't close any of the address jumpers so that it defaults to address 0x70.
 * Attach a second Alphanumeric display using Qwiic cable.
 *  Close address jumper A0 so that this display's address become 0x71.
 *
 * Distributed as-is; no warranty is given.
 *****************************************************************************************/
#include <Wire.h>

#include <SparkFun_Alphanumeric_Display.h>  //Click here to get the library: http://librarymanager/All#SparkFun_Qwiic_Alphanumeric_Display by SparkFun
HT16K33 display;

void setup() {
  Serial.begin(115200);
  Serial.println("SparkFun Qwiic Alphanumeric - Example 9: Scrolling String");
  Wire.begin(); //Join I2C bus

  //check if displays will acknowledge
  if (display.begin(0x70) == false)
  {
    Serial.println("Device did not acknowledge! Freezing.");
    while(1);
  }
  Serial.println("Display acknowledged.");

  display.print("MILK");
}

void loop()
{
  delay(300);
  display.shiftLeft();
  //Alternatively - you could also shift the string to the right
  //display.shiftRight();
}
Once you've got your code, make sure you've got the correct port selected, and then go ahead and click on the upload button. You should see the following:
Troubleshooting
If you need technical assistance and more information on a product that is not working as you expected, we recommend heading on over to the SparkFun Technical Assistance page for some initial troubleshooting.
If you don't find what you need there, the SparkFun Forums are a great place to find and ask for help. If this is your first visit, you'll need to create a Forum Account to search product forums and post questions.
Resources and Going Further
Congratulations! Now that you've got your Alphanumeric Display(s) up and running, you can hack that boring ol' microwave message with something more "fool" proof! YES!
If you want or need information on your Alphanumeric Display, check out some of the resources below:
- Schematic
- Eagle Files
- Board Dimensions
- Datasheet (VK16K33)
- Qwiic Info Page
- Arduino Library
- GitHub Hardware Repo
Need inspiration? Check out some of these Qwiic related tutorials: