SparkFun Indoor Air Quality Sensor - ENS160 (Qwiic) Hookup Guide
Contributors:
Ell C
Example 1: Basic Readings
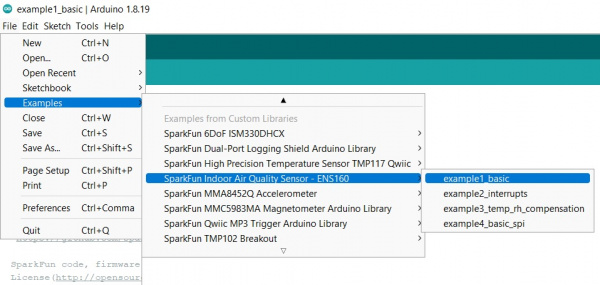
Once the library is installed, go ahead and open up File->Examples->SparkFun Indoor Air Quality Sensor - ENS160->example1_basic. Make sure to select your board (SparkFun RedBoard) and COM port before hitting upload to begin experimenting with the air quality sensor.
Alternatively, you can copy and paste the code below to a shiny new Arduino file:
language:c
/* example1_basic.ino

 This example shows basic data retrieval from the SparkFun Indoor Air Quality Sensor - ENS160.

 Written by:
    Elias Santistevan @ SparkFun Electronics October, 2022

 Product:
  https://www.sparkfun.com/products/20844

 Repository:
    https://github.com/sparkfun/SparkFun_Indoor_Air_Quality_Sensor-ENS160_Arduino_Library

 SparkFun code, firmware, and software is released under the MIT
 License(http://opensource.org/licenses/MIT).

*/
#include <Wire.h>
#include "SparkFun_ENS160.h"

SparkFun_ENS160 myENS;


void setup()
{
    Wire.begin();

    Serial.begin(115200);

    if( !myENS.begin() )
    {
        Serial.println("Did not begin.");
        while(1);
    }

    if( myENS.setOperatingMode(0xF0) )
        Serial.println("Ready.");

    delay(100);

    myENS.setOperatingMode(0x02);

    if( myENS.checkOperationMode() )
        Serial.println("Running.");

}

void loop()
{
    if( myENS.checkDataStatus() )
    {
        Serial.print("Air Quality Index (1-5) : ");
        Serial.println(myENS.getAQI());

        Serial.print("Total Volatile Organic Compounds: ");
        Serial.print(myENS.getTVOC());
        Serial.println("ppb");

        Serial.print("CO2 concentration: ");
        Serial.print(myENS.getECO2());
        Serial.println("ppm");
    }

    delay(200);
}
Once you've got your code uploaded, open up a Serial Monitor and check out your output. In the example below, you can see where the board gave me baselines, then readings from my breath. Maybe I should've held off on that peanut butter toast...

