SparkFun Clock Generator 5P49V60 (Qwiic) Hookup Guide
Example 1: Generate a Clock Signal
The first example demonstrates the very basics of the SparkFun Clock Generator: how to generate a clock signal. With the Arduino library installed, click on File > Examples > SparkFun Clock 5P49V60 Arduino Library > Example1_generate clock to follow along with this example. At the top of the example code, the correct library is imported and the microcontroller connects to the SparkFun Clock Generator over the default I2C address: 0x6A.
language:c
#include <Wire.h>
#include "SparkFun_5P49V60.h"

// Uses default address at 0x6A, alternate available at 0x68
SparkFun_5P49V60 clockGen;

void setup(){

  Wire.begin();
  Serial.begin(115200);

  if (clockGen.begin() == true){
    Serial.println("Clock Generator Ready.");
  }
  else {
    Serial.println("Could not communicate with the SparkFun Clock Generator.");
    while(1);
  }
After connecting to the SparkFun Clock Generator, the internal clock frequency of the voltage controlled oscillator is set to 1600MHz (1.6GHz). This frequency can then be fed to the frequency output dividers of the clock outputs. This is done with clockGen.muxPlltoFodOne() which tells the IC to send the VCO frequency to the frequency output divider of clock one. Next the output mode is set to LVPECL_MODE (low voltage positive emitter coupled logic) with clockGen.clockOneConfigMode(LVPECL_MODE).
language:c
  // Fist, Setting the internal oscillator to a known value.
  Serial.println("Setting Internal Clock Frequency to 1600MHz.");
  clockGen.setVcoFrequency(1600.0); // Give float value in MHz.

  // Clock One -----------------------------------------------------
  // Use internal phase lock loop for clock output calculation.
  clockGen.muxPllToFodOne();
  Serial.println("Setting Output Mode to LVPECL.");
  // There are many OUTPUT modes available for each clock - this example uses
  // LVPECL (Low voltage Positive Emitter Coupled Logic) mode.
  clockGen.clockOneConfigMode(LVPECL_MODE);
Finally, the frequency is set to 16MHz by giving a float value of 16.0 to the clockGen.setClockOneFreq() function.
language:c
  Serial.println("Setting Clock One Frequency to 16MHz.");
  clockGen.setClockOneFreq(16.0); // Give float value in MHz, 16.0 = 16000000Hz or 16MHz
  // --------------------------------------------------------------

}

void loop(){

  delay(1000);

}
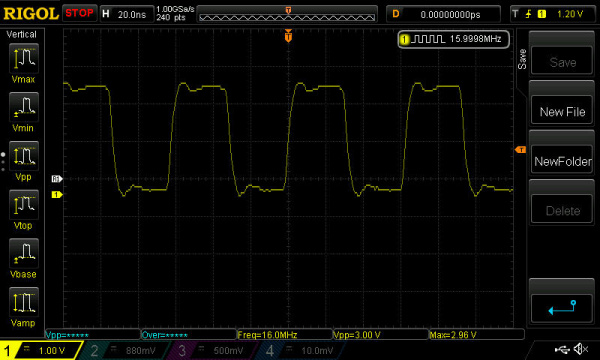
If you have not already, make sure to select the board (in this case the Arduino/Genuino Uno) and COM port. Then hit the upload button. Connecting the output to an oscilloscope, you should see a waveform similar to the output below when in LVPECL mode. If you decide to use a different mode, make sure to adjust the parameter in clockGen.clockOneConfigMode() and its hardware termination.
