SparkFun Blocks for Intel® Edison - ADC V20
 SFUptownMaker,
  HelloTechie,
  CaseyTheRobot
C++ Code Examples
We're assuming that you're using the Eclipse IDE as detailed in our Beyond Arduino tutorial. If you aren't, you'll need to go to that tutorial to get up to speed.
Getting Started
Follow the instructions in the programming tutorial to create a new project named "SparkFun_ADC_Edison_Block_Example". Once you've created the project, open the project files on disk (hint: you can find the path to the project by choosing "Properites" from the project menu) and copy the three source files found in the Edison ADC Block CPP library GitHub repository into the "src" directory.
Hardware Connection
For this example, we've just got two 5k potentiometers connected between 3.3V and GND, with the wipers connected to channels 0 and 1.
V20 of the board adds a 3.3V reference supply (capable of sourcing up to 150mA, so it can power small sensors directly!).
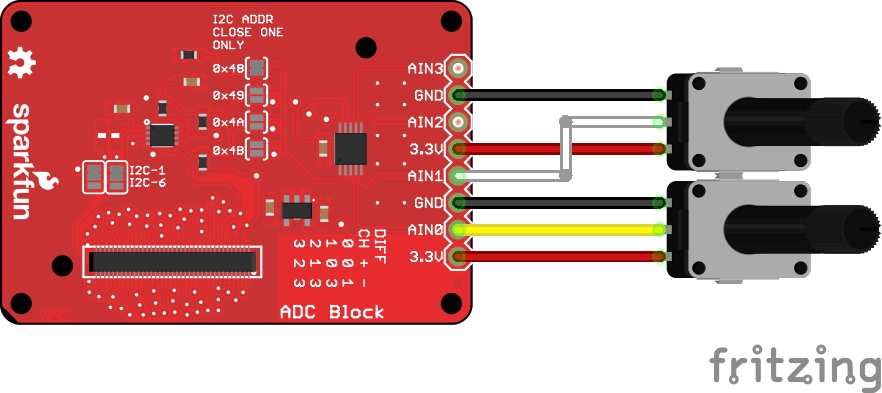
Of course, you can connect any other analog voltage signal in place of the potentiometers; we're using them because they're convenient to demonstrate the concepts.
Code
Everything you need to know is in the comments.
language:cplusplus
/****************************************************************
Example file for SparkFun ADC Edison Block Support

1 Jun 2015- Mike Hord, SparkFun Electronics
Code developed in Intel's Eclipse IOT-DK

This code requires the Intel mraa library to function; for more
information see https://github.com/intel-iot-devkit/mraa

This code is beerware; if you use it, please buy me (or any other
SparkFun employee) a cold beverage next time you run into one of
us at the local.
****************************************************************/

#include "mraa.hpp"

#include <iostream>
#include <unistd.h>
#include "SparkFunADS1015.h"

using namespace std;

// Declare a variable for our i2c object. You can create an
//  arbitrary number of these, and pass them to however many
//  slave devices you wish.
mraa::I2c* adc_i2c;

int main()
{
    // The ADC is (by default) connected to I2C channel 1. Here, we create
    //  a device to pass to the ads1015 object constructor.
    adc_i2c = new mraa::I2c(1);

    // Now, pass that I2C object and the address of the ADC block in your
    //  system to the ads1015 object constructor. Note that there are up to
    //  four different addresses available here, settable by jumper on the
    //  board. You'll need to create an ads1015 object for each one.
    ads1015 adc(adc_i2c, 0x48);

    // There are 6 settable ranges:
    //  _0_256V - Range is -0.256V to 0.255875V, and step size is 125uV.
    //  _0_512V - Range is -0.512V to 0.51175V, and step size is 250uV.
    //  _1_024V - Range is -1.024V to 1.0235V, and step size is 500uV.
    //  _2_048V - Range is -2.048V to 2.047V, and step size is 1mV.
    //  _4_096V - Range is -4.096V to 4.094V, and step size is 2mV.
    //  _6_144V - Range is -6.144V to 6.141V, and step size is 3mV.
    // The default setting is _2_048V.
    // NB!!! Just because FS reading is > 3.3V doesn't mean you can take an
    //  input above 3.3V! Keep your input voltages below 3.3V to avoid damage!
    adc.setRange(_0_512V);
    // getResult() returns a normalized floating point value representing the
    //  current voltage of the passed channel. User is responsible for
    //  logic to determine whether the value is at min or max.
    cout<<"Ch 0: "<<adc.getResult(0)<<endl;
    cout<<"Ch 1: "<<adc.getResult(1)<<endl;
    // getDiffResult() returns a normalized fp value representing the
    //  difference between two channels. Options are
    //  0 - Ch0 - Ch1
    //  1 - Ch0 - Ch3
    //  2 - Ch1 - Ch3
    //  3 - Ch2 - Ch3
    cout<<"Ch 0 - ch 1: "<<adc.getDiffResult(0)<<endl;

    // If you want to do the math yourself, you can determine the current gain
    //  setting by using the getScaler() command.
    cout<<"Current scaler: "<<adc.getScaler()<<"V per bit"<<endl;
    // The current voltage is the scaler/1000 multiplied by the raw value. You
    //  can get the raw ADC readings using the getRawResult() and
    //  getRawDiffResult() functions.
    cout<<"Ch 0 raw: "<<adc.getRawResult(0)<<endl;
    cout<<"Ch 1 raw: "<<adc.getRawResult(1)<<endl;
    cout<<"Ch 0 - ch 1 raw: "<<adc.getRawDiffResult(0)<<endl;

    // If you want to get *really* crazy, you can always go look up the
    //  datasheet and read and write the configuration register directly.
    cout<<"Config register: "<<hex<<adc.getConfigRegister()<<endl;
    // There's a "setConfigRegister()" function, too, which expects an
    //  unsigned 16-bit integer. Just FYI.

    return MRAA_SUCCESS;
}