Programming the Intel® Edison: Beyond the Arduino IDE
 SFUptownMaker
Introduction
The majority of content in the wild for the Intel Edison seems to be focused on using the Edison while it is attached to the Arduino-compatible development board. With the release of the SparkFun Block line for the Edison, it becomes practical to use far less hardware to access the resources of the Edison.
This tutorial will show you how to write C++ code for the Edison without using the Arduino IDE or making the assumption that the Edison is mounted to an Arduino development board.
Components Used
We're going to do this fairly minimally; we're going to demonstrate the Edison's most basic functionality without involving any fancy hardware. You'll find more examples involving hardware in tutorials for individual blocks.
- Intel Edison Starter Pack - You'll need the Console Block at a minimum to get your Edison onto your local WiFi network.
- Intel Edison Base Block (optional) - You may find that the latency of your WiFi network is unacceptable; in that case, you can connect to the OTG port on the Base Block to access the Edison via a USB RNDIS network interface. This is a highly recommended upgrade, however, as it will allow you to upgrade the flash image on the Edison to the latest version.
- Edison Hardware Kit - One will be enough to make the Edison/Console/GPIO stack.
Recommended Reading
Writing code for the Edison without using the Arduino IDE is an advanced topic; we're going to assume that you're conversant in at least basic Linux command line syntax and C++ syntax.
- Getting Started with the Edison - Getting the Edison powered up, connected to your network, and getting to the command line. Also updating the firmware, which is recommended before proceeding but not mandatory.
- General Edison Block Guide - Just what it says. This will give you some help understanding how to put the stack together and avoid inter-block conflicts.
- Console Block Hookup Guide - More information on the Console Block.
Toolchain: Eclipse
There are two approaches to writing C++ code on the Edison: Using the Eclipse IDE that Intel provides or going barebones using GCC and a command line directly on the Edison.
Using the Eclipse Environment
Intel has provided a version of Eclipse for Windows, Linux, and MacOS.
Go ahead and download the appropriate file. You'll find that it's a compressed archive (either .7z or .bz2); there's no actual installation process. Just extract the file some place reasonable and run the devkit-launcher script in the extracted directory to launch Eclipse.
Super important note for Windows users: before you can launch Eclipse, you'll need to open that script and make the following change:
Find this line:
java -version 2>&1 | find "64-Bit" >nul:
and change it to:
java -version 2>&1 | C:\Windows\System32\find "64-Bit" >nul:
Once you've installed it and launched it, come back here and we'll walk through connecting the Edison to the IDE and loading an example program.
Starting with Eclipse
The first time you launch Eclipse, you'll see this window:
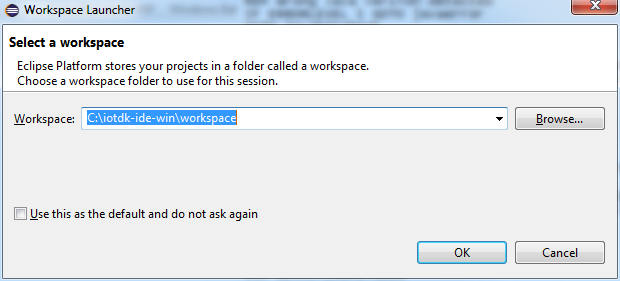
You can choose any folder you like; it doesn't really matter. I keep mine on Dropbox. I also clicked the "Use this as the default and do not ask again" checkbox; I like to keep my projects in one place and please don't hassle me about it. Note, however, that this doesn't mean you can't store individual projects elsewhere, just that Eclipse will assume this is where you want stuff stored and not ask.
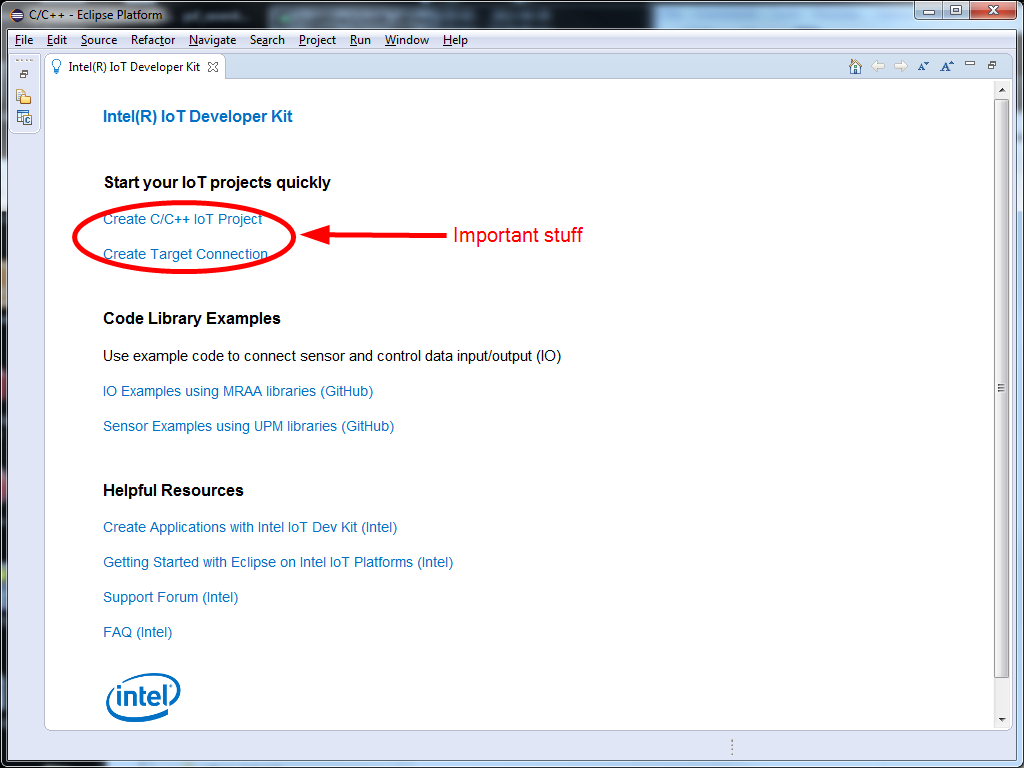
After you click okay, you'll see this startup screen. This only comes up the very first time you run Eclipse, as far as I can tell; I haven't been able to find it again at any rate.
The circled links are the important ones. First, we'll create our link to the Edison, and then start a new project. Click the "Create Target Connection" link, to bring up this dialog:
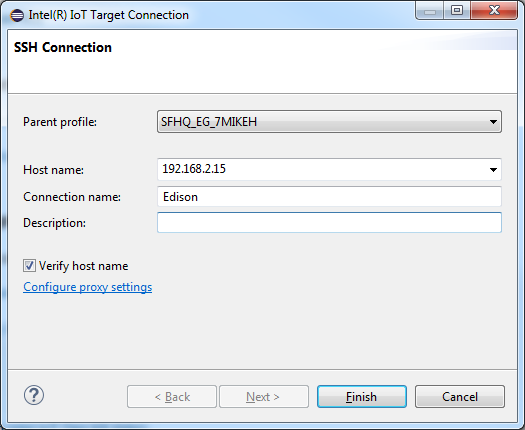
"Parent profile:" will vary for you, depending on the name of the computer you're on. Don't worry about it.
"Host name:" should be the IP address of your Edison. If you don't know what that is go to the Edison Getting Started Guide and follow the instructions there to get your Edison networked with your development computer. 192.168.2.15 is the default address for connections via the USB-OTG port.
"Connection name:" needs to be set to Edison. This is important.
Click finish, then click the "Create C/C++ IoT Project" link on the startup page.
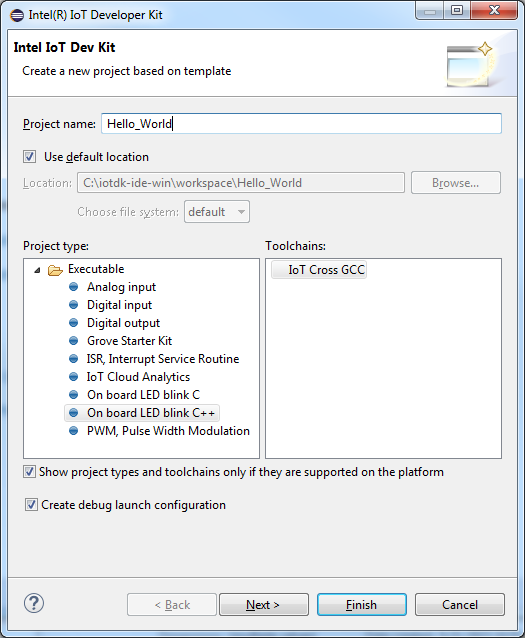
This window pops up; notice that the location is pre-filled with the workspace folder you selected earlier. "Project type" is (relatively) unimportant; it determines what sort of code will be present when the project launches. Let's start with "On board LED blink C++", and name the project "Hello_World". Click "Finish" to have the IDE copy over the files and set up the environment.
Toolchain: Command Line
I like to use the command line, myself; it gives me more options for my editor of choice and generally runs more lightly on my system than Eclipse. Here's how to get there.
Most of the toolchain is installed on the Edison already: GCC, make, and vi come with the install. Yes, vi, not vim, and no, there's no other option. I do my editing on the PC and then push the files over to the Edison via SCP or rsync for compilation.
If you're like me, the thought of editing code remotely through vi makes you cringe. The version of vi on the Edison is so simple, it doesn't support split frames or most types of search and replace. So, you'll need some way to push the files up to your Edison once you've created them on a development computer.
rsync
The cross-platform option is rsync. It should be on your Mac or Linux computer already, and it can be found for Windows, if you find using Cygwin an acceptable practice.
I'm not going to go into the use of rsync here; it's been covered extensively elsewhere, and its use with Edison is straightforward.
WinSCP
WinSCP is a Windows-only program that offers update-on-change synchronization over SCP. I've used it extensively, and it's generally pretty good at detecting and keeping your files updated. The downside is that it requires the timebases of the two systems to be fairly synchronized, so you'll need to make sure that Edison's NTP is set up properly for your timezone (hint: /usr/share/timeinfo has many locality files; copy the best one for you over the /etc/localtime file, and use the sync command to force a time update.

Hello, world!
Now it's time to try the classic "Hello, world!" program (not the classic "blinkenlight" one) in both Eclipse and via the command line.
Eclipse
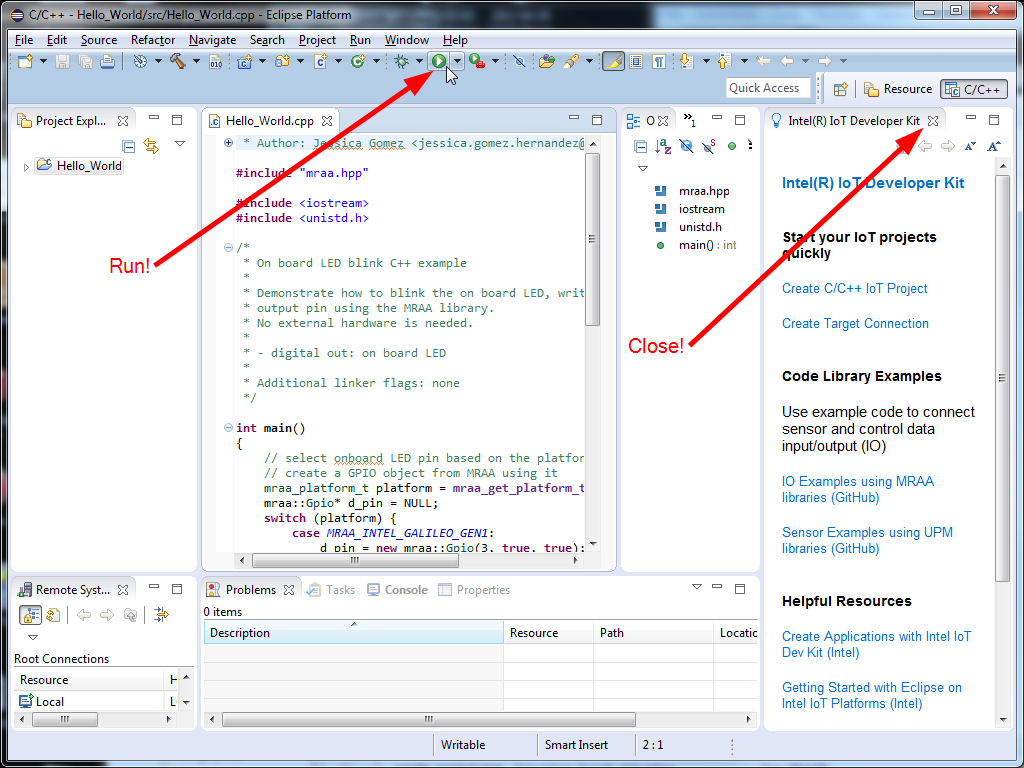
Close that "IoT Developer Kit" frame on the right. It's really just clogging up the works.
Click the "Run" button on the screen that's popped up, and you should be asked to provide login credentials. If not, you're probably not connected and you should go back to the Edison Getting Started Guide and follow the instructions there to get your Edison networked with your development computer. Otherwise, it should build and then deploy on the Edison; you'll know because you'll see some action on the console at the bottom of the screen:
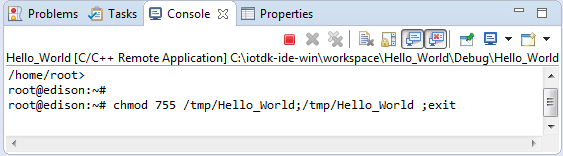
As you can see, this is essentially just a command prompt that you don't have control over. Under the hood, the IDE copied your executable over to the Edison, then launched this shell and ran the program.
If you've got hardware capable of doing it, you've got a blinking LED someplace. Of course, since we're not making the assumption that you have the appropriate hardware, let's change things so we can see something on the console.
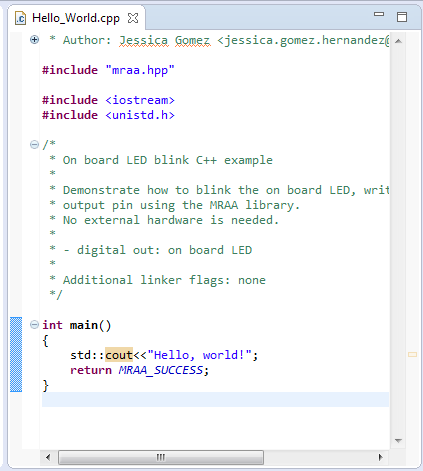
Go ahead and delete everything in the main() function, except the return statement. Now, let's add a simple print statement:
Click that "Run" button again and marvel at the simplicity of--
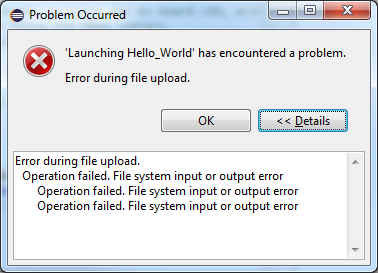
Wait, what?
"Error during file upload." Sounds bad, doesn't it? Oddly enough, the IDE can't (or doesn't) remove or replace the remote binary before trying to copy the new one over; you've got to do that yourself. Fortunately, it's pretty easy to run a terminal window within the IDE so you can do this delete every time you build.
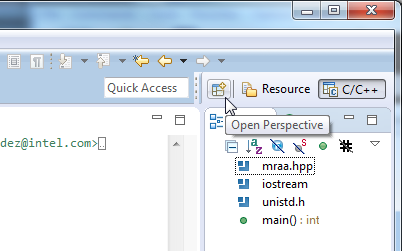
In the upper right corner, click the "Open Perspective" button.
You'll get this dialog box:
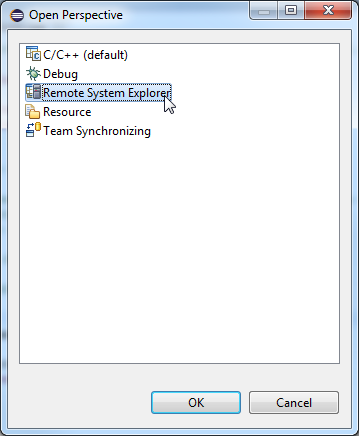
Select "Remote System Explorer" and hit OK.

The "Remote System Explorer" lets you change and view the settings of, well, the remote systems (in this case, the Edison). Right click the "Ssh Terminals" entry and choose "Launch Terminal".
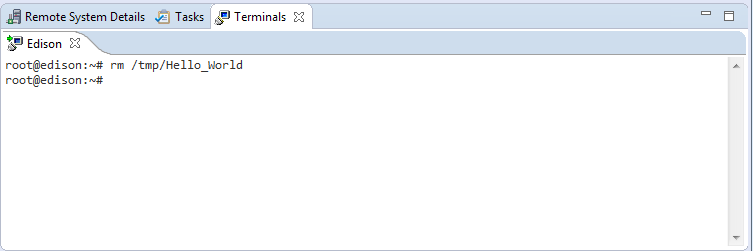
Here's a terminal for you! It's logged in with the credentials you provided earlier (or, if you elected to not retain the login settings, with the credentials you supply upon opening it). Delete the executable with the command shown above. Of course, you'll need to change the name of the file if your project isn't called "Hello_World".
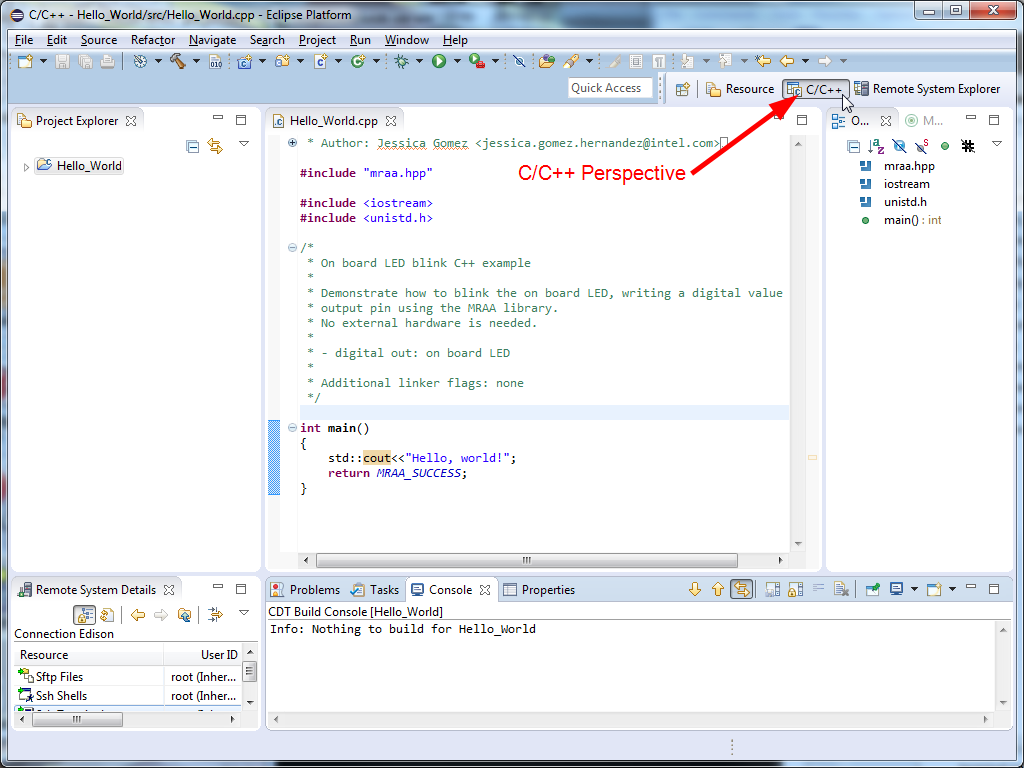
Change the "perspective" (see image above) back to C/C++; if you want to access that terminal again, you can go back to the Remote System Explorer perspective with the button next to the "C/C++" button.
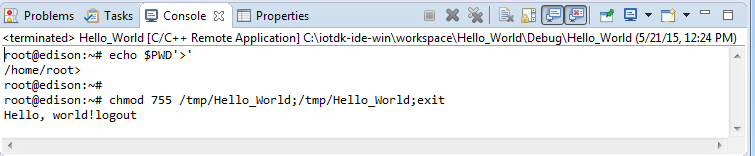
Click that "Run" button again and you'll see the console fill up again. That spurious "logout" at then end of the output is caused by the IDE closing that shell.
Starting your next project
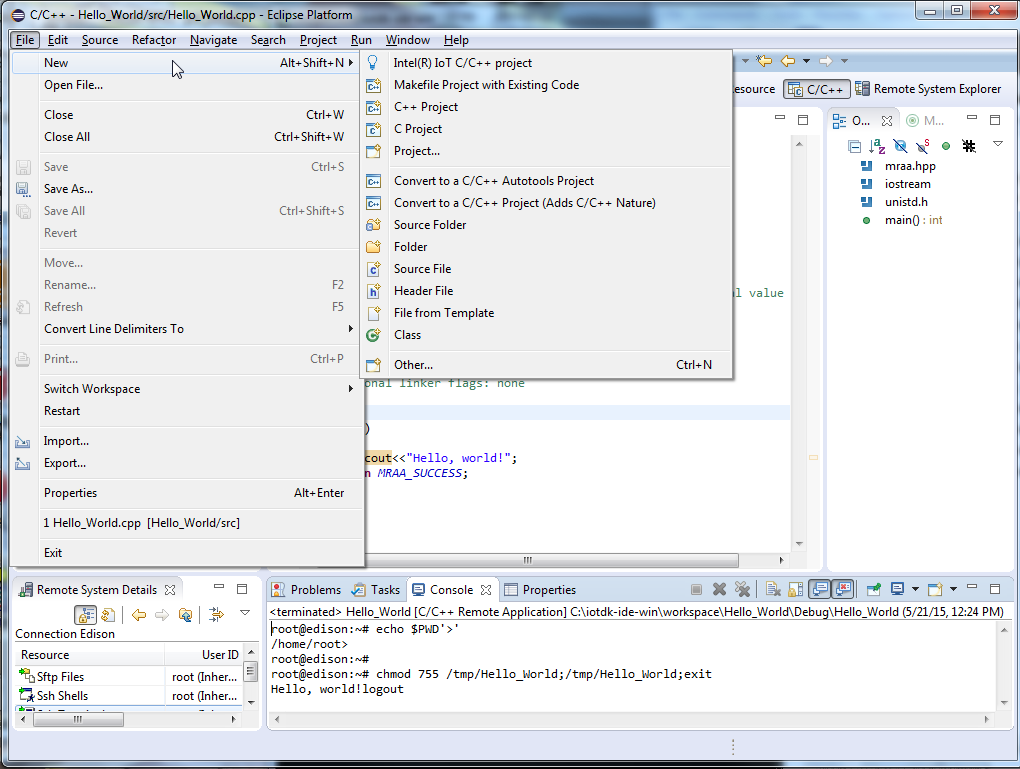
To make your next project, use the "Intel(R) IoT C/C++ project" from the "New" submenu under the "File" menu. Rinse, repeat as needed.
Console
The process for the console is much easier; in fact, in general, when working with smaller programs on the Edison, doing things over the console is the easier path. Larger projects may become unwieldy, and, in that case, Eclipse probably has the upper hand.
The code for the program is the same; in fact, if you already did the Eclipse project above, you can just copy that file over to the Edison using your favorite file copy method.
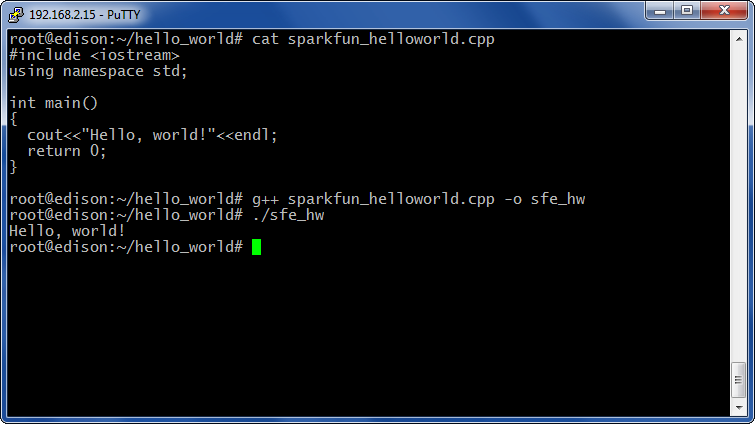
You can see that the contents of the file are the same. On the command line, I invoked g++, and then executed the binary it produced.
For smaller files, that's fine, but what about more complex projects? That's where Cmake comes in. Cmake uses a fairly simple syntax to determine how to build and link multiple files and libraries into one project. It then generates a make file that can be run to do the actual build. I'm not going to delve too deeply into Cmake here; I'll reserve that topic for a later tutorial.
Resources and Going Further
That should get you started on writing programs in C++ for the Edison, without relying on the Arduino IDE. In later tutorials, we'll cover Python, JavaScript, and other options for getting the Edison to do what you want.
Here are some other resources you might find useful for this topic from around the web:
- libmraa - libmraa is Intel's highly structured framework for IoT hardware platforms. At the moment, it supports Edison, Galileo, Minnow, and Raspberry Pi B.
- cmake - CMake is a cross-platform utility used to build projects. libmraa uses it.
- userland - A useful treatise on the subtleties of living in a command-line world.
Check out these other Edison related tutorials from SparkFun: