Simon Splosion Wireless
 bri_huang
Hacking the Simon Says Board
Now you're ready to start reprogramming your Simon.
A while back, we created a tutorial around tweaking the Simon Says board- https://www.sparkfun.com/tutorials/203. The images are of an older version but the experiments and documentation are all applicable to the current version of the Simon. You will also find example experiments to play around with here.
To help you out with hacking into the Simon Says board, here are a few notes about the LEDs, buttons, and the buzzer on the Plated Through Hole (PTH) Simon:
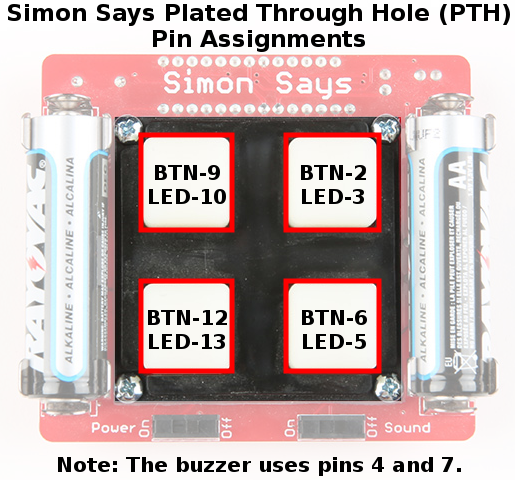
Pins 4 and 7 are tied to the buzzer. To use the tone() command, set both pin 4 and pin 7 as OUTPUTs, start with a digitalWrite(7, LOW), and use tone(4, freq); to drive the buzzer.
If you happened to get the SMD version of the Simon, the pin assignments are a little different. Here are the pin-outs for the LEDs and buttons on the Surface Mount Device (SMD) Simon:
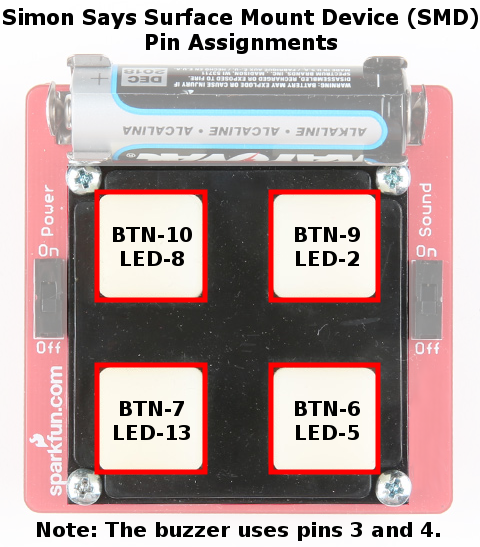
Buzzer is between pins 3 and 4.
If you're curious, check out Pete's tutorial and tinker around with the Simon. It has 4 buttons, 4 LEDs, a buzzer, and access to 6 additional I/O pins. What cool games or applications can you come up with for it? Be sure to share it back with us!
For now, we're going to show you how to add wireless XBee communication to your Simon Says.