Si7021 Humidity and Temperature Sensor Hookup Guide
Introduction
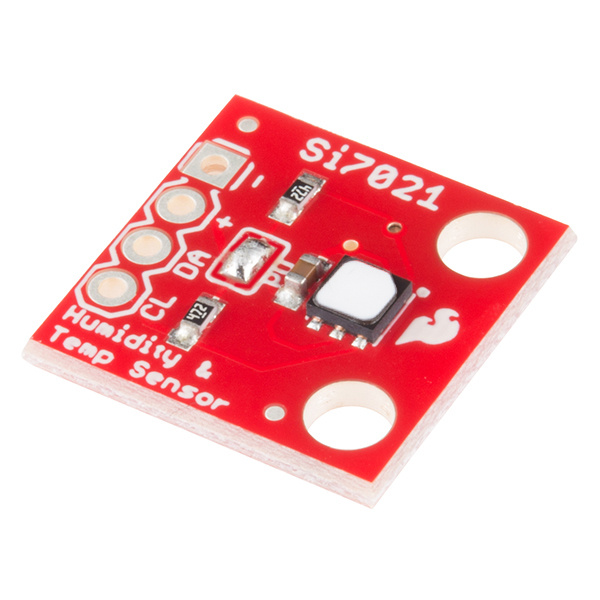
The Si7021 is a low-cost, easy to use, highly accurate, digital temperature and humidity sensor. All you need is two lines for I2C communication, and you’ll have relative humidity readings and accurate temperature readings as well! This sensor is ideal for environmental sensing and data logging, perfect for a weather station or humidor control system.
The Si7021 also comes equipped with a hydrophobic PTFE filter covering the inlet on the sensor. This filter blocks contaminants but allows water vapor to pass through, keeping your sensor safe from water damage while still proving accurate sensor readings.
Required Materials
To follow along with this hookup guide, you will need the following:
Suggested Reading
Before embarking upon this tutorial, you may find the following links useful:
Pull-up Resistors
Installing an Arduino Library
Logic Levels
I2C
Board Overview
Let's go over the Si7021 Breakout in detail.
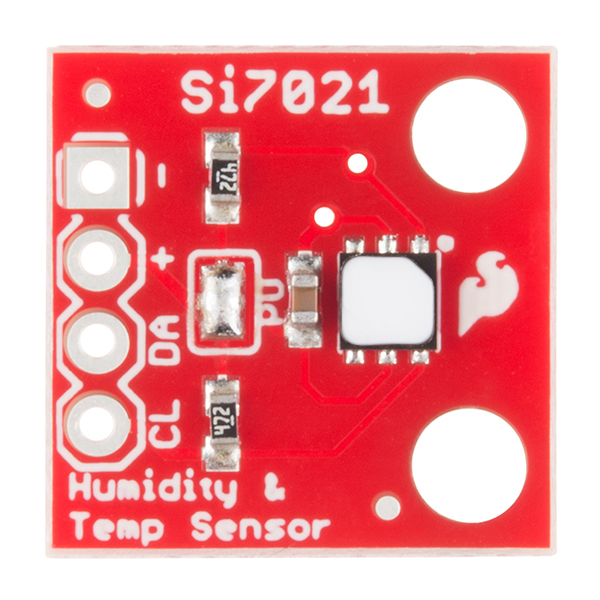
Si7021 Details:
- Uses the I2C interface
- Typical humidity accuracy of ±2%
- Typical temperature accuracy of ±0.3C
- Operates from 0 to 100% humidity but this sensor isn’t recommended for harsh environments where it could come in contact with water (such as rain)
- 3.3V sensor - use inline logic level converters or 10kΩ resistors to limit 5V signals
- Only one Si7021 sensor can reside on the I2C bus at a time
Pull-up Resistors
This breakout board has built-in 4.7KΩ pull up resistors for I2C communications. If you're hooking up multiple I2C devices on the same bus, you may want to disable/enable the pull-up resistors for one or more boards. On the Si7021, the pull-ups are enabled by default. To disable them, simply use some solder wick to remove the solder on the jumper labeled PU. This will disconnect the resistors from VCC and from the I2C bus.
PTFE Filter
The tiny white cover on the IC is known as a Polytetrafluorethylene (PTFE) Membrane Filter. It keeps moisture out but allows humidity in. This filter is very low-profile, hydrophobic and oleophobic, and excludes particulates down to 0.35 microns in size.
From the Si7021 datasheet:
"Because the sensor operates on the principal of measuring a change in capacitance, any changes to the dielectric constant of the polymer film will be detected as a change in relative humidity. Therefore, it is important to minimize the probability of contaminants coming into contact with the sensor. Dust and other particles as well as liquids can affect the RH reading."
Hooking It Up
Wiring up the Si7021 is very easy! We recommend soldering four male headers to the breakout board. You can also solder wires if your application needs.
Power
This board runs at 3.3V. Be sure to power the board from the 3.3V pin! Because I2C is an open drain signal, there's no need to worry about level shifting the signal; the 3.3V signal will be adequate to communicate with the Arduino and the signal will never reach a dangerous level for the pins on the Si7021.
Connections: Breakout to Arduino
Method 1
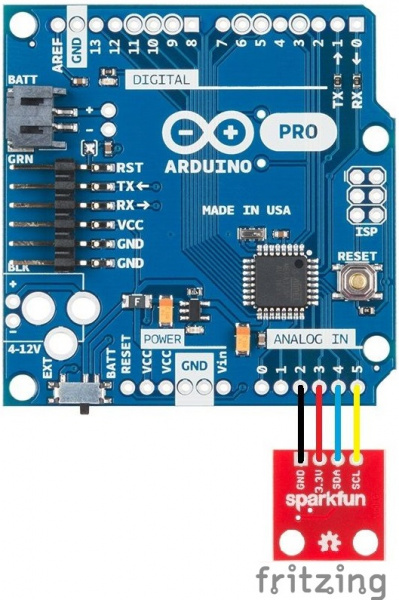
There are two ways to connect an Si7021 to an Arduino. The first is using pins A4 and A5 on classic Arduino boards. This breakout was designed using our standard I2C pinout, allowing the sensor to be connected directly to an Arduino without using a breadboard or wires.
- GND → A2
- VCC → A3
- SDA → A4
- SCL → A5
This would look like the following:
Also, if using this wiring scheme, be sure to assign pins A2 and A3 as GND and VCC, respectively, in your code.
If you need to use this device with a 5V microcontoller, you will need to use a Logic Level Converter.
Method 2
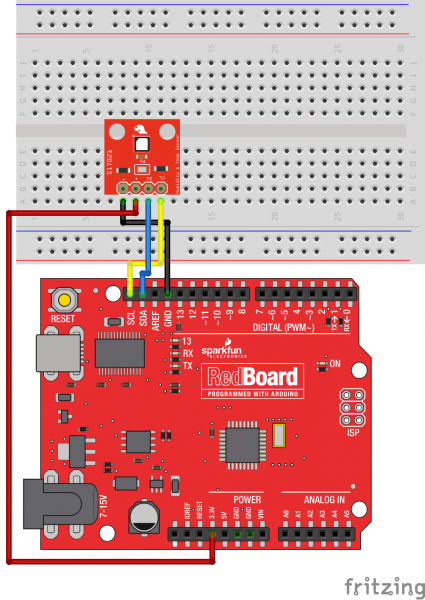
This method is for those with newer model Arduino boards that have the SDA and SCL lines broken out. We'll be hooking up VCC and GND to the normal power pins and two data lines for I2C communication. Connect the SDA and SCL lines directly to the SDA and SCL lines broken out on the Arduino headers.
- VCC → 3.3V
- GND → GND
- SDA → SDA
- SCL → SCL
This would look something like the following:
Si7021 Library and Example Code
To get started, use the example code and library files below.
Note: This example assumes you are using the latest version of the Arduino IDE on your desktop. If this is your first time using Arduino, please review our tutorial on installing the Arduino IDE.
If you have not previously installed an Arduino library, please check out our installation guide.You can download the library from the link below. Check out our Installing an Arduino Library tutorial for more help.
Once the library is installed, open Arduino, and expand the examples menu. You should see the Si7021 example.
language:c
/******************************************************************************
  SparkFun Si7021 Breakout Example
  Joel Bartlett @ SparkFun Electronics
  Original Creation Date: May 18, 2015
  Updated May 4, 2016
  This sketch prints the temperature and humidity the Serial port.

  The library used in this example can be found here:
  https://github.com/sparkfun/Si7021_Breakout/tree/master/Libraries

  Hardware Connections:
      HTU21D ------------- Photon
      (-) ------------------- GND
      (+) ------------------- 3.3V (VCC)
       CL ------------------- D1/SCL
       DA ------------------- D0/SDA

  Development environment specifics:
    IDE: Particle Dev
    Hardware Platform: SparkFun RedBoard
                       Arduino IDE 1.6.5

  This code is beerware; if you see me (or any other SparkFun
  employee) at the local, and you've found our code helpful,
  please buy us a round!
  Distributed as-is; no warranty is given.
*******************************************************************************/
#include "SparkFun_Si7021_Breakout_Library.h"
#include <Wire.h>

float humidity = 0;
float tempf = 0;


int power = A3;
int GND = A2;

//Create Instance of HTU21D or SI7021 temp and humidity sensor and MPL3115A2 barrometric sensor
Weather sensor;

//---------------------------------------------------------------
void setup()
{
    Serial.begin(9600);   // open serial over USB at 9600 baud

    pinMode(power, OUTPUT);
    pinMode(GND, OUTPUT);

    digitalWrite(power, HIGH);
    digitalWrite(GND, LOW);

    //Initialize the I2C sensors and ping them
    sensor.begin();

}
//---------------------------------------------------------------
void loop()
{
    //Get readings from all sensors
    getWeather();
    printInfo();
    delay(1000);

}
//---------------------------------------------------------------
void getWeather()
{
  // Measure Relative Humidity from the HTU21D or Si7021
  humidity = sensor.getRH();

  // Measure Temperature from the HTU21D or Si7021
  tempf = sensor.getTempF();
  // Temperature is measured every time RH is requested.
  // It is faster, therefore, to read it from previous RH
  // measurement with getTemp() instead with readTemp()
}
//---------------------------------------------------------------
void printInfo()
{
//This function prints the weather data out to the default Serial Port

  Serial.print("Temp:");
  Serial.print(tempf);
  Serial.print("F, ");

  Serial.print("Humidity:");
  Serial.print(humidity);
  Serial.println("%");
}
Once you've uploaded the code, connect using this serial terminal to see the output.
Si7021 Functions:
Weather::getRH() - Returns current Relative Humidity measurement.
Weather::readTemp() - Returns temperature in Celsius from previous RH measurement.
Weather::getTemp() - Returns current temp in Celsius.
Weather::readTempF() - Returns temperature in Fahrenheit from previous RH measurement.
Weather::getTempF() - Returns current temp in Fahrenheit.
Weather::changeResolution() - Allows the user to change the humidity and temperature resolution. The vast majority of users do not need to change the resolution. By default the sensor will be in its highest resolution settings. This function is useful if you need to decrease the amount of time between readings or to save power. See the datasheet for more information. As an example, to change the resolution to 11 bit RH and 11 bit temperature, you would call myHumidity.SetResolution(0b10000001); to set bit 7 and bit 0.
Resources and Going Further
With that, you should now have a functional humidity and temperature sensing system. Check the links below for more information.
- Si7021 Datasheet
- Si7021 Breakout Board Schematic
- Si7021 Breakout Board Eagle Files
- Github repo containing all the latest files and code
Need some inspiration? Check out these other tutorials:
- Make an automated terrarium that manages heat and humidity levels.
- Build a humidor control box that maintains a constant humidity in a controlled space.
Blynk Board Project Guide
Hazardous Gas Monitor
Wireless Remote Weather Station with micro:bit
Artemis Global Tracker Hookup Guide
Or check out this blog post for ideas.


