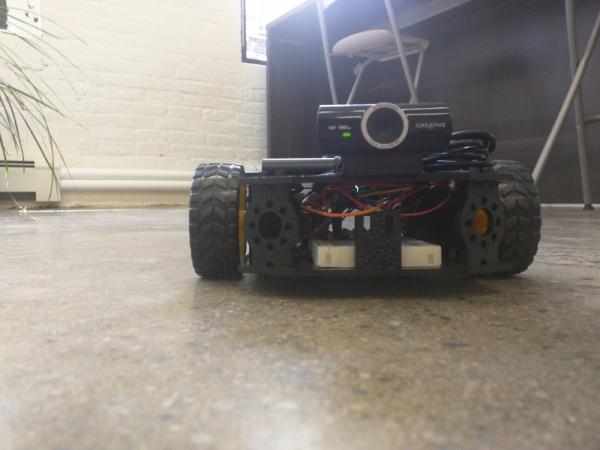
ReconBot with the Tessel 2
Let's Build a Robot!
You are about to build a robot that you can control from a browser on your phone or laptop. You can guide the robot by looking through the robot's "eyes" (first-person-view, or FPV), because it's going to stream live video for you so you can see what's in front of it. You can pilot your robot around corners and into nooks and crannies, chase your cat, entertain guests or just bonk it into a chair leg over and over again—it's all up to you!
The browser-based controls emulate a thumb-pad joystick, hearkening back to the tactile controls of radio-controlled (RC) cars. The virtual joystick for our robot controls both direction and speed. It'll snap back to center (and the robot will stop moving) when it's not being actively dragged and held.
Your robot will be independent of wires and external connections: you'll control it over your local WiFi network, and we'll use a USB power bank to give it juice.
Preflight Check
If this is your first time experimenting with the Tessel 2, there are a few things you gotta do first! We recommend reading through our Getting Started with the Tessel 2 before diving into this project. We promise, it wont take that long.
Getting Started with the Tessel 2
Dive Deeper into the Tessel 2
The entire Johnny-Five Inventor's Kit Experiment Guide is great stuff if you're starting out with the Tessel 2.
Experiment Guide for the Johnny-Five Inventor's Kit
Materials
To build our robot, you'll need the following parts:
Additional Supplies
- 1 Long, plastic wire tie
- Monoprice Hook and Loop Fastening Cable Ties (Amazon)
- Scotch Exterior Mounting Tape, 1-Inch by 60-Inch (Amazon)
- 1 Creative Live! Cam Sync HD 720P Webcam (Amazon)
- 1 iXCC 8000mAh Compact Power Bank (Amazon)
Meet the Supporting Hardware
Shadow Chassis and Wheels
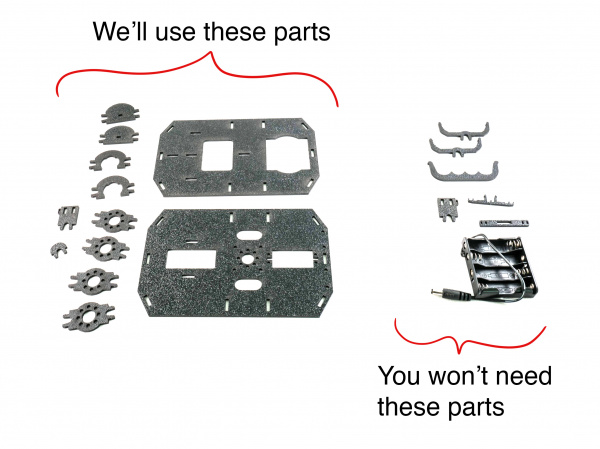
The SparkFun Shadow Chassis is an economic and straightforward platform for constructing a robot. It comes as a kit that has a bunch of parts—our robot will use many, but not all of the parts in the kit.
The chassis will be the "body" of our robot, a frame to which we can attach motors, wheels, a camera, and our robot's other components.
Camera
While creating the robot, we experimented with several different USB cameras and ultimately settled on the Creative Live! Cam Sync HD 720P Webcam. While we'll admit the product name is quite a mouthful, we like this camera because:
- It's reliable: this camera is a work horse—you'll see.
- It's easy to mount and position: the clip for mounting this camera to a monitor or similar vertical surface is perfectly suited for easy attachment to the top panel of Shadow Chassis (as you'll see below).
Battery Pack
You'll be powering the bot with any adequate USB power bank; the iXCC 8000mAh Compact Power Bank (Amazon) is inexpensive and handy.
Build It
To construct the robot, we'll put the chassis partially together and wire up a motor circuit. Then we'll install the robot's software and test the motors before completing the chassis construction.
Constructing the Chassis Base
Connect Motor Mounts
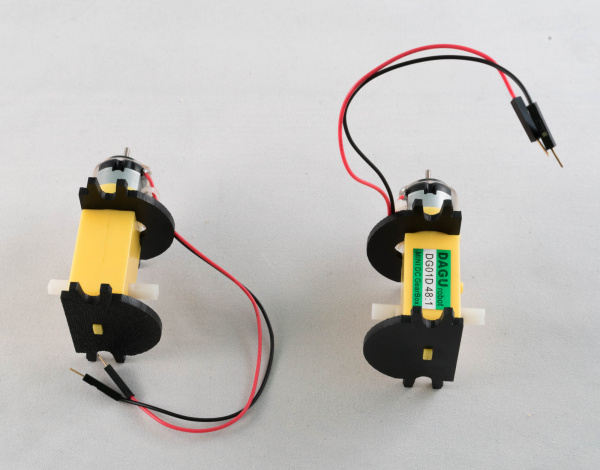
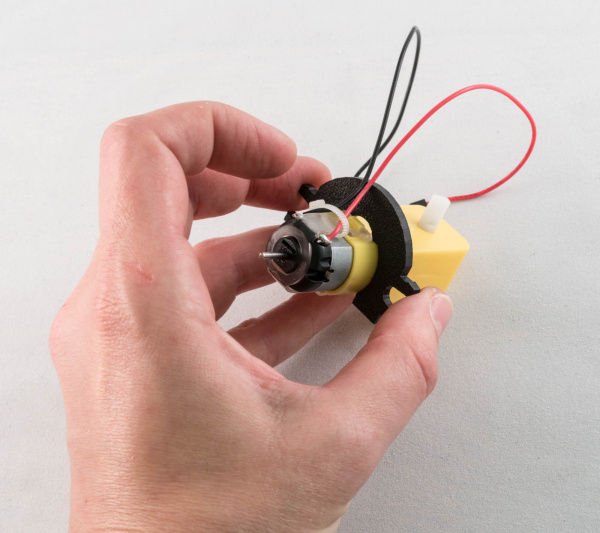
Each of the robot's two motors will have two supporting plastic mounts from the Shadow Chassis kit: one near the front of the motor and one at the back. When attached, the motor mounts will look like this:
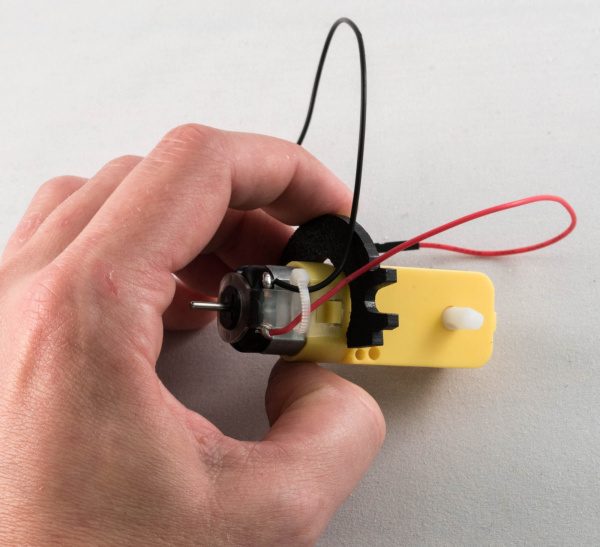
The back mounts are easy to attach—they just slide on. The front mounts require a quarter-turn to attach. Start by positioning the front mount as shown in the photo below, taking care not to pinch the motor's wires underneath the mount. Note the position of the motor's protruding white plastic axle to help you orient the motor.
Now, rotate the mount counter-clockwise 90 degrees until it clicks into place around the motor. After it's secured, it should be positioned as in the photo below:
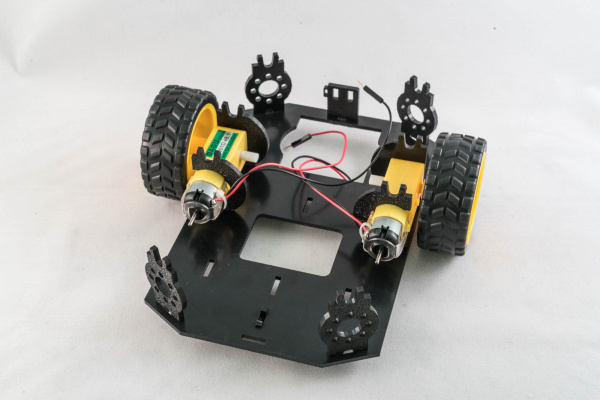
Now you can construct the chassis base:
- Connect the mounted motors to the chassis by snapping the mounts into the chassis base. Pay attention to the orientation. The wires should be on the inside and the rear mounts of the motor should be toward the front of the robot (at the top in the preceding photo).
- Connect the struts at each of the four corners. Push hard to snap into place. Attach an extra support piece at the front of the robot for stability.
- Attach the wheels to the motor axles.
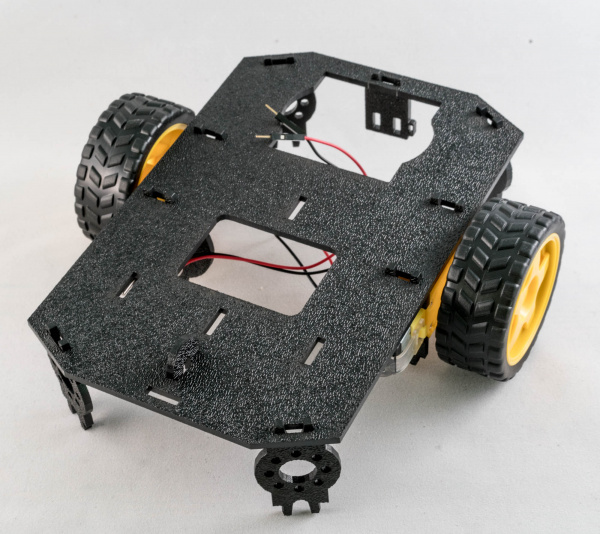
- Flip the base over and attach the little semicircular support nubbin from the Shadow Chassis kit near the back end of the robot (toward bottom left of the following photo)
Some more views of the chassis base (this version has black motors):
Attach the Camera
With the top panel in hand—that's the other big piece in the Shadow Chassis kit—loop one of the ~~Hook and Loop Fastening Cable Ties~~ Velcro ties through the two oblong cut-outs positioned between the wheel mounts:
Next, place the top panel (shiny side down) in front of you. Cut a piece of two-sided tape or mounting tape, approximately half the length of the bottom side of the camera clip (or full length, it's up to you) and attach to the camera clip, like so:
Then flip the camera over and fasten it to the rough side of the top panel. Use the Velcro tie to wrap the camera's USB cable:
Make sure the front "lip" of the camera clip is flush with the edge of the top panel, and that the camera lens itself is centered:
Cut another piece of double sided tape and attach to one side of the USB battery:
Remove the adhesive paper from the other side of the tape, and place the battery on the top panel:
Attach the Breadboard
Now for a shocking twist: set the top assembly aside and grab the bottom assembly and then carefully remove the adhesive strip paper from the breadboard (we're going to reuse it) and place the breadboard over the hole in the front section of the bottom panel. (As it turns out, most people never remove this adhesive cover strip!).
Turn the bottom assembly over and press the paper backing onto the adhesive surface that's exposed through the hole. Turns out they are the same size! Using a sharp utility knife, trim off the excess paper.
Once trimmed, the underside of the chassis base should like this:
Wire the Motor Driver Circuit
Turn the bottom assembly right-side-up and insert the Motor Driver breakout onto the breadboard, as shown here:
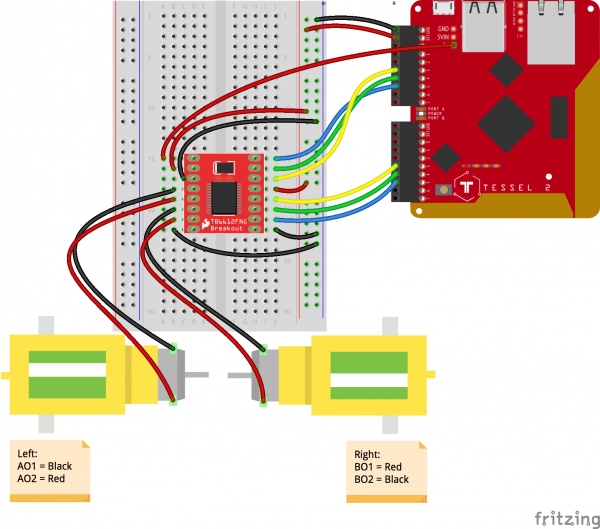
Wire in the Motor Driver, by following the diagram here:
Start by making the breadboard connections (we'll connect to the Tessel 2 in a few moments). As you assemble, your work should look similar to following image:
Connecting the Tessel 2
Position the Tessel 2 near the rear of the robot on the bottom panel and complete the connections for the motor driver.
To help you verify your wiring, review the following tables:
| Motor | Wire | Driver Pin |
|---|---|---|
| Left | Black | AO1 |
| Left | Red | AO2 |
| Right | Black | BO2 |
| Right | Red | BO1 |
| Motor | Tessel Pin | Driver Pin | Color In Diagram |
|---|---|---|---|
| Left | Port A, Pin 5 | PWMA | Blue |
| Left | Port A, Pin 4 | AIN2 | Green |
| Left | Port A, Pin 3 | AIN1 | Yellow |
| Right | Port B, Pin 5 | PWMB | Blue |
| Right | Port B, Pin 4 | BIN2 | Green |
| Right | Port B, Pin 3 | BIN1 | Yellow |
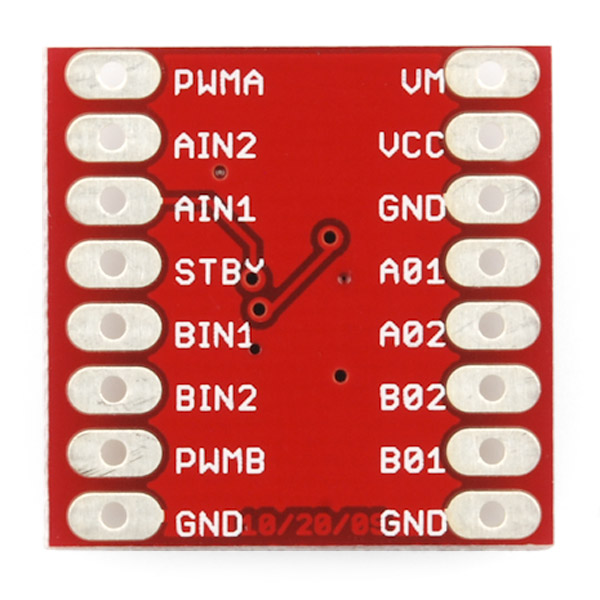
Above: the pins of the SparkFun Motor Driver Breakout board. Note that this view is of the bottom of the board. As attached to your breadboard, connections will be flipped left-to-right.
Prepping and Testing the Robot
Before you secure all of your connections and put the top on your robot, put the chassis aside for a few minutes, and install the robot's software. You'll want to test to make sure your motors run in the expected directions before putting it all together. Trust us. We speak from experience.
Installing the Robot's Software
Get the Software
If you have git installed and feel comfortable using that tool, open your terminal and run:
git clone https://github.com/bocoup/j5ik-reconbot-tessel-edition.git;
cd j5ik-reconbot-tessel-edition;
npm install;
If git is not your thing, you can also download the project as a zip file:
You can always find the most up to date content at in the GitHub repository as well.
Extract the contents however you prefer, then open your terminal and navigate to the extracted project directory.
Install the Software
From your project directory, run:
npm install;
...And that should do it! Go ahead and open the project directory in your preferred editor, and familiarize yourself with the location of each file. The structure should look something like this:
language:console
 .
 ├── app
 │   ├── index.html
 │   ├── pep.js
 ├── lib
 │   └── rover.js
 ├── node_modules
 │   ├── express
 │   ├── johnny-five
 │   ├── socket.io
 │   ├── tessel-av
 │   └── tessel-io
 ├── .tesselinclude
 ├── index.js
 ├── install.js
 └── package.json
Installing mjpg-streamer on the Tessel
Next, install needed video software on your Tessel.
To support one of the most important components of this project—an efficient video stream over a Wireless LAN connection—you'll need to install mjpg_streamer. To do that, you could SSH to the board and manually install it by using opkg (Open PacKaGe Management, a package manager for embedded Linux)—but instead you'll use another JavaScript program! Yay!
In the project's directory, there's a script called install.js—this contains our installation operations. Feel free to open and read the contents of that file if you're curious how it works. You can type—or copy and paste—the following command into your terminal:
t2 run install.js
Hit enter and let the script run to completion. The result should look similar to the following:
Testing the Motors
Now's the time to make any needed adjustments to the motor driver circuit. Double-check the "Pre-Flight Check" above to make sure your Tessel is prepped and powered. You may want to use the (USB micro) wall adapter to power the motors during this step.
With your Tessel and robot chassis base ready and off the ground, type—or copy and paste—the following command in your terminal:
t2 run motors.js
This script will cause the robot's motors to run alternately forward and backward, accelerating from slow to top speed. A console log message will let you know which way the motors should be turning at any given time.
Troubleshooting Motor Connections
Don't freak out if one (or both) of your motors is spinning in the wrong direction. If your left motor is spinning the wrong way, swap the red and black connections on the motor driver's A01 and A02 pins. If the right motor is misbehaving, swap the red and black connections on B01 and B02.
If your script crashes suddenly or your Tessel becomes unresponsive, double-check to make sure that you are providing the motors with enough power—remember, the Tessel's USB connection to your computer cannot provide enough current. You'll need to use the DC adapter or a standalone USB power bank.
Finishing the Robot's Construction
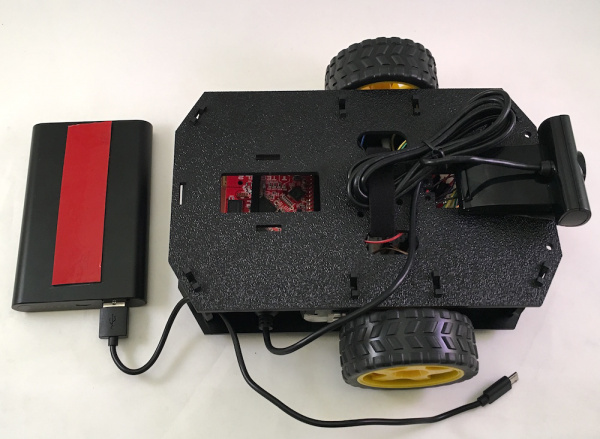
Onward! Secure the Tessel 2 to the lower chassis with wire ties, and use a piece of scotch tape across the pin headers on the Tessel 2 to hold the wires in place so they don't jiggle out of place when the robot is roving. Connect the USB camera to either of the USB host inputs:
Align the top assembly over the bottom assembly and snap it into place. The camera should be on the breadboard end of the chassis.
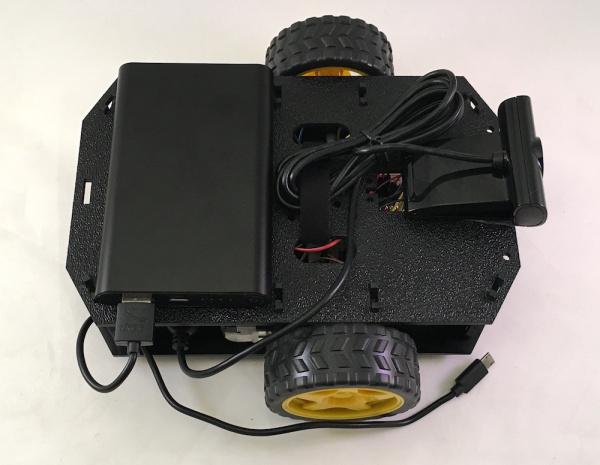
Give your assembled Reconbot: Tessel 2 Edition a turn and admire your handiwork:
Nice looking robot, eh?
Running the Robot
Now all you need to do is run:
t2 run index.js
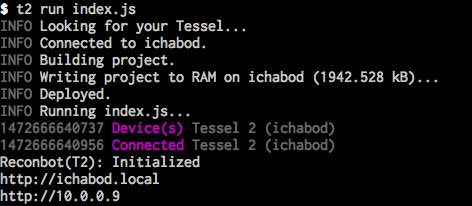
Once the program is started, the console should print out an IP address that you can open in your web browser
Visit that IP address in a web browser on the same WiFi network, and you should see streaming video from your robot and be able to control it using the thumb joystick!
If you're curious about how the robot actually works, read on!
How the Robot Works
The software for this project is similar in structure to the software in the Johnny-Five Inventors Kit Guide Experiment 10: Using the BME280—if you haven't read that guide, we suggest doing so now and working through that experiment. That will help to familiarize you with how we will be using Web Sockets in the robot's application.
The robot's code is composed of two main "chunks":
- Client code. This code runs inside a web browser (on your laptop or phone, e.g.) and consists of an HTML page and some JavaScript. The client code is responsible for displaying the robot's streaming video, as well as the display and behavior of the steering controls. The HTML and JavaScript that make up the client code are delivered to your web browser by the server code when you connect to the Tessel. The client code is contained within the
app/directory of the project. - Server code. This Node.js application code runs on the Tessel when you execute
t2 run index.js. The server code creates a web server to respond to requests from web browsers. It starts a process that streams video from the webcam and makes it available for browsers that connect. It also takes incoming steering data from the browser-based controls and translates it into speed and direction of the robot's motors (wheels).
How the Web Interface Works (The Client Code)
The client code—which executes in your browser—is responsible for rendering the controls, showing the streaming video and sending steering and speed instructions to the server.
The client application's user interface is a single HTML file (app/index.html). The important parts of this file are:
- An
<img>element to display themjpg-streamer"video stream". Thisimgis sized so that the video stream fills the browser's viewport. - A
<canvas>element to display the touch-driven virtual thumb-stick. - JavaScript (inline in a
<script>tag) to draw the shapes of the controls into thecanvas, capture and process interaction events (e.g. touch) and send socket messages containing axis value payloads to the server application.
How Steering Works
The virtual thumbstick is designed in a way that hearkens back to traditional radio-controlled (RC) transmitters. Take a look at a "real" RC transmitter control:
And our version:
Interacting with the thumbstick causes a message to be sent over the connected socket to the server. This message contains an object representing a point { x, y } for the coordinates (relative to the thumbstick) last touched. Values for both x (left-right) and y (up-down) axes are between -100 and 100.
        (X, Y)

-100,   0,100    100,
100              100
  \       |       /
   \      |      /
    \     |     /
     \    |    /
      \   |   /
       \  |  /
        \ | /
         \|/
-100,-----+-------100,
  0      /|\       0
        / | \
       /  |  \
      /   |   \
     /    |    \
    /     |     \
   /      |      \
  /       |       \
-100,   0,-100   100,
-100            -100
On the server, this point object is used to compute an angle, which is then used to find a "turn coefficient", which is then used to calculate how much "turn" to apply to the motors. Yay, trigonometry!
How the Server Code Works
The code that runs on your Tessel is a Node.js application. It:
- hosts an HTTP server. This is what will serve the HTML page and the streaming video you'll see in your browser when you connect to the Tessel. Using the built-in module
http, as well as the popular third-party web framework moduleexpress, the server code serves static content (HTML and JavaScript) as well as routing requests for/videoto support the streaming video. - hosts a web socket. Remember, the virtual thumbstick in the browser will be sending data messages about its position to the server so that the robot's direction and speed can be controlled. The code combines uses the
socket.iomodule to pull this off. - controls the robot hardware itself. As the server receives axis data on the web socket, it passes these values along to an
update(...)method on an object that is controlling the robot itself (an instance of a class calledRover.
Let's take a look at the supporting cast—a script that fires up a video-streaming process and a class (Rover) for controlling the robot's movements.
How the Video is Streamed
At the beginning of index.js, an instance of av.Camera is created, which itself controls an mjpg_streamer child process that streams video, which is available at port 8080 on the Tessel.
How the Robot Controls its Motors
lib/rover.js contains a class called Rover, which encapsulates the logic for actually moving the two-wheeled robot around. Most of Rover's functionality is within a method called update(...). update(...) takes in axis information (direction and speed information from the controller) and converts that into the right kind of motor motion.
There's a bunch of trigonometry in update(...) and we don't want to make you glaze over completely (though, by all means, explore the source code if you're curious!). It does the heavy lifting of calculating and converting angles, computing "move" and "turn" values, scaling values to the correct speed and updating the motors.
How it all Fits Together
index.js is the script that pulls it all together, and this is the script you'll run on the Tessel using t2 run (or t2 push). Here is the script in its entirety (and then we'll break it down):
language:javascript

"use strict";

// Built-in Dependencies
const cp = require("child_process");
const Server = require("http").Server;
const os = require("os");
const path = require("path");

// Third Party Dependencies
const five = require("johnny-five");
const av = require("tessel-av");
const express = require("express");
const Socket = require("socket.io");
const Tessel = require("tessel-io");

// Internal/Application Dependencies
const Rover = require("./lib/rover");


// Application, Server and Socket
const app = express();
const server = new Server(app);
const socket = new Socket(server);
const video = new av.Camera({
   fps: 15,
   dimensions: "320x240",
   quality: 50,
});

// Configure express application server:
app.use(express.static(path.join(__dirname, "app")));
app.get("/video", (request, response) => {
  response.redirect(`${video.url}`);
});

// Start the HTTP Server
const port = 80;
const listen = new Promise(resolve => {
  server.listen(port, resolve);
});

// Initialize the Board
const board = new five.Board({
  sigint: false,
  repl: false,
  io: new Tessel()
});

board.on("ready", () => {
  const rover = new Rover([
    // Left Motor
    { pwm: "a5", dir: "a4", cdir: "a3" },
    // Right Motor
    { pwm: "b5", dir: "b4", cdir: "b3" },
  ]);

  console.log("Reconbot(T2): Initialized");
  socket.on("connection", connection => {
    console.log("Reconbot(T2): Controller Connected");
    connection.on("remote-control", data => {
      rover.update(data.axis);
     });
  });

  listen.then(() => {
    console.log(`http://${os.hostname()}.local`);
    console.log(`http://${os.networkInterfaces().wlan0[0].address}`);

    process.on("SIGINT", () => {
      video.stop();
      server.close();
      process.exit();
    });
  });
});
Breaking down index.js
The very first thing we encounter is a Use Strict Directive—this informs the JavaScript engine that this code conforms to a safe subset of JavaScript. It will also appear at the beginning of the lib/rover.js:
language:javascript
"use strict";
Getting our Dependencies in Order
This is the program's "setup" stage, and we need to organize and require all of the application's dependencies: built-in node modules, third-party packages and our own modules:
language:javascript
// Built-in Dependencies
const cp = require("child_process");
const Server = require("http").Server;
const os = require("os");
const path = require("path");

// Third Party Dependencies
const av = require("tessel-av");
const express = require("express");
const five = require("johnny-five");
const Socket = require("socket.io");
const Tessel = require("tessel-io");

// Internal/Application Dependencies
const Rover = require("./lib/rover");
Starting up the Streaming Video
To create our video stream, all we have to do is instantiate a new av.Camera object:
language:javascript
const video = new av.Camera({
  fps: 15,
  dimensions: "320x240",
  quality: 50,
});
Starting the Web Server and Web Socket
We'll be using a web application framework called Express to provide the logic necessary to support what our web server does:
language:javascript
const app = Express();
We'll need a web server (via Node's built-in http module) to handle delegating incoming requests to our application:
language:javascript
const server = new Server(app);
And a web socket hosted by that http server:
language:javascript
const socket = new Socket(server);
Most of what our web application needs to deliver is static content: an HTML document, specifically. For that, we can use Express' static "middleware". Long story short, the following makes it so clients (i.e. browsers) can request and successfully receive files that live under the app/ directory:
language:javascript
app.use(Express.static(path.join(__dirname, "app")));
But the app does need to do one fancy thing. When the browser requests /video, our app redirects it to the specific URL where the streaming video is available:
language:javascript
// Configure express application server:
app.use(Express.static(path.join(__dirname, "app")));
app.get("/video", (request, response) => {
  response.redirect(`${video.url}`);
});
Finally, we'll fire up the web server so it's listening on port 80 (default HTTP port):
language:javascript
// Start the HTTP Server
const port = 80;
const listen = new Promise(resolve => {
  server.listen(port, resolve);
});
Initializing the Tessel Board
Note: If this is your first exposure to using the Johnny-Five Board class to represent the state of the Tessel 2's board, we recommend you read (at the least) Experiment 1: Blink an LED for a little background.
This Board instantiation looks a little different from other Johnny-Five Tessel examples. We're explicitly disabling the automatic REPL (interactive console). We also tell the board not to respond in its default way to SIGINT events. SIGINT is a signal sent by Unix-based systems when a process is interrupted, like when you type ctrl-C after using the t2 run command. We'll shortly define how we do want the robot to respond if the process is interrupted.
language:javascript
// Initialize the Board
const board = new five.Board({
  sigint: false,
  repl: false,
  io: new Tessel()
});
When the board emits the ready event, the Tessel 2's hardware is ready for interaction.
language:javascript
board.on("ready", () => {
  // ... Let's go!
});
Creating the Rover Object
Within the "ready" event handler, we can be confident that the Tessel hardware is ready to go. The next step is to instantiate an object of the Rover. When we instantiate a Rover, we need to give it some information about the motors attached to the board. Each motor has three relevant pin connections: pwm (pulse-width modulation), dir (direction) and cdir (counter-direction). You can read more about this in the documentation for Johnny-Five's Motor class. The pin numbers correspond to how the pins on the motor driver are connected to the Tessel.
language:javascript
const rover = new Rover([
  // Left Motor
  { pwm: "a5", dir: "a4", cdir: "a3" },
  // Right Motor
  { pwm: "b5", dir: "b4", cdir: "b3" },
]);
Phew! Now the robot is ready to rock. A message is logged that says "Reconbot(T2): Initialized":
language:javascript
console.log("Reconbot(T2): Initialized");
Handling socket connection events
When you open the robot's controlling web page in a browser, it will trigger a "connection" event on the web socket. The "connection" handler logs a message confirming the connection and sets up an event handler for "remote-control" events. Remote control events are fired when new axis data is sent from the thumbstick controls. This axis data gets passed on to the rover.
language:javascript
socket.on("connection", connection => {
  console.log("Reconbot(T2): Controller Connected");
  connection.on("remote-control", data => {
    rover.update(data.axis);
  });
});
That's it for hardware interaction control! The next few lines helpfully show the URL for your robot's controlling web page. Remember how we turned off default SIGINT handling? Here's where we circle back and define how we do want SIGINT events to be handled—making sure to close the web server before exiting the process.
language:javascript
listen.then(() => {
  console.log(`http://${os.hostname()}.local`);
  console.log(`http://${os.networkInterfaces().wlan0[0].address}`);
  process.on("SIGINT", () => {
    video.stop();
    server.close();
    process.exit();
  });
});
Deployment And Operation of the Robot
It's time to deploy and run the software on our robot—which also means it's time to drive!
Whenever you're ready, go ahead and type—or copy and paste—the following command into your terminal:
t2 run index.js
Once the program is deployed and started, you will see the URL of the controller application displayed:
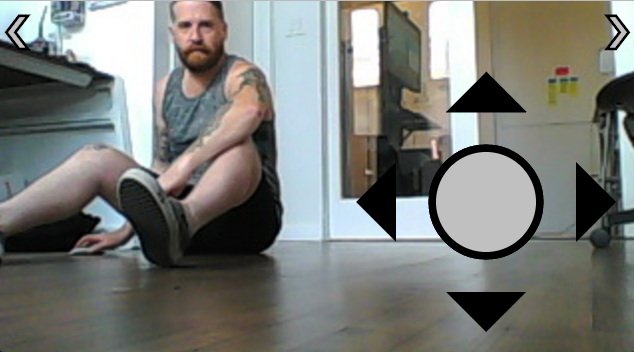
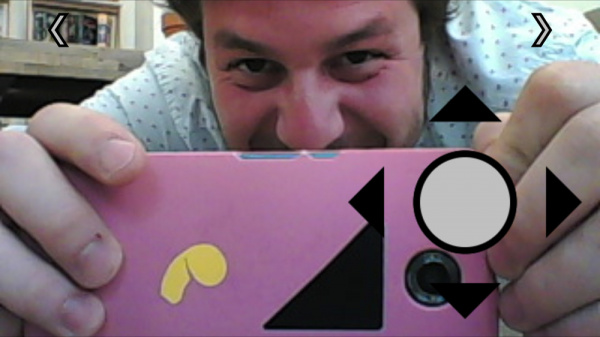
Go ahead and open that URL in a browser on your mobile device or laptop. If your friend is positioned directly in front of the bot, you might see something like this:
While they will see this:
Resources and Going Further
For some extra fun, you could implement the following.
- Instead of relying on an existing Wireless LAN, use the Tessel 2's built-in Access Point support. Remember that your control device will have to connect to the Tessel 2's Access Point network in order to access the controller application in the browser.
Deploy your software to the Tessel 2's flash memory with the following command:
t2 push index.js
this way your program will be automatically started when the Tessel 2 boots.
You can find all the files for the Reconbot at the GitHub repository.
For more Tessel fun, check out these other great SparkFun tutorials.
