Real Time Clock Module Hookup Guide
Using the SparkFun DS1307 Arduino Library
We've written an Arduino library for the DS1307, which takes care of all of the I2C communication, bit-shifting, register-writing, and clock-managing; it even sets the time of your RTC automatically! Grab the most recent version of the library from our SparkFun_DS1307_RTC_Arduino_Library GitHub repository:
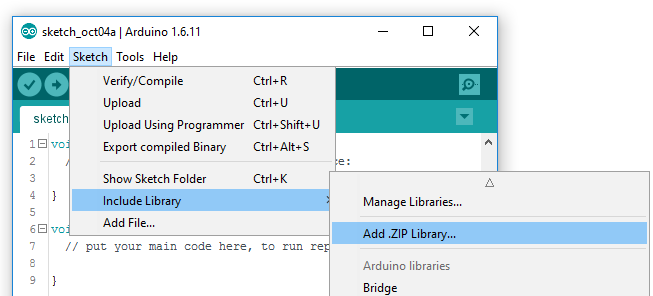
Then follow along with our How to Install an Arduino Library tutorial for help installing the library. If you download the library's ZIP file, you can use Arduino's "Add ZIP Library..." feature to install the source and example files with just a couple clicks.
Using the DS1307_RTC_Demo Example
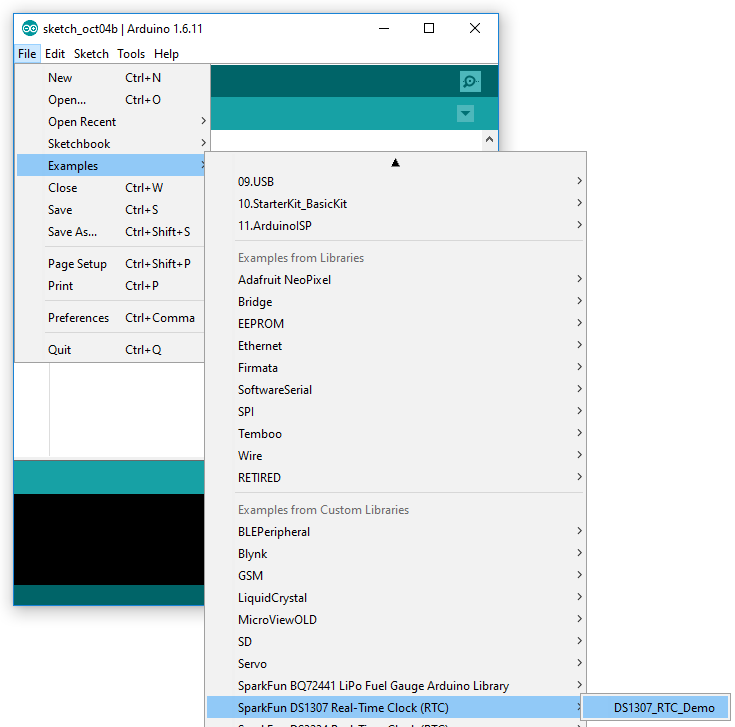
Once you've downloaded the library, open the DS1307_Demo by navigating to File > Examples > SparkFun DS1307 Real Time Clock (RTC) > DS1307_RTC_Demo:
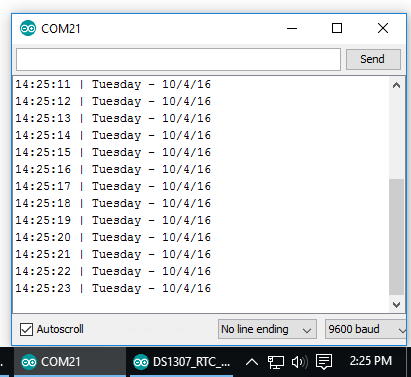
Once the demo's loaded, make sure your board and port are set correctly -- no modifications required -- and upload! Then click over to the Serial Monitor. Make sure the baud rate is set to 9600 bps, and you should begin to see the seconds fly by:
Using the SparkFun DS1307 Arduino Library
The example demonstrates almost all of the DS1307's functionality. Here's a quick primer on how to incorporate the library into your project:
Initialization
To begin, make sure you include the SparkFunDS1307RTC.h library. Above that, you'll need to include Wire.h the Arduino I2C library:
language:c
#include <SparkFunDS1307RTC.h>
#include <Wire.h>
The DS1307 library defines an object conveniently named rtc to access all of the functions and data of the RTC module. To initialize the RTC, begin by calling the rtc.begin() function in your setup() area:
language:c
void setup()
{
    ...
    rtc.begin();
    ...
}
Setting the Time
Once the RTC is initialized, you can set the time in the clock. There are a few options here. We recommend using either the rtc.autoTime() function, which sets the RTC's clock your computer's date and time (based on the time of compilation), or rtc.setTime(second, minute, hour, day, date, month, year), which allows you to precisely set the clock.
The demo example defaults to using rtc.autoTime(), which sets your RTC's time and date to your computer's time and date (may be a dozen seconds off).
Set and Forget!
Once the RTC's time and date register have been set – using either the autoTime or setTime functions – you may never have to set the clock again!
Consider commenting out the autoTime or setTime entirely once you've perfectly configured the clock.
If you want to manually set the time, use the setTime() function. For example:
language:c
// Set to 13:37:42 (1:37:42 PM)
int hour = 13;
int minute = 37;
int second = 42;
// Set to Monday October 31, 2016:
int day = 2; // Sunday=1, Monday=2, ..., Saturday=7.
int date = 31;
int month = 10;
int year = 16;

rtc.setTime(second, minute, hour, day, date, month, year);
12-Hour Mode
The RTC defaults to 24-hour mode, but does support 12-hour mode with an AM/PM bit. If you’d like to use 12-hour mode, simply call rtc.set12Hour() (or rtc.set24Hour() to switch back to 24-hour mode).
To set the time in 12-hour mode, an extra parameter – AM or PM – should be added after ther `hour` variable. For example:
setTime(14, 42, 7, PM, 1, 28, 12, 16); // Set time to 7:42:14 PM, Sunday December, 28 Reading the Time
Once the clock is set, it will automatically begin incrementing second-by-second, minute-by-minute, etc. To read the time and date values, begin by calling rtc.update(). This will command the DS1307 to read all of its data registers in one, fell swoop.
After the RTC data is updated, you can read those updated values by calling rtc.hour(), rtc.minute(), rtc.second(), etc. For example:
language:c
rtc.update(); // Update RTC data

// Read the time:
int s = rtc.second();
int m = rtc.minute();
int h = rtc.hour();

// Read the day/date:
int dy = rtc.day();
int da = rtc.date();
int mo = rtc.month();
int yr = rtc.year();
"Day" is as in "day of the week", e.g. Sunday, Monday, Tuesday... rtc.day() returns an integer between 1 and 7, where 1 is Sunday and 7 is Saturday (sorry week-starts-on-Monday truthers). Alternatively, you can call rtc.dayChar() or rtc.dayStr(), which return a character or full-string representation of the day of the week.
For more on using the SparkFun DS1307 Arduino Library consider reading through the header file, which documents all of the Arduino sketch-available functions.


