Qwiic Magnetometer (MLX90393) Hookup Guide
 Englandsaurus
Example Code
Before we get into programming our Magnetometer, we'll need to download and install the magnetometer library. Ted Yapo has written a library to control the Qwiic Magnetometer. You can obtain the .zip for this library using the below button. Never installed a library before? That's ok! Checkout our tutorial on installing Arduino Libraries.
Note: This example assumes you are using the latest version of the Arduino IDE on your desktop. If this is your first time using Arduino, please review our tutorial on installing the Arduino IDE. If you have not previously installed an Arduino library, please check out our installation guide.
Since this isn't a SparkFun library, the example sketches are not included, so you'll have to download those separately from the GitHub page by clicking the below button. The example sketches are located in software
Go ahead and unzip these examples to a location of your choosing and open Example 1 - Basic Readings.
Example 1 - Basic Readings
Once we have our first example opened up, let's look at how things are structured as we set up our sensor. First we create our sensor, and then an array of floats to contain our data.
language:c
MLX90393 mlx;
MLX90393::txyz data; //Create a structure, called data, of four floats (t, x, y, and z)
Then in our setup loop, we must initialize our sensor, notice the delay afterwards, this gives the sensor time to initialize before we start attempting to talk to it.
language:c
mlx.begin(); //Assumes I2C jumpers are GND. No DRDY pin used.
delay(1000); //Allow the sensor to initialize.
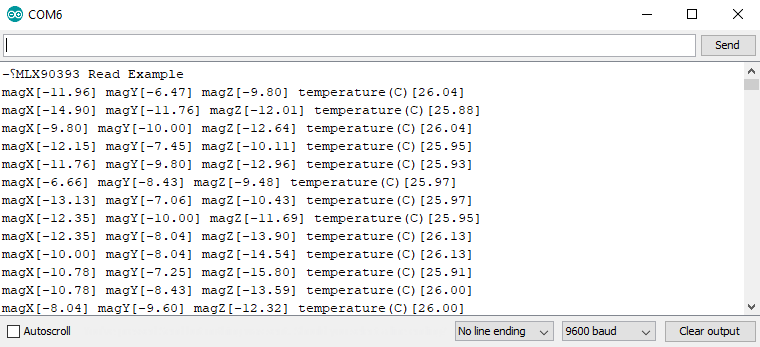
Once the sensor is initialized, our void loop() will read the data from our sensor into data, the array of floats we created earlier, and print it over serial to our serial monitor. Opening up your serial monitor to a baud rate of 9600 should display output similar to that shown below. The numbers are in units of µT.
Example 2 - Configure Sensor
Go ahead and open Example 2 from the location you saved it in. The only differences between this example and the previous one are in the setup() function. Notice how we now call the begin() function with 3 arguments, which are the value of the A0 jumper, the value of the A1 jumper, and the pin that we've connected to INT. The below code assumes that the A0 jumper has been cut from ground and soldered to 3.3V and that A3 is connected to the INT pin (sometimes referred to in the datasheet as the DRDY or data ready pin).
language:c
byte status = mlx.begin(1, 0, A3);
If we must change the address of our magnetometer due to overlapping addresses, ensure that the values we pass into begin() match up with the values of our address jumpers. The MLX90393 also has a ton of different ways to change the sensor behavior. You can set the gain, resolution of the x, y and z channels, oversampling rates, and even offsets of your x, y, and z channels. In this example however, we set the gain to 1 and the resolution of our x, y, and z channels to their finest setting, 0.
language:c
mlx.setGainSel(1);
mlx.setResolution(0, 0, 0);
A table showing the different possible resolutions of the sensor for the X and Y axes is shown below. These can be selected using the setGainSel(uint8_t gain) and setResolution(uint8_t x, uint8_t y, uint8_t z) functions. All resolutions are in units of µT/LSB.
XY Axis:
| Gain | Res = 0 | Res = 1 | Res = 2 | Res = 3 |
|---|---|---|---|---|
| 0 | 0.805 | 1.610 | 3.220 | 6.440 |
| 1 | 0.644 | 1.288 | 2.576 | 5.152 |
| 2 | 0.483 | 0.966 | 1.932 | 3.864 |
| 3 | 0.403 | 0.805 | 1.610 | 3.220 |
| 4 | 0.322 | 0.644 | 1.288 | 2.576 |
| 5 | 0.268 | 0.537 | 1.073 | 2.147 |
| 6 | 0.215 | 0.429 | 0.859 | 1.717 |
| 7 | 0.161 | 0.322 | 0.644 | 1.288 |
Shown below is the table containing the possible combinations for resolutions on the Z axis. Once again, units are in µT/LSB
Z Axis:
| Gain | Res = 0 | Res = 1 | Res = 2 | Res = 3 |
|---|---|---|---|---|
| 0 | 1.468 | 2.936 | 5.872 | 11.744 |
| 1 | 1.174 | 2.349 | 4.698 | 9.395 |
| 2 | 0.881 | 1.762 | 3.523 | 7.046 |
| 3 | 0.734 | 1.468 | 2.936 | 5.872 |
| 4 | 0.587 | 1.174 | 2.349 | 4.698 |
| 5 | 0.489 | 0.979 | 1.957 | 3.915 |
| 6 | 0.391 | 0.783 | 1.566 | 3.132 |
| 7 | 0.294 | 0.587 | 1.174 | 2.349 |
Since we are simply connecting our magnetometer on a different address, our output should be similar to the one in the first example.