The Raspberry Pi is an amazing single board computer (SBC) capable of running Linux and a whole host of applications. Python is a beginner-friendly programming language that is used in schools, web development, scientific research, and in many other industries. This guide will walk you through writing your own programs with Python to blink lights, respond to button pushes, read sensors, and log data on the Raspberry Pi.
To work through the activities in this tutorial, you will need a few pieces of hardware:


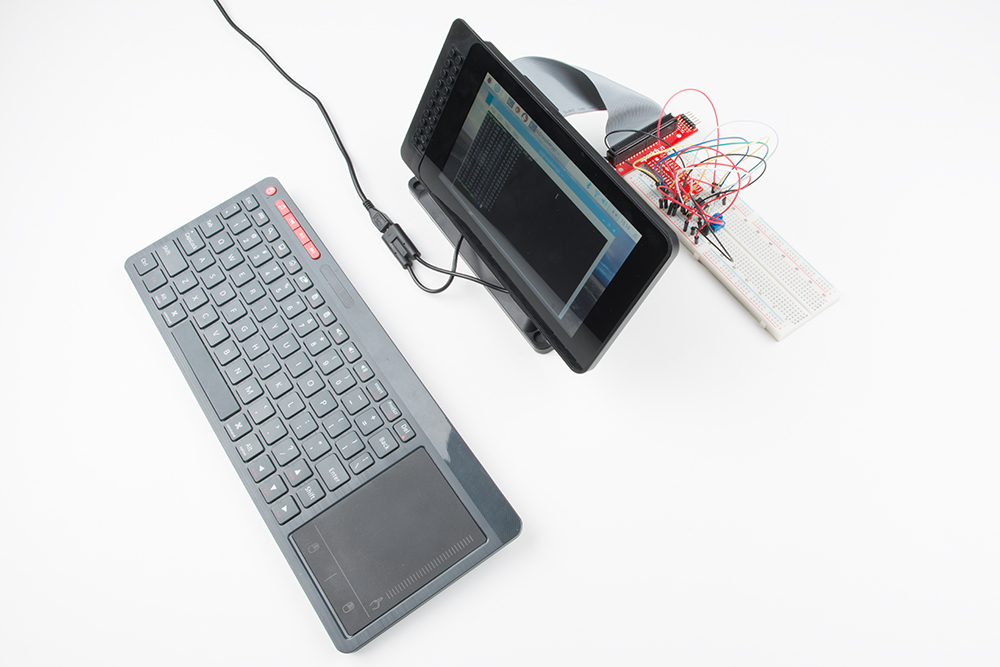
You have several options when it comes to working with the Raspberry Pi. Most commonly, the Pi is used as a standalone computer, which requires a monitor, keyboard, and mouse (listed below). To save on costs, the Pi can also be used as a headless computer (without a monitor, keyboard, and mouse). This setup has a slightly more difficult learning curve, as you will need to use the command-line interface (CLI) from another computer.
This guide is licensed under the Creative Commons Attribution Share-Alike 4.0 International License.
You have a few options when it comes to interacting with the Raspberry Pi. The first and most common is to use it like you would a full desktop computer (just smaller). This involves connecting a keyboard, mouse, and monitor. With this setup, you are likely best served by installing Raspbian with Desktop, which gives you a full graphical user interface (GUI) to work with. This is the best option if you want an experience similar to working with other operating systems (OS), such as Windows, macOS, or other popular Linux flavors, like Ubuntu.
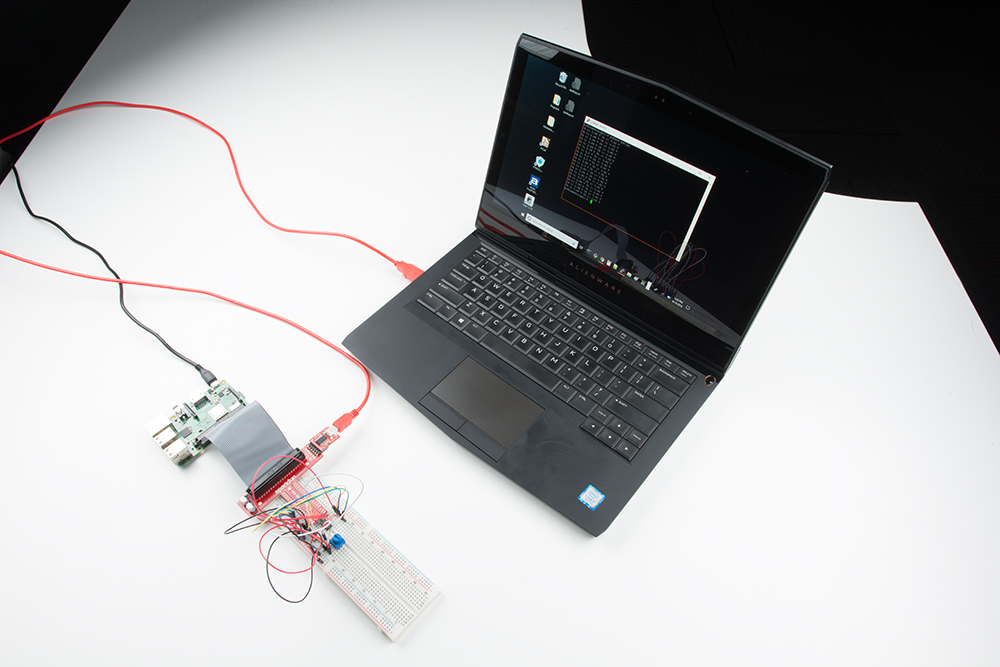
The other option is to create a headless setup, which means you can skip the monitor, keyboard, and mouse. While this is the cheaper way to go, it means you'll need to be open to performing all your actions in the command line interface. For this, you will want either Raspbian with Desktop or Raspbian Lite operating systems.
This guide will show you how to write and run Python programs that will work in both configurations.
The Raspberry Pi 3 Starter Kit Hookup Guide offers a great walkthrough to setting up your Raspberry Pi with NOOBS (Raspberry Pi's easy-to-use graphical OS installer).
From here on out, all instructions that are unique to the full desktop setup will be highlighted in blue.
If you want to skip the keyboard, mouse, and monitor, you can install Raspbian Lite. This will allow you to get a terminal into your Pi using SSH or Serial on another computer. The Headless Raspberry Pi Setup walks you through setting up your Raspberry Pi without a graphical interface.
Instructions in this tutorial that are unique to the headless setup will be highlighted in yellow.
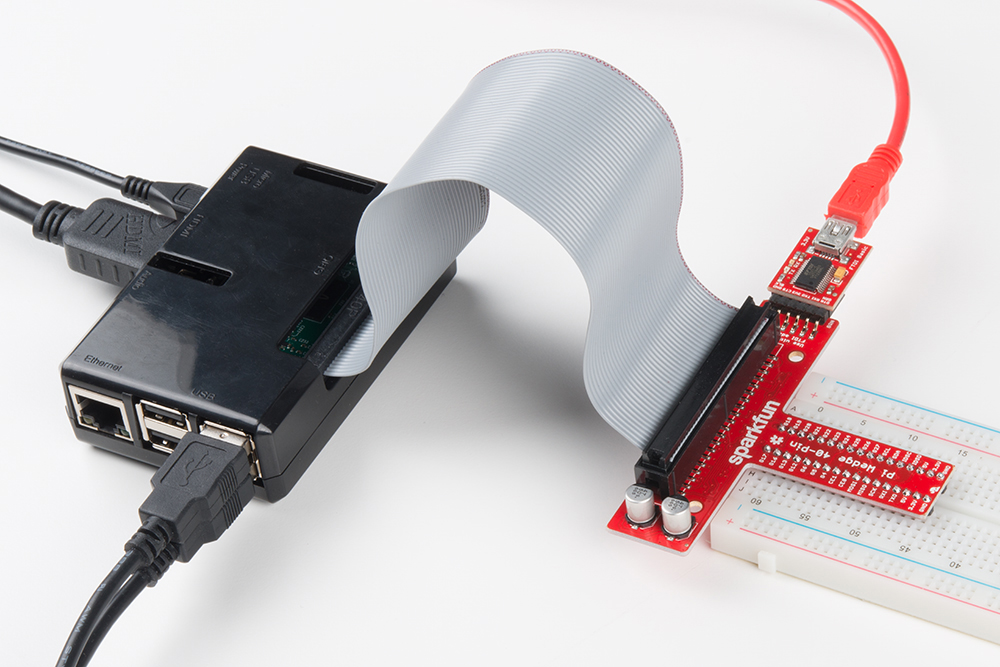
If you have the Raspberry Pi Starter Kit, you can attach the Pi Wedge to the Pi over the provided ribbon cable, and connect the FTDI Breakout board to the Pi Wedge. From here, connect a USB cable between your computer and the FTDI Breakout board. This will allow you to open a Serial terminal to your Raspberry Pi, as covered in the Serial Terminal section of the Headless Pi tutorial.
Regardless of whether you are using the full desktop or a headless setup, you will need to perform some basic configuration steps on your new Raspberry Pi installation. These steps can be easily performs from a terminal (a text input/output environment).
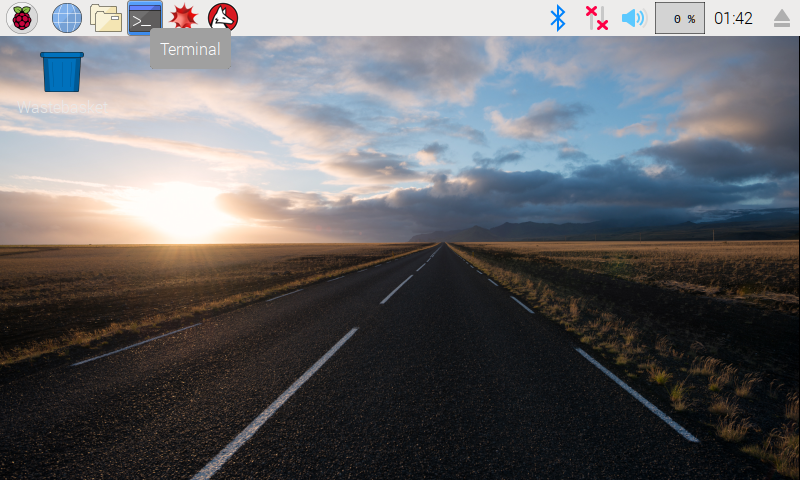
Full Desktop: You should be automatically logged into the X windows manager (otherwise known as the desktop). To open a terminal, simply click on the Terminal icon on the top left of the desktop. You should be immediately presented with a command prompt in a terminal window.
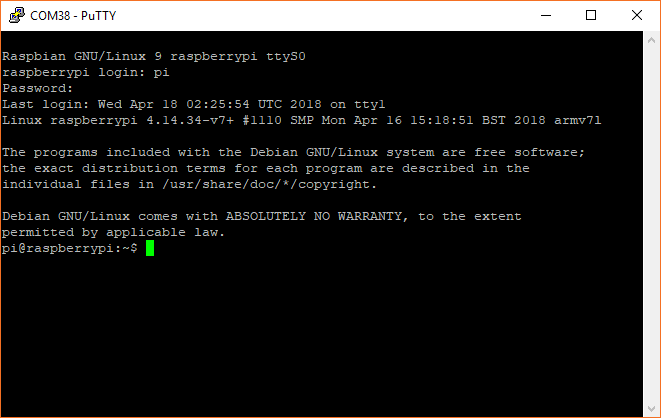
Headless: With a headless setup, everything you do will be through a terminal. When you connect to your Pi through Serial or SSH, you will be presented with a login prompt on the terminal. Enter the default credentials:
You will be presented with a command prompt.
From your command prompt, enter the command:
language:bash
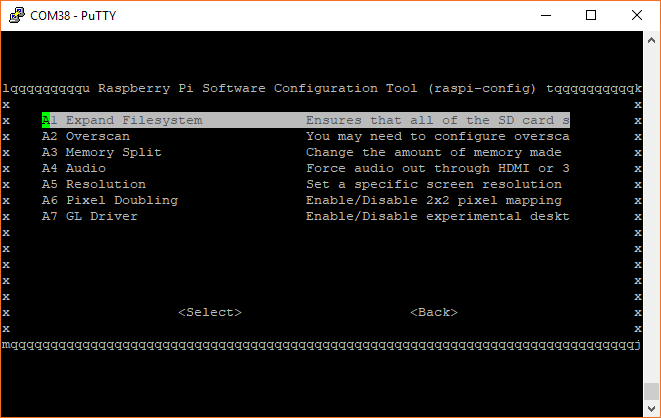
sudo raspi-config
If asked to enter a password, type out the default password: raspberry.
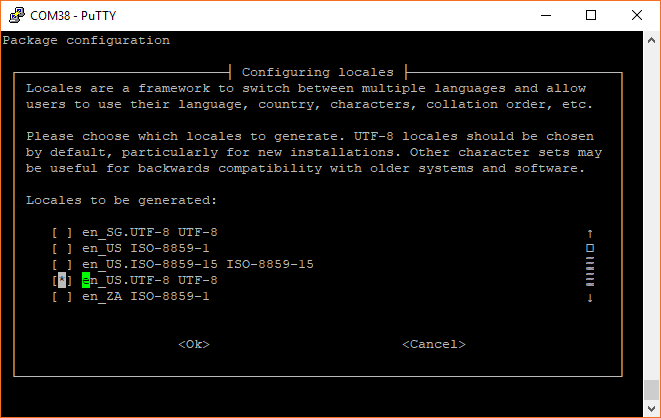
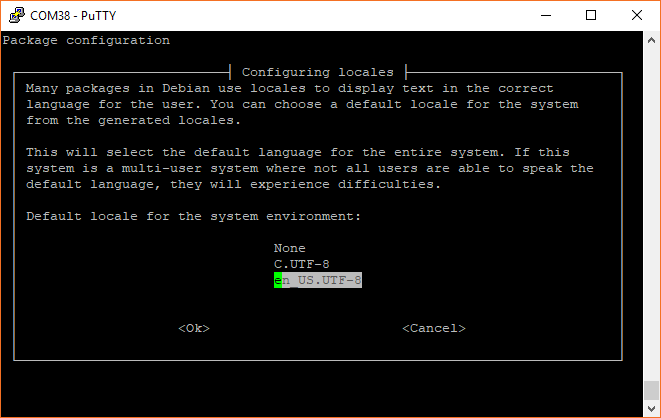
You will be given several options on how to configure your Raspberry Pi.
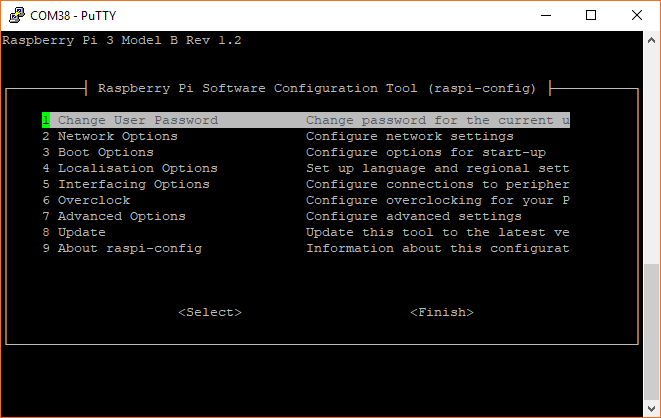
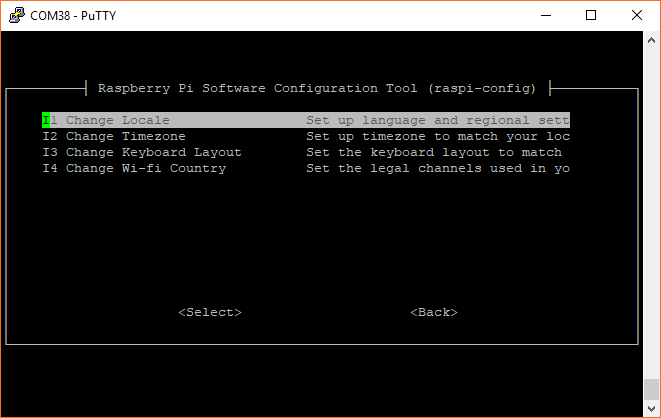
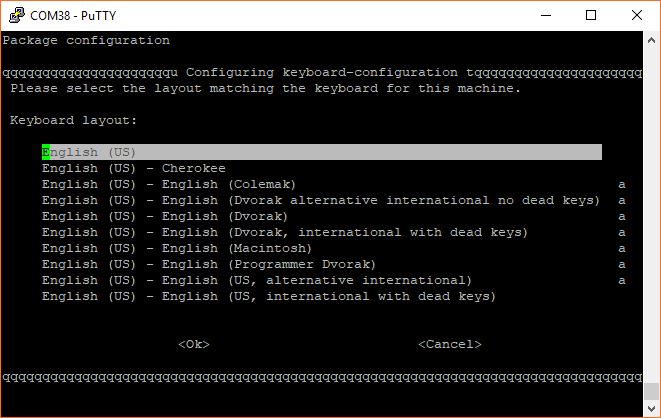
Select 4 Localisation Options to bring up the keyboard and time zone options.
Select 5 Interfacing Options.
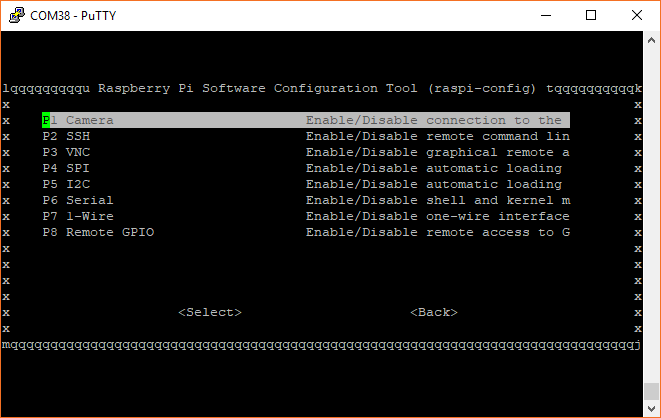
Back in the main screen, select 7 Advanced Options.
If you are using a Serial or SSH terminal, log back in using the username pi and the password you created earlier.
By default, Raspbian (Stretch version April 2018 and earlier) uses Python 2. However, versions 2 and 3 come installed by default. We just have to make 1 minor change so that the Pi uses Python 3 whenever we type python into a terminal.
In a terminal window, enter the following command:
language:bash
python --version
You should see which version is being used by default. For example, you might see Python 2.7.13. If you see that your OS is using Python 2 by default, you'll need to change it to use the Python 3 installation. We want to this so that Python 3 is used every time we log in.
Enter the command:
language:bash
nano ~/.bashrc
.bashrc is a file that resides in the user's home directory (the user pi in this case). The file acts as a shell script that is run each time that specific user opens a terminal (or logs in over SSH, Serial, etc.). It can help to customize the user environment, and you will likely see a number of other commands already in there.
Scroll down to the bottom, and add the following command to the file:
language:bash
alias python='/usr/bin/python3'
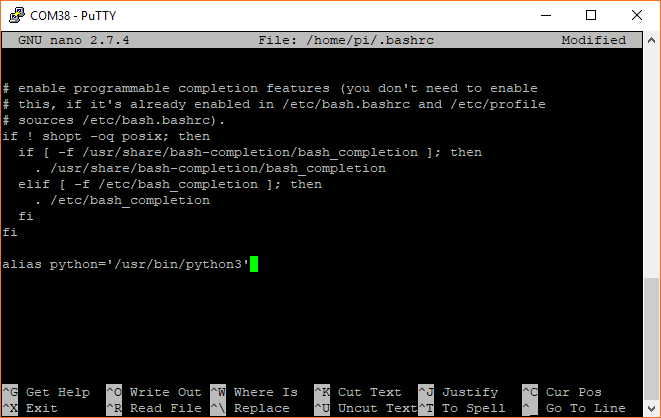
Exit out of nano by pressing ctrl+x, press the y key when prompted if you want to save the file, and press the enter key.
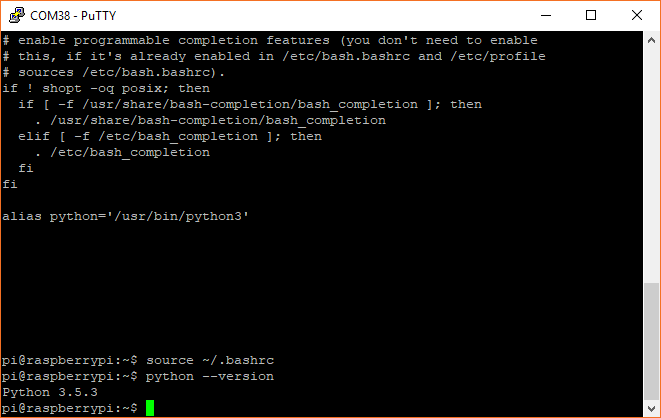
Instead of logging out and logging back in again to run the new command, you can simply run the contents of the .bashrc script by entering:
language:bash
source ~/.bashrc
Now, check the version of Python again:
language:bash
python --version
You should see some version of Python 3 being used.
Full Desktop: If you are using the full desktop version of Raspbian, you should have pip already installed.
Headless: If you are using Raspbian Lite, the Python package manager, pip, does not come pre-installed. As a result, you will need to install it with the commands:
language:bash
sudo apt-get update
sudo apt-get install python3-pip
Press y when prompted.
Note that to use pip for Python 3, you will need to use the command pip3. However, we can modify the .bashrc file to use pip instead of pip3, as the rest of the tutorial will show examples using pip:
language:bash
nano ~/.bashrc
Scroll down to the bottom, and add the following command to the file:
language:bash
alias pip=pip3
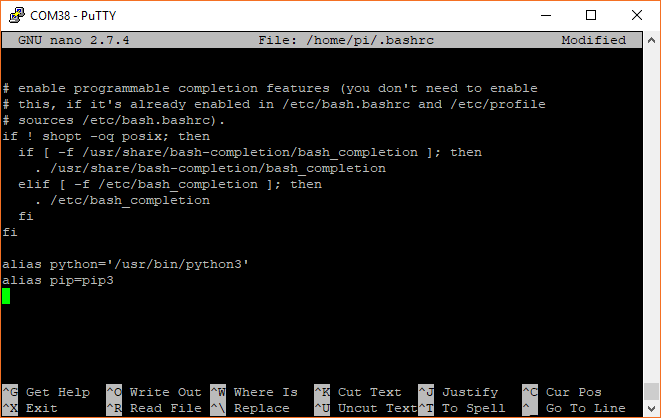
Exit out of nano with ctrl+x, press y and enter. Run the .bashrc script with:
language:bash
source ~/.bashrc
You should now be able to install Python packages using the pip command.
One of the coolest features of Python is that it is an interpreted language (OK, in reality, Python scripts are first compiled to some bytecode, and that bytecode is interpreted). This means that we don't need to run a separate compile step (i.e. translate our program into machine code) in order to run our program. In fact, we can even run the interpreter in what's known as interactive mode. This will allow us to test out commands one line at a time!
To start, we'll tell Python to print the phrase, "Hello, World!" to the terminal. We'll do this first from the interpreter and then we'll create a file and run it as a program. This will show you two of the main ways to interact with Python.
If you are curious about where the phrase "Hello, World!" comes from, this Wikipedia article gives a brief yet fascinating history.
From a terminal, enter the following commend to start the Python interpreter:
language:bash
python
You should be presented with a different command prompt, consisting of 3 greater-than signs >>>.
Type the following command:
language:bash
print("Hello, World!")
Once you press enter, you should see the phrase Hello, World! repeated back to you.
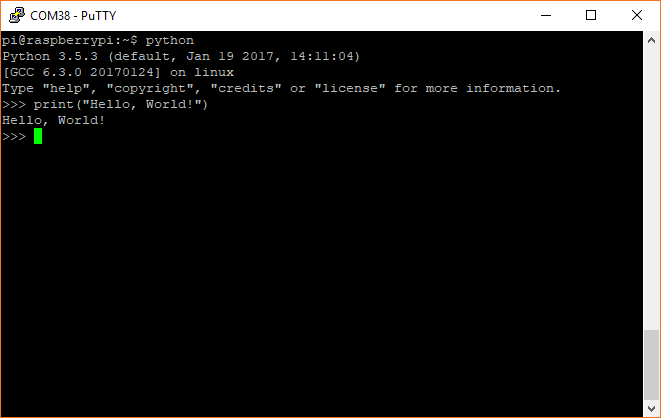
And that's it! You just ran your first Python program!
Exit out of the interpreter by entering:
language:bash
exit()
You can individually enter and run commands one line at a time in the Python interpreter, which is incredibly useful for trying out different commands (or using it as a calculator!). Often, you will want to save your commands together in one or more files so that you can run them all at once.
The simplest way to do this is to create a file from the terminal, although you are welcome to use the Raspbian graphical editor, Leafpad, as well (found under Accessories > Text Editor when you click on the Raspberry Pi icon in the top left).
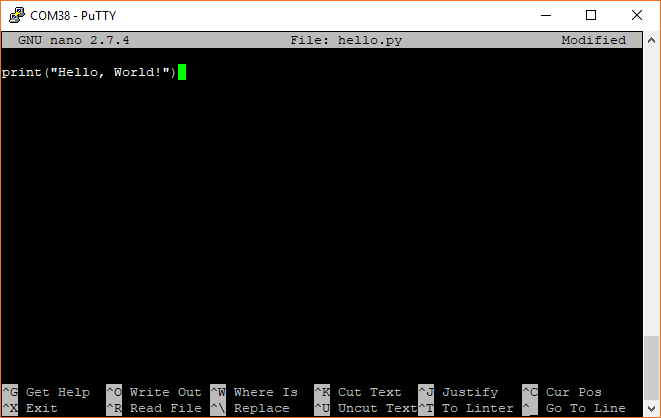
Still in a terminal, enter the command:
language:bash
nano hello.py
This creates a file named hello.py in your home directory (/home/pi) and starts editing it with the nano program.
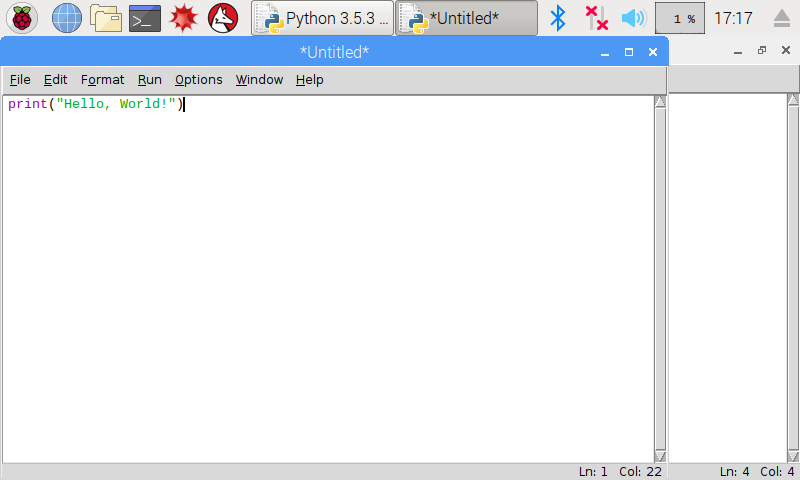
In this file, enter the following on the first line:
language:bash
print("Hello, World!")
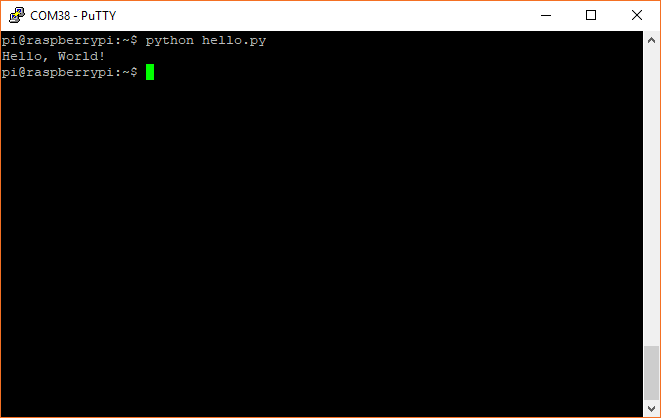
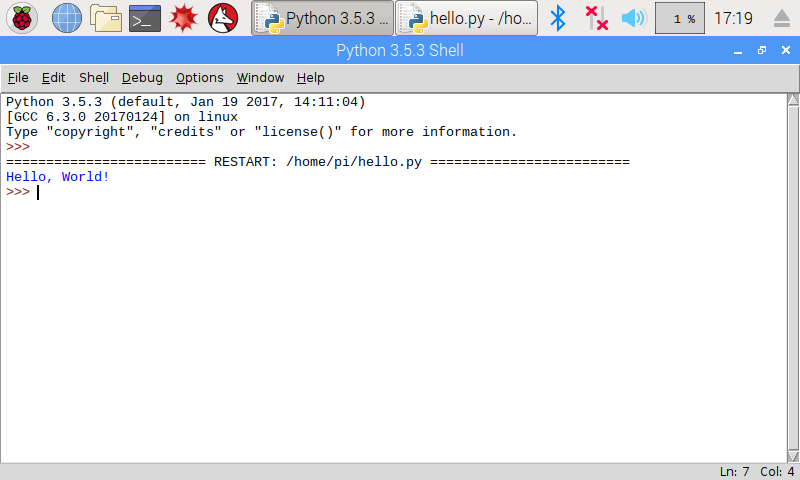
Save and exit (ctrl+x followed by y and then enter). Back in the Linux command prompt, enter the command:
language:bash
python hello.py
This should run the code found in the file hello.py. In our case, you should see the iconic phrase Hello, World! printed out in the console.
clear command.To summarize what we just did, you can use the python command on its own to begin an interactive interpreter session that allows you to type commands in real time. If you specify a file, such as python <FILE>.py, the Python interpreter will run the commands found in the file without giving you an interactive session.
Note that the filename suffix .py is not required for the interpreter to run the code found inside. However, it can be very helpful to keep your files organized so that when you see a file ending in .py, you will know that it contains Python code. The .py suffix is also necessary when making modules, which we'll cover later.
The simplest way to create Python programs is to write your code in a text editor (e.g. nano, vim, emacs, Midnight Commander, Leafpad, etc.), save it, and then run it from the terminal with the command python <FILE>.py. You are welcome to continue working through this guide using a text editor and command line.
Some users prefer to use an integrated development environment (IDE) when developing code. IDEs offer a number of benefits including syntax highlighting, code completion, one-click running, debugging hints, etc. However, most IDEs require a graphical interface to use, which means you will need to be on the full desktop version of Raspbian.
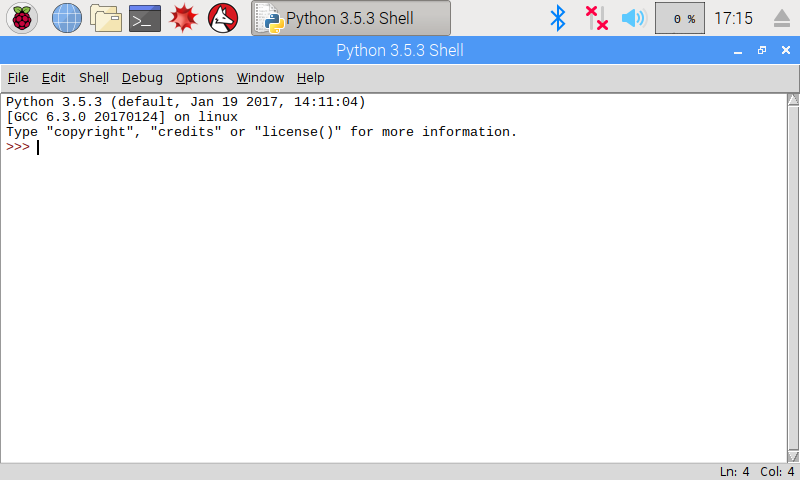
IDLE is the default Python editor that has been available on Raspbian for many generations. The good news is that it has a built-in interpreter, which allows you to run commands one at a time to test code. The bad news is that it doesn't show line numbers, and it only works with Python (but you're only here for Python anyway, right?).
Open IDLE by selecting the Raspberry Pi logo in the top-left, and click Programming > Python 3 (IDLE). You should be presented with the Python interactive interpreter.
To write a program, go to File > New File. Enter in your code.
Click File > Save As... to save your code to a Python file (don't forget the .py suffix!). Click Run > Run Module to run your program.
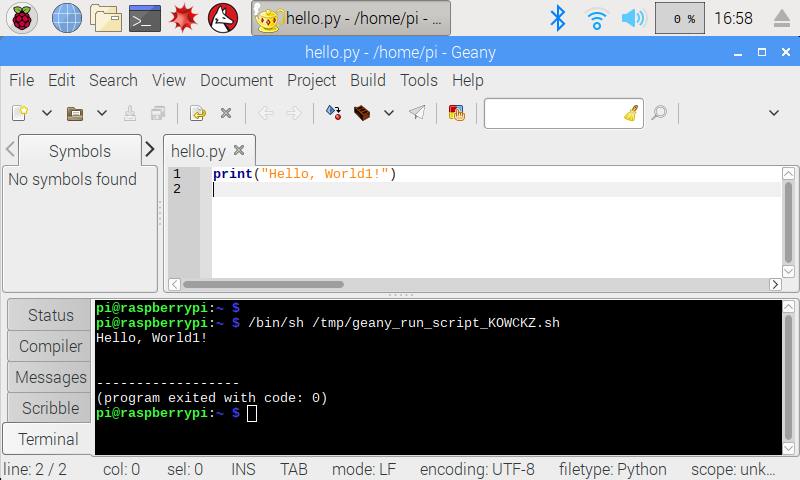
Geany is a great, beginner-friendly IDE that works with many different languages. However, it does not start up with a Python interactive interpreter. You can open Geany up by click on the Raspberry Pi logo in the top-left, and selecting Programming > Geany. Write your code in the file editor pane.
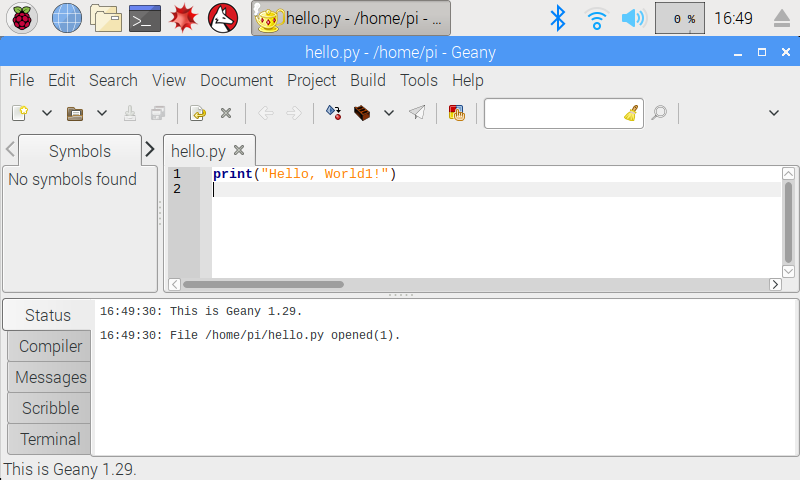
Save your code, making sure the filename ends with .py.
By default, Geany will attempt to open a new window to show the output of your code, which may or may not work on the Raspberry Pi. We can change it to run in the Terminal pane. Click Edit > Preferences. Select the Terminal tab and click to enable Execute programs in the VTE. Press enter to save and close the Preferences window.
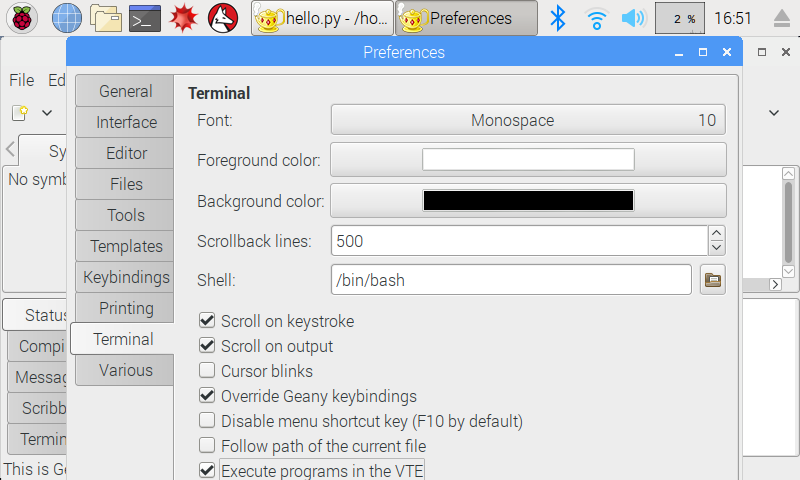
Click Build > Execute (or click the paper airplane icon) to run your code. You should see the output of your program appear in the Terminal pane of Geany.
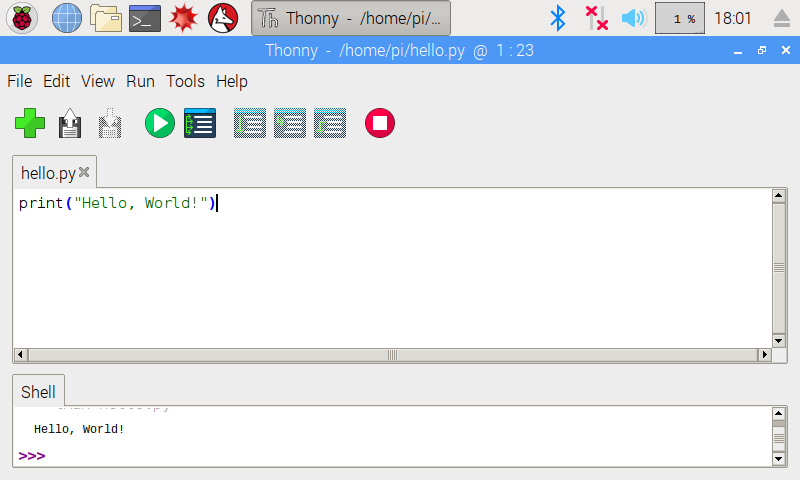
Finally, Thonny is another great, easy-to-use IDE that comes pre-loaded on Raspbian. It focuses on Python and has an interactive environment when you load the program. Start Thonny by clicking on the Raspberry Pi icon followed by Programming > Thonny Python IDE.
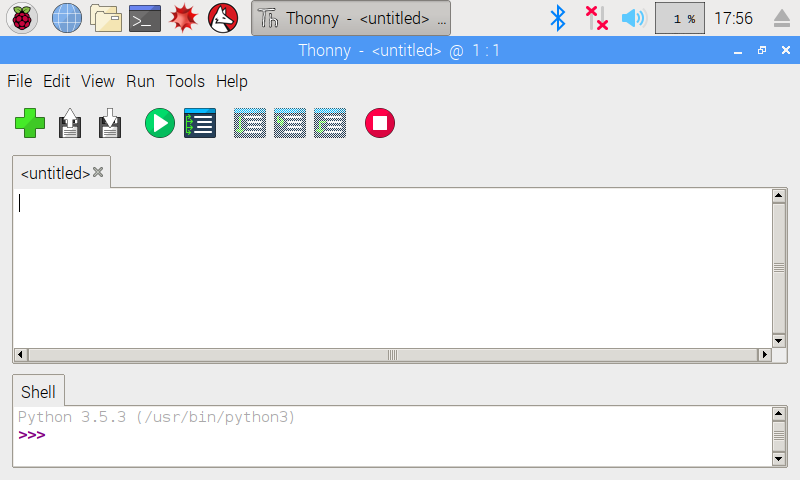
Write your program in the top pane, click File > Save as... to save it, and click Run > Run current script to execute the program. Output will appear in the bottom interpreter pane.
The bulk of this tutorial focuses on controlling hardware connected to the Raspberry Pi. To accomplish that, we will be using the Python programming language. As such, you should be familiar with some of the basics of Python, including literals, variables, operators, control flow, scope, and data structures. Depending on your comfort level with Python, we recommend the following:
Since we don't want to reinvent the wheel (there are many great tutorials and books out there on Python!), we will be referencing two texts:
If you would like additional help with programming in Python (more examples and exercises) than what's provided here, check out the following free sites: Non-Programmer's Tutorial for Python 3, learnpython.org, and Google's Python Class. After covering the basics of the Python language in this section, we're going to dive into flashing lights, reading sensors, and controlling motors!
A comment is any text to the right of the pound (or hash) symbol #. The Python interpreter ignores this text, and it can be useful for writing notes to yourself or other programmers about what's going on in the code.
Example:
language:python
# This is a comment and is not seen by the interpreter
print("Hello, World!")
Recommended reading:
Literals, also known as literal constants, are fixed values and include integers (e.g. 42), floating-point numbers (e.g. 6.23), and strings (e.g. "Hello, World!"). Note that strings need to be in between single quotation marks (' ') or in between double quotation marks (" ").
Example:
language:python
print(42)
print("hi")
Recommended reading:
Challenge: Change the print("Hello, World!") program we wrote earlier so that it prints out your name.
Variables are containers whose values can change. We can store a number or string in a variable and then retrieve that value later.
Example:
language:python
number = 42
print(number)
Recommended reading:
Challenge: Store your name in a variable and then print that variable's value to the terminal.
So far, we've been writing one expression per line in our program. For example:
language:python
message = "hello!"
print(message)
You can combine these two lines into one line by separating them with a semicolon ;:
language:python
message = "hello"; print(message)
These two programs will execute in exactly the same fashion. That being said, it's often recommended that you write programs with one logical line per physical line to make your code easier to read.
Recommended reading:
You can ask a user to enter information into the terminal by using the input() function. This will prompt the user to type out some text (including numbers) and then press enter to submit the text. Upon submission, the input() function will read the text and then return it as a string, which can be stored in a variable.
Whatever is in between the parentheses (known as arguments) will be printed to the screen prior to accepting user input.
Functions are sections of code that can be called by name. For example, print() is a function that takes the arguments and prints it out to the terminal. Notice in the example below that we separated two different arguments in print() by a comma. In this case, print() will print the different strings (or variables) in order on one line.
Note that you can use the int() function to turn a string into an integer (assuming the string is an integer).
Examples:
language:python
message = input("Type a message to yourself: ")
print("You said:", message)


number = int(input("Type a number:"))
print("You entered:", number)
Recommended reading:
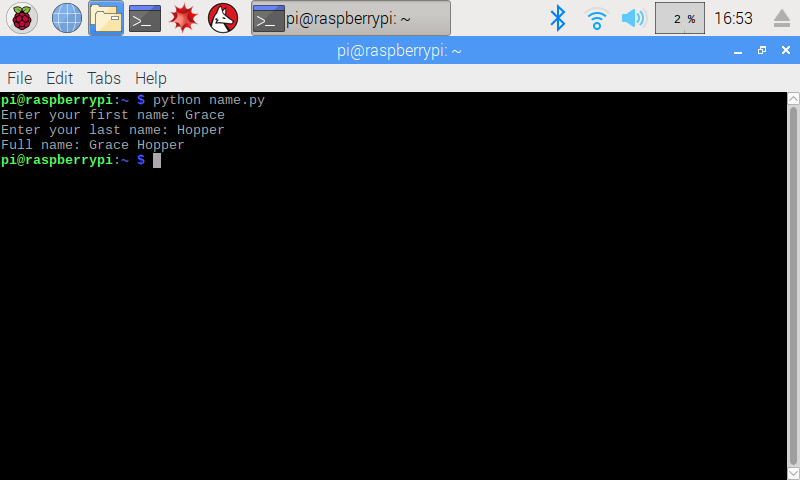
Challenge: Write a program that asks for the user's first name and last name (two separate input() calls) and then prints the user's first and last name on one line. An example of this program running should look like:
White space (number of spaces) at the beginning of a line is important in Python. Statements that form a group together must have the same level of indentation (amount of white space in front of the line). This will be important when we get into control flow statements (e.g. if, for) and functions.
If you have written programs in other languages before, you might be familiar with curly braces {}. In other languages, code in between these curly braces would form a group (or block) of code. In Python, a group (or block) of code is designated by the level of indentation of the individual lines of code.
Example:
language:python
answer = "yes"
guess = input("Is the sky blue? ")
if guess == answer:
    print("Correct!")
else:
    print("Try again")
if statements will be covered later, but note how the print() functions are indented, and thus form separate code groups underneath if and else statements.
Recommended reading:
An operator is a symbol that tells the interpreter to perform some mathematical, relational, or logical operation on one or more pieces of data and return the result.
Mathematical operators perform basic math operations on numbers:
| Operator | Description | Example |
|---|---|---|
+ |
Adds two numbers | 2 + 3 returns 5 |
- |
Subtracts one number from another | 8 - 5 returns 3 |
* |
Multiplies two numbers together | 4 * 6 returns 24 |
** |
Raises the first number to the power of the second number | 2 ** 4 returns 16 |
/ |
Divides the first number by the second number | 5 / 4 returns 1.25 |
// |
Divides the two numbers and rounds down to the nearest integer (divide and floor) | 5 / 4 returns 1 |
% |
Divides the first number by the second number and gives the remainder (modulo) | 19 % 8 returns 3 |
Logical operators compare two numbers and returns one of the Boolean values: True or False.
| Operator | Description | Example |
|---|---|---|
< |
True if the first number is less than the second, False otherwise |
5 < 3 returns False |
> |
True if the first number is greater than the second, False otherwise |
5 > 3 returns True |
<= |
True if the first number is equal to or less than the second, False otherwise |
2 <= 8 returns True |
>= |
True if the first number is equal to or greater than the second, False otherwise |
2 >= returns False |
== |
True if the first number is equal to the second, False otherwise |
6 == 6 returns True |
!= |
True if the first number is not equal to the second, False otherwise (not equal) |
6 != 6 returns False |
Compound logical operators require Boolean inputs and give a Boolean answer.
| Operator | Description | Example |
|---|---|---|
not |
Gives the opposite (True becomes False and vice versa) |
x = False; not x returns True |
and |
Returns True if both operands are True, False otherwise |
x = True; y = False; x and y returns False |
or |
Returns True if either of the operands are True, False otherwise |
x = True; y = False; c or y returns True |
Bitwise operators perform binary operations on the bits (1s and 0s) of the given numbers. This tutorial talks more about binary and bitwise operations.
| Operator | Description | Example |
|---|---|---|
& |
Returns a 1 in each bit position for which the corresponding bits of both operands are 1 (bitwise AND) | 3 & 5 returns 1 |
| |
Returns a 1 in each bit position for wich the corresponding bits of either or both operands are 1 (bitwise OR) | 3 | 5 returns 7 |
^ |
Returns a 1 in each bit position for which the corresponding bits of either but not both operands are 1 (bitwise XOR) | 3 ^ 5 returns 6 |
~ |
Inverts the bits in the given number (bitwise NOT) | ~5 returns -6 |
<< |
Shifts the bits of the first number to the left by the number of bits specified by the second number | 5 << 2 returns 20 |
>> |
Shifts the bits of the first number to the right by the number of bits specified by the second number | 5 >> 2 returns 1 |
Recommended reading:
Challenge: Ask the user for two integers, and print the addition, subtraction, multiplication, division, and modulo of those numbers. For example, if you enter the numbers 6 and 7, the output should look like:
First number: 6
Second number: 7
13
-1
42
0.8571428571428571
6
The Python interpreter executes statements in your code from the top to the bottom of the file, in sequential order. That is unless, of course, we employ some time of control flow statements to break this normal sequential flow.
We introduce the range(x, y) function in the examples below, which generates a list of numbers between the first number, x (inclusive), and the second number, y (exclusive).
| Statement | Description | Example |
|---|---|---|
if
elif
else
|
If a condition is true, execute the block of code underneath the if statement. If not, see if the condition is true in one or more else if (elif) statements. If one of those is true, execute the code block under that. Otherwise, execute the code block underneath the else statement. elif and else statements are optional. |
number = 42 |
while |
A while loop executes the block of code underneath it repeatedly as long as the condition is true. | counter = 15 |
for..in |
Iterate over a sequence of numbers or objects. The variable declared in a for loop assumes the value of one of the numbers (or objects) during each iteration of the loop. | for i in range(1, 11): |
break |
Use the break statement to exit out of a loop. | while True: |
continue |
The continue statement works similar to break, but instead of exiting the loop, it stops the current iteration and returns to the top of the loop. | for i in range(1, 6): |
Recommended reading:
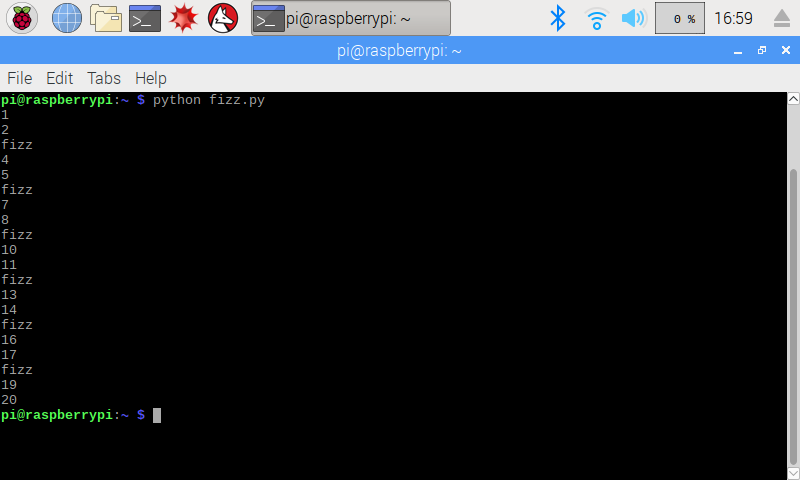
Challenge: Write a program that prints integers counting up from 1 to 20, except that for every multiple of 3 (3, 6, 9, etc.), the word "fizz" is printed instead. The output should look like the following:
Functions allow you to name a block of code and then reuse that code by calling its name. You can pass data to a function through variables known as parameters (note that the variables in the function definition are called parameters whereas the actual data itself being passed are known as arguments). Data can also be passed back to the calling statement using the return statement.
An example of a function definition would look like:
language:python
def functionName(parameter1, parameter2):
    # Code goes here
You can call this function elsewhere in your code with functionName(argument1, argument2).
Note that variables declared inside the function definition are known as having local scope. This means that they cannot be accessed outside of that function. Variables declared at the top level of the program (i.e. outside any functions, loops, or classes) are known as having global scope and can be accessed anywhere in the program (including inside functions).
Important: Any functions you create must be defined before you use them! If you try to call a function higher up in the code (before its def definition), you'll likely get an error such as:
language:python
NameError: name 'FUNCTION_NAME' is not defined
Python has a number of built-in functions that can help you (we've already seen three: print(), int(), and range()). A list of these functions can be found in the Python Tutorial.
Example:
language:python
def add(x, y):
    sum = x + y
    return sum

print(add(2, 3))
Recommended reading:
Challenge: Starting with the code below, implement the sumTo() function that takes an integer as a parameter (n), sums all the whole numbers from 1 to n (including n), and returns the sum. You may assume that the input, n, will always be a positive whole number (do not worry about handling negative numbers).
language:python
def sumTo(n):
    # YOUR CODE GOES HERE

# Should be 1
print(sumTo(1))

# Should be 45
print(sumTo(9))

# Should be 5050
print(sumTo(100))
We have not talked about objects yet, but in reality, you've been using them all along. The secret to Python is that everything is an object. That's right: everything, including functions and integers.
An object is simply a collection of data stored somewhere in your computer's memory. What makes an object special in a programming language is the ability for it to store information and perform actions. We've already seen an object's ability to store data (for example, a = 3 means that a is an integer object and stores the information 3). But how do we get an object to perform an action?
Objects are given a set of functions as defined by their class, which acts as a blueprint--telling the objects what they can and can't do or information it can and can't hold. When we talk about functions within a class (or objects), we call them methods.
For example, we can test if a floating point number is an integer by using the built-in is_integer() method. Note that this method is only accessible from float objects! We can't call is_integer() on its own, so we use the dot-notation (.) to have the float object call the is_integer() method from within itself.
Example:
language:python
a = 3.0
b = 7.32

print(a.is_integer())
print(b.is_integer())
Note that we can't use an integer as a float! For example, if we said c = 8, then c is an integer, not a float! If c is an integer, there is no .is_integer() method in integers, so calling c.is_intger() would fail (and throw an interpreter error). Try it! To force an integer value to be a floating point number, we simply add .0 after it (just like we did with a = 3.0).
Recommended reading:
Challenge: Modify the code below so that the phrase stored in my_string is converted to all lower case letters and printed to the terminal. Hint: review the String Methods in the Python Reference Guide to find a built-in method to do this for you.
language:python
my_string = "THiS iS A TEst!"

# Should print "this is a test!"
# YOUR CODE GOES HERE
In addition to variables and objects, Python has four other ways to store data: list, tuple, dictionary, set. These structures hold a collection of related data, and each of them has a slightly different way of interacting with it.
| Structure | Description | Example |
|---|---|---|
| List | A list is a sequence of ordered items. You can access items in a list using brackets [] and an index (e.g. list[2]). Note that indeces are 0-based, which means list[0] will access the first item in the list. Because lists can be modified, they are known as mutable. |
my_list = [1, 5, 73, -3] |
| Tuple | A tuple works just like a list (an ordered set). The difference is that a tuple is immutable, which means you cannot change the values once they are set. A tuple is usually specified by parentheses (). While the parentheses are not necessary, they are highly recommended to make your code easier to read. |
my_tuple = ("bird", "plane", 5, "train") |
| Dictionary | A dictionary is a collection of assciated key and value pairs. Similar to how a phonebook works: you look up someone's name (key) and you find their phone number (value). Dictionaries are defined by curly braces {}, and key/value pairs are separated by a colon :. Dictionaries are mutable. |
my_dictionary = {"name": "Bruce", "aka": "The Hulk"} |
| Set | A set is a mutable, unordered collection with no duplicate elements. Sets are optimized for determining if an item is in the set (and you don't care about the order of items). Sets are great if you want to implement any sort of set theory in Python. | my_set_1 = set(["orange", "banana"]) |
Recommended reading:
Challenge: Starting with the code below, implement the average() function to compute the average of the numbers given to it in list form. Hint: you will probably want to use the len() function.
language:python
def average(num_list):
    # YOUR CODE GOES HERE

# Should print 5.0
list_1 = [4, 7, 9, 0]
print(average(list_1))

# Should print 4.406333333333
list_2 = [-3.2, 6.419, 10]
print(average(list_2))

# Should print 42.0
list_3 = [42]
print(average(list_3))
Modules are another way to reuse code and help you organize your program. They are simply files that are imported into your main program. After importing a module, you can use a module in much the same way you would an object: access constants and functions using the dot-notation.
Example:
Save the following file as stringmod.py:
language:python
a = 42

def string_to_list(s):
    c_list = []
    for c in s:
        c_list.append(c)
    return c_list
In the same folder as stringmod.py, run the following code (either in the interpreter or saved as a file):
language:python
import stringmod

s = "Hello!"
print(stringmod.a)
print(stringmod.string_to_list(s))
Recommended reading:
Challenge: Python comes with several standard modules that you can import into your program. One of them is the math module, which you can use with import math. Use the constants and functions found in the math module to perform the following actions:
Programs almost never work right away, so don't sweat it! The art and science of finding and fixing problems in your code is known as debugging. The most helpful debugging tool is the standard Python output. If there is a problem with your code, it will likely tell you where the error is and what's wrong with it.
For example, let's take the following code snippet. In it, we forget to indent our code underneath our for loop.
language:python
a = [1, 2, 3, 4]

for n in a:
print(n)
If you run this code, you'll see that the Python interpreter is super helpful by saying it was looking for an indented piece of code around line 4.
language:bash
  File "test_01.py", line 4
    print(n)
        ^
IndentationError: expected an indented block
Here's another example. Can you spot the error?
language:python
a = [1, 2, 3, 4]

for n in a
    print(n)
We forgot the colon after the for loop! The interpreter will let us know by telling us:
language:bash
  File "test_01.py", line 3
    for n in a
             ^
SyntaxError: invalid syntax
"Invalid syntax" is a little vague, but it tells you to look around line 3 for something that might be wrong, such as a missing colon, too many parentheses, a single quote instead of a double quote, etc.
What happens if your code runs, but it doesn't output the value(s) you expect? This is on you, the programmer, to find and fix! Adding print() statements throughout your code can help you identify where something might have went wrong.
Try running this code:
language:python
for i in range(1, 10):
    if i == 10:
        print("end")
Why don't you see "end" appear in the terminal? To help diagnose this problem, we can add a print() statement to see what's going on:
language:python
for i in range(1, 10):
    print(i)
    if i == 10:
        print("end")
When we run this, we see the values of i printed in order.
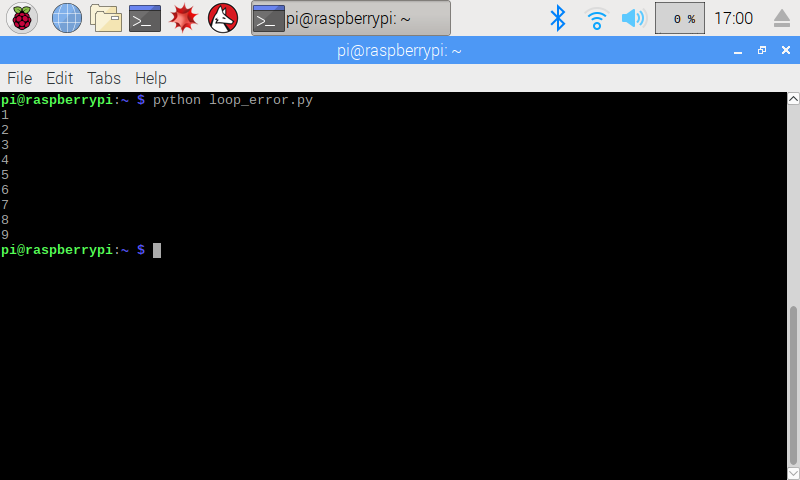
A-ha! It turns out that i never reaches 10. That's because the second number in the range() function is exclusive. If we need it to count to 10, then we should change it to:
language:python
for i in range(1, 11):
    if i == 10:
        print("end")
Thanks for the help, print()!
Recommended reading:
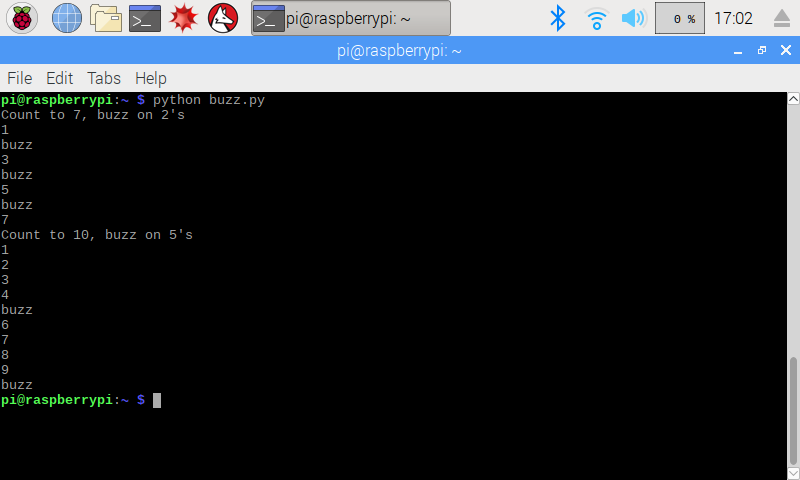
Challenge: Find the 7 errors in the program below. When you fix the errors and run it, it should print numbers from 1 to the first argument, replacing multiples of the second argument with the word "buzz".
language:python
print("Count to 7, buzz on 2's")
buzz(7, 2)

print('Count to 10, buzz on 5's")
buzz(10, 5)

def buzz(n):
    for i in range(1, n):
        if i % z = 0:
            print("buzz")
        else
            print(n)
Here is the program running successfully:
In the embedded world, the first thing many developers like to do is blink an LED. In a sense, it is the "Hello, World!" of embedded electronics. It proves that we can run code and control some hardware (with immediate, and often amusing, results). In this section, we'll start by blinking an LED, and we'll take it a step further by also responding to a push button.
One of the things that makes the Raspberry Pi better for learning electronics than most other computers is its ability to control the voltage on several of its easily accessible pins. If you hold your Pi facing up in portrait mode (as shown in the photo below), on the right side, you will see a header with 40 pins. This header contains outputs for 3.3V, 5V, Ground, and lots of General Purpose Input/Output (GPIO) pins!
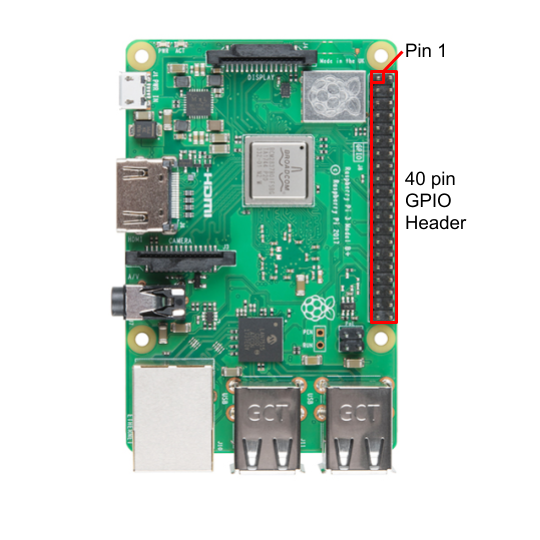
Note that pin 1 is on the top left of the header, as shown in the photo. With pin 1 in this position, we can see what each of the pins is used for:
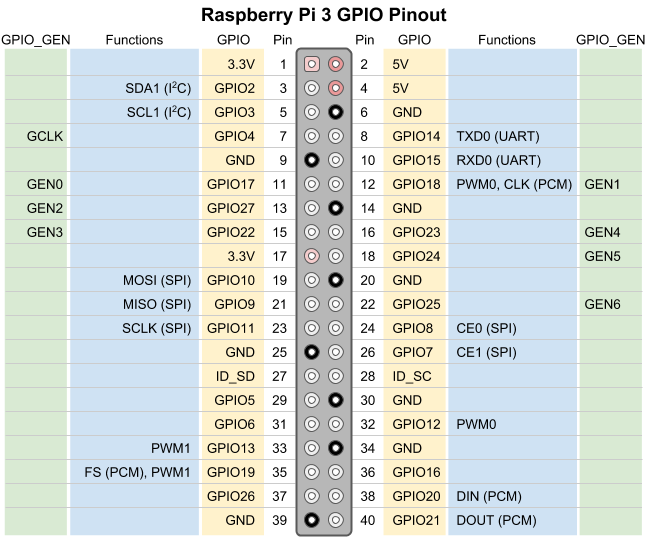
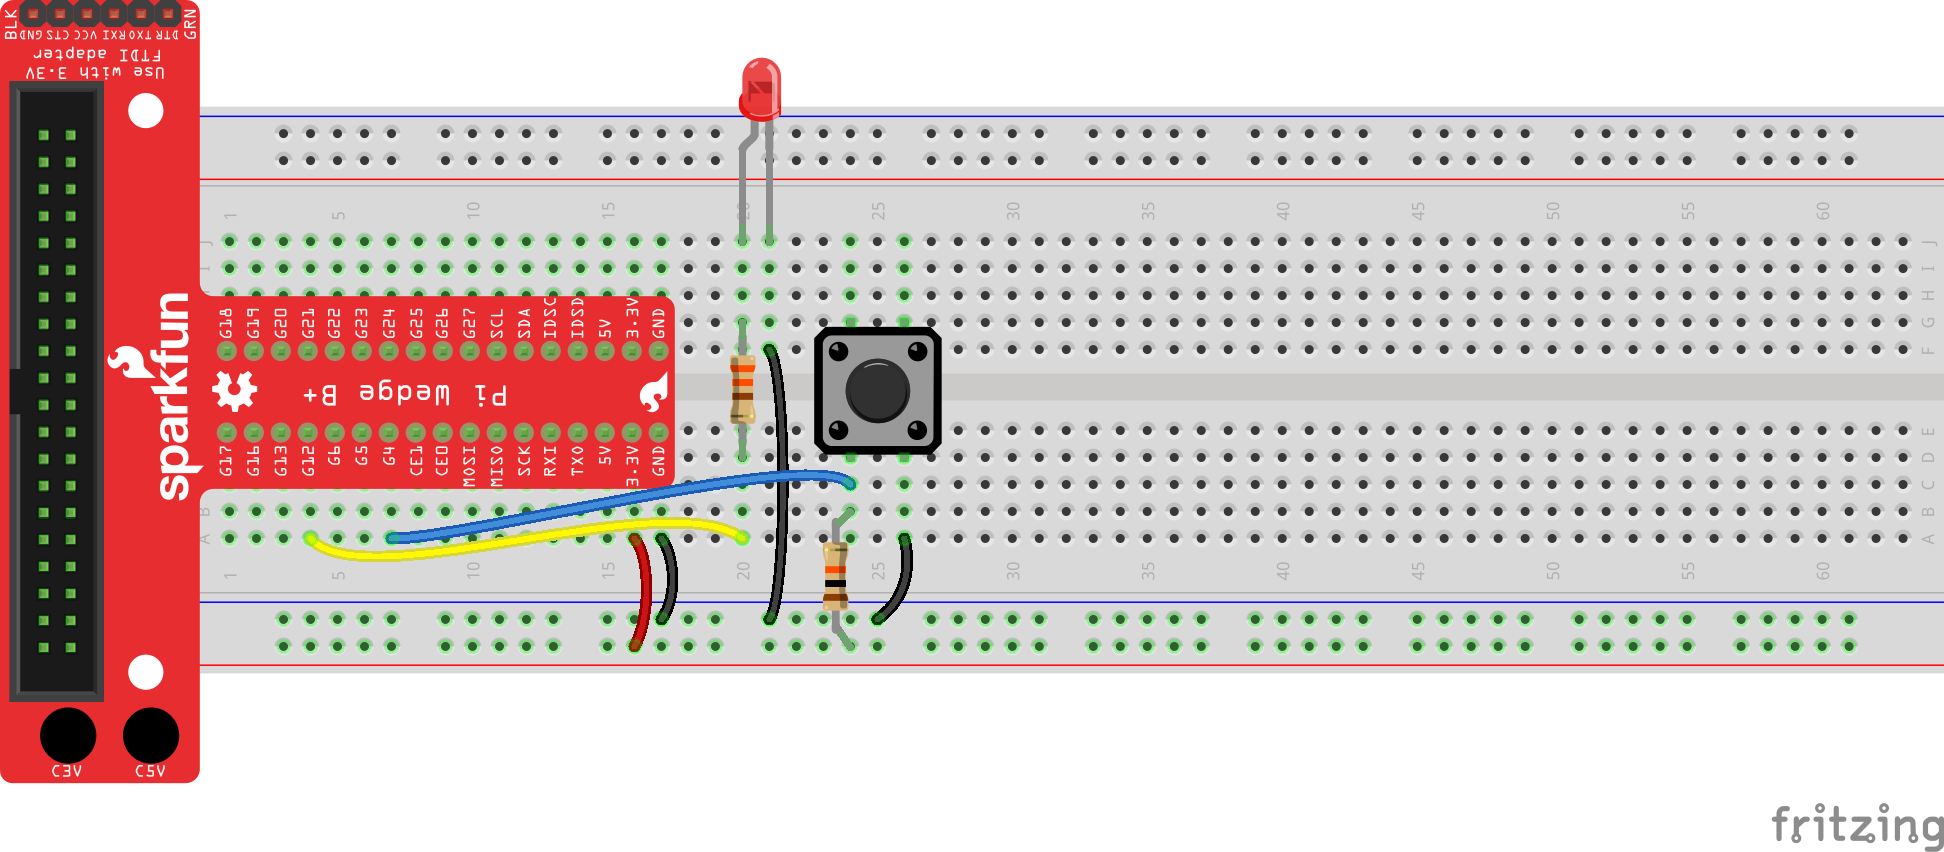
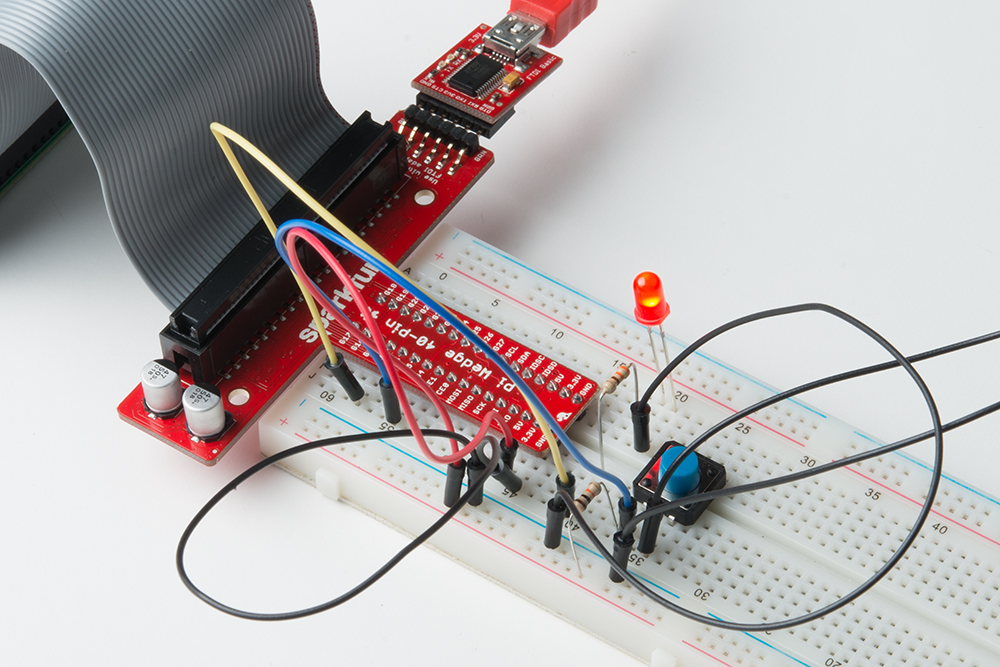
You can connect the Raspberry Pi to the LED and button directly, or you can go through the SparkFun Pi Wedge to make the connections easier on a breadboard. The important thing is to note that we are using the GPIO numbers in our code (listed as Gx on the Pi Wedge, where x is the GPIO number). These GPIO numbers are shown in the yellow boxes in the GPIO Pinout diagram above.
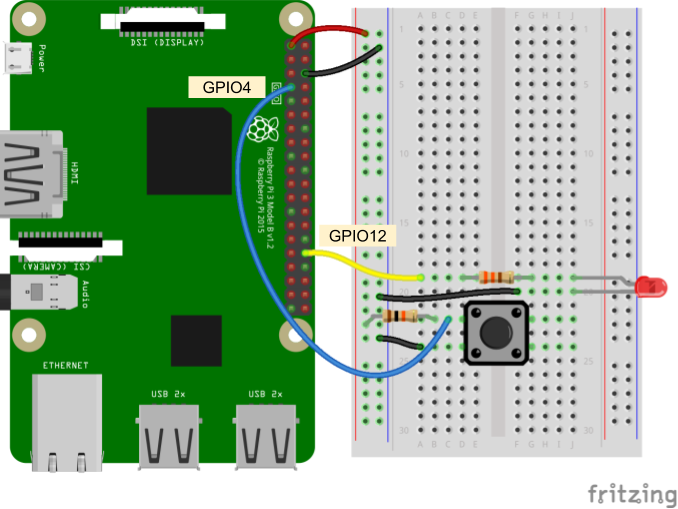
If you have a Pi Wedge, it can make connecting to external hardware on a breadboard easier. If you don't, you can still connect directly to the Raspberry Pi with jumper wires.
Connecting through a Pi Wedge:
Connecting directly to the Raspberry Pi:


Depending on your version of Raspbian, you may or may not have to install the RPi.GPIO package (e.g. Raspbian Lite does not come with some Python packages pre-installed). In a terminal, enter the following:
language:bash
pip install rpi.gpio
In a new file, enter the following code:
language:python
import time
import RPi.GPIO as GPIO

# Pin definitions
led_pin = 12

# Suppress warnings
GPIO.setwarnings(False)

# Use "GPIO" pin numbering
GPIO.setmode(GPIO.BCM)

# Set LED pin as output
GPIO.setup(led_pin, GPIO.OUT)

# Blink forever
while True:
    GPIO.output(led_pin, GPIO.HIGH) # Turn LED on
    time.sleep(1)                   # Delay for 1 second
    GPIO.output(led_pin, GPIO.LOW)  # Turn LED off
    time.sleep(1)                   # Delay for 1 second
Save the file (I named my file blink.py). Run the code from the terminal by entering:
language:bash
python blink.py
You should see your LED begin to blink on and off every second:
Once you've gotten bored of watching the LED, end the program by pressing ctrl + c.
pip install RPi.GPIO in a terminal.Code to Note:
To control hardware from the Raspberry Pi, we rely on the RPi.GPIO module. This module (likely known as a "library" in other languages) is specifically designed to help us toggle pins and talk to other pieces of hardware. Lucky for us, it comes pre-packaged with Raspbian!
In the first two lines, you see that we imported modules, but we added a few things onto those imports. First up, we used the keyword as:
language:python
import RPi.GPIO as GPIO
RPi.GPIO is the name of the module. By saying as GPIO, we change how we want to refer to that module in the rest of the program. This allows us to type
language:python
GPIO.output(led_pin, GPIO.HIGH)
instead of the much longer
language:python
RPi.GPIO.output(led_pin, RPi.GPIO.HIGH)
While it's generally not a good idea to disable warnings while coding, we added the following line:
language:python
GPIO.setwarnings(False)
Without it, you'll get a warning from the interpreter when you try to run the blink program again:
language:python
blink.py:14: RuntimeWarning: This channel is already in use, continuing anyway.  Use GPIO.setwarnings(False) to disable warnings.
  GPIO.setup(led_pin, GPIO.OUT)
This is because we did not shut down the GPIO 12 pin nicely when we exited the program. To do this, we would want to add a GPIO.cleanup() line at the end of our program. However, because we wrote our program to run forever, we have to interrupt the program to stop it (and a call to cleanup() would never occur). For the time being, it's enough to just ignore the warnings.
Challenge: Change the program to make the LED blink like a heartbeat: 2 quick flashes in succession and then a longer delay.
We've seen how to turn an LED on and off, but how do we control its brightness levels? An LED's brightness is determined by controlling the amount of current flowing through it, but that requires a lot more hardware components. A simple trick we can do is to flash the LED faster than the eye can see!
By controlling the amount of time the LED is on versus off, we can change its perceived brightness. This is known as pulse width modulation (PWM). We have two separate PWM channels for our use: PWM0 and PWM1. We can output a PWM signal on PWM0, which will show up on GPIO12 and GPIO18. Additionally, PWM1 controls the signal for GPIO13 and GPIO19.
Copy the following code into a file (e.g. pwm.py):
language:python
import time
import RPi.GPIO as GPIO

# Pin definitions
led_pin = 12

# Use "GPIO" pin numbering
GPIO.setmode(GPIO.BCM)

# Set LED pin as output
GPIO.setup(led_pin, GPIO.OUT)

# Initialize pwm object with 50 Hz and 0% duty cycle
pwm = GPIO.PWM(led_pin, 50)
pwm.start(0)

# Set PWM duty cycle to 50%, wait, then to 90%
pwm.ChangeDutyCycle(50)
time.sleep(2)
pwm.ChangeDutyCycle(90)
time.sleep(2)

# Stop, cleanup, and exit
pwm.stop()
GPIO.cleanup()
Run it (e.g. python pwm.py), and you should see the LED start dim, wait 2 seconds, grow brighter, wait another 2 seconds, and then turn off before exiting the program.
Code to Note:
In the first part, we use the .output() function of the GPIO module to toggle the LED. Here, we create PWM object and store it in the variable pwm. We do this with the line:
language:python
pwm = GPIO.PWM(led_pin, 50)
From there, we can control the PWM by calling methods within that object. For example, we change the brightness by calling:
language:python
pwm.ChangeDutyCycle(t)
where t is some number between 0-100 (0 being off and 100 being always on). Putting in the number 50 would mean that the LED is on half the time and off the other half the time (it's just toggling so fast that you can't see it!).
Also, we left out the GPIO.setwarnings() call, since we can actually call GPIO.cleanup() at the end of our program! If you try to run the PWM code twice, you should not see any warnings.
Challenge: Make the LED slowly fade from off to fully bright over the course of about 2 seconds. Once it has reached maximum brightness, the LED should turn off and repeat the fading process again. Have the LED fade on over and over again forever.
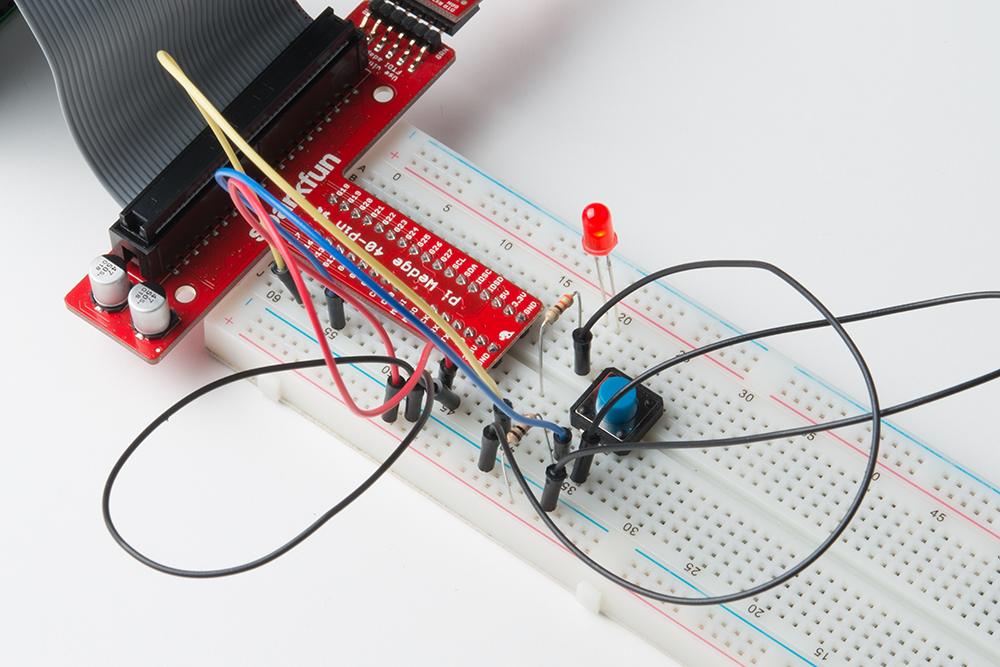
Let's add some user input! Save the following to a file (such as button.py).
language:python
import time
import RPi.GPIO as GPIO

# Pins definitions
btn_pin = 4
led_pin = 12

# Set up pins
GPIO.setmode(GPIO.BCM)
GPIO.setup(btn_pin, GPIO.IN)
GPIO.setup(led_pin, GPIO.OUT)

# If button is pushed, light up LED
try:
    while True:
        if GPIO.input(btn_pin):
            GPIO.output(led_pin, GPIO.LOW)
        else:
            GPIO.output(led_pin, GPIO.HIGH)

# When you press ctrl+c, this will be called
finally:
    GPIO.cleanup()
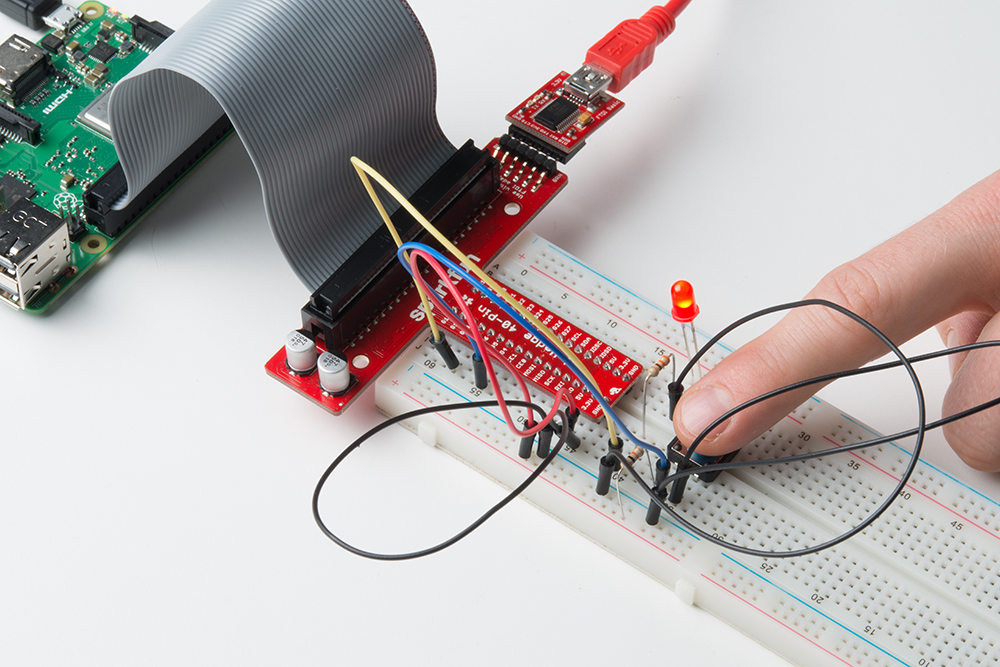
Run it the code (python button.py). Now, when you press the button, the LED should turn on.
Code to Note:
The first odd thing you might notice is the try: and finally: statements. These are part of the error and exception handling abilities in Python (you can read more about them in the Exceptions chapter in Byte of Python).
If we press ctrl + x while the program is inside the while True: loop, an exception will be thrown. We don't care to do anything with that exception (hence why you don't see an except block, like you might have read about in "exception handling"). Regardless of whatever the exception is, we do want to call our GPIO.cleaup() function. That way, we can close down the GPIO and not have to worry about any more errors!
The other odd thing you might see is that if GPIO.input(btn_pin) is True (which means the pin is logic high, or 3.3V), we turn the LED off. Wait, what?
In our circuit, our button has a pull-up resistor connecting one of the pins to a constant 3.3V. This means that in its default state (not pressed), the pin connected to the button is 3.3V. When we press the button, the pin is connected to ground (through the button's internal contacts), and the pin becomes logic low (0V).
As a result, when the button is not pressed, we get logic high (GPIO.input() returns True), and when the button is pressed, we get logic low (GPIO.input() returns False).
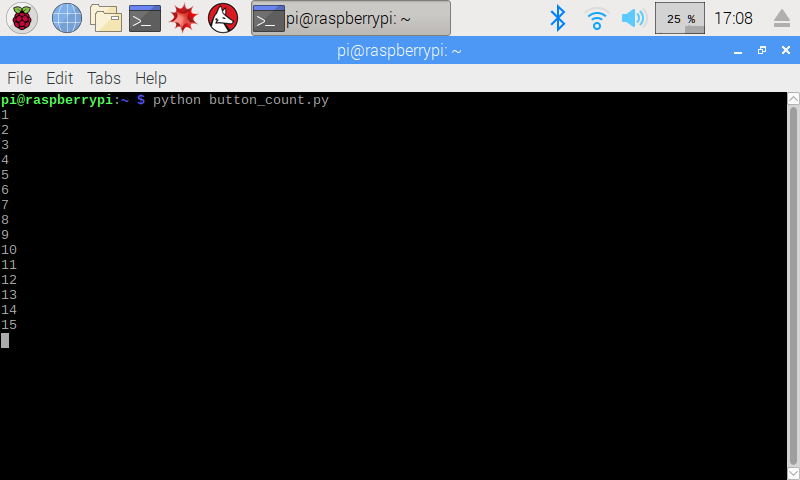
Challenge: Write a program so that whenever you press the button, a variable is incremented by one and is printed to the screen. This should work as a simple button counter. Start at 0, and each time you press the button, it counts up on the screen.
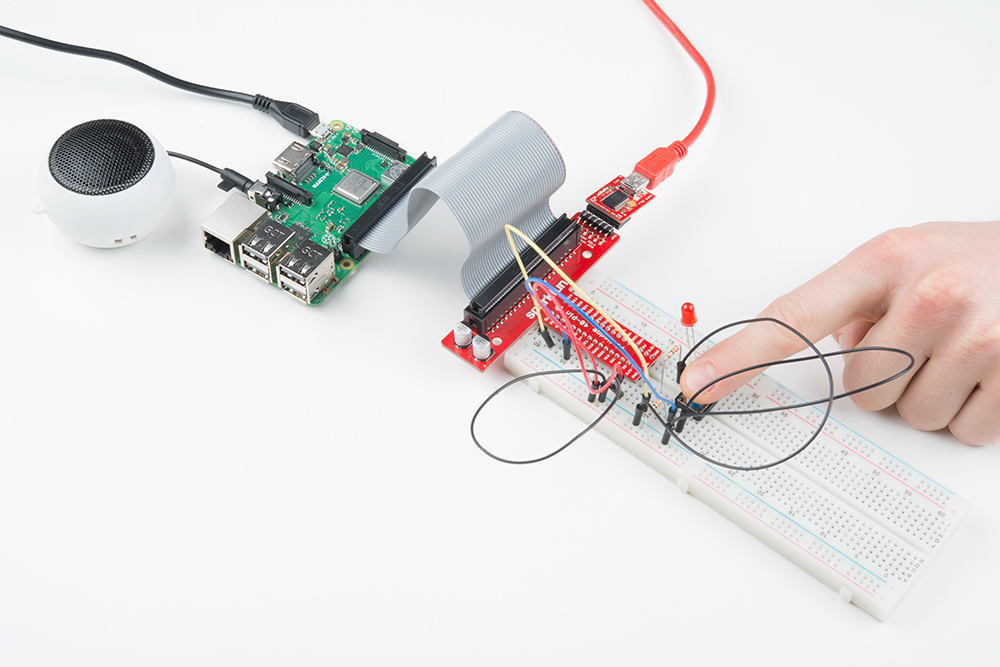
Downloading audio clips and playing them on a Raspberry Pi is quite simple. We will use the command line to download a .wav file, adjust the audio, and test playing the file. Then, we'll write a Python script to play that file whenever we press a button!
Good news, everyone! We will be using the same circuit from the previous experiment.
Connecting through a Pi Wedge:
Connecting directly to the Raspberry Pi:
You will also need to plug an external speaker (or a set of headphones) into the Pi's headphone jack. If you are using the Hamburger Mini Speaker, make sure it is charged and turned on.
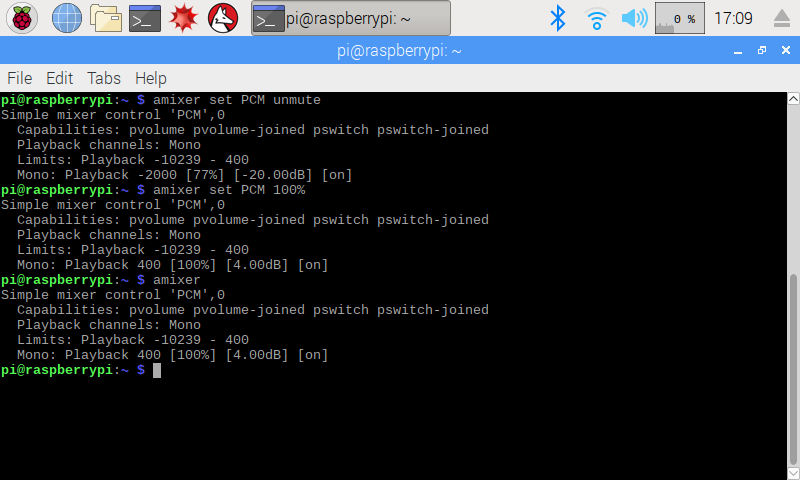
Before we write code, we need to configure the audio from the command line. Open a terminal (if you are using Raspbian with a desktop).
sudo rasp-config advanced options. Refer to the Configure Your Pi section to see how to do this.From a terminal, enter the following commands:
language:bash
amixer set PCM unmute
amixer set PCM 100%
Verify that your audio is on and up by entering the command:
language:bash
amixer
At the end of the printout, you should see Mono: Playback 400 [100%] [4.00dB] [on].
Download a free sound clip (we'll go with some applause, because we're awesome):
language:bash
wget http://www.pacdv.com/sounds/people_sound_effects/applause-1.wav
Test playing this sound with:
language:bash
aplay applause-1.wav
You should hear some nice cheering and clapping out of your speaker (or headphones).
Depending on your version of Raspbian, you may or may not have to install the pygame package (e.g. Raspbian Lite does not come with some Python packages pre-installed). In a terminal, enter the following:
language:bash
sudo apt-get update
sudo apt-get install python3-pygame
In a new file, enter the following code:
language:python
import time
import RPi.GPIO as GPIO
from pygame import mixer

# Pins definitions
btn_pin = 4

# Set up pins
GPIO.setmode(GPIO.BCM)
GPIO.setup(btn_pin, GPIO.IN)

# Initialize pygame mixer
mixer.init()

# Remember the current and previous button states
current_state = True
prev_state = True

# Load the sounds
sound = mixer.Sound('applause-1.wav')

# If button is pushed, light up LED
try:
    while True:
        current_state = GPIO.input(btn_pin)
        if (current_state == False) and (prev_state == True):
            sound.play()
        prev_state = current_state

# When you press ctrl+c, this will be called
finally:
    GPIO.cleanup()
Save the file (e.g. applause.py), and start the program with python applause.py. Push the button, and you should hear some congratulatory sounds!
pip install pygame in a terminal.Code to Note:
To play sounds, we are using the pygame package. A package in Python is a collection of modules grouped together. Lucky for us, pygame comes pre-installed with Python on Raspbian. To use it, we just need to use from pygame in our code, and we can specify which module we want to use by saying import after it. For example, we might say:
language:python
from pygame import mixer
This says that we want to import the mixer module from the pygame package. Later in our code, we can use the mixer module to create a Sound object with:
language:python
sound = mixer.Sound('applause-1.wav`)
Our downloaded file, applause-1.wav is used to create a Sound object, which we store in the sound variable. We can call the .play() method in our Sound object to start playing the .wav file.
language:python
sound.play()
Challenge: You might have noticed that if you press the button again while the sound is playing, an new sound will start that overlaps the first clip. Let's fix this! Change the code so that when you press the button while the sound is playing, the sound stops. When you press it again, the sound clip starts over again. Also, because we can, have the LED light up while the sound is playing. Hint: it might help to look at the pygame.mixer methods for determining if sound is being played (or "mixed") and how to stop a sound.
Many sensors out there use an analog voltage to convey their measurement data. For example, photocells change their resistance depending on how much light is falling on the sensor. By using a voltage divider in our circuit, we can effectively measure the amount of ambient light by measuring a voltage.
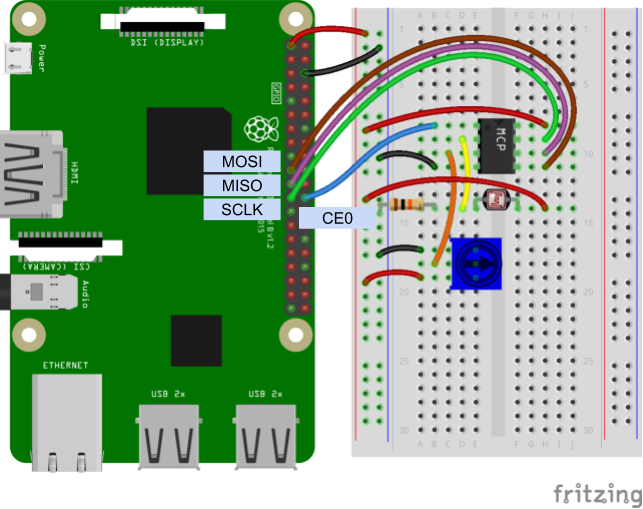
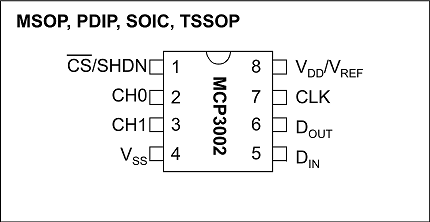
The bad news is that our Raspberry Pi does not come with any way to measure an analog voltage. To do that, we'll need to rely on a separate piece of circuitry: an analog-to-digital converter (ADC). Specifically, we'll be using the Microchip MCP3002, which is a niftly little chip that can measure up to 2 analog voltages on separate channels and report their values over the Serial Peripheral Interface (SPI) interface.
We'll use the built-in spidev module in Python to send commands and read replies on the SPI bus.
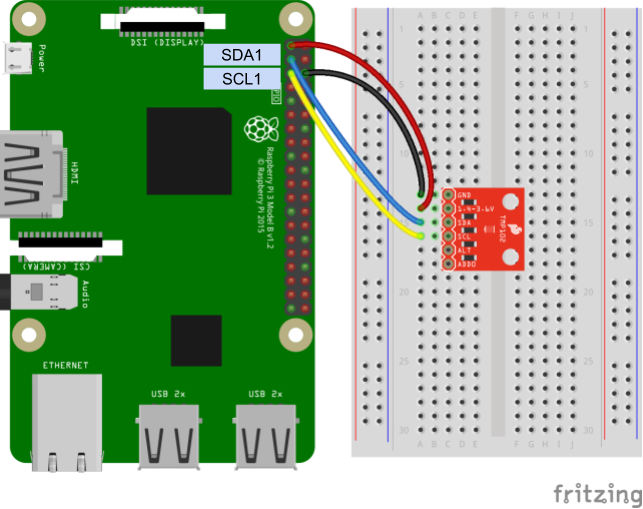
Refer to the Raspberry Pi Pinout section in the previous example if you would like to see what pins and GPIO labels belong to each of these connections.
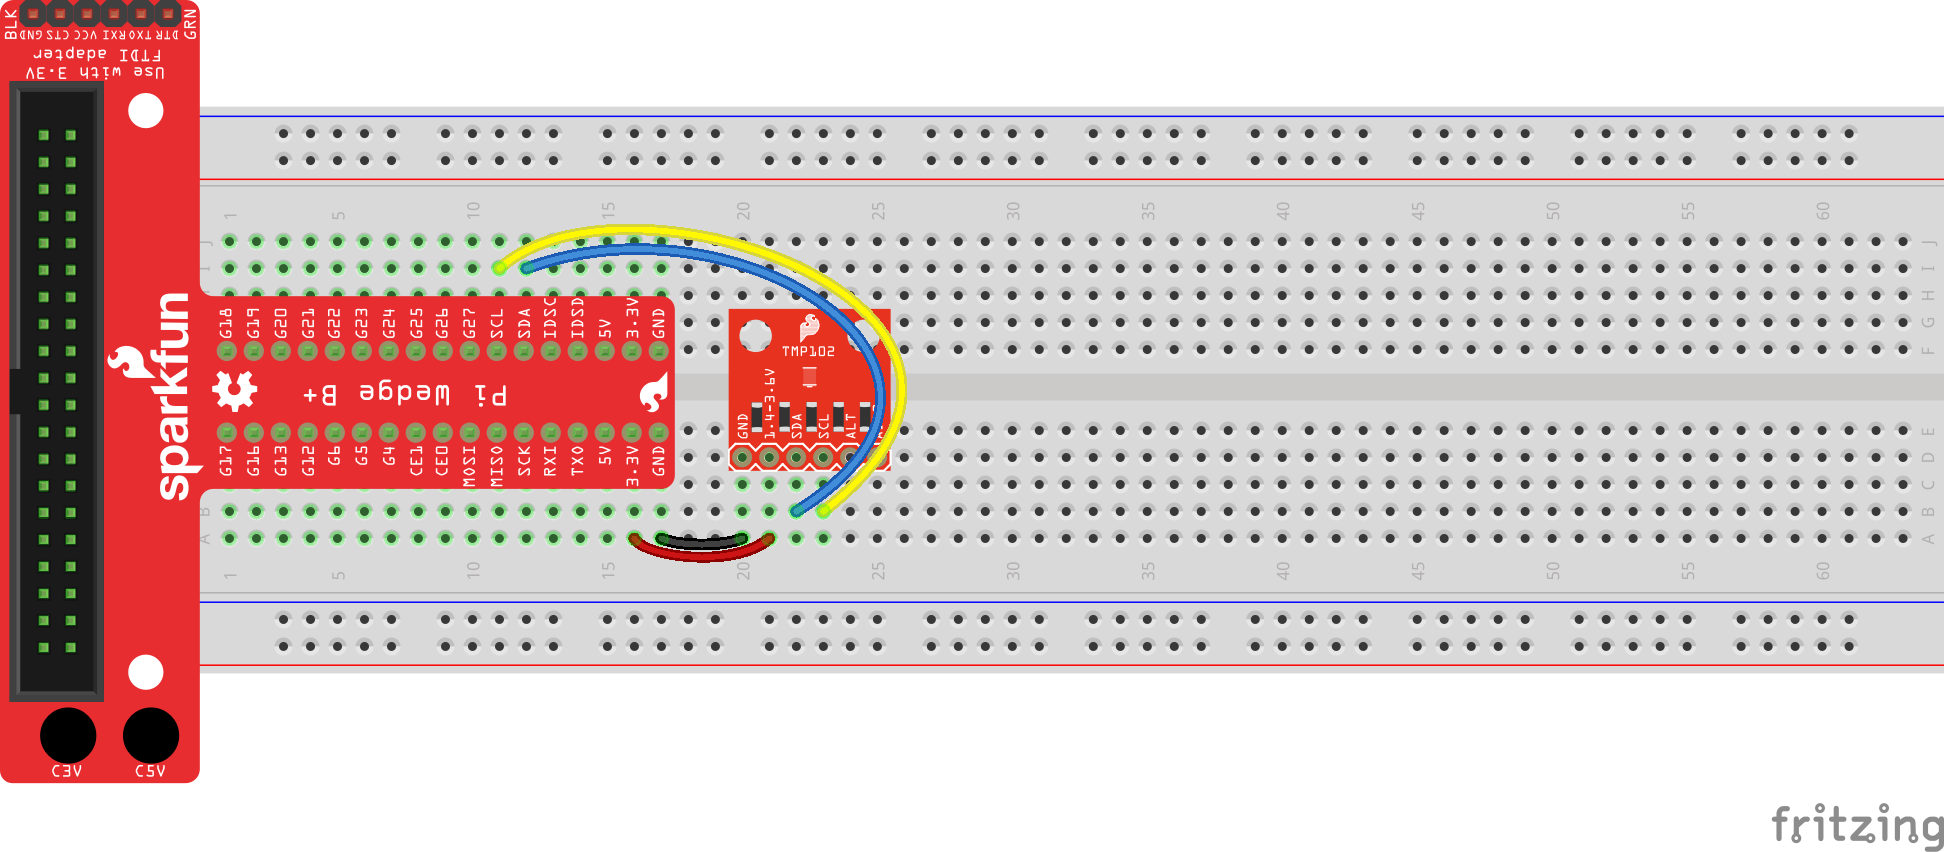
Connecting through a Pi Wedge:

Connecting directly to the Raspberry Pi:
Depending on your version of Raspbian, you may or may not have to install the spidev package (e.g. Raspbian Lite does not come with some Python packages pre-installed). In a terminal, enter the following:
language:bash
pip install spidev
In a new file, enter the following code:
language:python
import time
import spidev
spi_ch = 0
# Enable SPI
spi = spidev.SpiDev(0, spi_ch)
spi.max_speed_hz = 1200000
def read_adc(adc_ch, vref = 3.3):
# Make sure ADC channel is 0 or 1
if adc_ch != 0:
adc_ch = 1
# Construct SPI message
# First bit (Start): Logic high (1)
# Second bit (SGL/DIFF): 1 to select single mode
# Third bit (ODD/SIGN): Select channel (0 or 1)
# Fourth bit (MSFB): 0 for LSB first
# Next 12 bits: 0 (don't care)
msg = 0b11
msg = ((msg << 1) + adc_ch) << 5
msg = [msg, 0b00000000]
reply = spi.xfer2(msg)
# Construct single integer out of the reply (2 bytes)
adc = 0
for n in reply:
adc = (adc << 8) + n
# Last bit (0) is not part of ADC value, shift to remove it
adc = adc >> 1
# Calculate voltage form ADC value
voltage = (vref * adc) / 1024
return voltage
# Report the channel 0 and channel 1 voltages to the terminal
try:
while True:
adc_0 = read_adc(0)
adc_1 = read_adc(1)
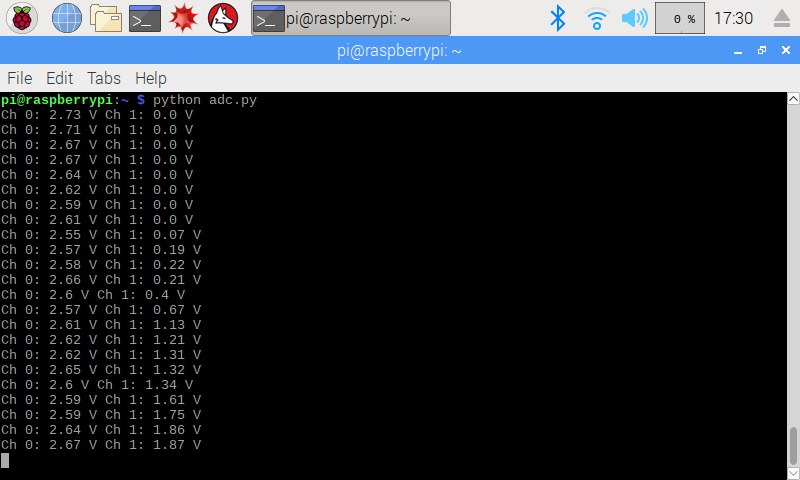
print("Ch 0:", round(adc_0, 2), "V Ch 1:", round(adc_1, 2), "V")
time.sleep(0.2)
finally:
spi.close()
GPIO.cleanup()
Save the file (e.g. adc.py), and run it with Python:
language:bash
python adc.py
You should be able to cover the photocell and see the Ch 0 voltage change. Adjust the knob on the potentiometer to see the Ch 1 voltage change.
Code to Note:
We are using SPI channel 0 on the Raspberry Pi when we initialize the SpiDev object:
language:python
spi_ch = 0
spi = spidev.SpiDev(0, spi_ch)
Channel 0 corresponds to using CE0 (chip enable 0) on the Pi's pins. If you wanted to use another device on the SPI bus, you would need to connect it to CE1 and use SpiDev channel 1 as well.
We construct our SPI message by manipulating individual bits. We start with binary 11 (which is the decimal number 3) by using the prefix '0b':
language:python
msg = 0b11
If you look at section 5 in the MCP3002 datasheet, you will see that we need to send a 1 to start transmission, followed by another 1 to denote that we want "single ended mode." After that, we select our channel with a 0 (for channel 0) or a 1 (for channel 1). Then, we send a 0 to show that we want data returned to us with the least significant bit (LSB) sent first.
language:python
msg = ((msg << 1) + adc_ch) << 5
Finally, we send another twelve 0s. What we send here really doesn't matter, as we just need to send clock pulses to the MCP3002 so that it sends data back to us over the Dout (MISO) line. This data (4 setup bits followed by twelve 0s) is stored in a list.
language:python
msg = [msg, 0b00000000]
We store the data returned to us in the reply variable, and it comes to us as a list of 2 bytes (stored as 2 integers). Note that we send out data and read the reply at the same time when using SPI:
language:python
reply = spi.xfer2(msg)
From there, we construct a single integer out of the two bytes (8 bits) by shifting the first over to the left by 8 bits and then adding the second byte to it. The last bit we read in is extraneous (not part of the ADC's return value) so we shift the answer to the right by one bit.
language:python
adc = 0
for n in reply:
    adc = (adc << 8) + n

adc = adc >> 1
The ADC value is given as a percentage of the maximum voltage (whatever the voltage is on the Vdd/Vref pin). That percentage is calculated by dividing the reply value by 1024. We get 1024 because we know that the MCP3002 is a 10-bit ADC, which means the maximum value of 10 bits (0b1111111111) is 1023. Many ADCs have some error, so we round up to 1024 to make the math easier (here's a discussion on max ADC values, if you're curious).
Once we get the percentage of Vref with val / 1024, we multiply that percentage by our Vref, which we know is 3.3V in the case of our Raspberry Pi.
language:python
voltage = (vref * adc) / 1024
And that's how we get our analog voltage reading! If all this is confusing, you can simple copy the Enable SPI portion and read_adc() function into your own code. Then, just call read_adc(0) to get the voltage at CH0 on the MCP3002.
One last interesting bit of code is the idea of default parameters. If you take a look at the read_adc() definition:
language:python
def read_adc(adc_ch, vref = 3.3):
You'll see that there are actually two parameters: adc_ch and vref. When you call this function, you are required to give it a channel number (0 or 1). However, you can optionally send it an argument with the Vref value. On most cases with the Raspberry Pi, the voltage will be 3.3V. If you use another voltage (e.g. 5V), then you can change the math so that the ADC gives you a more accurate reading.
You have the option of calling this function with another Vref (e.g. 5) using either read_adc(0, 5) or by explicitly naming the vref parameter read_adc(0, vref=5). However, because we know that we've connected 3.3V to the MCP3002, we can simply call read_adc(0) and know that the function will rely on its default parameter of vref=3.3 when doing its calculations.
Challenge: Add an LED to your circuitry. Write a program to act as a variable nightlight. That is, the LED should turn on whenever the photocell sees dark (little ambient light) and should turn off whenever the photocell sees light (lots of ambient light). Have the potentiometer control the brightness of the LED when it is on. Hint: you might want to take some measurements to determine the threshold of light vs. dark. What is the voltage when you cover the photocell with your hand?

In addition to analog sensors and SPI chips, you'll often find sensors (and other devices) that rely on the Inter-Integrated Chip (IIC or I2C) protocol. This is a 2-wire bus that contains a clock and data channel. The master (Raspberry Pi) and device (sensor) can communicate on the same data wire.
To see this protocol in action, we'll write a program to talk to a TMP102 Temperature Sensor. We'll use the smbus Python module to handle the low-level communication for us. Note that "SMBus" stands for "System Management Bus" and is another protocol layer built on top of the I2C protocol. By using smbus, we lose out on a few I2C abilities (e.g. clock stretching), but we can still talk to many I2C sensors.
Refer back to Experiment 1 to look at the Pinout chart.
Connecting through a Pi Wedge:
Connecting directly to the Raspberry Pi:
Depending on your version of Raspbian, you may or may not have to install the smbus package (e.g. Raspbian Lite does not come with some Python packages pre-installed). In a terminal, enter the following:
language:bash
sudo apt-get install python3-smbus
In a new file, copy in the following code:
language:python
import time
import smbus

i2c_ch = 1

# TMP102 address on the I2C bus
i2c_address = 0x48

# Register addresses
reg_temp = 0x00
reg_config = 0x01

# Calculate the 2's complement of a number
def twos_comp(val, bits):
    if (val & (1 << (bits - 1))) != 0:
        val = val - (1 << bits)
    return val

# Read temperature registers and calculate Celsius
def read_temp():

    # Read temperature registers
    val = bus.read_i2c_block_data(i2c_address, reg_temp, 2)
    # NOTE: val[0] = MSB byte 1, val [1] = LSB byte 2
    #print ("!shifted val[0] = ", bin(val[0]), "val[1] = ", bin(val[1]))

    temp_c = (val[0] << 4) | (val[1] >> 4)
    #print (" shifted val[0] = ", bin(val[0] << 4), "val[1] = ", bin(val[1] >> 4))
    #print (bin(temp_c))

    # Convert to 2s complement (temperatures can be negative)
    temp_c = twos_comp(temp_c, 12)

    # Convert registers value to temperature (C)
    temp_c = temp_c * 0.0625

    return temp_c

# Initialize I2C (SMBus)
bus = smbus.SMBus(i2c_ch)

# Read the CONFIG register (2 bytes)
val = bus.read_i2c_block_data(i2c_address, reg_config, 2)
print("Old CONFIG:", val)

# Set to 4 Hz sampling (CR1, CR0 = 0b10)
val[1] = val[1] & 0b00111111
val[1] = val[1] | (0b10 << 6)

# Write 4 Hz sampling back to CONFIG
bus.write_i2c_block_data(i2c_address, reg_config, val)

# Read CONFIG to verify that we changed it
val = bus.read_i2c_block_data(i2c_address, reg_config, 2)
print("New CONFIG:", val)

# Print out temperature every second
while True:
    temperature = read_temp()
    print(round(temperature, 2), "C")
    time.sleep(1)
Save the file (e.g. tmp102.py), and run it with Python:
language:bash
python tmp102.py
You should see the 2 bytes in the CONFIG register be updated and then the temperature is printed to the screen every second.

Code to Note:
Unlike SPI, I2C relies on a set of addresses and registers. This is because SPI is configured to talk to one chip at a time while I2C can share many devices on one bus. To avoid conflicts, addresses are assigned to devices (by the manufacturer) so that each one knows when the host (the Pi) is trying to talk to it. The address for our TMP102 is 0x48.
Each time we want to talk to the TMP102, we must send out its address (0x48) on the bus. Only then can we send the memory location (or address) of the register that we want to read from or write to on the TMP102. Note that for most I2C devices, a register is a location in the device's memory that stores 8 bits (1 byte) of data. Sometimes, this data controls the function of the device (as in the case of the CONFIG register). Other times, the registers hold the sensor reading data (as in the case of the temperature register).
We use the following command to read 2 bytes from the temperature register in the TMP102:
language:python
val = bus.read_i2c_block_data(i2c_address, reg_temp, 2)
These values are stored as a list [x, y] in the val variable. By looking at the TMP102 datasheet, we see that temperature is 12 bits. When we read the two bytes that contain this reading, we need to remove the last 4 bits from the second byte. We also move the first byte over 4 bits:
language:python
temp_c = (val[0] << 4) | (val[1] >> 4)
In order to display negative numbers for the temperature, values from the TMP102 can come in the form of Two's Complement. In this, the first bit of the 12-bit number determines if the value is positive or negative (0 for positive, 1 for negative). See this article to learn more about Two's Complement.
To convert a Two's Complement number to a negative number in Python, we check to see if the first bit is 0 or 1. If it is 0, then we just use the number as is (it's positive!). If it's a 1, we subtract the max negative number of the Two's Complement (212=4096 in this case) from our number.
language:python
if (val & (1 << (bits - 1))) != 0:
    val = val - (1 << bits)
Challenge: Change the CONFIG register so that the TMP102 updates its temperature reading 8 times per second (instead of 8). Additionally, print out the temperature in degrees Fahrenheit. Hint: see page 7 of the TMP102 datasheet to see which bits need to be changed in the CONFIG register.
Let's take our previous example (taking measurements from an I2C device) and log them to a file! This can be incredibly useful if you are trying to measure the temperature (light, humidity, wind speed, air pressure, people entering your room, or really anything) and want to see how it changes over the course of minutes, hours, or days.
We'll use the same circuit as last time.
Connecting through a Pi Wedge:
Connecting directly to the Raspberry Pi:
We'll turn our previous code into a module for use to use. Change the code in tmp102.py to the following:
tmp102.py
language:python
import smbus

# Module variables
i2c_ch = 1
bus = None

# TMP102 address on the I2C bus
i2c_address = 0x48

# Register addresses
reg_temp = 0x00
reg_config = 0x01

# Calculate the 2's complement of a number
def twos_comp(val, bits):
    if (val & (1 << (bits - 1))) != 0:
        val = val - (1 << bits)
    return val

# Read temperature registers and calculate Celsius
def read_temp():

    global bus

    # Read temperature registers
    val = bus.read_i2c_block_data(i2c_address, reg_temp, 2)
    # NOTE: val[0] = MSB byte 1, val [1] = LSB byte 2
    #print ("!shifted val[0] = ", bin(val[0]), "val[1] = ", bin(val[1]))

    temp_c = (val[0] << 4) | (val[1] >> 4)
    #print (" shifted val[0] = ", bin(val[0] << 4), "val[1] = ", bin(val[1] >> 4))
    #print (bin(temp_c))

    # Convert to 2s complement (temperatures can be negative)
    temp_c = twos_comp(temp_c, 12)

    # Convert registers value to temperature (C)
    temp_c = temp_c * 0.0625

    return temp_c

# Initialize communications with the TMP102
def init():

    global bus

    # Initialize I2C (SMBus)
    bus = smbus.SMBus(i2c_ch)

    # Read the CONFIG register (2 bytes)
    val = bus.read_i2c_block_data(i2c_address, reg_config, 2)

    # Set to 4 Hz sampling (CR1, CR0 = 0b10)
    val[1] = val[1] & 0b00111111
    val[1] = val[1] | (0b10 << 6)

    # Write 4 Hz sampling back to CONFIG
    bus.write_i2c_block_data(i2c_address, reg_config, val)

    # Read CONFIG to verify that we changed it
    val = bus.read_i2c_block_data(i2c_address, reg_config, 2)
Create a new file and enter the following code. Give the file a name such as templogger.py.
templogger.py
language:python
import time
import datetime
import tmp102

filename = "temp_log.csv"

# Create header row in new CSV file
csv = open(filename, 'w')
csv.write("Timestamp,Temperature\n")
csv.close

# Initialize communication with TMP102
tmp102.init()

# Sample temperature every second for 10 seconds
for t in range(0, 10):

    # Construct CSV entry from timestamp and temperature
    temp_c = str(round(tmp102.read_temp(), 2))
    entry = str(datetime.datetime.now())
    entry = entry + "," + temp_c + "\n"

    # Log (append) entry into file
    csv = open(filename, 'a')
    try:
        csv.write(entry)
    finally:
        csv.close()

    # Wait 1 second before sampling temperature again
    time.sleep(1)

# When all the writing has been completed, print the CSV contents
csv = open(filename, 'r')
print(csv.read())
csv.close()
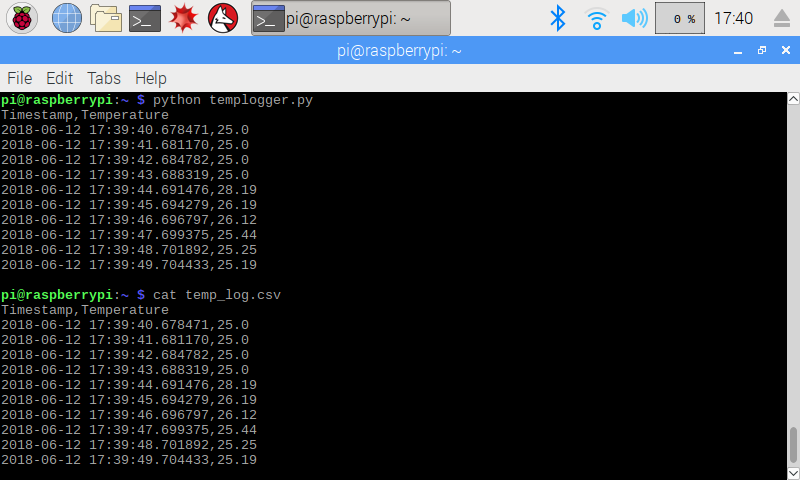
Run the temperature logger with python templogger.py. You should see nothing happen for 10 seconds as the program reads the temperature once every second. For fun, try breathing on the temperature sensor to affect the data! After those 10 seconds, the collection should be complete, and the contents of temp_log.csv will be printed to the screen.
You can view the contents of the log by entering cat temp_log.csv into the console.
Code to Note:
If you remember from our Programming in Python section, we covered how to create modules. Modules let you reuse code that exist in other files. In our case, we put the "measure temperature" section of the tmp102.py code into a function definition so that we may call it from another file.
In our main program (templogger.py), we imported our own module with import tmp102. Notice that we left out the .py suffix--Python knows to look for a .py file.
You'll also notice that whenever we open a file for reading or writing, we close it as soon as we can. It's generally not good practice to open a file and leave it open. If your program or operating system crashes while the file is open, you could potentially corrupt the file (or worse, the whole filesystem).
For extra protection, we add the writing section in a try block:
language:python
try:
    csv.write(entry)
finally:
    csv.close()
Now, if something crashes while the program is trying to write to the file, an exception will be thrown and Python will automatically close the file before exiting.
You can also see that how we access a file is given by the second parameter in the open() function:
datetime.datetime.now() returns a datetime object, which we convert into a string with str(). Note that this is based on the local time of your Raspberry Pi. You can get a Coordinated Universal Time (UTC) date and timestamp with datetime.datetime.utcnow().
Challenge: Open the temperature log in a spreadsheet program and create a graph showing how the temperature changed over those 10 seconds (for extra credit, change the program to measure temperature over a longer period of time). Hint: Raspbian comes with LibreOffice Calc, a free spreadsheet program. If you use Calc, the Data > Text to Columns function might help you convert your date/timestamps into something usable.

Headless: If you are using the Raspberry Pi as a headless device, you may want to print the contents of the CSV to the screen, and copy-and-paste them into a spreadsheet program on your host computer.
Solution: There's not really an "answer" to this. Get creative and show off your graphing skills!
Hopefully, this tutorial has given you a starting point for your adventures with Python (and more specifically, how to control hardware with Python). If you would like to dig deeper into the Python language, here are some resources for you:
Looking for even more inspiration? Check out these other Raspberry Pi projects:
Or check out some of these blog posts for ideas:
learn.sparkfun.com | CC BY-SA 3.0 | SparkFun Electronics | Niwot, Colorado