Programming the SparkFun Edge with Arduino
 ROB-24601
Running the Examples
Get the Code
We have three examples written for the Edge board using TensorFlow Lite and programmed with Arduino. They can be cloned or downloaded and unzipped from here:
https://github.com/sparkfun/Tensorflow_AIOT2019 With your Edge Board connected to your computer (via your Serial Breakout), go to your Tools>Board"...", and select SparkFun Edge. Next, you'll need to select the port to which your board is connected.That can be found under Tools>Port>. It will look slightly different depending on your OS.
- Windows - "COM Port"
- macOS - "/dev/cu.usbserial*" (Note: You might have to check permissions)
- Linux - "/dev/ttyUSB*"
You're now ready to open your first example. Go to the folder where you downloaded (and unzipped, if necessary) the examples folder.
Micro Speech
From the micro_speech folder in your TensorFlow_AIOT2019-master folder, open the file micro_speech.ino. Full disclosure - this is the sketch that comes pre-loaded on your SparkFun Edge Board, so you should already see the blue LED blinking. If you open the Serial Monitor of your Arduino IDE, saying "Yes" will return something like "Heard yes (203) @4032ms," accompanied by a single blink of the yellow onboard LED; saying "No" will return a statement similar to "Heard no (209) @7936ms," along with a blink of the red onboard LED. Any other word or statement that the mics pick up will return "Heard unknown (212) @50304ms." I've noticed that a more percussive "yes" seems be be picked up a little better, and a slightly slower, more drawn out "no" tends to be better recognized by the model. The model used for this example is called from within the void:setup(), here:

The Upload Sequence
By default, when you power up the SparkFun Edge Board, it immediately goes to Run mode and runs whatever file has been uploaded to it. In order to upload something new, we need to put it in bootloader mode. This is done using the two buttons on the Edge Board in a specific sequence. When you are ready to upload your code, take the following steps:
- Press and hold the Reset button
- While still holding down the Reset button, press and hold the 14 button
- Release the Reset Button
- Hit Upload in the Arduino IDE (or use your keyboard shortcut)
- Release the 14 button (after the upload has completed)
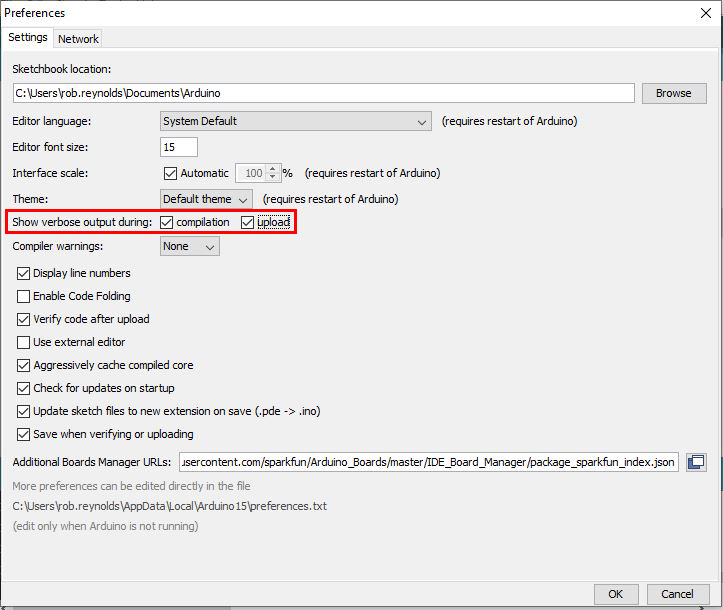
These files will take a bit longer than your standard Arduino sketches to compile and upload, so be patient. If you want to see what's going on during all that time, you can always go back into your Arduino preferences and check the boxes for verbose output.
The Arduino IDE will make three attempts to upload the sketch to your board. Ideally, when it finished, you should see "Upload complete!" in the output pane. However, we've noticed that this process can sometimes be a little finicky. You may get a message that reads "Tries = 3; Upload failed!" You can always reset and try again, or lower the SVL Baud Rate down to 460800. We've yet to nail down a specific reason for this issue - wind direction, pollen count, still not entirely sure - but a little patience should get you up and running.
Person Detection
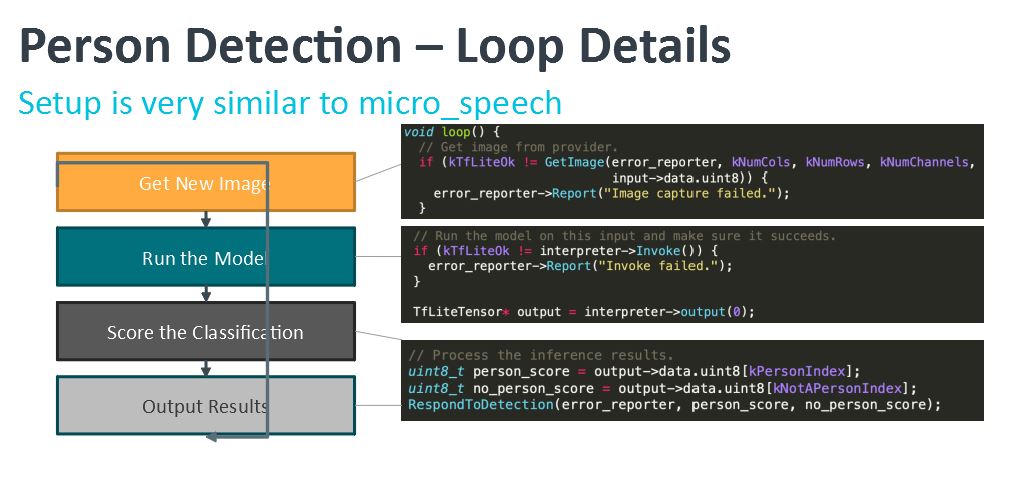
This example uses an imaged captured by a camera for the classification process. The model is trained to recognize when a person is present. When the model analyzes an image, the serial monitor will display scores for "human detected" and "no human detected." Keep in mind that this isn't motion detection, nor is it reading pixel differences from frame to frame. The model here is looking for what it perceives to be a human figure based on its training model.
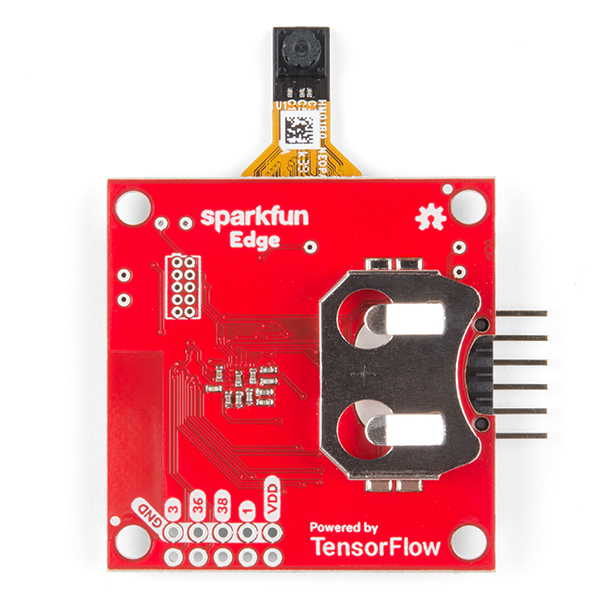
The upload protocol is the same as it was for the first example. The only difference is that you need the camera module attached. When attaching it to the Edge Board, make sure that the lens is facing out over the back, or battery side of the Edge Board, as in the image below.
This is by far the largest of the three packages, and will therefore take the longest to upload. It sends the 284776 bytes in 140 frames of 2048 bytes each (except for the final frame, which only contains 104 bytes). Occasionally it will choke up about halfway through the upload. We've found that, especially on Macs, adjusting the SVL Baud Rate (under "Tools>") down to 460800 may do the trick, or sometimes it just needs a retry at the same speed. Once it uploads, reset your board and see how it does.
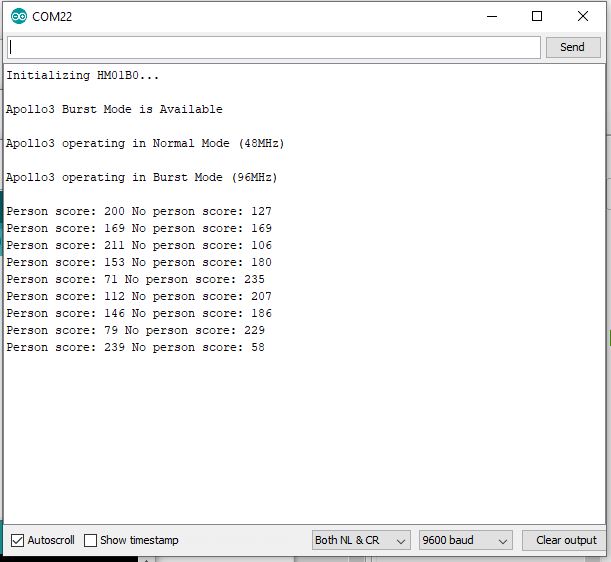
Here you can see how it did with me - never really 100 percent sure I was a person, although once I put a little light on myself (the final score), it felt pretty sure that I was, in fact, human.
Magic Wand
Time to get your Harry Potter on! For the final example, open the magic_wand sketch. This example uses a 20KB neural network and TensorFlowLite to recognize gestures. It reads data from the Edge Board's on-board accelerometer, and the recognized gestures are output to the serial monitor, as well as the on-board LEDs. This sketch recognizes three distinct gestures, which we're calling a wing, a ring and a slope.
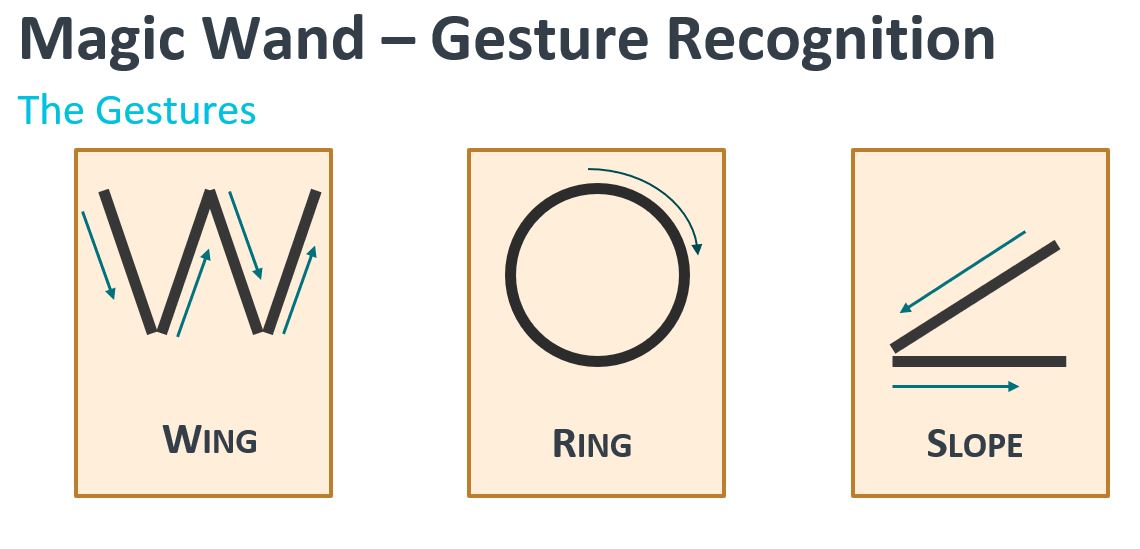
Note the direction of each gesture, as it does make a difference. For example, a counter-clockwise ring movement will not work. Go ahead and upload the sketch in the same fashion as the other two. Once that's done, you'll want to hold the board with the serial connector to your left, camera port away from you. In order for the board to properly read the gestures, you'll have the best luck if you keep your wrist rigid, and move your arm from the elbow. Arpit Shah, the Director of Technology & Partner Enablement at Ambiq Micro (makers of the Apollo3 chip on the Edge Board) who helped with the workshop we lead at the ARM AIoT Dev Summit, found he had the best luck taping or rubber banding the board to the end of a drumstick. (Apparently he was out of unicorn hair and/or dogwood). Hold the board still to allow it to orient itself, then make one of the gestures, holding at the end for a second as well. It may take a little practice to get it consistent, but isn't that true of all magic?
More magic please!
If you're ready to dig deeper, and want to start adding additional gestures to your magical repertoire, you can find a good starting off point at TensorFlow's GitHub repository. Check out the instructions in the README.md that is linked to train your own model.
This is quite a bit more than just running a simple Arduino sketch, so be prepared to do some heavy brain lifting here.