Programming the LilyMini
 MikeGrusin,
  Gella
Gella 
Uploading Code
Once you've installed the LilyMini extensions to Arduino, you're ready to start programming the LilyMini!
Note that you won't have to install the LilyMini extensions again (whew!), but you will need to perform the below three steps every time you want to program the LilyMini. These three steps are:
- Connect the LilyMini to your computer (and turn it on)
- Select the board type (LilyMini)
- Select the port
Don't worry, Arduino will remember these things so you'll usually just need to double-check that the settings are correct. It will all become second nature soon.
Let's go over the three steps in detail:
1. Connect the LilyMini to your Computer (and turn it on)
Connect the LilyMini to a USB port on your computer using a micro USB cable. The cable can only be inserted one way, and should snap down securely.
Here's something important to remember: The LilyMini must be powered up in order to program it. If you plug it in and the built-in LED doesn't fade up from black to green, press the "ON" button to wake it up. (You'll know it's powered up if it appears in Arduino's port list, which we'll talk about below.)
The LilyMini can be powered by a coin cell, or USB cable, or both at the same time. It's perfectly safe to have a coin cell in the LilyMini while it's attached to your computer via USB.
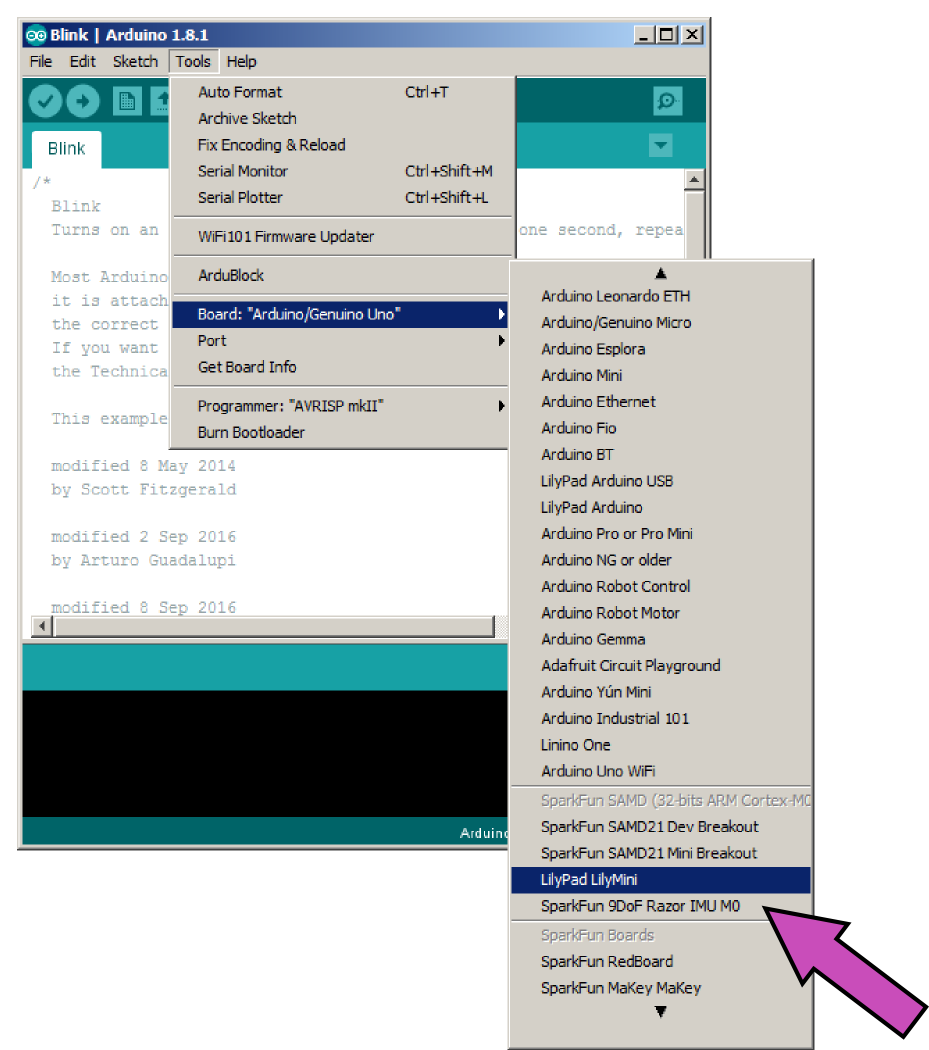
2. Select LilyMini from the Board Menu
Once the LilyMini software is installed, it will be available in the Tools > Board list. Go there now and select LilyPad LilyMini. Depending on how many boards are already in the list, you may need to scroll down to get to it.
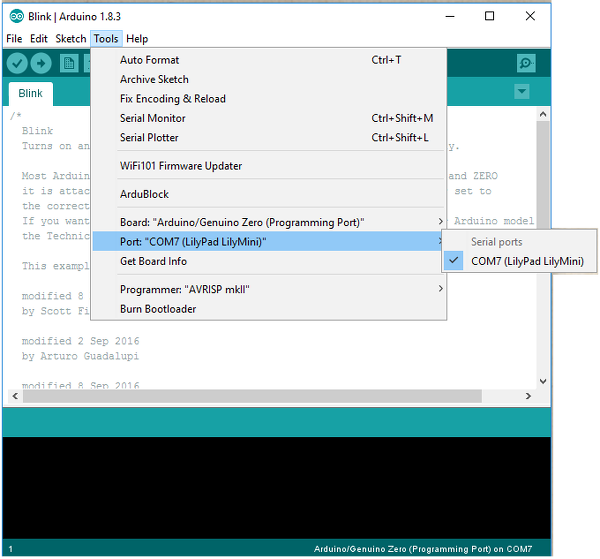
3. Select the Port
Whenever you plug a USB device into your computer, your computer will assign it a port number. On Windows these are listed as COM##; on a Mac or Linux machine they will be "/dev/cu.usbmodem####".
Arduino needs to know which port your LilyMini is attached to so it can program it. This used to be difficult to determine, but the LilyMini has a handy feature that identifies itself. Go to the Tools > Port menu, and select the port that has "LilyPad LilyMini" next to it. Easy!
Uploading Code
To review, once you've:
- Connected the LilyMini to your computer (and turned it on)
- Selected the board type (LilyMini)
- Selected the port
you're ready to upload code! Let's test everything out:
Load the "blink" example from the menu File > Examples > 01.Basics > Blink, and click the "Upload" button (the large round button with the right arrow in it).
Arduino will compile the code, then send it to the LilyMini via USB. While the code is uploading, the LilyMini's built-in RGB LED will blink various colors, and when the code finally runs, the red LED will slowly blink. Success!
If this all works, congratulations! You're all set up and ready to program the LilyMini. But before you go, please read the "Recovery Mode" section below so you know how to recover from a bad upload.
If something didn't work, follow the troubleshooting steps below (coming soon).
Recovery Mode
Most of the time, code uploads will work perfectly.* But occasionally an upload will fail halfway through. In this case, the LilyMini will try to run the the bad code, run out of instructions, and lock up. While it's locked up, the USB won't work, so you won't be able to upload new code to fix it. Power cycling won't help because it will just run the bad code again. The board will seem dead! HELP!
To recover from this problem, the LilyMini has a recovery mode built into it. If you hold down the "ON" button while powering it up, the LilyMini won't run any uploaded code (good or bad). It will quietly wait for a USB connection, which will then let you upload new code to it.
The exact steps to get into recovery mode are:
Unplug the LilyMini from any USB cables, and remove the coin cell if one is installed. The LilyMini must be completely powered down for this to work.
Plug a micro USB cable into your computer, but don't plug the other end into the LilyMini yet.
Hold down the "ON" button on the LilyMini.
While you're holding down the "ON" button, plug the USB cable into the LilyMini. Once the RGB LED turns on, you can release the "ON" button.
The LilyMini's RGB LED will turn blue as it powers up in Recovery Mode, then green as it establishes a USB connection with your computer. The LilyMini should now appear in Arduino's port list, and you can upload new code to it.
Remember this tip! You can use it to bring "dead" LilyMinis back to life.