Programming the LilyMini
 MikeGrusin,
  Gella
Gella Introduction
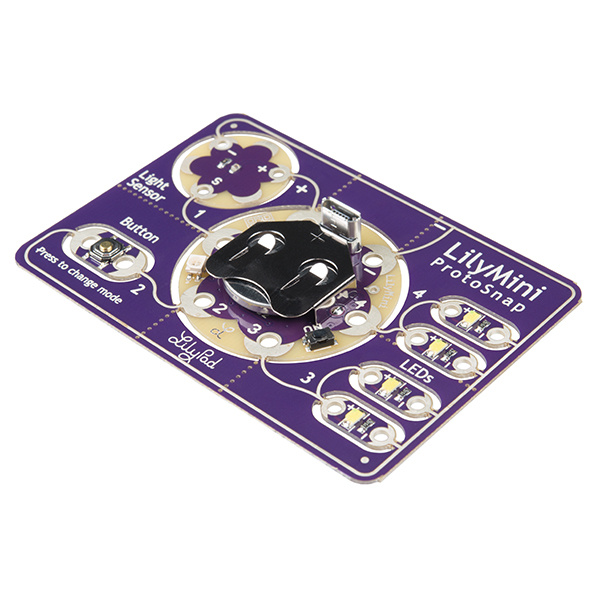
The LilyMini is a tiny sewable computer that you can use to make interactive craft projects. The LilyMini is part of the LilyPad line - a unique collection of electronic parts designed to be connected together with conductive thread instead of wire. The LilyMini comes pre-programmed to blink LEDs in fun ways, but you can also write your own programs using the popular (and free!) Arduino system. It’s easy, we’ll show you how!
In this tutorial, we'll set up the Arduino software to program the LilyMini. The process is the same whether you are using a standalone LilyMini (Coming Soon!) or the LilyMini ProtoSnap.
Once you've set up Arduino using the instructions in this tutorial, you'll be able to write and upload your own programs to the LilyMini.
Suggested Reading
- LilyMini Hookup Guide (Coming Soon!)
- LilyMini ProtoSnap Hookup Guide
- Night-Light Pennant with LilyMini ProtoSnap
- What is an Arduino?
Setting Up Arduino
When you first install the Arduino software, it knows how to program a number of "standard" Arduino-compatible boards. You can add the LilyMini to this list by following the three steps below. You'll need to do these steps on every machine you want to use to program LilyMini, but once it's done, it won't need to be done again.
If this is your first time using Arduino, you can install it by following our Installing the Arduino IDE tutorial.
Ready? Let's get started!
1. Add Sparkfun to your Preferences
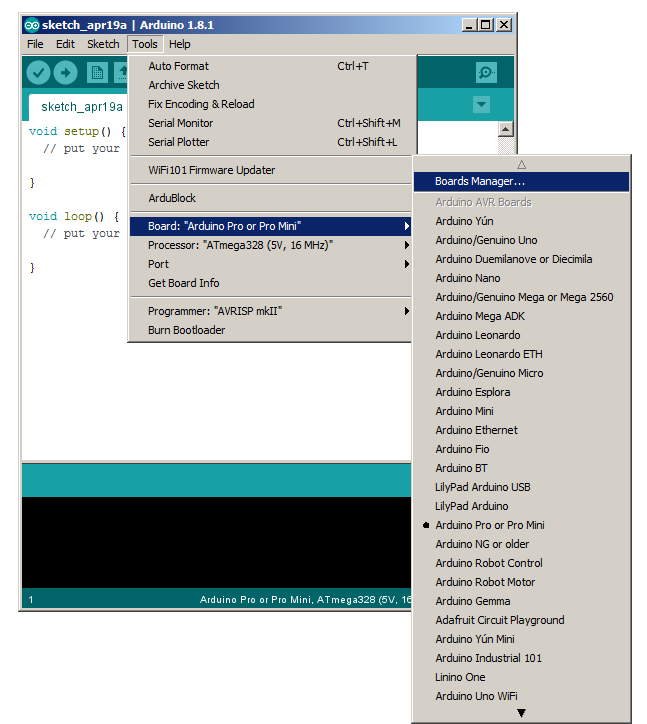
Start the Arduino software (version 1.8 or higher) and open the Preferences window by choosing File > Preferences from the menu.
Now copy the below text and paste it into the "Additional Boards Manager URLs" text box:
https://raw.githubusercontent.com/sparkfun/Arduino_Boards/master/IDE_Board_Manager/package_sparkfun_index.json
When you're done, click the "OK" button.
2. Install Arduino SAMD Boards
We'll now install two Arduino extensions. The first allows Arduino to compile code for "SAMD" processors (which the LilyMini uses), and the second one will add the LilyMini specifically.
Start up Arduino, and open the Boards Manager window by choosing Tools > Board > Boards Manager... (The Boards Manager option is at the very top of the list of boards; you may need to scroll up to see it.)
When the Boards Manager window opens, it will present a long list of options. Type "samd" (without quotes) into the "Filter your search" box at the top of the window. This will shrink the list down to the options with "samd" in them.
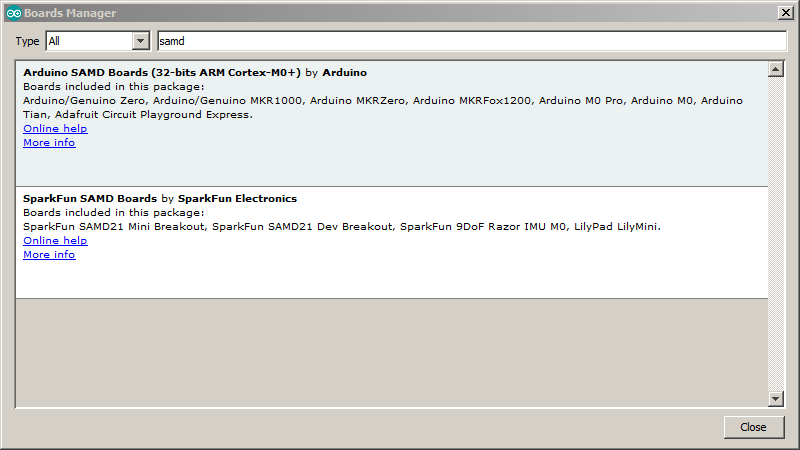
You should see two (or more) entries, including Arduino SAMD Boards and SparkFun SAMD Boards. We'll install both of these, starting with Arduino SAMD Boards.
Click anywhere in the Arduino SAMD Boards box. A version number and an "Install" button will appear. Click the install button. This will download and install the extension. This extension is quite large and will take a while to install. It may also ask for permission to install drivers; please let it do so.
If everything worked, a blue "INSTALLED" should appear next to the Arduino SAMD Boards title.
3. Install SparkFun SAMD Boards
When the Arduino SAMD Boards has finished installing, click anywhere in the SparkFun SAMD Boards box. A version number and an "Install" button will appear.
Once you've selected 1.4.0 from the version list, click the install button. This package is small and will install much faster than the Arduino SAMD Boards.
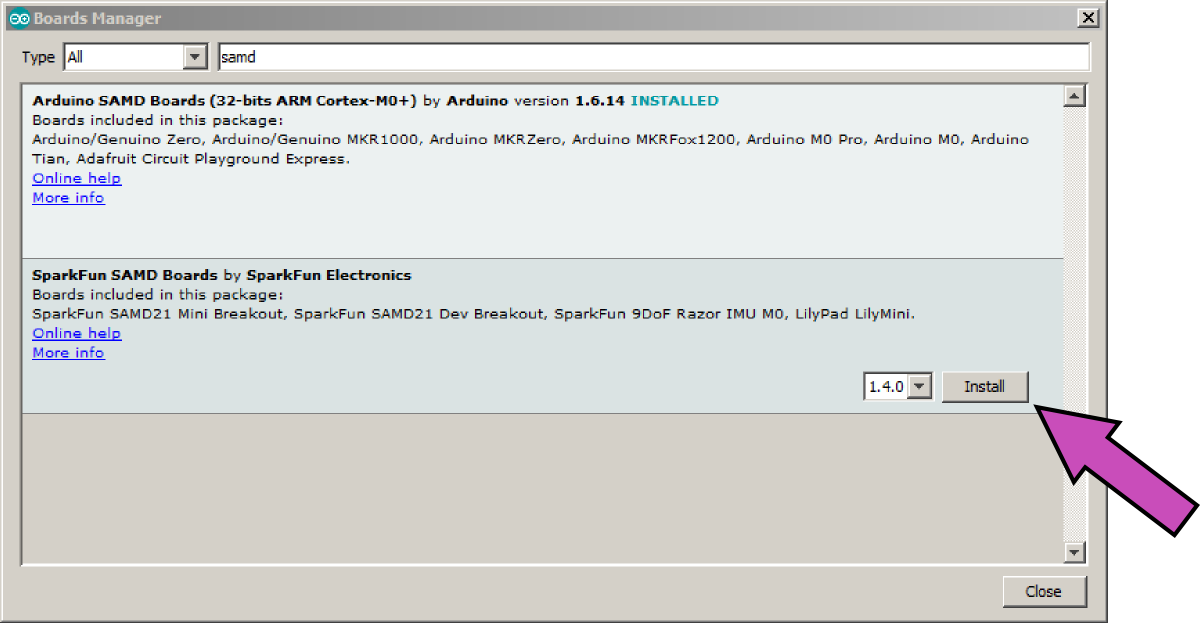
If everything worked, a blue "INSTALLED" should appear next to the SparkFun SAMD Boards title. Congratulations, you're done installing the LilyMini extensions!
Uploading Code
Once you've installed the LilyMini extensions to Arduino, you're ready to start programming the LilyMini!
Note that you won't have to install the LilyMini extensions again (whew!), but you will need to perform the below three steps every time you want to program the LilyMini. These three steps are:
- Connect the LilyMini to your computer (and turn it on)
- Select the board type (LilyMini)
- Select the port
Don't worry, Arduino will remember these things so you'll usually just need to double-check that the settings are correct. It will all become second nature soon.
Let's go over the three steps in detail:
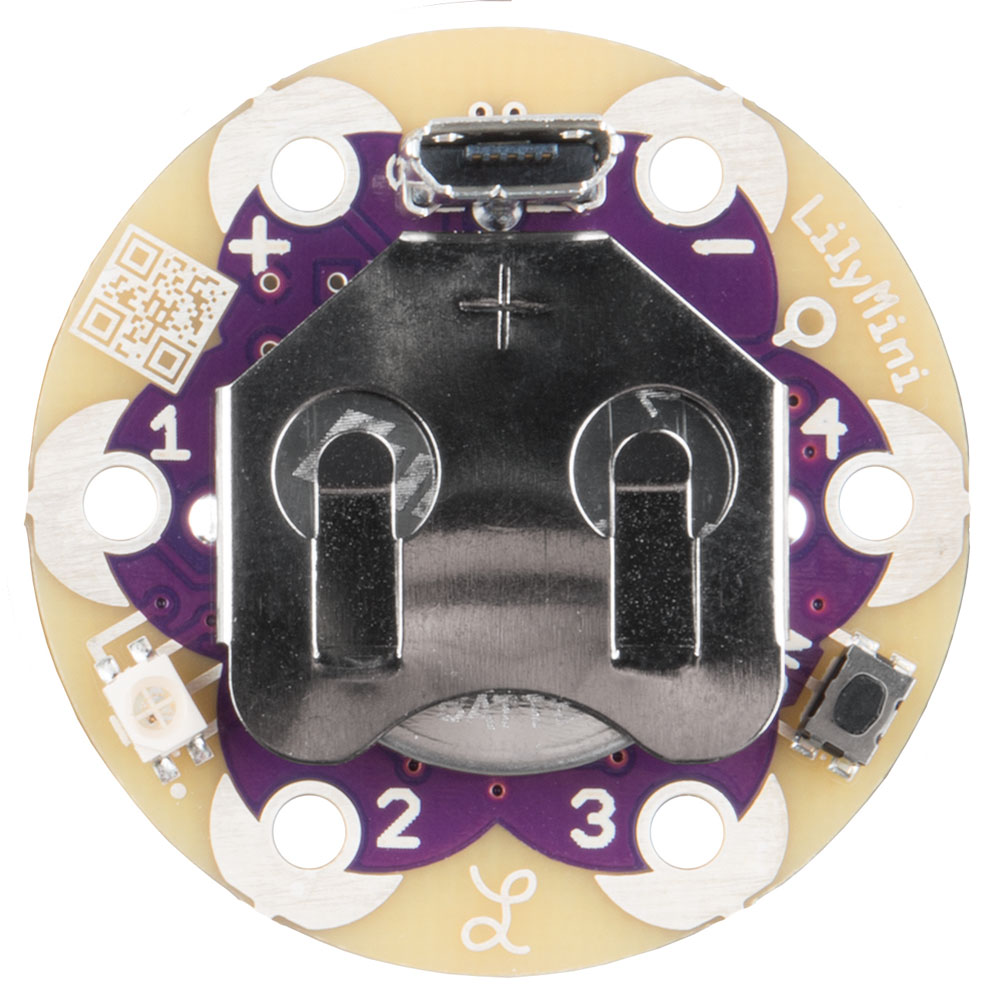
1. Connect the LilyMini to your Computer (and turn it on)
Connect the LilyMini to a USB port on your computer using a micro USB cable. The cable can only be inserted one way, and should snap down securely.
Here's something important to remember: The LilyMini must be powered up in order to program it. If you plug it in and the built-in LED doesn't fade up from black to green, press the "ON" button to wake it up. (You'll know it's powered up if it appears in Arduino's port list, which we'll talk about below.)
The LilyMini can be powered by a coin cell, or USB cable, or both at the same time. It's perfectly safe to have a coin cell in the LilyMini while it's attached to your computer via USB.
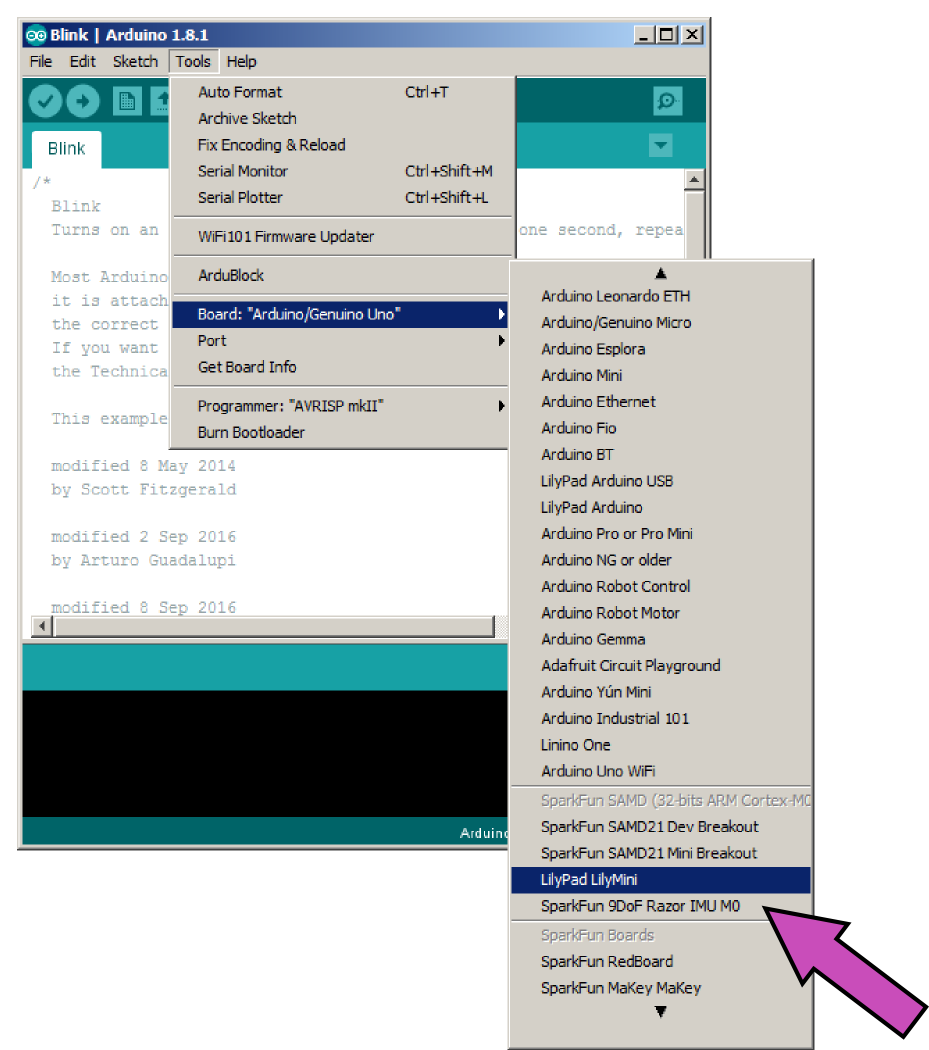
2. Select LilyMini from the Board Menu
Once the LilyMini software is installed, it will be available in the Tools > Board list. Go there now and select LilyPad LilyMini. Depending on how many boards are already in the list, you may need to scroll down to get to it.
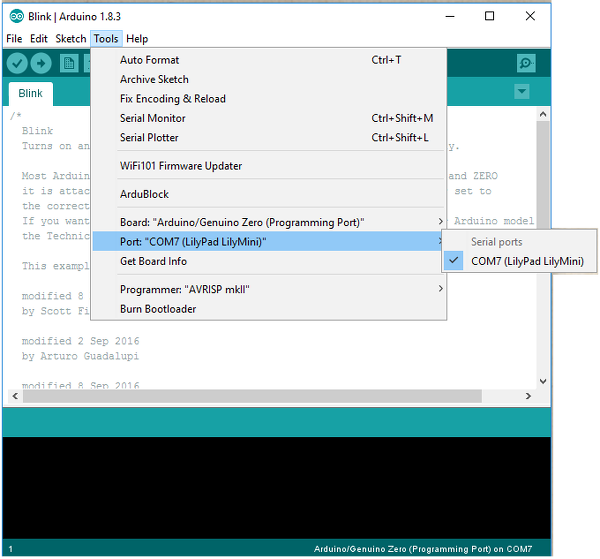
3. Select the Port
Whenever you plug a USB device into your computer, your computer will assign it a port number. On Windows these are listed as COM##; on a Mac or Linux machine they will be "/dev/cu.usbmodem####".
Arduino needs to know which port your LilyMini is attached to so it can program it. This used to be difficult to determine, but the LilyMini has a handy feature that identifies itself. Go to the Tools > Port menu, and select the port that has "LilyPad LilyMini" next to it. Easy!
Uploading Code
To review, once you've:
- Connected the LilyMini to your computer (and turned it on)
- Selected the board type (LilyMini)
- Selected the port
you're ready to upload code! Let's test everything out:
Load the "blink" example from the menu File > Examples > 01.Basics > Blink, and click the "Upload" button (the large round button with the right arrow in it).
Arduino will compile the code, then send it to the LilyMini via USB. While the code is uploading, the LilyMini's built-in RGB LED will blink various colors, and when the code finally runs, the red LED will slowly blink. Success!
If this all works, congratulations! You're all set up and ready to program the LilyMini. But before you go, please read the "Recovery Mode" section below so you know how to recover from a bad upload.
If something didn't work, follow the troubleshooting steps below (coming soon).
Recovery Mode
Most of the time, code uploads will work perfectly.* But occasionally an upload will fail halfway through. In this case, the LilyMini will try to run the the bad code, run out of instructions, and lock up. While it's locked up, the USB won't work, so you won't be able to upload new code to fix it. Power cycling won't help because it will just run the bad code again. The board will seem dead! HELP!
To recover from this problem, the LilyMini has a recovery mode built into it. If you hold down the "ON" button while powering it up, the LilyMini won't run any uploaded code (good or bad). It will quietly wait for a USB connection, which will then let you upload new code to it.
The exact steps to get into recovery mode are:
Unplug the LilyMini from any USB cables, and remove the coin cell if one is installed. The LilyMini must be completely powered down for this to work.
Plug a micro USB cable into your computer, but don't plug the other end into the LilyMini yet.
Hold down the "ON" button on the LilyMini.
While you're holding down the "ON" button, plug the USB cable into the LilyMini. Once the RGB LED turns on, you can release the "ON" button.
The LilyMini's RGB LED will turn blue as it powers up in Recovery Mode, then green as it establishes a USB connection with your computer. The LilyMini should now appear in Arduino's port list, and you can upload new code to it.
Remember this tip! You can use it to bring "dead" LilyMinis back to life.
Programming Notes
If this is your first time programming, you're in for some fun! We recommend you head over to the LilyMini Programming Guide (COMING SOON) which will walk you through simple programming lessons that you can also use in your projects.
If you've already programmed Arduino for a while, read on for tips about the LilyMini. It's very similar to other Arduinos, but has some special features and limitations you'll want to know about.
Code Space
To keep the cost as low as possible, the LilyMini uses an inexpensive SAMD11 processor. This processor does not provide a lot of programming space (after the Arduino "core" is loaded you'll have about 4KB free), but that's more than enough for the short sketches typically used by beginning programmers. You can pack a lot of simple code into the LilyMini, but we suggest you avoid libraries and floating-point math as you can quickly run out of space.
Pin Numbering
The LilyMini's I/O pins have been renumbered to simplify things for beginners. The external sewtabs are numbered 1-4 (unlike other Arduinos there is no pin "0"), and the internal RGB LED is numbered 5-7 (R,G,B respectively). All external sewtabs will work for digital in, digital out, analog in, and analog out*. Pin 13 (which doesn't physically exist on the LilyMini) and "LED_BUILTIN" (Introduced in Arduino 1.8) are tied to the built-in red LED to maintain compatibility with existing example code.
The following names are predefined in the core if you prefer using names rather than pin numbers:
LED_RED     = 5
LED_GREEN   = 6
LED_BLUE    = 7
LED_BUILTIN = 5 // Introduced in Arduino 1.8, tied to red LED
Analog Input
All four external sewtabs support analog input. The core has been hardcoded to 10 bits (0 to 1023) for compatibility with existing sketches. Several "virtual" pins are predefined for battery voltage, 1-volt reference, and temperature. Because analogRead() can fluctuate with changing battery voltage, functions have been provided to measure true volts from any pin or the battery. (To avoid floating-point numbers that require a lot of space, these return integers that are 100x the floating-point value.)
// Virtual "pins" for analogRead()
PIN_BATT    // Battery voltage (when not on USB)
PIN_1V      // 1 volt reference
PIN_TEMP    // Temperature sensor (internal to SAMD11)

// True voltage-reading macros, these return e.g. 199 for 1.99V
int analogReadVolts(pin)    // Read true voltage on any sew tab
int analogReadBattVolts()   // Read true voltage of the battery (if not on USB)
Serial Monitor
The serial monitor on the LilyMini is slightly different than other Arduinos in that activating it does not reset the processor. This means that if your sketch is already running and you activate the serial monitor, you'll see output from that point forward, but will miss whatever it may have output in the past. If you need to see serial output from the beginning of your sketch, you can keep the serial window open, or put the following statement at the end of your setup():
while (!Serial) ;
This will wait (forever if necessary) until the serial monitor window is activated before continuing.
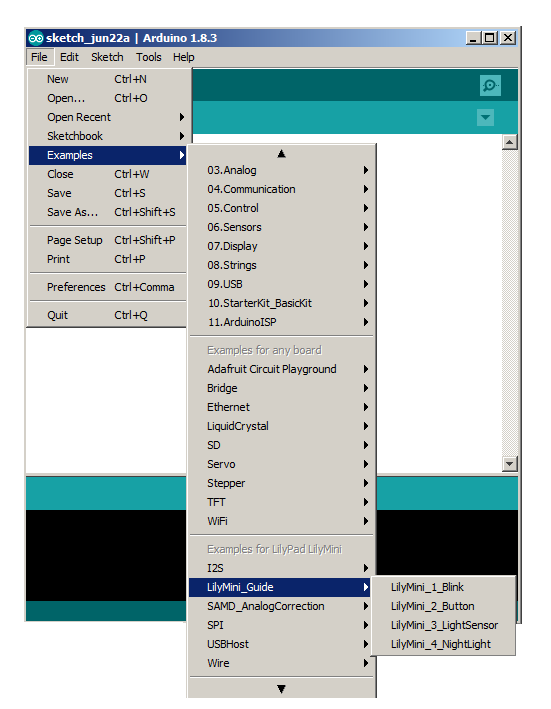
ProtoSnap Example Code
To go along with the Intro to Arduino with LilyMini ProtoSnap guide that we're working on (coming soon), we've preinstalled programming examples in the Arduino IDE. To get to them, select File > Examples > LilyMini_Guide. We'll be adding to these examples as we finish the Guide.
Resources and Going Further
If you've never programmed before, the Intro to Arduino with LilyMini ProtoSnap is a great place to start. It walks you through a number of simple programs that teach you how to use the LilyMini in your own projects.