PIC-Based Serial Enabled Character LCD Hookup Guide
 bboyho,
  MikeGrusin
Example Code
Note: This example assumes you are using the latest version of the Arduino IDE on your desktop. If this is your first time using Arduino, please review our tutorial on installing the Arduino IDE. If you have not previously installed an Arduino library, please check out our installation guide.
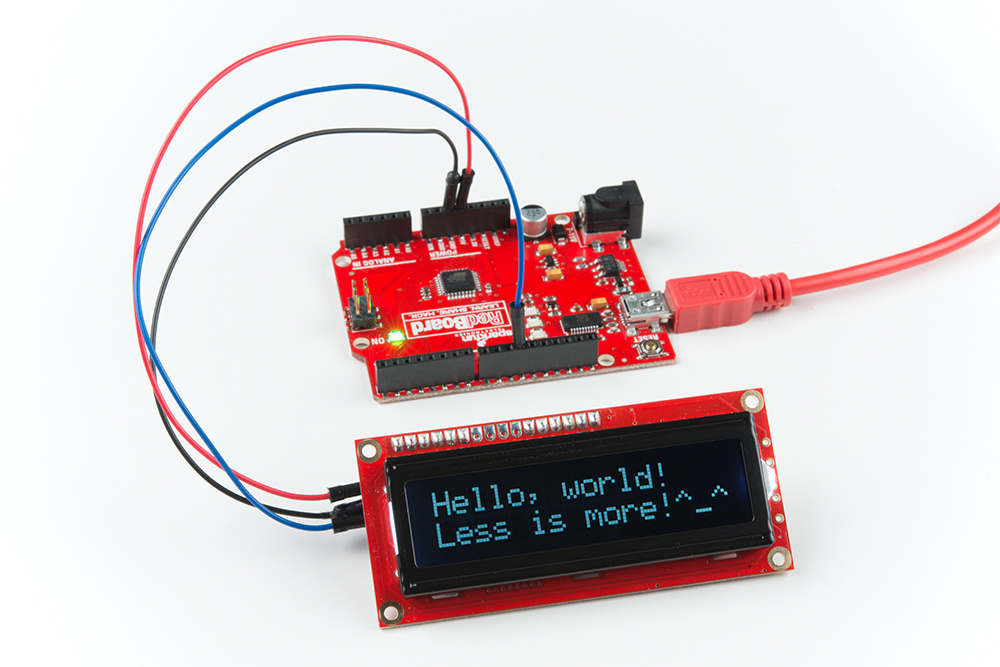
For simplicity, we will be using an Arduino microcontroller. In this example, we connected a serial enabled LCD to the RedBoard programmed with Arduino (basically an Arduino Uno with an ATmega328P).
Example 1: Hello World!
Copy and paste these sketch into your Arduino IDE.
language:c
// SparkFun Serial LCD example 1
// Clear the display and say "Hello World!"

// This sketch is for Arduino versions 1.0 and later
// If you're using an Arduino version older than 1.0, use
// the other example code available on the tutorial page.

// Use the Software Serial library to create a new "soft" serial port
// for the display. This prevents display corruption when uploading code.
#include <SoftwareSerial.h>

// Attach the serial enabld LCD's RX line to digital pin 11
SoftwareSerial LCD(10, 11); // Arduino SS_RX = pin 10 (unused), Arduino SS_TX = pin 11

void setup()
{
  LCD.begin(9600); // set up serial port for 9600 baud
  delay(500); // wait for display to boot up
}

void loop()
{
  // move cursor to beginning of first line
  LCD.write(254);
  LCD.write(128);

  // clear display by sending spaces
  LCD.write("                ");
  LCD.write("                ");

 // move cursor to beginning of first line
  LCD.write(254);
  LCD.write(128);

  LCD.write("Hello, world!");


// move cursor to beginning of second line
LCD.write(254);
LCD.write(192);

LCD.write("Less is more!^_^");

  while(1); // wait forever
}
When you power up the board, you'll briefly see a SparkFun splash screen, and then the display will go blank. To send text to the board, wait 1/2 second (500ms) after power up for the splash screen to clear, then send text to the display through your serial port. The display understands all of the standard ASCII characters (upper and lowercase text, numbers, and punctuation), plus a number of graphic symbols and Japanese characters. See the HD44780 datasheet for the full list of supported characters.
If you send data that goes past the end of the first line, it will skip to the start of the second line. If you go past the end of the second line, the display will jump back up to the beginning of the first line.
Here's what you should see after uploading the code to your Arduino. Try changing the text with a different message!
Example 2: Move the Cursor
A common LCD technique is to repeatedly display changing numbers such as RPM or temperature in the same place on the display. You can easily do this by moving the cursor before sending your data.
To move the cursor, send the special character (0xFE), followed by the cursor position you'd like to set. Each cursor position is represented by a number, see the table below to determine the number in decimal to send for a serial enabled LCD set to 16x2:
| Position | 1 | 2 | 3 | 4 | 5 | 6 | 7 | 8 | 9 | 10 | 11 | 12 | 13 | 14 | 15 | 16 |
|---|---|---|---|---|---|---|---|---|---|---|---|---|---|---|---|---|
| Line 1 | 128 | 129 | 130 | 131 | 132 | 133 | 134 | 135 | 136 | 137 | 138 | 139 | 140 | 141 | 142 | 143 |
| Line 2 | 192 | 193 | 194 | 195 | 196 | 197 | 198 | 199 | 200 | 201 | 202 | 203 | 204 | 205 | 206 | 207 |
For example, if you want to move to the beginning of the second line, send the control character 0xFE and command character 0d192.
Here's a slightly more complex example showing how to display data at fixed points on the display, plus the use of sprintf() to convert numbers to strings (this right-justifies the numbers with leading spaces, which keeps them from "jumping around" if the number of digits changes):
language:c
// SparkFun Serial LCD example 2
// Format and display fake RPM and temperature data

// This sketch is for Arduino versions 1.0 and later
// If you're using an Arduino version older than 1.0, use
// the other example code available on the tutorial page.

// Use the Software Serial library to create a new "soft" serial port
// for the display. This prevents display corruption when uploading code.
#include <SoftwareSerial.h>

// Attach the serial enabld LCD's RX line to digital pin 11
SoftwareSerial LCD(10, 11); // Arduino SS_RX = pin 10 (unused), Arduino SS_TX = pin 11

void setup()
{
  LCD.begin(9600); // set up serial port for 9600 baud
  delay(500); // wait for display to boot up

  // cursor to beginning of first line
  LCD.write(254);
  LCD.write(128);

  // clear display + legends
  LCD.write("RPM:            ");
  LCD.write("TEMP:           ");
}

int temp, rpm;
char tempstring[10], rpmstring[10]; // create string arrays

void loop()
{
  temp = random(1000); // make some fake data
  rpm = random(10000);

  sprintf(tempstring,"%4d",rpm); // create strings from the numbers
  sprintf(rpmstring,"%4d",temp); // right-justify to 4 spaces

  LCD.write(254); // cursor to 7th position on first line
  LCD.write(134);

  LCD.write(rpmstring); // write out the RPM value

  LCD.write(254); // cursor to 7th position on second line
  LCD.write(198);

  LCD.write(tempstring); // write out the TEMP value

  delay(1000); // short delay
}
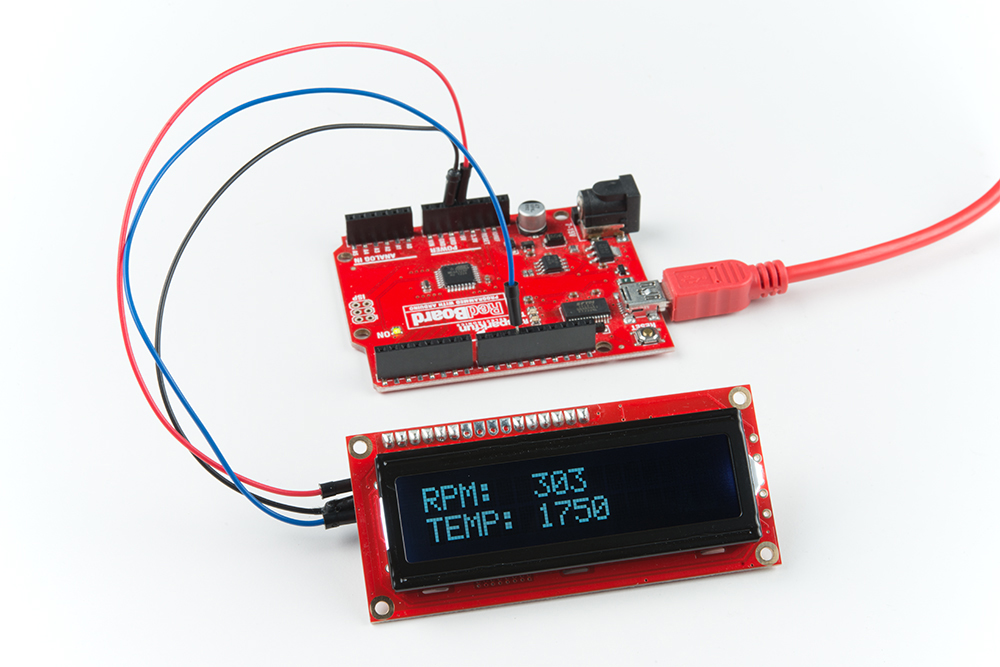
You should see something similar to the image below. Try reading a sensor and displaying the values on the screen!
SerLCD Demo
This is an extensive example sketch that shows you how to create a scrolling marquee, create a timer, display sensor data, and control the backlight. Copy and paste the following example to the Arduino IDE. Upload the example to your Arduino to test!
language:c
/***********************************************************************
  SerLCD Demo Example Code
  Written by: Joel Bartlett @ SparkFun Electronics
  Date: December 20, 2012
  Modified by: Ho Yun "Bobby" Chan @ SparkFun Electronics
  Date: May 3, 2018

  This code uses the information presented in the SerLCD Datasheet
  to create an Arduino example using the SerLCD from SparkFun Electonics.
  Each of the SerLCD's capabilities is broken up into seperate functions
  within the sketch. Simply call each function with the correct parameters
  to get the desired result form the LCD screen.

  This code was developed for the Arduino IDE v102

  To use, connect the following pins
      VDD -> 5V
      GND -> GND
      LCD RX -> Arduino TX (pin 11)

    ***Don't forget to disconnect the LCD's RX pin from the TX pin of
the Arduino's UART line while programming!***

  You can also check out the SerLCD library from Arduino
http://playground.arduino.cc/Code/SerLCD

  If you need to reprogram often, or need the UART for another device,
  you can use the Software Serial libary to create a
  seperate UART for the LCD.
  Arduino IDE -> Sketch -> Import Library ->Software Serial

  To declare a new UART using SoftwareSerial, insert this line:
  SoftwareSerial NAME(x,y); // RX, TX
  where Name is the name of the new UART, x is the RX pin, and y is the TX     pin.

  "THE BEER-WARE LICENSE"
  As long as you retain this notice you can do whatever you want with this stuff.
  If we meet some day, and you think this stuff is worth it, you can buy me a beer.
************************************************************************/
#include <SoftwareSerial.h>

SoftwareSerial LCD(10, 11); // Arduino SS_RX = pin 10 (unused), Arduino SS_TX = pin 11

//-------------------------------------------------------------------------------------------
void setup()
{
LCD.begin(9600);// all SerLCDs come at 9600 Baud by default
}
//-------------------------------------------------------------------------------------------
void loop()
{
  scrollingMarquee();
  tempAndHumidity();
  counter();
  backlight();
  cursors();
}
//-------------------------------------------------------------------------------------------
void clearScreen()
{
  //clears the screen, you will use this a lot!
  LCD.write(0xFE);
  LCD.write(0x01);
}
//-------------------------------------------------------------------------------------------
void selectLineOne()
{
  //puts the cursor at line 0 char 0.
  LCD.write(0xFE); //command flag
  LCD.write(128); //position
}
//-------------------------------------------------------------------------------------------
void selectLineTwo()
{
  //puts the cursor at line 0 char 0.
  LCD.write(0xFE); //command flag
  LCD.write(192); //position
}
//-------------------------------------------------------------------------------------------
void moveCursorRightOne()
{
  //moves the cursor right one space
  LCD.write(0xFE); //command flag
  LCD.write(20); // 0x14
}
//-------------------------------------------------------------------------------------------
void moveCursorLeftOne()
{
  //moves the cursor left one space
  LCD.write(0xFE); //command flag
  LCD.write(16); // 0x10
}
//-------------------------------------------------------------------------------------------
void scrollRight()
{
  //same as moveCursorRightOne
  LCD.write(0xFE); //command flag
  LCD.write(20); // 0x14
}
//-------------------------------------------------------------------------------------------
void scrollLeft()
{
  //same as moveCursorLeftOne
  LCD.write(0xFE); //command flag
  LCD.write(24); // 0x18
}
//-------------------------------------------------------------------------------------------
void turnDisplayOff()
{
  //this tunrs the display off, but leaves the backlight on.
  LCD.write(0xFE); //command flag
  LCD.write(8); // 0x08
}
//-------------------------------------------------------------------------------------------
void turnDisplayOn()
{
  //this turns the dispaly back ON
  LCD.write(0xFE); //command flag
  LCD.write(12); // 0x0C
}
//-------------------------------------------------------------------------------------------
void underlineCursorOn()
{
  //turns the underline cursor on
  LCD.write(0xFE); //command flag
  LCD.write(14); // 0x0E
}
//-------------------------------------------------------------------------------------------
void underlineCursorOff()
{
  //turns the underline cursor off
  LCD.write(0xFE); //command flag
  LCD.write(12); // 0x0C
}
//-------------------------------------------------------------------------------------------
void boxCursorOn()
{
  //this turns the box cursor on
  LCD.write(0xFE); //command flag
  LCD.write(13); // 0x0D
}
//-------------------------------------------------------------------------------------------
void boxCursorOff()
{
  //this turns the box cursor off
  LCD.write(0xFE); //command flag
  LCD.write(12); // 0x0C
}
//-------------------------------------------------------------------------------------------
void toggleSplash()
{
  //this toggles the splash screen
  //if off send this to turn on
  //if on send this to turn off
  LCD.write(0x7C); //command flag = 124 dec
  LCD.write(9); // 0x09
}
//-------------------------------------------------------------------------------------------
int backlight(int brightness)// 128 = OFF, 157 = Fully ON, everything in between = varied
{
  //this function takes an int between 128-157 and turns the backlight on accordingly
  LCD.write(0x7C); //NOTE THE DIFFERENT COMMAND FLAG = 124 dec
  LCD.write(brightness); // any value between 128 and 157 or 0x80 and 0x9D
}
//-------------------------------------------------------------------------------------------
void scrollingMarquee()
{
//This function scroll text across the screen on both lines
  clearScreen(); // it's always good to clear the screen before moving onto a new print
  for(int j = 0; j < 17; j++)
  {
    selectLineOne();
    for(int i = 0; i < j;i++)
      moveCursorRightOne();
    LCD.print("SPARK");
    selectLineTwo();
    for(int i = 0; i < j;i++)
      moveCursorRightOne();
    LCD.print(" FUN");
    delay(500); // you must have a delay, otherwise the screen will print and clear before you can see the text
    clearScreen();
  }
}
//-------------------------------------------------------------------------------------------
void counter()
{
  //this function prints a simple counter that counts to 10
  clearScreen();
  for(int i = 0; i <= 10; i++)
  {
    LCD.print("Counter = ");
    LCD.print(i, DEC);
    delay(500);
        clearScreen();
  }
}
//-------------------------------------------------------------------------------------------
void tempAndHumidity()
{
  //this function shows how you could read the data from a temperature and humidity
  //sensor and then print that data to the SerLCD.

  //these could be varaibles instead of static numbers
  float tempF = 77.0;
  float tempC = 25.0;
  float humidity = 67.0;

  clearScreen();
  selectLineOne();
  LCD.print(" Temp = ");
  LCD.print((long)tempF, DEC);
  LCD.print("F ");
  LCD.print((long)tempC, DEC);
  LCD.print("C");
  selectLineTwo();
  LCD.print(" Humidity = ");
  LCD.print((long)humidity, DEC);
  LCD.print("%");
  delay(2500);
}
//-------------------------------------------------------------------------------------------
void backlight()
{
  //this function shows the different brightnesses to the backlight can be set
      clearScreen();
  for(int i = 128; i < 158; i+=2)// 128-157 are the levels from off to full brightness
  {
    backlight(i);
    delay(100);
    LCD.print("Backlight = ");
    LCD.print(i, DEC);
    delay(500);
    clearScreen();
  }
}
//-------------------------------------------------------------------------------------------
void cursors()
{
  //this function shows the different cursors avaiable on the SerLCD
  clearScreen();

  boxCursorOn();
  LCD.print("Box On");
  delay(1500);
  clearScreen();

  boxCursorOff();
  LCD.print("Box Off");
  delay(1000);
  clearScreen();

  underlineCursorOn();
  LCD.print("Underline On");
  delay(1500);
  clearScreen();

  underlineCursorOff();
  LCD.print("Underline Off");
  delay(1000);
  clearScreen();
}
Alternative Libraries
Alternatively, you can use the SerLCD library found on the Arduino.cc website.
If you are using Linux, you may want to try this library instead.