MP3 Player Shield Hookup Guide V15
Example Sketch: MP3 Trigger
Whether it's red or purple, everyone loves a good MP3 trigger. Where a simple button or switch is all it takes to trigger a song or sound effect. Let's use the MP3 Player Shield library to make an MP3 trigger that can rival the big boys.
This is a simple example, which shows how to play and stop tracks using the SFEMP3Shield library. Up to nine tracks can be triggered by the shield, using pins 0, 1, 5, 10, and A0-A4. A5 can be used to stop a currently playing track.
Step 1: Set up the SD Card
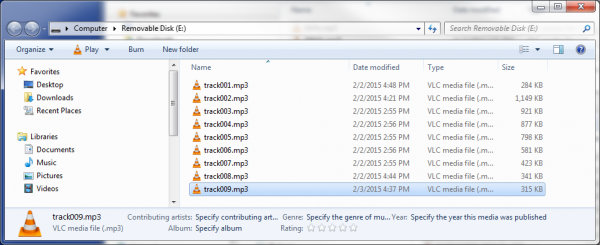
You'll need to rename your MP3 files before plugging the µSD card into your shield. Each of the nine tracks needs to be specifically named from "track001.mp3" to "track009.mp3".
The first trigger -- D0 -- will play an MP3 named "track001.mp3", the second trigger -- D1 -- will play "track002.mp3", and so on up to A4 which will play "track009.mp3".
Step 2: Set up the Hardware
Of course, the shield does most of the hardware set up for you. Aside from sticking the shield on your Arduino, you'll need to find something to trigger the pins. You could use a switch, of which there are tons of options, or you could just us a simple jumper wire to ground one of the trigger pins.
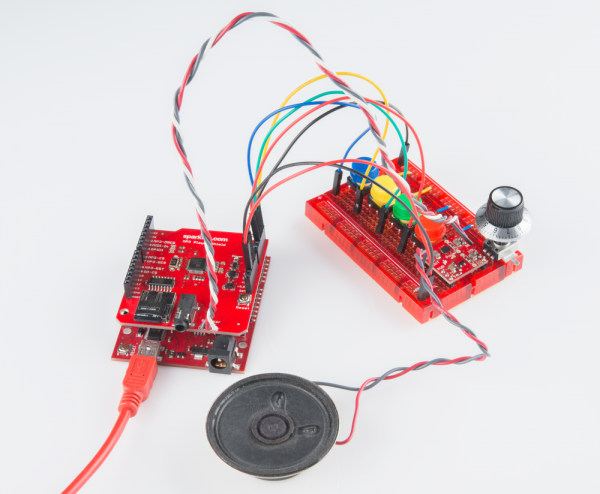
The photo above shows a prior revision of the MP3 Player Shield. The circuit for wiring up the MP3 Trigger example is identical.
Once you have configured the output, you can either plug headphones into the on-board jack to listen, or, if you want to get fancy with it, use the three broken out "Speaker" pins. Here's our setup with a combination of MonoAmp Breakout and 8 Ω Speaker:
Step 3: Load Up the Code
Here's our MP3 Shield trigger sketch. Copy/paste from below, or download it here:
language:c
/*
  MP3 Shield Trigger
  by: Jim Lindblom
      SparkFun Electronics
  date: September 23, 2013

  This is an example MP3 trigger sketch for the SparkFun MP3 Shield.
  Pins 0, 1, 5, 10, A0, A1, A2, A3, and A4 are setup to trigger tracks
  "track001.mp3", "track002.mp3", etc. on an SD card loaded into
  the shield. Whenever any of those pins are shorted to ground,
  their respective track will start playing.

  When a new pin is triggered, any track currently playing will
  stop, and the new one will start.

  A5 is setup to globally STOP playing a track when triggered.

  If you need more triggers, the shield's jumpers on pins 3 and 4
  (MIDI-IN and GPIO1) can be cut open and used as additional
  trigger pins. Also, because pins 0 and 1 are used as triggers
  Serial is not available for debugging. Disable those as
  triggers if you want to use serial.

  Much of this code was grabbed from the FilePlayer example
  included with the SFEMP3Shield library. Major thanks to Bill
  Porter and Michael Flaga, again, for this amazing library!
*/

#include <SPI.h>           // SPI library
#include <SdFat.h>         // SDFat Library
//#include <SdFatUtil.h>     // SDFat Util Library
#include <SFEMP3Shield.h>  // Mp3 Shield Library

SdFat sd; // Create object to handle SD functions

SFEMP3Shield MP3player; // Create Mp3 library object
// These variables are used in the MP3 initialization to set up
// some stereo options:
const uint8_t volume = 0; // MP3 Player volume 0=max, 255=lowest (off)
const uint16_t monoMode = 1;  // Mono setting 0=off, 3=max

/* Pin setup */
#define TRIGGER_COUNT 9
int triggerPins[TRIGGER_COUNT] = {0, 1, 5, 10, A0, A1, A2, A3, A4};
int stopPin = A5; // This pin triggers a track stop.
int lastTrigger = 0; // This variable keeps track of which tune is playing

void setup()
{
  /* Set up all trigger pins as inputs, with pull-ups activated: */
  for (int i=0; i<TRIGGER_COUNT; i++)
  {
    pinMode(triggerPins[i], INPUT_PULLUP);
  }
  pinMode(stopPin, INPUT_PULLUP);

  initSD();  // Initialize the SD card
  initMP3Player(); // Initialize the MP3 Shield
}

// All the loop does is continuously step through the trigger
//  pins to see if one is pulled low. If it is, it'll stop any
//  currently playing track, and start playing a new one.
void loop()
{
  for (int i=0; i<TRIGGER_COUNT; i++)
  {
    if ((digitalRead(triggerPins[i]) == LOW) && ((i+1) != lastTrigger))
    {
      lastTrigger = i+1; // Update lastTrigger variable to current trigger
      /* If another track is playing, stop it: */
      if (MP3player.isPlaying())
        MP3player.stopTrack();

      /* Use the playTrack function to play a numbered track: */
      uint8_t result = MP3player.playTrack(lastTrigger);
      // An alternative here would be to use the
      //  playMP3(fileName) function, as long as you mapped
      //  the file names to trigger pins.

      if (result == 0)  // playTrack() returns 0 on success
      {
        // Success
      }
      else // Otherwise there's an error, check the code
      {
        // Print error code somehow, someway
      }
    }
  }
  // After looping through and checking trigger pins, check to
  //  see if the stopPin (A5) is triggered.
  if (digitalRead(stopPin) == LOW)
  {
    lastTrigger = 0; // Reset lastTrigger
    // If another track is playing, stop it.
    if (MP3player.isPlaying())
      MP3player.stopTrack();
  }
}

// initSD() initializes the SD card and checks for an error.
void initSD()
{
  //Initialize the SdCard.
  if(!sd.begin(SD_SEL, SPI_HALF_SPEED))
    sd.initErrorHalt();
  if(!sd.chdir("/"))
    sd.errorHalt("sd.chdir");
}

// initMP3Player() sets up all of the initialization for the
// MP3 Player Shield. It runs the begin() function, checks
// for errors, applies a patch if found, and sets the volume/
// stero mode.
void initMP3Player()
{
  uint8_t result = MP3player.begin(); // init the mp3 player shield
  if(result != 0) // check result, see readme for error codes.
  {
    // Error checking can go here!
  }
  MP3player.setVolume(volume, volume);
  MP3player.setMonoMode(monoMode);
}
Check the comments in the code for a step-by-step walkthrough. This example shows just how easy it is to use the MP3 Player Shield (with a lot of thanks to Bill Porter and Michael Flaga for their library). Call the MP3player.playTrack() function to start a song, and use MP3player.stopTrack() call to stop it.
Step 4: Trigger Some Tunes
With the sketch loaded up, all you have to do is ground one of the trigger pins (0, 1, 5, 10, A0, A1, A2, A3, A4). When a new trigger pin is grounded, any currently playing song will stop and the MP3 file it relates to will start playing. If you want to stop a track, briefly connect A5 to ground.
You can connect any of these trigger pins up to all kinds of buttons or switches, or just use a strand of wire to momentarily short them to ground.

