MaKey MaKey Advanced Guide
This Tutorial is Retired!
This tutorial covers concepts or technologies that are no longer current. It's still here for you to read and enjoy, but may not be as useful as our newest tutorials.
View the updated tutorial: Makey Makey Classic Hookup Guide
 jimblom
Programming the MaKey MaKey
You're just about ready to modify the firmware driving the MaKey MaKey. But first there are a few settings we need to adjust.
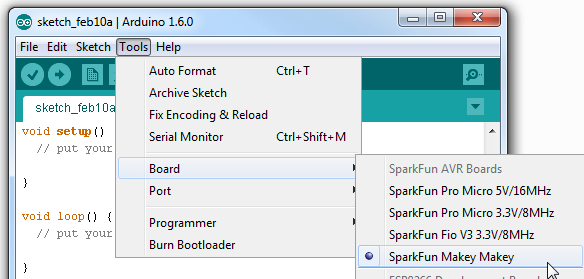
Board and Port Selection
The addon you installed will add a "MaKey MaKey" option to the Tools > Board menu within the Arduino IDE. Go ahead and select that.
You'll also need to set the Serial Port. When you plug in the MaKey MaKey it enumerates as a communication device and gets assigned a COM port (Windows users, you'll need drivers installed, see here). Select the MaKey MaKey's COM port under the Tools > Serial Port menu in Arduino. For most users, there'll be only one port to choose from. If there are two, unplug and replug the MaKey MaKey in, observing which COM port disappears and reappears.
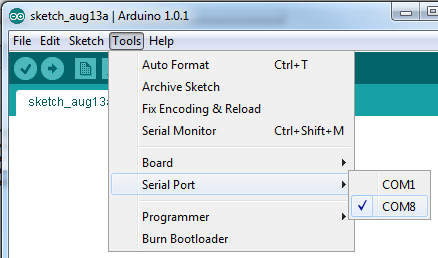
On a Mac, the Serial Port will come in the form of "/dev/tty.usbmodem":

Modifying the Code
Onto the code. You can find the most up-to-date MaKey MaKey source code at its Github home (check out our Using GitHub tutorial for help downloading). Or click the link below to download it directly. It's another ZIP file, so don't forget to extract it!
There are two pieces to the MaKey MaKey code: the main file (currently makey_makey_1_4_2.ino) and the settings.h file. Open the .ino file with your Arduino IDE, settings.h will open up in a tab up top.
Generally you'll only need to futz with settings.h. This is where all of the keys are defined, and there are a few more advanced options to play with the filters, and mouse movement speed. Here's what it'll look like by default:
language:c
#include "Arduino.h"

/*
/////////////////////////////////////////////////////////////////////////
// KEY MAPPINGS: WHICH KEY MAPS TO WHICH PIN ON THE MAKEY MAKEY BOARD? //
/////////////////////////////////////////////////////////////////////////

  - edit the keyCodes array below to change the keys sent by the MaKey MaKey for each input
  - the comments tell you which input sends that key (for example, by default 'w' is sent by pin D5)
  - change the keys by replacing them. for example, you can replace 'w' with any other individual letter,
    number, or symbol on your keyboard
  - you can also use codes for other keys such as modifier and function keys (see the
    the list of additional key codes at the bottom of this file)

*/

int keyCodes[NUM_INPUTS] = {
  // top side of the makey makey board

  KEY_UP_ARROW,      // up arrow pad
  KEY_DOWN_ARROW,    // down arrow pad
  KEY_LEFT_ARROW,    // left arrow pad
  KEY_RIGHT_ARROW,   // right arrow pad
  ' ',               // space button pad
  MOUSE_LEFT,        // click button pad

  // female header on the back left side

  'w',                // pin D5
  'a',                // pin D4
  's',                // pin D3
  'd',                // pin D2
  'f',                // pin D1
  'g',                // pin D0

  // female header on the back right side

  MOUSE_MOVE_UP,      // pin A5
  MOUSE_MOVE_DOWN,    // pin A4
  MOUSE_MOVE_LEFT,    // pin A3
  MOUSE_MOVE_RIGHT,   // pin A2
  MOUSE_LEFT,         // pin A1
  MOUSE_RIGHT         // pin A0
};

///////////////////////////
// NOISE CANCELLATION /////
///////////////////////////
#define SWITCH_THRESHOLD_OFFSET_PERC  5    // number between 1 and 49
                                           // larger value protects better against noise oscillations, but makes it harder to press and release
                                           // recommended values are between 2 and 20
                                           // default value is 5

#define SWITCH_THRESHOLD_CENTER_BIAS 55   // number between 1 and 99
                                          // larger value makes it easier to "release" keys, but harder to "press"
                                          // smaller value makes it easier to "press" keys, but harder to "release"
                                          // recommended values are between 30 and 70
                                          // 50 is "middle" 2.5 volt center
                                          // default value is 55
                                          // 100 = 5V (never use this high)
                                          // 0 = 0 V (never use this low


/////////////////////////
// MOUSE MOTION /////////
/////////////////////////
#define MOUSE_MOTION_UPDATE_INTERVAL  35   // how many loops to wait between
                                           // sending mouse motion updates

#define PIXELS_PER_MOUSE_STEP         4     // a larger number will make the mouse
                                           // move faster

#define MOUSE_RAMP_SCALE              150  // Scaling factor for mouse movement ramping
                                           // Lower = more sensitive mouse movement
                                           // Higher = slower ramping of speed
                                           // 0 = Ramping off

#define MOUSE_MAX_PIXELS              10   // Max pixels per step for mouse movement

/*

///////////////////////////
// ADDITIONAL KEY CODES ///
///////////////////////////

- you can use these codes in the keyCodes array above
- to get modifier keys, function keys, etc

KEY_LEFT_CTRL
KEY_LEFT_SHIFT
KEY_LEFT_ALT
KEY_LEFT_GUI
KEY_RIGHT_CTRL
KEY_RIGHT_SHIFT
KEY_RIGHT_ALT
KEY_RIGHT_GUI

KEY_BACKSPACE
KEY_TAB
KEY_RETURN
KEY_ESC
KEY_INSERT
KEY_DELETE
KEY_PAGE_UP
KEY_PAGE_DOWN
KEY_HOME
KEY_END
KEY_CAPS_LOCK

KEY_F1
KEY_F2
KEY_F3
KEY_F4
KEY_F5
KEY_F6
KEY_F7
KEY_F8
KEY_F9
KEY_F10
KEY_F11
KEY_F12

*/
The first variable definition, keyCodes[NUM_INPUTS], is an array of 18 values. Each value in this array represents a single key or mouse input. Each variable in that array has a defined position, called an index, numbered from 0 to 17. KEY_UP_ARROW is at position 0, while, down at the bottom, MOUSE_RIGHT is at position 17. The positions in the array map to the MaKey MaKey inputs as such:
If you want to define an input as a-z, A-Z, 0-9, or other printable characters, you can fill the keyCodes array with single characters surrounded by apostrophes (e.g. 'a','s','d',...). If there's no printable character for the key you need, like the arrow keys, modifier keys, etc. you'll need to use one of the defined special key values. The special keys available are all printed (in comments) at the bottom of settings.h (KEY_LEFT_CTRL, KEY_LEFT_SHIFT, etc.). Their function should be pretty self-explanatory.
Just remember, there can only be 18 total values, comma-seperated, in that array!
As an example, say you want the 'CLICK' key on the top side to instead be the ENTER key. Easy! Just go to the sixth entry (position 5, darn that 0!) in the keyCodes array and replace MOUSE_LEFT with KEY_RETURN (just like that, all caps, don't remove the comma that was there already).
To load your new code onto the MaKey MaKey, all you need to do is hit the Upload button (the right-facing arrow icon up top). If all of the settings in the Tools menu are correct, you should see some blinky lights on the MaKey MaKey, followed by something like this:
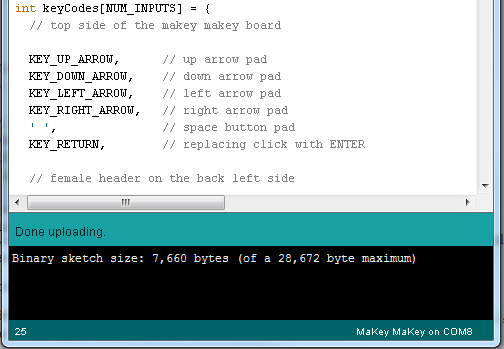
Now you should have some ENTER action on your MaKey MaKey, in place of the top-side click!