LilyPad USB Plus Hookup Guide
 Gella
Gella Introduction
The LilyPad USB Plus is a sewable electronics microcontroller that you can use with Arduino. In this tutorial, we'll introduce the features of the USB Plus and set up the free Arduino software you'll need to upload code to it.
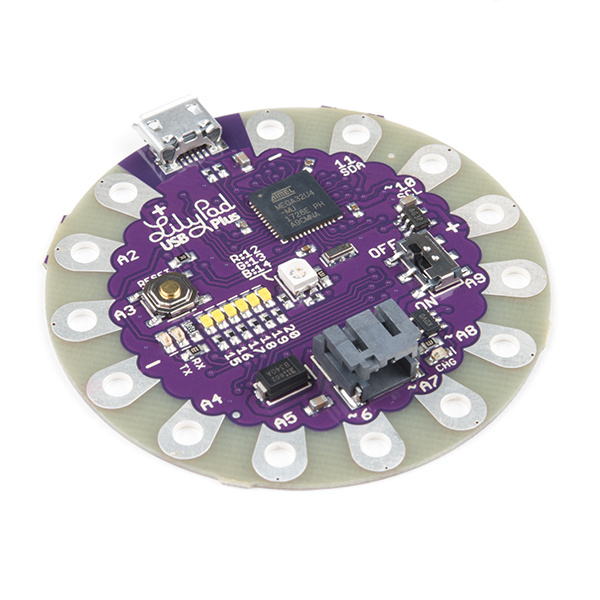
Lilypad USB Plus
DEV-14631The USB Plus is available as a standalone board or as part of the LilyPad ProtoSnap Plus board.
Required Materials
To reprogram and recharge the board, you'll need a micro-B USB cable. This is a common cable used by many devices, so you may already have one. Double check that it is not labeled ‘Power Only’ as these type of cables will not transmit the programming data needed by the LilyPad USB Plus board. If you don't have one you can get one from SparkFun:


Suggested Reading
If you aren't familiar with the following concepts, we recommend checking out these tutorials before continuing.
What is an Arduino?
Installing Arduino IDE
Planning a Wearable Electronics Project
Hardware Overview and Features
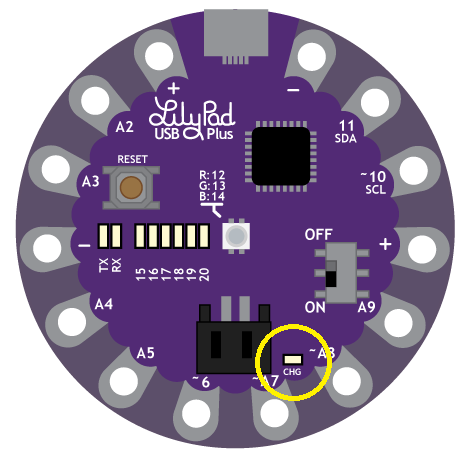
The LilyPad USB Plus is an Arduino-compatible microcontroller. It has fourteen sew tabs for connecting components with conductive thread. Four of these tabs are reserved for connecting power and ground of LilyPad sensors and accessory boards, and ten are input/output (I/O). For reference, each sew tab has a nearby label with its name and the pin number it is connected to on the ATmega32U4 chip at its center.
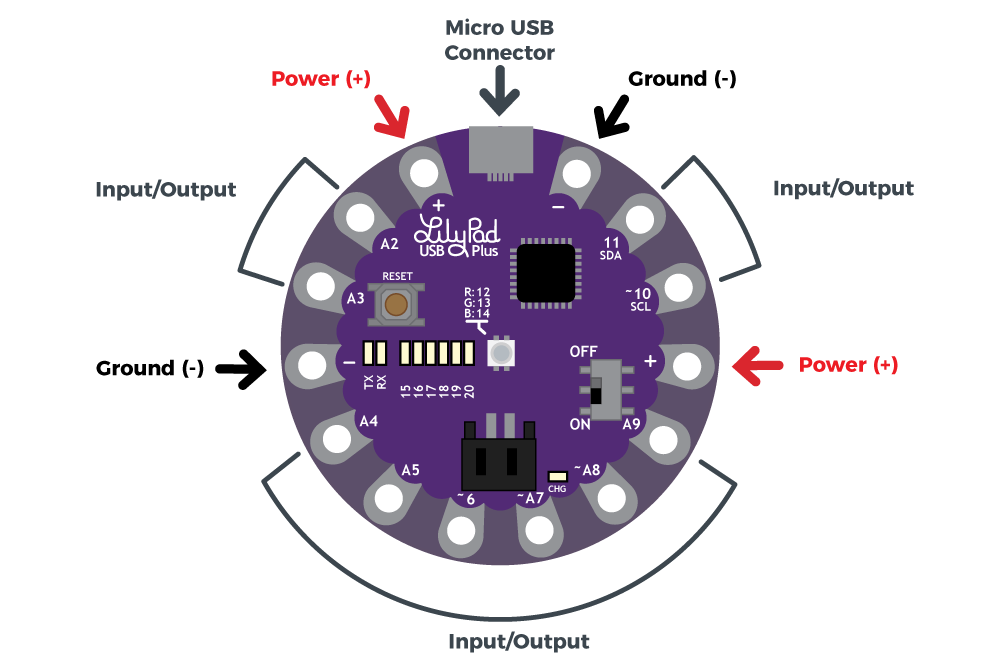
Features:
- USB port for connecting to a computer.
- Two sets of power (+) and ground (-) sew tabs.
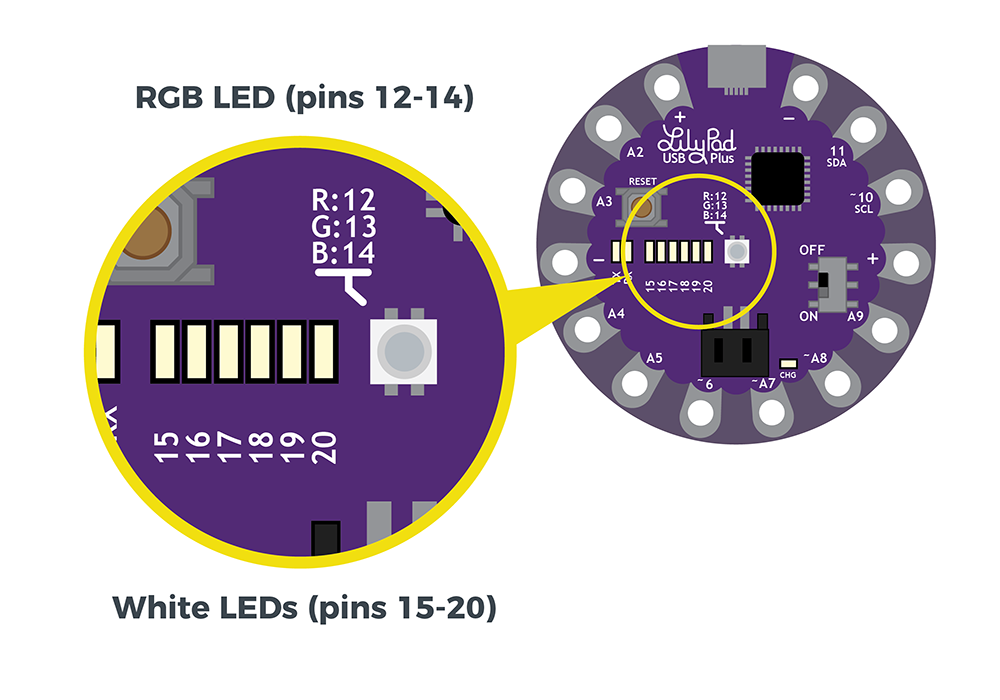
- Built-in RGB LED attached to pins 12 (R), 13 (G), and 14 (B).
- A row of six white LEDs attached to pins 15-20.
- Charging circuit for single-cell (3.7V) Lithium-Polymer batteries.
- An 'A' in front of the number denotes a tab that can function as an analog input. These sew tabs can read sensors that output a varying voltage like the light sensor built into the ProtoSnap Plus.
- A '~' symbol in front of the number indicates that tab supports PWM (Pulse Width Modulation) output. These tabs can output an "analog" signal that can be used to vary the brightness on LEDs, etc.
Note: The "A" in front of analog sew tab numbers in your code is optional. However, do not include the "~" symbol for PWM outputs. It is only provided to make it easy for you to check which pins can produce PWM (analog) output and is not used in programming.
Powering the LilyPad USB Plus
The LilyPad USB Plus can be powered in two ways:
If you have a USB power source available (a computer, 5V USB wall adapter, USB battery pack, etc.), you can run the board from a USB cable.
Once sewn into a project, you can easily attach a rechargable Lithium-polymer battery to the board. See Technical Notes section for more information on batteries and charging.
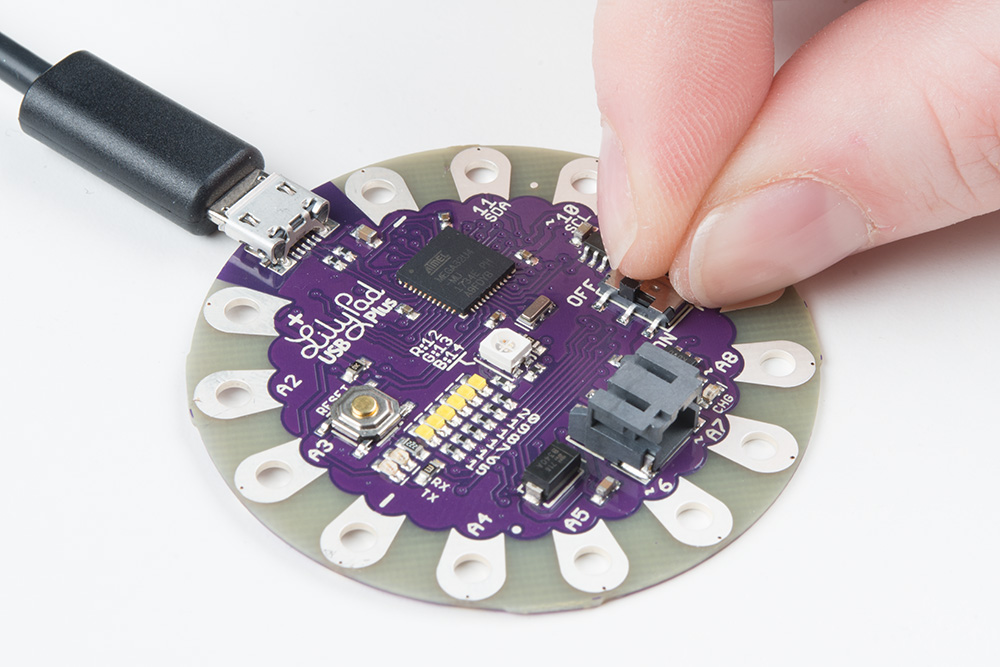
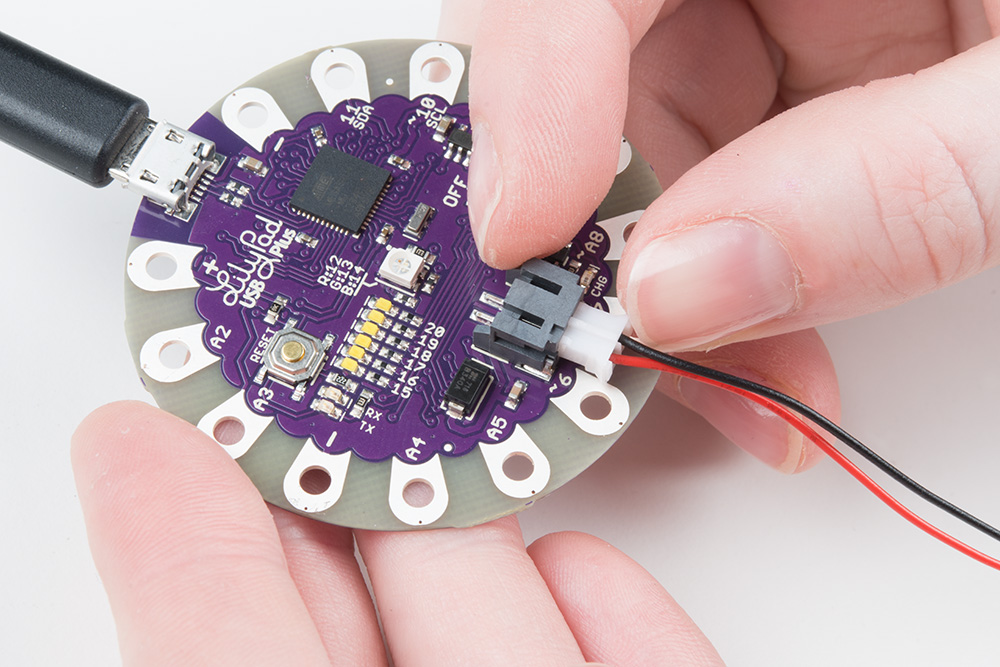
To power up the USB Plus, connect it to your computer using a micro-B USB cable or attach an E-Textiles Battery. Then slide the switch on the right side of the LilyPad USB Plus to the ON position.
Setting Up Arduino
When you first install Arduino, it knows how to program a number of "standard" Arduino-compatible boards. Since the LilyPad USB Plus is a newer LilyPad microcontroller, you will need to manually add it to this list by following the steps below. You'll only have to do this once to add the board to Arduino.
Add SparkFun Boards to Arduino's Preferences
Start the Arduino IDE software (version 1.8 or higher) and open the Preferences window by choosing File > Preferences from the menu.
Now copy the below text and paste it into the "Additional Boards Manager URLs" text box:
https://raw.githubusercontent.com/sparkfun/Arduino_Boards/master/IDE_Board_Manager/package_sparkfun_index.json
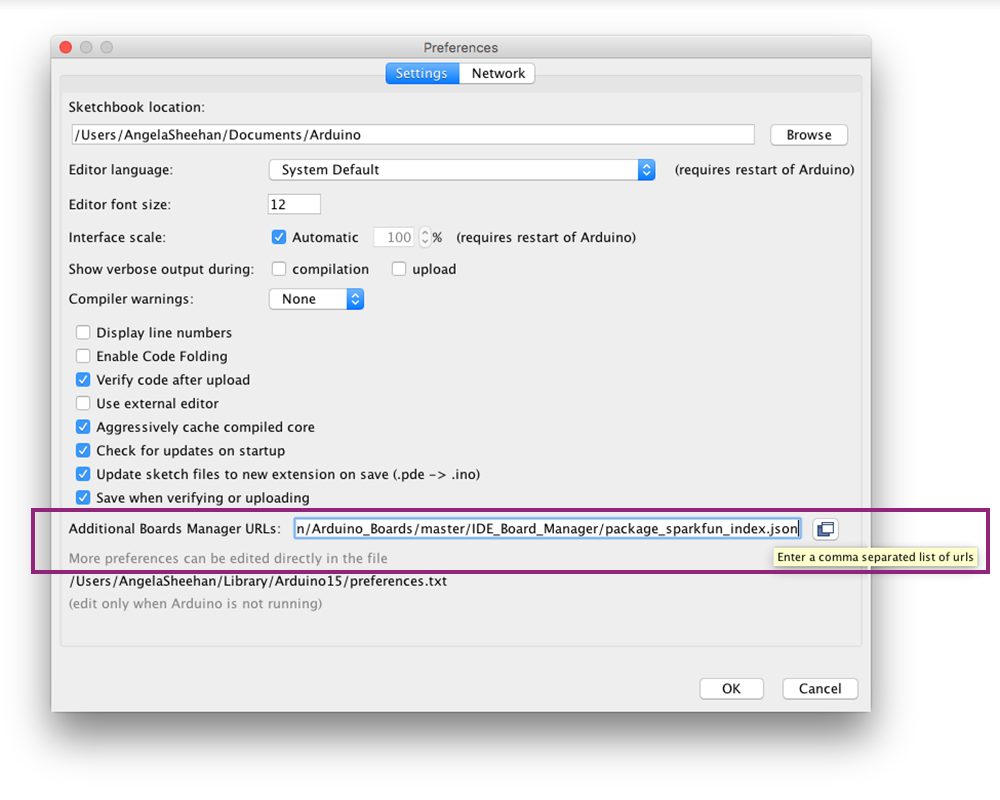
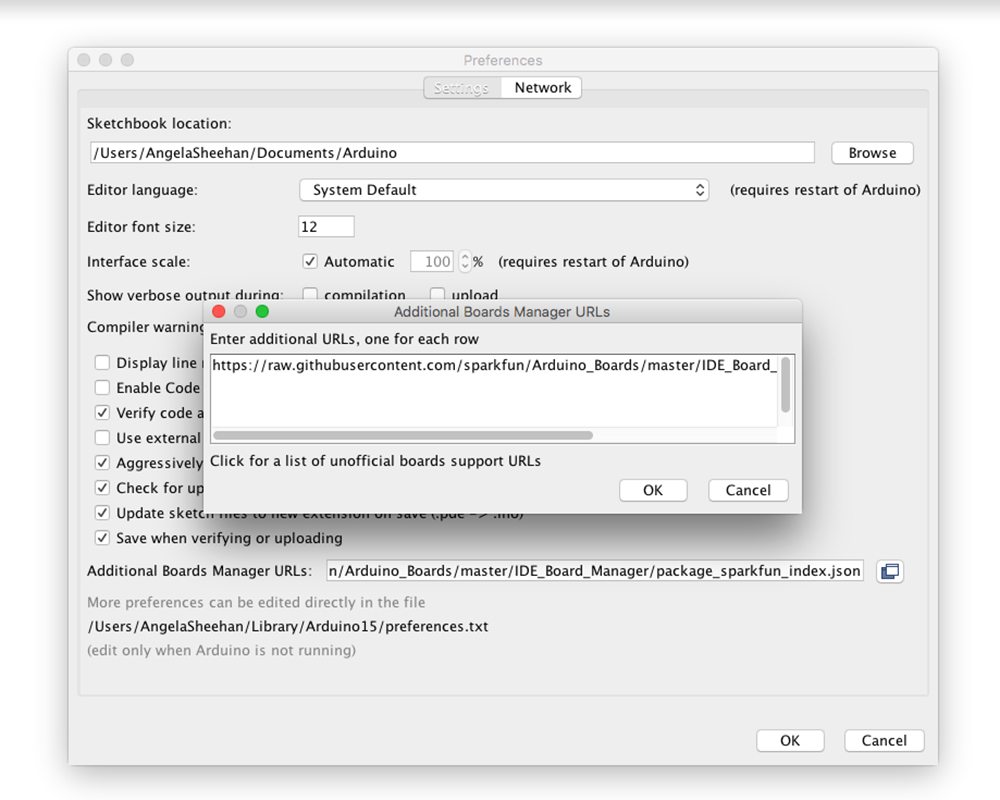
When you're done, click the "OK" button.
Install SparkFun AVR Boards
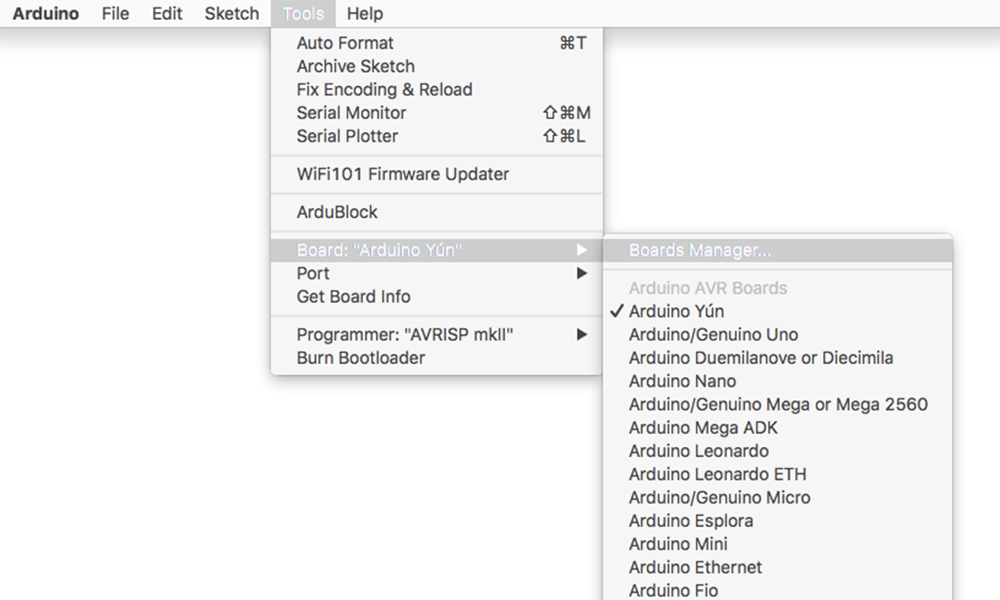
Next, you'll add the LilyPad USB Plus through Arduino's Boards Manager Menu. Open the Boards Manager by choosing Tools > Board > Boards Manager... (The Boards Manager option is at the very top of the list of boards; you may need to scroll up to see it.)
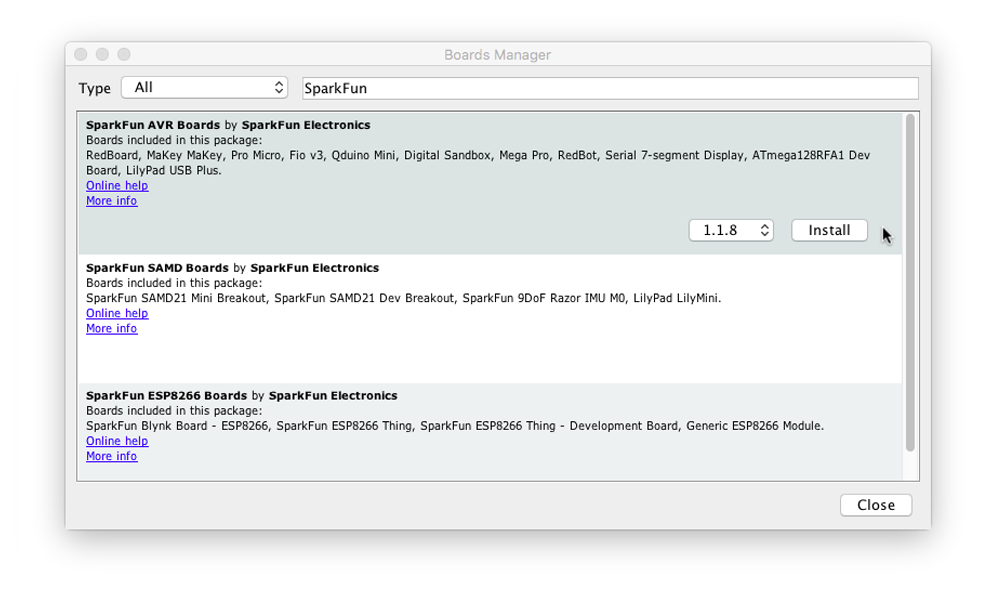
When the Boards Manager window opens, it will present a long list of options. Type "SparkFun" (without quotes) into the "Filter your search" box at the top of the window. This will shrink the list down to SparkFun's options.
You should see several entries. Look for the one labeled SparkFun AVR Boards by SparkFun Electronics.
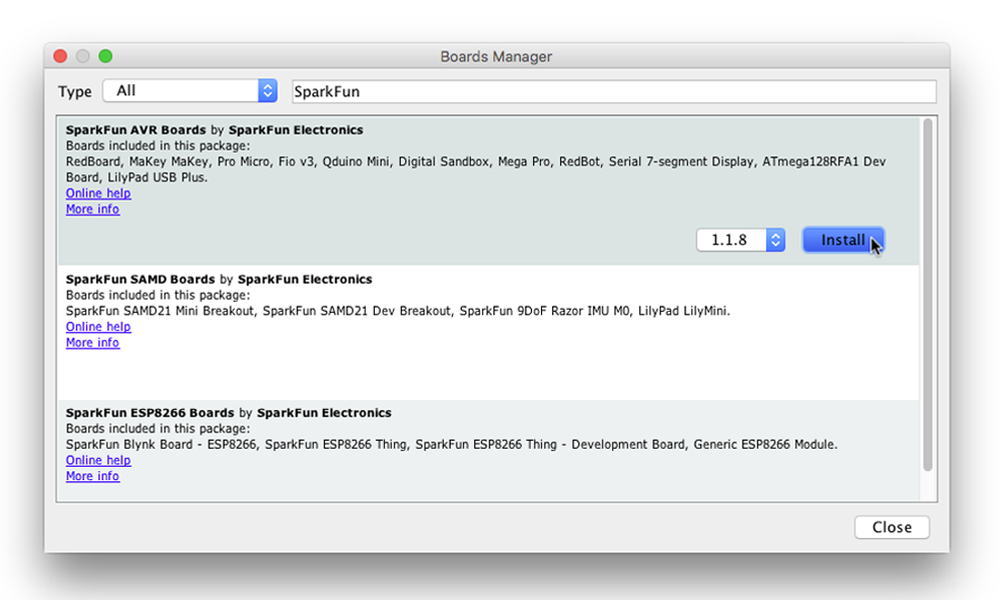
Click anywhere in the SparkFun AVR Boards box. A version number and an "Install" button will appear. Click the install button. This will download and install the extension. If you have already installed the SparkFun AVR Boards support, update to the latest version (LilyPad USB Plus is included in 1.1.8 and higher).
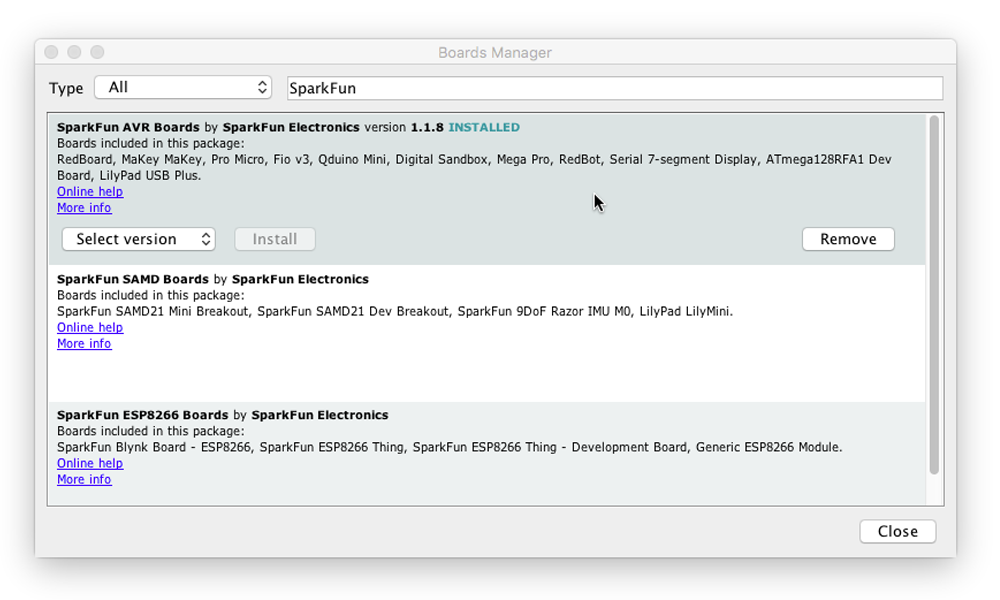
If everything worked, a blue "INSTALLED" note should appear next to the SparkFun AVR Boards title. You're ready to start programming.
Uploading Code
Once you've installed the LilyPad USB Plus extensions to Arduino, you're ready to start programming the board!
Note that you won't have to install the extensions again, but you will need to perform the below three steps every time you want to program the board. These three steps are:
2. Select "LilyPad USB Plus" from Arduino's "Board" menu
3. Select "LilyPad USB Plus" from Arduino's "Port" menu
Let's go over the three steps in detail:
1. Connect the LilyPad USB Plus to Your Computer
Place the LilyPad USB Plus on a clean, non-metal work surface. Connect the LilyPad USB Plus to a USB port on your computer using a micro-B USB cable. The cable can only be inserted one way, and should snap in securely.

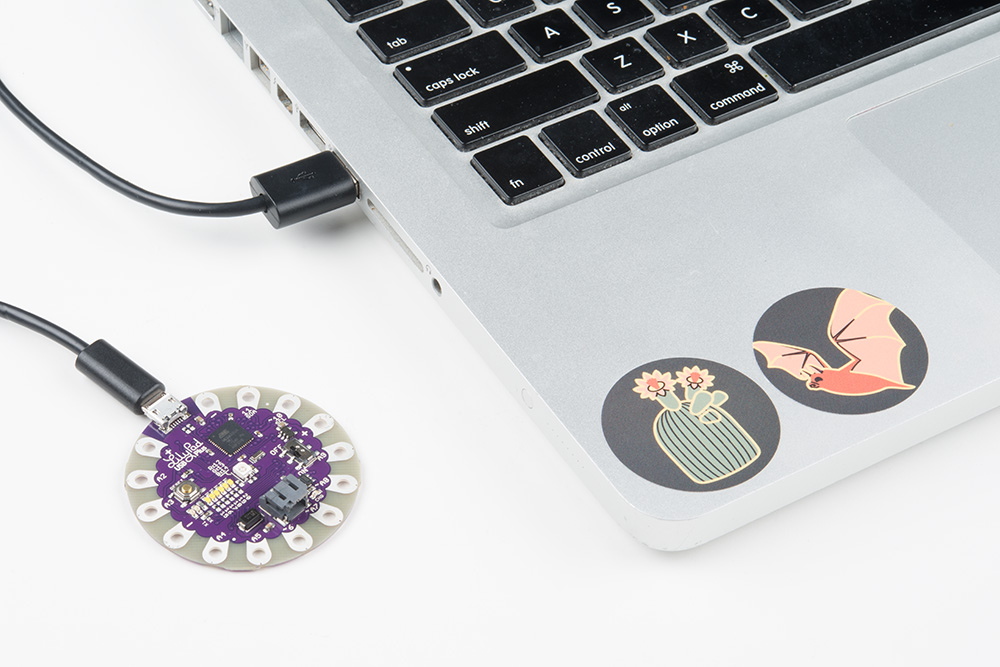
Slide the switch on the LilyPad USB Plus to the ON position. You will not be able to upload code to the board if it is set to the OFF position.
2. Select LilyPad USB Plus from the Board Menu
If the Arduino board support was installed correctly, "LilyPad USB Plus" option will be available in the Tools > Board list under the SparkFun AVR Boards group. Open the menu and select LilyPad USB Plus. Depending on how many boards are already in the list, you may need to scroll down a bit to get to it. A dot (Windows) or check mark (Mac) will show next to the board in the menu when it is selected, and it will show next to Board in the Tools menu.

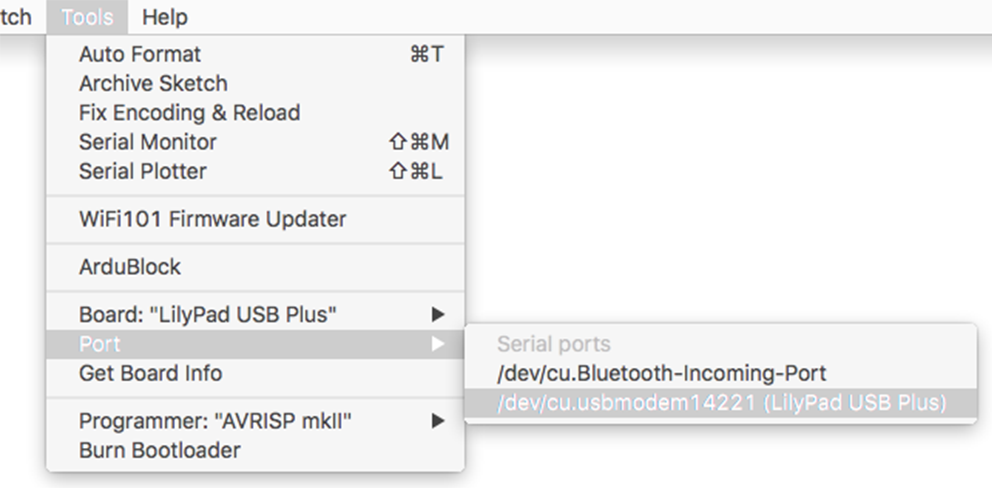
3. Select LilyPad USB Plus from the Port Menu
Arduino needs to know which port your LilyPad USB Plus is attached to so it can program it. Whenever you plug a USB device into your computer, your computer will assign it a port number. This used to be difficult to determine, but this board has a handy feature that identifies itself. Go to the Tools > Port menu, and select the port that has "LilyPad USB Plus" next to it.
On Windows, ports are listed as COM##; on a Mac or Linux machine they will be "/dev/cu.usbmodem####". Your screen may look different than the image below, depending on what operating system you are using, but all should show LilyPad USB Plus next to the port address.
Uploading Code
To review, once you've:
- Connected the LilyPad USB Plus to your computer using a USB cable.
- Selected the board type ("LilyPad USB Plus" NOT "LilyPad Arduino USB").
- Selected the COM port.
You are ready to upload code! Let's upload some code to try it out:
Load the "Blink" example from the menu File > Examples > 01.Basics > Blink. This is a very simple example program; it just blinks a LED on and off once per second.

Click the "Upload" button (the large round button with the right arrow in it).
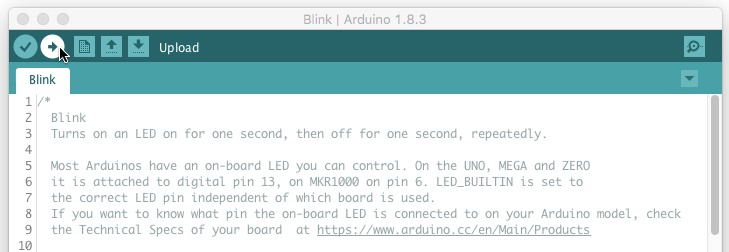
Arduino will compile the code, then send it to the LilyPad USB Plus via the USB cable. While the code is uploading, the built-in LED will blink to signal the code is transferring. When the code finally runs, the RGB LED at the center of the board will slowly blink green. Success!
If this all works, congratulations! You're all set up and ready to prototype with the LilyPad USB Plus.
Troubleshooting: Error Messages on Upload?
If you are using a Mac and get an error message like the following:
Board LilyPad USB Plus (platform avr, package SparkFun) is unknown
It is possible that old Arduino versions left over after updates are interfering with the LilyPad USB Plus support installation. If you want to clear out this old information, follow these steps:
- Open Arduino's "Preferences" window.
- At the bottom of the window will be a link to your preferences file. Click on it and it will open a finder window.
- In the finder window, look for an "Arduino15" folder and delete it.
- Now open a finder window and open your personal folder (the one with your login name and a house icon next to it). Look for an "Arduino" folder (possibly in "Documents"). If the "Arduino" folder contains a "Hardware" folder, delete it. Your Arduino installation is now clean. Restart Arduino and repeat the LilyPad installation instructions from the previous page.
Troubleshooting: Still Problems Uploading?
If you still have problems uploading code to the LilyPad USB Plus and they are not outlined here, try checking out the troubleshooting section of our activity guide:
Stitching Into a Project
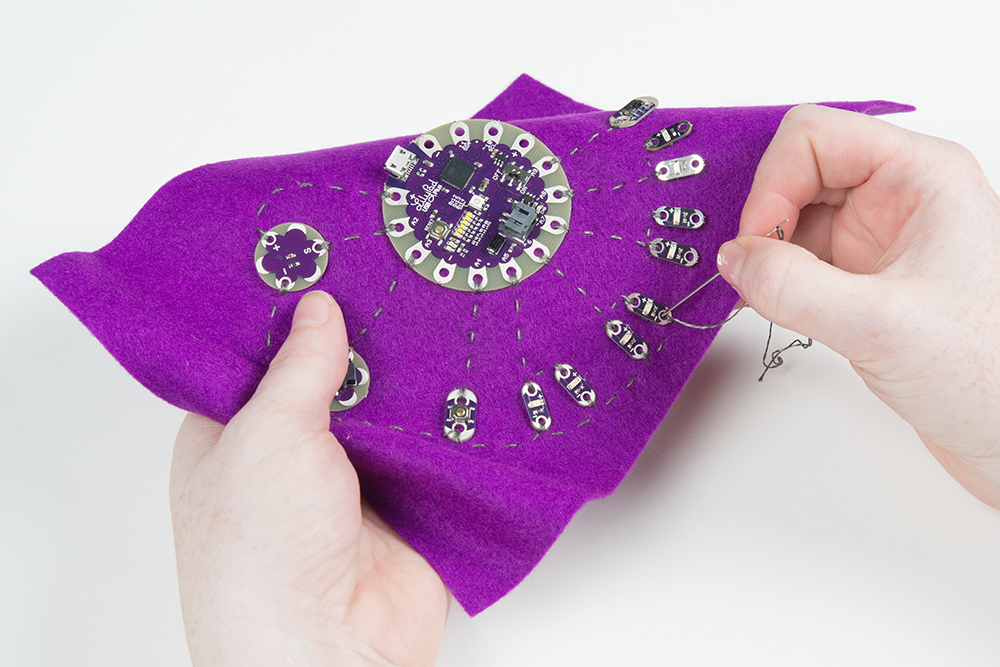
As you plan your project and prototype your code, you can use alligator clips to connect individual LilyPad pieces to the USB Plus and test them before building into a project.
The connections you've planned using alligator clips or a sketch of your circuit can then be recreated with conductive thread by stitching the components in your project once you are finished prototyping. If you'd like to continue to refine your code after sewing into your project, make sure to leave the USB connector accessible.
These tutorials will give you some tips and tricks for project construction and insulation:
Insulation Techniques for e-Textiles
LilyPad Basics: E-Sewing
Technical Notes
If you are already familiar with programming Arduino for a while, read on for some additional notes about the LilyPad USB Plus. It's similar to other Arduinos, but has some special features and limitations you'll want to know about.
Using a Battery and Battery Charging
SparkFun sells a number of LiPo batteries compatible with this board. If you are new to the LilyPad system, we recommend the E-Textiles Battery. If you're supplying your own battery, use a single-cell (3.7V) LiPo battery with a JST connector.
Batteries with larger capacities (measured as amp-hours or Ah) will run the board longer before needing recharging. How long will depend on how many LEDs your program turns on, etc. If you're just running a few LEDs, you can expect the board to run about 5 hours for every 100mAh of battery capacity.
Charge Rate
To recharge an attached battery, plug the board into a USB power source.
While the battery is charging, the "CHG" LED will illuminate. When the battery is fully charged the LED will turn off. The default charge current is set to 100mA, so a 100mAh battery will recharge in one hour, a 1000mAh battery in 10 hours, etc. Since the board is set to charge at a rate of 100mA, we do not recommend connecting a lower capacity LiPo battery (i.e. 40mAh LiPo battery) to charge.
It is safe to leave a LiPo battery attached to the board permanently, even with USB power applied. The battery will not be overcharged.
Notes on Washing LilyPad Projects
Removing the LiPo Battery
The battery connector can be tight; to remove a battery never pull on the wires. Use a pair of needle nose pliers or cutters to gently hold pull the plug out of the connector.

Pin Numbering
Below is a list of the LilyPad USB Plus I/O pins and each function.
Legend:
- n = digital pin
- ~n = PWM-capable pin
- An = analog-capable pin
- (n) = internal pin (not connected to sew tab)
- [n] = internal pin (available on an exposed via)
| Function | Digital | Analog |
|---|---|---|
| RX_LED | (0) | |
| RX_LED/SS | (1) | |
| 2 | A2 | |
| 3 | A3 | |
| 4 | A4 | |
| 5 | A5 | |
| ~6 | ||
| ~7 | A7 | |
| ~8 | A8 | |
| 9 | A9 | |
| SCL | ~10 | |
| SDA | 11 | |
| RGB LED - Red | (~12) | |
| RGB LED - Green | (~13) | |
| RGB LED - Blue | (~14) | |
| Bar Graph LED 0 | (15) | |
| Bar Graph LED 1 | (16) | |
| Bar Graph LED 2 | (17) | |
| Bar Graph LED 3 | (18) | |
| Bar Graph LED 4 | (19) | |
| Bar Graph LED 5 | (20) | |
| SCLK | [21] | |
| MOSI | [22] | |
| MISO | [23] |
Resources and Going Further
Now that you've successfully got your LilyPad USB Plus up and running, it's time to incorporate it into your own project!
For more information about the LilyPad USB Plus, check out the resources below:
- Schematic (PDF)
- Eagle Files (ZIP)
- LilyPad Landing Page
- LilyPad for Education
- SparkFun Arduino Board Add-Ons GitHub Repository
- LilyPad USB Plus GitHub Repository
Looking to reuse old Lilypad Development Board examples and projects with the new LilyPad ProtoSnap Plus? Check out the guide linked below for more information.
Adapting LilyPad Development Board Projects to the LilyPad ProtoSnap Plus
Check out these projects using LilyPad Arduino: